• Ships of Scale has incorportated an extra level of security when you log In. Please follow on-screen prompts to acknowledge that you are not a robot via a "Check Box" or a "Pictorial Check Box Puzzle". This is needed due to higher level of AI Activity Security.
  • SUBSCRIBE TO SHIPS IN SCALE TODAY!

    The beloved Ships in Scale Magazine is back and charting a new course for 2026!
    Discover new skills, new techniques, and new inspirations in every issue.

    NOTE THAT OUR NEXT ISSUE WILL BE July/August 2026
  • Win a Free Custom Engraved Brass Coin!!!
    As a way to introduce our brass coins to the community, we will raffle off a free coin during the month of August. Follow link ABOVE for instructions for entering.

Unimat Hobby Lathe Restoration

Joined
Apr 18, 2022
Messages
63
Points
88

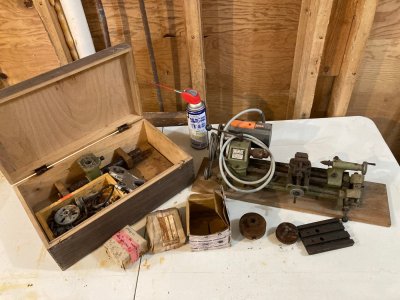
I'm not sure I'm in the right spot, could use a little direction here. I have a Unimat 1000 and several accessory bits that went through Hurricane Ian. I think most of it except the motor can be revitalized. The thing was under water for a few hours and when I retuned home 5 days after thee storm, I doused it and accessories with WD40. I'll be setting out the pieces and parts on the bench this coming week and will know more about the condition, but I am looking for suggestions about what to do with it. It would cost $40 to $70 dollars to ship US, I would want shipping and about $100 handling, but it's basically a freebe. Who is interested?
IMG_2398.JPG
 
It all looks salvageable to me, with a full strip, clean and re-build.
If the motor is thoroughly dried out an spins freely by hand, I'd plug it in, stand back and turn it on; you may be lucky.
 
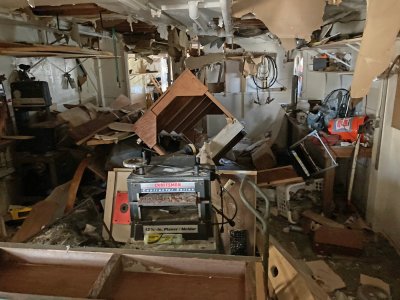
Yes, the old smoke test. Thanks for your reply, btw. I don't know if you have followed my thread "Elsie in 1/4 inch, but if you had, you would see where I'm at with all of this. The whole shop and its' equipment was wiped out and I've had to decide what to do with time. If I had spent the time resuscitating the tools, I'd still be working on that. As it is, I'm still working on the house, making it fit to live with. The upper floors of living space weren't damaged but I'm still working on the downstairs. My son and grandson are coming down this weekend, and they'll help me decide. Grandson is studying medical engineering, and if they feel it's too much of a distraction, then the Unimat will be up for grabs. Meantime, here's a pic of "what I've been dealing with". Anyone reading this will see that storm preparation along Florida's hazardous coast takes on a different set of parameters.
IMG_1121-b.jpg
 
Last edited:
wow what a mess the storm left you with.

unimats are tough machines and restore nicely... and even in bad condition, they still sell at a good price. i see yours has the threading accessory which by itself gets over $150.

doucing with oil is the best thing to do till someone can restore it.

yes postage will be about $80 ground advantage. even with your $100, its still a real bargain... even with a burnt out motor.

for a good perspective on restoration, check out someones post here on his restoration of a heavily rusted unimat, where he completely tore it down and repainted it. its definately a must read.


good luck recovering.
 
Last edited:
There are several good rust removal products available to soak parts in to help with cleaning and restoring.

You need to test anything you use on small parts to make sure they don't effect painted surfaces.

Lots of work with elbow grease and scrub pads to clean off rust and lube again.

Small screws, nuts and washers or allen screws can be replaced at local hardware store often or ordered online. These are not worth time to restore.
 
btw a couple new improvements....
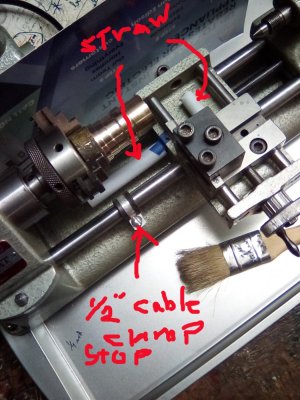
lead screw protectors to keep the metal dust out of the threads... used a straw from someone's fruit drink.

something i noticed while playing with my unimat...

when i lock down the tail stock, the tool transport becomes stiffer than when its lose. im trying to find the culpret. i think tightening it down must be deforming the rails somehow. its a mystery im working on.

any ideas or solutions?
 
Has your lathe got the auto-feed attachment on the right?

Something isn't bedded down/seated somewhere.
 
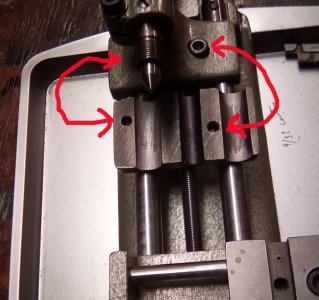
no auto feed. i took the tail stock off n blued the lead screw path to see if it was rubbing. no signs of anything there. curious though, its lock down screw only tightens on the left rail. so that seemed suspect.

i see a screw hole on the other side, but it would have to be installed from the underside of the clam. that would make sense so the clam would put even pressure on both rails as it gets locked down. but its not possible to get the screw in unless it gets installed before the rails are locked in place... that doesnt make sense.
 
yes. i split it so its easily installed. i used a short piece just long enough so when im at the stop where my tool may hit the chuck, about 2". it rides with the tool holder. i have a pic ill post later.

i saw an add somewhere for a telescopic screw guard that expands as it runs along with the tool. that gizmo is about $60

lathe straw.jpglathe tailstock.jpg
.
 
Last edited:
Paul, hi.

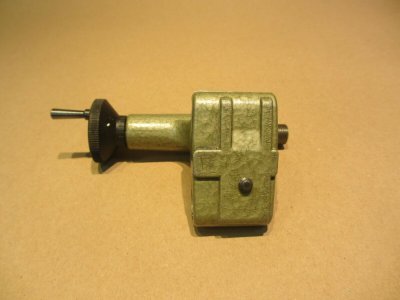
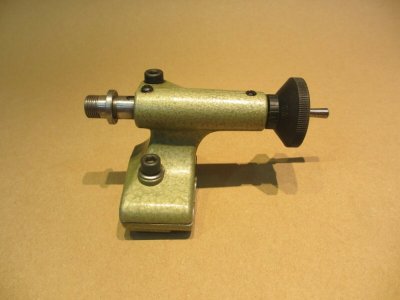
I'm attaching photo's of the tailstock.
From underneath there isn't a second screw as you describe.
The image from above illustrates the clamping screw, which when removed allows the tailstock removal (simplicity its self).
That clamping screw should be on the side facing the operator.

6 s-l1600.jpg

1 s-l1600.jpg
 
pugwash look at my picture... you see the screw head on the operator side?

also the 2 threaded screw holes on the bottom half? there is another blind threaded matching hole on the underside of top half. i have an sd200 if that makes a difference.
 
Last edited:
Paul, I have files which cover the DB200/DB200 mk2B & SL1OOO.
None have those 2 extra holes.

A long shot; could a previous owner have done them?
I don't see any logic for them, except for extra lock on the rails to use the machine as some kind of press?

The next thing I'd check; are your rails and lead screw straight?
Also check the tailstock for warpage.

Well done with the belts, but can't figure how without a photo or drawing.
 
ALL the double bar bed Unimat's could be configured for milling/drill press set up.
So I'm none the wiser.

Your issue is the lead screw/saddle traverse problem once the tail stock is locked down.
If the tail stock saddle isn't warped or the lead screw and bars aren't bent and the bed isn't warped, then I'm out of ideas.
There's a slim possibility some debris was trapped somewhere during the rebuild.
 
Back
Top