
- Home
- Forums
- Ships of Scale Group Builds and Projects
- Le Coureur 1776 1:48 PoF Group Build
- Le Coureur 1776 1:48 Group Build Logs
You are using an out of date browser. It may not display this or other websites correctly.
You should upgrade or use an alternative browser.
You should upgrade or use an alternative browser.


Exactly as Jimsky and Maarten put it, a clean great job. Respect.

First of all:I could not resist to take the ship out of the jig. Gosh, it felt jolly good to see the lines outside the jigI managed to take it out without damaging the jig too much so it could be put back again. However, I decided to plank the lower part of the stern so at last the jig went into the trash bin.
View attachment 206614
The lowest planks are not sanded yet as the glue is not dry.
Now I have a lot of questions to my SoS friends
1) I assume the empty space between the 2 upper and lower deck clamps inside the ship should be planked. However, I don't see anything about it in the manual (maybe I can't see the forest for trees). Should this plank be made from scratch or . . .?
2) Also I don't find any numbers or reference in the manual to the small brass rings and eyelets on the hatches for the small decks in the hold (maybe also here I can't see the forest for trees). Are these supposed to be made from scratch? (the eyelets seem to much smaller than the eyelets on the hatches on the weather deck)
3) According to figure 19 in manual 2 the cargo hold pillars have to be installed before the platform. I think I have to it the other way around. It says pillars but the drawing shows only one. Is there more than 1 pillar? It is not on the plan and the drawing in the manual does not show the details. I know there should be some notches on the corners but I don't know the purpose of these, how many corners, how long they should be, which directions etc. Does any of you have any knowledge or information about this
4) The bottom of my frame 37 is covering the rabbet on the stern post. I don't understand why as I think it is in the right position? Looking at the plans it seems the lowest part of this frame is not visible at all. Strange! I guess it has to be modified so that it fades out into the rabbet?
View attachment 206616
5) According to the manual the sides of the ship should be planked before the transom / upper part of the stern. Is there any good reason for that or would it perhaps be wiser to do the transom first?
Your status of your work is looking excellent - your frames are very well prepared, so that you will have a very good basis for the planking
Only some small adjustments with a chisel will be necessary
also the stern planking is looking very good - I guess you made some caulking, or? - very good my friend !!!
Now I try to give my 2 cents to your questions - but this is only brain storming and partly a description, how I made it
1) I assume the empty space between the 2 upper and lower deck clamps inside the ship should be planked. However, I don't see anything about it in the manual (maybe I can't see the forest for trees). Should this plank be made from scratch or . . .?
Very often, also on other ships, the interior planking was not completely closed, especially on areas, where it was technically not necessary. With this the costs for timber during the construction was reduced, the total weight of the ship also, and in addition the carpenters had the possibility to see and inspect the outer hull. In bigger ships, there were the carpenters walk. So I think this space between the wales and clamps can stay open - nevertheless I will check this with the drawings
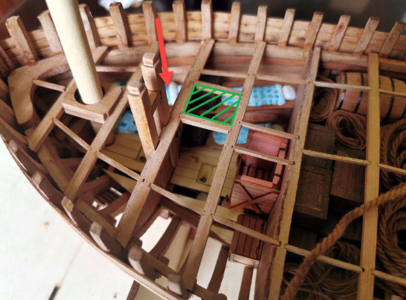
(see also the blue arrows in the photo for your question No.2)
2) Also I don't find any numbers or reference in the manual to the small brass rings and eyelets on the hatches for the small decks in the hold (maybe also here I can't see the forest for trees). Are these supposed to be made from scratch? (the eyelets seem to much smaller than the eyelets on the hatches on the weather deck)
I can not imagine, that they have to be made from scratch. The rings of the eyelets on the deck hatches have the triangle form
But you are correct, that they should have to be smaller, due to the fact, that the size of the hatches in the hold are much lighter

I plan to make later all the metal works (combined blackaning of the material) so I did not make the eyelets until now
We have to see, if these rings are possible (bags 07 and 08)

3) According to figure 19 in manual 2 the cargo hold pillars have to be installed before the platform. I think I have to it the other way around. It says pillars but the drawing shows only one. Is there more than 1 pillar? It is not on the plan and the drawing in the manual does not show the details. I know there should be some notches on the corners but I don't know the purpose of these, how many corners, how long they should be, which directions etc. Does any of you have any knowledge or information about this

I am pretty sure, that there was only one of these pillars installed - if any was there. Maybe it was technically necessary, due to the fact that there is directly close to it the big hatch opening, so there were no deck planking stabilising. The width of the ship was not so big...... So I really think, that there was only this one.
And this one is more or less only necessary to have the ladder to climp down and up - there is no other entrance to the store-room only via the hatch, so such a monkey ladder

BTW: this pillar is standing in the middle of the big storage hold, so will be hindering during the loading and unloading the ship. so I think such a pillar would be better installed on the other side of the hatch, were already the mast protection is...... but this is only my own idea, how I would have build the ship.
BTW: "Before the ballast Box is installed,....." -> I think the idea of the wording was, that the pillar has to be installed, before the ballast and cargo is installed!
I think, that first has to be the box to be installed, afterwards the pillar together with the deck-beam the pillar is connected, than also the mast protection with the beams and partner, and aftwards the ballast and cargo...
4) The bottom of my frame 37 is covering the rabbet on the stern post. I don't understand why as I think it is in the right position? Looking at the plans it seems the lowest part of this frame is not visible at all. Strange! I guess it has to be modified so that it fades out into the rabbet?
Mine was exactly the same - It is on the correct position

You have to adjust the thickness etc. so it fitsfor the planking - the rabbet has to be free for the ends of the hull planking

I cut along the green line and removed the blue stripped area. the rest has to be sanded down, that the plank can end inside the prepared rabbet.
BTW: This part of the last stern planking marked with purple has to be also adjusted, when you install the plank - wait with all these preparation until you really work on the plank(s)
5) According to the manual the sides of the ship should be planked before the transom / upper part of the stern. Is there any good reason for that or would it perhaps be wiser to do the transom first?
Maybe the transom has to be adjusted based on the real final form of the individual planking (errors by the modeler can give more easier a different form of the planking - the transom is fixed by the one part -> But I have to think about it more in detail

Many thanks, guys, for the comments, the likes and the way too excessive praise
I expected already before I started that lot of questions would appear along the way. That is exactly why I found it important to attend a group build for my first build. I really appreciate that I can follow other, even experienced, builders and that we can have small 'brain stormings' when in doubt about different details.
@Uwe: Yes I did try making caulking with silk paper.
1) I think I'll make a scratch plank from the pump room to the stern like in Etienne's model:

2) Yes, we can use the eyelets from bag 07 but then they will be same size as the eyelets on the weather deck.
3) Thanks for the good picture. Helps me a lot. Speaking about climbing up and down, was there also no ladder neither in the sleeping compartments at the bow or in the galley? And could they close a 120 x 120 cm hatch from below
4) I'm pleased to know that it looked the same way for you and OT1138. It was just to be 100% sure that I had not made some kind of a mistake with frame 37
5) The reason I was asking is because it seems that the side counter timber should be rounded slightly more inwards around the lowest transom. This of course must be done before planking the side and I thought it might be easier to hit the corrects shape in both sides if the transom was fixed

I expected already before I started that lot of questions would appear along the way. That is exactly why I found it important to attend a group build for my first build. I really appreciate that I can follow other, even experienced, builders and that we can have small 'brain stormings' when in doubt about different details.
@Uwe: Yes I did try making caulking with silk paper.
1) I think I'll make a scratch plank from the pump room to the stern like in Etienne's model:
2) Yes, we can use the eyelets from bag 07 but then they will be same size as the eyelets on the weather deck.
3) Thanks for the good picture. Helps me a lot. Speaking about climbing up and down, was there also no ladder neither in the sleeping compartments at the bow or in the galley? And could they close a 120 x 120 cm hatch from below
4) I'm pleased to know that it looked the same way for you and OT1138. It was just to be 100% sure that I had not made some kind of a mistake with frame 37
5) The reason I was asking is because it seems that the side counter timber should be rounded slightly more inwards around the lowest transom. This of course must be done before planking the side and I thought it might be easier to hit the corrects shape in both sides if the transom was fixed
Last edited:
to 1) I saw Etiennes model also - it is a solution and maybe we should close the gap - I will see with my model, when it comes to the final installation of the interior, how it is looking likeMany thanks, guys, for the comments, the likes and the way too excessive praise
I expected already before I started that lot of questions would appear along the way. That is exactly why I found it important to attend a group build for my first build. I really appreciate that I can follow other, even experienced, builders and that we can have small 'brain stormings' when in doubt about different details.
@Uwe: Yes I did try making caulking with silk paper.
1) I think I'll make a scratch plank from the pump room to the stern like in Etienne's model:
View attachment 206869
2) Yes, we can use the eyelets from bag 07 but then they will be same size as the eyelets on the weather deck.
3) Thanks for the good picture. Helps me a lot. Speaking about climbing up and down, was there also no ladder neither in the sleeping compartments at the bow or in the galley? And could they close a 120 x 120 cm hatch from below
4) I'm pleased to know that it looked the same way for you and OT1138. It was just to be 100% sure that I had not made some kind of a mistake with frame 37
5) The reason I was asking is because it seems that the side counter timber should be rounded slightly more inwards around the lowest transom. This of course must be done before planking the side and I thought it might be easier to hit the corrects shape in both sides if the transom was fixed
View attachment 206868
to 2) I have also to see, if they fit in size - maybe using other smaller one would fit better
to 3) the main hatch over the store room, which was much bigger, was definitely handled only by lifting hoist. The hatch cover with 1,2 by 1,2 over the living compartment in the bow area - under there was a ladder, so I guess two seaman could lift it and lower it, but I guess it was very often open and not closed.
Here the kit is completely following the information given in the contemporary drawings
So from the living compartments either in the bow but also especially at the stern were ladders to climb up.


and here the comparison of the decks drawings of the Le Coureur between CAF (on the top) and Boudriot (the lower one)

To 5) I think we have to check all parts several times if they fit together, independent the words in any manual (or also building logs
) - never switch of the brainMaybe you remember one of my photos during I installed the first planking of the stern

at the end everything have to fit together - you see - I have to slightly smaller the stern structure
and good to know, that a possible gap will be covered by the frame or freeze around the stern

Just checked the photos from the CAF-model
Here we can see one of the ladder

and here we can see two CAF-seamen handling the hatch cover

Here we can see one of the ladder
and here we can see two CAF-seamen handling the hatch cover
One more stupid question from the ignorant landlubber then: I assume the captain's cabin was in starboard side aft and I imagine that lower ranking sailors in the 18th century were not in general obese butterballs but still . . . would the sailors sleeping in the foremast room really have to climb through a 40x40 cm window in the middle of the night to take the dogwatch? or is there another entrance somewhere I have missed?

There are never stupid questions - maybe only stupid answers are possible (speech of my father)One more stupid question from the ignorant landlubber then: I assume the captain's cabin was in starboard side aft and I imagine that lower ranking sailors in the 18th century were not in general obese butterballs but still . . . would the sailors sleeping in the foremast room really have to climb through a 40x40 cm window in the middle of the night to take the dogwatch? or is there another entrance somewhere I have missed?
View attachment 206915
Take a look at the contemporary drawing - there is written at the hatch "Ladder way"

This hatch is also shown in CAF and Boudriot drawings

and these are the carlings around the hatch marked with green (turned the photo by 180° to fit with the drawings

in the CAFs model it is this hatch (closed)

Attachments
I see that hatch Uwe but isn't there a bulkhead between the hatch and the foremast room?
Sorry - now I understand your question 100% !I see that hatch Uwe but isn't there a bulkhead between the hatch and the foremast room?
So my father was right - there are only stupid answers possible
In the contemporary drawing it is written "Sails room" (which makes sense), so the sleeping compartment shown in CAFs model is an interpretation, I guess
Maybe the ships boy had the possibility to sleep there - and they were young and thin enough to climb trough the window
I have slowly started on some of interior and once again I'm in doubt: If I understand correctly the lower decks are supposed to be planked with maple. A glance at Tom's build substantiate my assumption. But there is only 2 lists of maple in the kit. Just enough for the deck in the foremast / sail room and the galley but certainly not enough for the big deck in the stern, the pump room and the magazine. I see some different options but I would very much like to hear the opinion of you guys before i make up my mind. The options I see:
1) I could make all the decks of cherry. However, using the same type of wood for everything would maybe make the interior a little 'colorless' or 'monotonous' (in lack of a better word)
2) I could make the 2 fore decks in maple and the other decks in cherry. But I have no clue if that would be appropriate? Also maybe it would look a little peculiar.
3) I don't think lists of maple are readily available in DK but I could buy some lists in abachi and make the lower decks in that.
4) I could make all the lower decks from ice cream sticks (beech I think )
5) I could make all the lower decks from wooden coffee/tea stirring sticks (birch I think)
Which option do you think is the better one? Any kind of comments or other options are welcome
The better one - is the one you like most! There is no such thing as appropriate, it is appropriate if it is up to your acceptance level. I don't suggest you to made all decks in Cherry. Beech sticks would be OK, but they will not be uniform (they all from different timber thought). The best option probably is to source somewhere lighter wood for lover decks, and save maple for upper deck\s.Which option do you think is the better one?
I would like to agree with Jimsky on everything. The feeling and impression you have yourself should determine the execution. Lower decks lighter and upper decks darker wood would be an interesting solution.
you wrote:I have slowly started on some of interior and once again I'm in doubt: If I understand correctly the lower decks are supposed to be planked with maple. A glance at Tom's build substantiate my assumption. But there is only 2 lists of maple in the kit. Just enough for the deck in the foremast / sail room and the galley but certainly not enough for the big deck in the stern, the pump room and the magazine. I see some different options but I would very much like to hear the opinion of you guys before i make up my mind. The options I see:
1) I could make all the decks of cherry. However, using the same type of wood for everything would maybe make the interior a little 'colorless' or 'monotonous' (in lack of a better word)
2) I could make the 2 fore decks in maple and the other decks in cherry. But I have no clue if that would be appropriate? Also maybe it would look a little peculiar.
3) I don't think lists of maple are readily available in DK but I could buy some lists in abachi and make the lower decks in that.
4) I could make all the lower decks from ice cream sticks (beech I think )
5) I could make all the lower decks from wooden coffee/tea stirring sticks (birch I think)
Which option do you think is the better one? Any kind of comments or other options are welcome
But there is only 2 lists of maple in the kit.
which dimensions you refer to?
and where did you read I understand correctly the lower decks are supposed to be planked with maple ?
Because I used for all the interior decks the cherry strips

The strips 1,5*5mm on the left side....
only in sketch 43 is written maple strips for the floor of the ammunition magazine

I think in all other skecthes it is written only the dimension, but not "maple"
Hallo Uwe,
It is correct that the word maple is only mentioned under the sketches for some of the decks, but not only for the magazine:

I thought it would be a little peculiar if some of the decks should be made of maple and other should be made from cherry. So I had a glance at Tom's build and there all the decks seems to be made of maple. Thus I assumed the word 'maple' was implicit in the sketches for the other decks (hence I wrote, if I understand correctly)
In your opinion won't it look a little strange to make some of the decks in maple and others in cherry?
As I said, I can of course make them all in cherry. However, using the same type of wood for everything would maybe make the interior a little 'colorless' or 'monotonous' (in lack of a better word)
It was in no way meant as a complaint. I just wanted to hear the views of others on the subject.
Karl Ingwer kindly offered his help but after some search I also found some Canadian maple in Denmark. Only it is in plates of 2 mm but I think I can reduce the thickness (1.5 mm is probably way out of scale anyway)
It is correct that the word maple is only mentioned under the sketches for some of the decks, but not only for the magazine:
I thought it would be a little peculiar if some of the decks should be made of maple and other should be made from cherry. So I had a glance at Tom's build and there all the decks seems to be made of maple. Thus I assumed the word 'maple' was implicit in the sketches for the other decks (hence I wrote, if I understand correctly)
In your opinion won't it look a little strange to make some of the decks in maple and others in cherry?
As I said, I can of course make them all in cherry. However, using the same type of wood for everything would maybe make the interior a little 'colorless' or 'monotonous' (in lack of a better word)
It was in no way meant as a complaint. I just wanted to hear the views of others on the subject.
Karl Ingwer kindly offered his help but after some search I also found some Canadian maple in Denmark. Only it is in plates of 2 mm but I think I can reduce the thickness (1.5 mm is probably way out of scale anyway)
Last edited:
Again not so much progress from my side in the past week. I made a few experiments. I bought a round nose plier and tried to make some eye-bolts and rings for the hatches in the lower decks as I want these smaller than on the hatches on the weather deck. I think I'll go for the 0.5 mm wire:

I also made an experiment with black ink and must conclude that even if using the best masking tape and being extremely careful I could not avoid the ink leaching a little into the surrounding wood. Question (for the far future): Can/should the wales be stained / treated with indian ink before mounting?
Besides from that I made and roughly dry-fitted a few of the bulkheads. The sliding hatch is working like a dream:
Ring\eye bolts looking very good, Poul! I also have the same round nose pliers, they do allow me to make smaller ring bolts. However, making the rings using the pliers isn't practical and time-consuming, A much better way, IMHO, is to wind the wire around the drill bit or any steel round mandrel then cut with a jewelers saw or cut off the disk in a rotary tool. I have a tutorial on making a ring boltsI bought a round nose plier and tried to make some eye-bolts and rings for the hatches in the lower decks as I want these smaller than on the hatches on the weather deck. I think I'll go for the 0.5 mm wire:
Charles Royal Yacht, 1674, Scale 1:64, by Woody Joe (Japan)
THANKS Jim, I have a couple of more questions if this is clogging your build can use PMs, let me know,,,I have chose the OTTO FRIE CO to order the BARRETTE FILES, ALSO THELINECO NEUTRAL PH ADHESIVE where can I order this and also RAPID FUSE CA, THANKS AGAIN BIG, BIG HELP TO ME.Don
shipsofscale.com
I would stain the wood with ink, first, and then mount it on the model. I would even seal the wood to avoid any leaching...I also made an experiment with black ink and must conclude that even if using the best masking tape and being extremely careful I could not avoid the ink leaching a little into the surrounding wood. Question (for the far future): Can/should the wales be stained / treated with indian ink before mounting?