sgtmik's HMS Blandford cross section build

Ahoy Shipmates,
I have gone back to work on my BCSGB project and I am correcting my previous mistakes. I was at first making my parts for the Cistern and pump dales.

IMG_0489.JPG IMG_0497.JPG

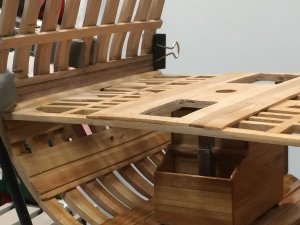
My plan was to finish the lower deck and press on. I started looking at the under side of my lower deck and it looked like Bovine excrecia. One thing lead to another and here I am.
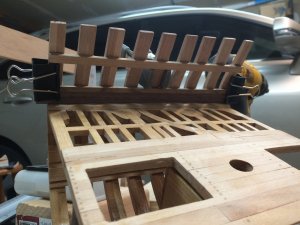
I removed the hatch covers and finished sizing the holes. And began sanding the under side of the lower deck.

IMG_0490.JPG IMG_0491.JPG IMG_0492.JPG IMG_0496.JPG IMG_0498.JPG

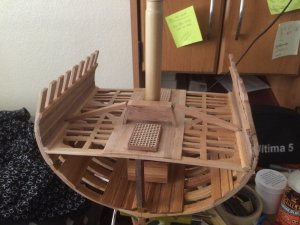
Eventually I got tired of my model wobbling around and set in an old stand and discover to my horror that the upper deck clamps are off. The starboard TOF is 3/16th" longer than the other. I removed the starboard deck clamp and added it to my todo list.

IMG_0499 (3).JPG IMG_0499.JPG

As a result of my model not being level the mast is not level. That too goes on my todo list.
Thanks for your visit.
The Saga continues.
 
Nice to see that you have started up this project again, it is nice for me that you and the others can discover problems
before i get that far, it wants to be of great help, i have now got order of all the drawings, made building jig,
Next is a test frame before I start producing parts for frames beams and so on.
 
Hi Mike,
Re-positioning the deck clamp will be an easy fix now before the beams and related framing is installed, good catch. You are making good progress on the model; redoing stuff helps you remember to check the hull for square and level occasionally.
Mike
 
Know the feeling, since i make numerous mistakes on all my models so many that if I tried to fix them all, I would have to start over, so what I do and the purist among us may disagree IS IF IT LOKS RIGHT IT IS RIGHT AND IT DOES NOT THEN I REDO IT, just me. Don
 
Nice to see that you have started up this project again, it is nice for me that you and the others can discover problems
before i get that far, it wants to be of great help, i have now got order of all the drawings, made building jig,
Next is a test frame before I start producing parts for frames beams and so on.
Ahoy Knut,
Thanks for visiting my build log and for your kind comments.
 
I’m glad you are back at work on the cross section. Redoing parts is part of the territory. Multiple redo’s on every project I’ve built. I feel your pain!
Ahoy Dave,
Thanks for your visit to my log. You posted a thread on using boiled eggs to blacken brass. Can you shoot me a copy of that post I want to blacken the hinge for my shot locker.
 
Know the feeling, since i make numerous mistakes on all my models so many that if I tried to fix them all, I would have to start over, so what I do and the purist among us may disagree IS IF IT LOKS RIGHT IT IS RIGHT AND IT DOES NOT THEN I REDO IT, just me. Don
Ahoy Don,
Thanks for your visit to my log and for your kind comments.
 
Hi Mike,
Re-positioning the deck clamp will be an easy fix now before the beams and related framing is installed, good catch. You are making good progress on the model; redoing stuff helps you remember to check the hull for square and level occasionally.
Mike
Ahoy Mike,
Thanks for your visit to my build log and for your kind comments. I got the deck clamp re-installed and it appears to be in the right spot.
 
Ahoy Shipmates,
Once I got my deck clamps positioned right I pressed on with the Spirketting of the lower deck. I used Walnut for this part.

IMG_0514.JPGIMG_0514.JPGIMG_0516.JPGIMG_0517.JPGIMG_0518.JPGIMG_0520.JPGIMG_0521.JPGIMG_0522.JPGIMG_0525.JPG


Once I finished the spirketting I finished up my Cistern, painted it and installed it.

IMG_0527.JPGIMG_0528.JPGIMG_0529.JPGIMG_0531.JPGIMG_0536.JPG


The next chore was to install the deck beams


IMG_0538.JPGIMG_0539.JPGIMG_0540.JPGIMG_0541.JPG


In the next installment I will be working on the carlings and ledges, and finishing up the shot lockers lid.
 

Attachments

  • IMG_0515.JPG
    IMG_0515.JPG
    204.8 KB · Views: 13
  • IMG_0519.JPG
    IMG_0519.JPG
    167.1 KB · Views: 14
  • IMG_0530.JPG
    IMG_0530.JPG
    221.1 KB · Views: 13
Ahoy Shipmates,
I have been slowly pressing on with my main deck framing. My notches for the carlings should have waited until I was actually installing them. Rather than starting over on the main deck I chose to note it and file it away until the next build.

81089810908109181092810948109581096

I also went back and completed my shot locker lid and hinges. I used brass black to give the appearance of age.

810978109881099IMG_0547.JPGIMG_0554.JPGIMG_0555.JPGIMG_0556.JPGIMG_0557.JPGIMG_0558.JPGIMG_0559.JPGIMG_0560.JPGIMG_0545.JPGIMG_0544.JPGIMG_0549.jpg
 
Last edited by a moderator:
Back
Top