#1 Support - Pre-construction: planning and preparing the build

Joined
Feb 18, 2019
Messages
685
Points
353

In this area we will address...
Questions and comments on matters such as:
- Tools
- Glue
- Lumber choice
- Tracing and cutting the Station mold.
- Anything related to planing and preparing for the build

Note added on June 19th 2020.
Printing the Station molds from the construction guide.
To print the pattern page at the "right scale" the page needs to be printed at 109% under "custom scale" in your print window.
 
Last edited:
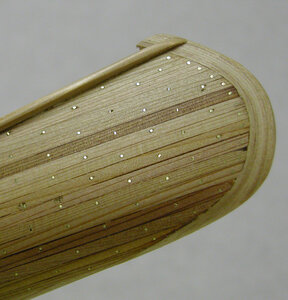
Part of planing prior to building the canoe is to get some ideas as to what the final look is going to be and look at options.
For example, whether one chooses cedar or cherry for the overall lumber package, it is still possible to personalize the canoe. One way to do this is to include 1 or 2 accent strips on each each side of the planking.
The problem is that all the strips are going to be either cedar or cherry.
Well this is not a problem, one can use basswood, by cutting strips from the stock used for the station molds. Just make sure you do not cut too many from 1 sheet so that the station mold templates can still fit.

It is easy to cut strips from a basswood sheet. The thickness of the basswood stock in the package is the same as the size of the strips for the planking. Use a very sharp knife (scalpel or Exacto blade) and a clamped ruler over the length of the sheet: score the basswood lightly to begin with, then do a few passes with a bit more pressure with the blade.

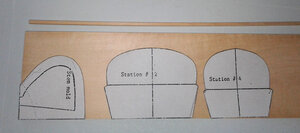
Basswood sheet, station mold templates and one strip cut. The basswood strip is a little wider than the other strips but that is of, it will run over the length of the canoe. As long as pairs of strips are the same width, the 2 sides will be will be symmetrical.

20200615_154751 copy.jpg
G
 
Last edited:
I used the link in your post to send a message to Dave. I'm assuming that link is to a private message.
I requested instructions on how to order the canoe packages.
Have had no reply.
Am I doing something wrong?

EJ
 
I used the link in your post to send a message to Dave. I'm assuming that link is to a private message.
I requested instructions on how to order the canoe packages.
Have had no reply.
Am I doing something wrong?

EJ

Explanation :
The "@member's name" is there to make sure that all people listed in the original message are notified that they can place the order by being referred to the post notification upon logging in to SOS.
As mentioned in the post, the order is to be placed in private to Dave at the Lumberyard through SOS private messaging. From there he should answer your messages and give you some more information pertaining to total amount including shipping etc. For that he will need your full name, shipping address, etc
The "@supplier name" (Dave in this case) is not a direct link to anything either, other than the fact that it will notify Him that orders are coming from each members.
I hope this clarifies things.

I sent him a message earlier about my order. Please keep in mind that Dave may not answer within minutes, but eventually, he will in not too long a delay.

G.
 
I got my reply back next day from Dave, he has many things going on at any time, from lurking and moderating the forums to making wood kits in shop for the orders.
 
Part of planing prior to building the canoe is to get some ideas as to what the final look is going to be and look at options.
For example, whether one chooses cedar or cherry for the overall lumber package, it is still possible to personalize the canoe. One way to do this is to include 1 or 2 accent strips on each each side of the planking.
The problem is that all the strips are going to be either cedar or cherry.
Well this is not a problem, one can use basswood, by cutting strips from the stock used for the station molds. Just make sure you do not cut too many from 1 sheet so that the station mold templates can still fit.

It is easy to cut strips from a basswood sheet. The thickness of the basswood stock in the package is the same as the size of the strips for the planking. Use a very sharp knife (scalpel or Exacto blade) and a clamped ruler over the length of the sheet: score the basswood lightly to begin with, then do a few passes with a bit more pressure with the blade.

Basswood sheet, station mold templates and one strip cut. The basswood strip is a little wider than the other strips but that is of, it will run over the length of the canoe. As long as pairs of strips are the same width, the 2 sides will be will be symmetrical.

View attachment 157717
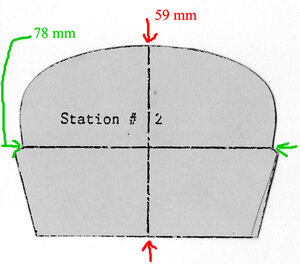
Gilles, Could you give me the horizontal and vertical line dimensions on station 2 so I can check
my printer is printing the correct scale.
Thanks
 
Good that you asked this question - I have also to adjust my print out :rolleyes:

Updated on June 19th
The document is to be printed at 109% size.

The pattern page can be printed separately if you just want to print only this particular page. That's what I would do.
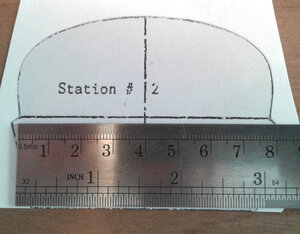
The size can be adjusted in your print window where you must choose the "Custom scale" option and set it at 109%.
As shown here:


G.
 
Last edited:
Glad I checked this and thanks to Hedly for asking.
Seems printers, especially when printing PDF's, all work a bit different. Mine primary printer is a Cannon TR8520. I tried the following on my secondary, a HP6280 with slightly different results. I am gonna use the final prints from the HP.
When doing newsletters, I have found that PDF's Word Docs, XL docs and other items, when used together or separately, don't always print out exactly like you see it on the screen when it has been saved as and printed from a PDF.
This was a good catch.

The first prints I did a few days ago, printed as just line drawings. I don't know where I got these from. When printed at 100%, they came out at 71.44 X 54.5. I had no dimensions to compare that to.

Today, I went to the downloaded manual and printed the station page. This page printed as a line drawing with a grey shaded fill. When printed at 100% they came out the same size - 71.44 X 54.5.

I then printed the same thing except at "actual size". Same result - 71.44 X 54.5.

I did not try "Fit" or "Shrink".

So, I printed at "custom" 110%. They printed out at 78.75 X 60.

Then I tried at "custom" 109%. they printed out at 78 X 59.5.
Using the same settings on the HP printer it came out at 77.5 X 59.

I guess that's as close as I'm gonna get, so I'll use that.

EJ
 
Hi All,
I have 2 other home office printers and did some testing today and it seems that there are printing at smaller scale although they seem to be set with the same parameters as the one I used for proofing. The dimensions of the station mold came out as per what EJ said (smaller)
So yes, the patterns need to be printed at 109% "custom scale" to get the 78 x 59 / 78 x 59.5

What I printed yesterday was printed from the same printer as the one I used to do my proofing for the pattern.
I have made a note of this in the top message:

20200619_150510 copy.jpg

G
 
@Gilles...
Your instructions in the "manual" start with a suggestion to familiarize...so that is what I have been doing.!! I've read through the manual three times. There are a few things that need clarifying --- at least for MY simple brain.!!

So, first thing... On page 4 (material list..) you have 5 strips 3/32 x 3/32 x 24 for the keel and gunwales. You have the KEEL marked as "optional". ?????? What does this mean.?? Back in the manual I find no indication of the keel being "optional".????

Howard
 
@Gilles...
Starting on page 11, you advise "pinning" the first planks on both sides of the canoe. This will obviously leave holes in the planks. Is there an alternate method so as to avoid making holes in the planks.?? I do not want to "nail" my canoes, so I would like to avoid making holes in them if possible.

I realize that amidships the holes might be covered by the out-wale, but as the strip progresses toward the stems the holes will definitely show...

Howard
 
Your instructions in the "manual" start with a suggestion to familiarize...so that is what I have been doing.!! I've read through the manual three times. There are a few things that need clarifying --- at least for MY simple brain.!!
So, first thing... On page 4 (material list..) you have 5 strips 3/32 x 3/32 x 24 for the keel and gunwales. You have the KEEL marked as "optional". ?????? What does this mean.?? Back in the manual I find no indication of the keel being "optional".????

The keel strip is optional as most canoes do not have one.
If you choose to place one, it would consist of 1 strip centered between the stem pieces, running on the outside of the hull.
I included it as optional in the material list as some of the canoes I was commissioned to build (models) had a request for one, and it is an easy addition.
G.
 
Starting on page 11, you advise "pinning" the first planks on both sides of the canoe. This will obviously leave holes in the planks. Is there an alternate method so as to avoid making holes in the planks.?? I do not want to "nail" my canoes, so I would like to avoid making holes in them if possible.
I realize that amidships the holes might be covered by the out-wale, but as the strip progresses toward the stems the holes will definitely show...

This is the easiest way to set the first plank.
It can be clamped in place if you would like.
I use pins or nails. The holes can be filled and be invisible by collecting saw dust (from the planking) and mixing it with a very small amount of glue.
Full size canoes strips are usually stapled in place at the station molds (100's of holes). Careful sanding and filling makes them disappear.
G.
 
The keel strip is optional as most canoes do not have one.
If you choose to place one, it would consist of 1 strip centered between the stem pieces, running on the outside of the hull.
I included it as optional in the material list as some of the canoes I was commissioned to build (models) had a request for one, and it is an easy addition.
G.

OK... But it's not really possible to leave it off is it.?? With the stems being built up, there must be some sort of a transition. Can't leave the stem terminated at position 7 with nowhere to go.?? Or...what am I missing.??
 
Back
Top