1805 Swift - Resurrected

Joined
Mar 22, 2021
Messages
69
Points
68

Location
Pearland, Texas
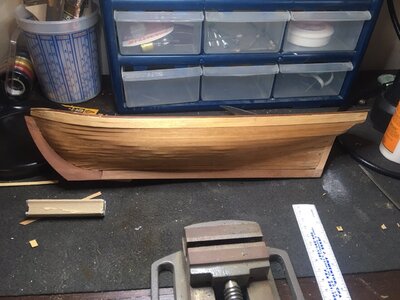
This isn't really a build log, since I didn't take pictures until well into the project. This is my first build (and it shows!), which I started back in 1983. My lack of experience and planning is evident with the hull. I probably started work on the vessel a couple of days after receiving the kit. It stood idle for close to twenty years in my garage and the temperature extremes and humidity caused problems with wrapping and separation.
IMG_2410.JPG
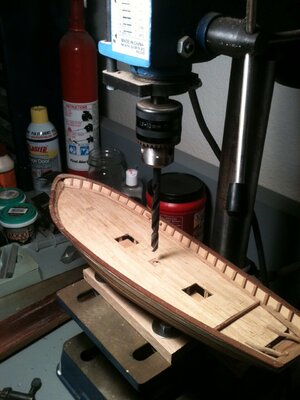
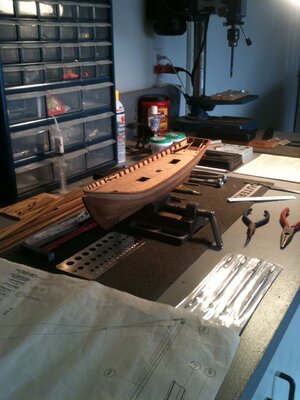
When drilling the holes for the mast, I felt the drill press was overkill, but it was all I had. I used a small file to accommodate for the angle of the masts. After looking numerous times, I do not see any degrees of angle given for the masts. Anyone know? Also, there is a small gap beneath the transom supports on the stern.
IMG_0207.JPGIMG_0214.JPG
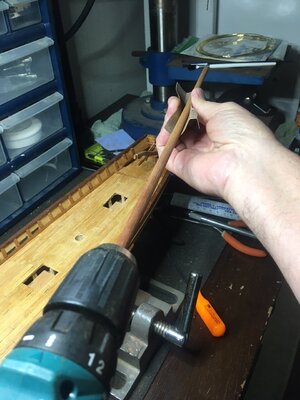
Tapering was a challenge. As shown, I used my cordless drill. The process was slow and tedious. The instructions said to use a coarse file to start, but I was unsure of that, so used various grit sandpapers as I progressed.
IMG_2438.JPG
An inventory of the kit would have exposed a few missing parts, and two of the smaller wooden pieces (guides for the cabin hatch) were shorter than shown in the plans. Some of the brass straps for the spars and masts were not the correct sizes. I did purchase a second used Swift kit off of eBay to use for missing parts and anything that might be damaged. I plan to use this second kit to practice on planking.

More pictures later. All comments are welcome.

Mike
 
Hi Mike
The plans say 81 degrees.
For me I like to whittle down the masts with a hobby knife to a close approximation and finishing with a file and sandpaper.
Drill press for sure is overkill IMO. A hand drill would be my choice or simply using my fingers twisting a small bit graduating to larger ones works.
I use paper instead of brass for the bands.
Also I would have cut a new keel.
 
Thanks for the info. I currently have the masts raked at about 85 degrees. On the issue of tapering. I used a small spoke shave on the bowsprit, which was the final tapering job. then I sanded it down. This cut the time in half. Of course I discovered this on the last item to be tapered! The next big step will be the masts installation, then the rigging will start. I notice that all the rigging supplied with the kit appears to be plain white cotton thread in various sizes. My main concern will be if the thread has started to rot after all these years. Plus, all white lines doesn't seem authentic. Your input is very helpful and extremely appreciated.
 
Thanks for the info. I currently have the masts raked at about 85 degrees. On the issue of tapering. I used a small spoke shave on the bowsprit, which was the final tapering job. then I sanded it down. This cut the time in half. Of course I discovered this on the last item to be tapered! The next big step will be the masts installation, then the rigging will start. I notice that all the rigging supplied with the kit appears to be plain white cotton thread in various sizes. My main concern will be if the thread has started to rot after all these years. Plus, all white lines doesn't seem authentic. Your input is very helpful and extremely appreciated.
I did the same thing you did. i.e. used my drill to taper the masts. It was the first time I tried that . I usually just do it by hand. I haven't stepped the masts yet. I'm going to use a satin varnish on the hull, deck, furniture, etc. The only thing I'm painting is the cap rail and the inner bulwarks, excluding the stern transom area. I think I'll also use paper and eyebolts for the mast bands. The brass is a pain to drill and shape. As long as it looks good, thanks all that matters. You can always use the current planking as the 1st layer. Sand it smooth, patch any holes with plastic wood and do a second layer with thing planking. I had the same experience with a Skipjack model . Bought and started it in the 80s, got stuck and walked away from it. Carried it thru several moves and a divorce. Wound up in my basement . Unfortunately it was right under a kitchen floor duct that allowed water to drip on it when my icemaker failed and flooded the kitchen floor. The model was ruined, so I stripped off any thing salvageable and tossed everything else. I was browsing eBay one day and spotted the kit for sale at a very reasonable price and bought it. I have the new one about 80% finished. And it's not sitting under a vent!!!
 
Hi Mike,
I to bought and started a Swift in the mid 90's.......
Started a business, built a new house-no time for modeling. So with a retirement date decided last November ( only 64 work days left! ), I restarted that build-my first also. I'm at building the mast stage. I bought a cheap bead lathe to help shape the masts. Keep in mind you need to make a bed extension for these little machines to accommodate various lengths. I used Baltic birch (15 ply) plywood which is very stable, void free and holds fasteners well. I also purchased two, 2" diameter 3 and 4 jaw chucks to extend the capability of this lathe. I purchased all items off EBay about 4 months ago for less then $100.
My long winded reply is actually a big THANK YOU for the great idea of using paper in place of the brass for mast strapping-brilliant!! That's been a stumbling block for me for more than two months, just could not get the brass strip to look nice. I'll stop at hobby lobby and look for some coated paper.
That's why this forum is sooo valuable, you never know what you'll read that will make things "click" for you.
Generally in life it's healthy to listen opinions of others, weather you agree or not, a wise person can usually learn something from the experience....
Have a wonderful and productive weekend!
Steviedean
 
Mike,
Forgot to mention, a drill press is the correct tool to drill mast holes. As long as the model is mounted to the table securely and at the proper angle is set-all holes will be the correct relationship to each other and position on your model.
Steviedean
 
Well the Swift is not a swift build, but is a basic simple build, I built mine as a first build also, but I had help of local ship building club in Oklahoma City to help.

Mine after 20 + years still sits waiting for final rigging to be installed, and mounted on base.

This kit is a good beginners kit to learn basics and do some minor kit bashing if someone tells you how to improve it. Glad I had mentors to help me.
 
This isn't really a build log, since I didn't take pictures until well into the project. This is my first build (and it shows!), which I started back in 1983. My lack of experience and planning is evident with the hull. I probably started work on the vessel a couple of days after receiving the kit. It stood idle for close to twenty years in my garage and the temperature extremes and humidity caused problems with wrapping and separation.
View attachment 227832
When drilling the holes for the mast, I felt the drill press was overkill, but it was all I had. I used a small file to accommodate for the angle of the masts. After looking numerous times, I do not see any degrees of angle given for the masts. Anyone know? Also, there is a small gap beneath the transom supports on the stern.
View attachment 227833View attachment 227834
Tapering was a challenge. As shown, I used my cordless drill. The process was slow and tedious. The instructions said to use a coarse file to start, but I was unsure of that, so used various grit sandpapers as I progressed.
View attachment 227839
An inventory of the kit would have exposed a few missing parts, and two of the smaller wooden pieces (guides for the cabin hatch) were shorter than shown in the plans. Some of the brass straps for the spars and masts were not the correct sizes. I did purchase a second used Swift kit off of eBay to use for missing parts and anything that might be damaged. I plan to use this second kit to practice on planking.

More pictures later. All comments are welcome.

Mike
I have the older kits of this model that I am going to try and put together. By chance have you ever built the Black falcon? I have 3 or 4 of them started and I can NOT get the hull planking right. It is a single layer plank ship so it has to look good. I know the planks have to be cut down but where do I start at and to what size do I cut them down to. Another thing tat I have read is that Mantua did not put good planking wood in these kits. Can you give me any pointers on these problems? Thanks Jim
 
Jim, check out the many discussions and hints on planking available in the help section, or you can use the search function to see what you can find.

Its a slow process to get right in single layer, but if done as many books suggest, by dividing and measuring widths of belts, you can then determine width of individual planks.

Very few real planks are straight on the edge length wise when done by proper planking methods.
 
I have the older kits of this model that I am going to try and put together. By chance have you ever built the Black falcon? I have 3 or 4 of them started and I can NOT get the hull planking right. It is a single layer plank ship so it has to look good. I know the planks have to be cut down but where do I start at and to what size do I cut them down to. Another thing tat I have read is that Mantua did not put good planking wood in these kits. Can you give me any pointers on these problems? Thanks Jim
No, never built the Black Falcon. The FAIR AMERICAN is my second build. I did get some good advice on here. It said never be afraid or reluctant to tear wood off and start over, no matter how far along you are. I have used this advice on my current build. I have put off the planking as long as possible. Since the FA has a painted hull, wood filler can be used to cover up some mistakes.
 
Jim, check out the many discussions and hints on planking available in the help section, or you can use the search function to see what you can find.

Its a slow process to get right in single layer, but if done as many books suggest, by dividing and measuring widths of belts, you can then determine width of individual planks.

Very few real planks are straight on the edge length wise when done by proper planking methods.
I have not seen that, I mean the help section. Thank you for pointing it out.
 
No, never built the Black Falcon. The FAIR AMERICAN is my second build. I did get some good advice on here. It said never be afraid or reluctant to tear wood off and start over, no matter how far along you are. I have used this advice on my current build. I have put off the planking as long as possible. Since the FA has a painted hull, wood filler can be used to cover up some mistakes.
I have not seen that, I mean the help section. Thank you for pointing it out.
Ok. Thanks Now I am off to find the Help place. It is a nice little ship but it is 3 decks. My dumb thinking saw a small ship and it looked like it would be a easy build. Well it has won so far with me pulling off the planks I have put on 3 times lol. I do believe I have the Fair American also.
 
Back
Top