-

Win a Free Custom Engraved Brass Coin!!!
As a way to introduce our brass coins to the community, we will raffle off a free coin during the month of August. Follow link ABOVE for instructions for entering.
You are using an out of date browser. It may not display this or other websites correctly.
You should upgrade or use an alternative browser.
You should upgrade or use an alternative browser.
I would cut them and shorten them before bending and gluing. Leave some little bit meat as an overlength, so you can sand the ends to the correct shape.
- Joined
- Mar 30, 2020
- Messages
- 141
- Points
- 113

Thank youI would cut them and shorten them before bending and gluing. Leave some little bit meat as an overlength, so you can sand the ends to the correct shape.
I agree. Cut them just a bit oversized on both ends and trim to fit after glue up.
Happy Birthday, David!!! Have a wonderful day full of joy and best wishes! 

- Joined
- Mar 30, 2020
- Messages
- 141
- Points
- 113

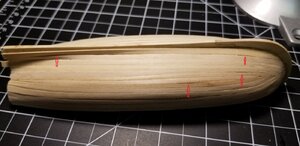
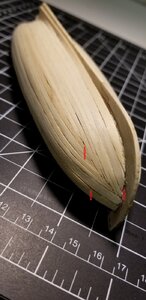
I finally finished the planking on the 18th century Longboat. Through many mistakes (probably the entire planking) I think I have learned a little more on planking.
My question is if I am staining the planking should I use a wood filler to fill the gaps?
Also if I paint the planks should I fill the gaps?
Final question.....from what you can see did I do the planking correctly?

My question is if I am staining the planking should I use a wood filler to fill the gaps?
Also if I paint the planks should I fill the gaps?
Final question.....from what you can see did I do the planking correctly?


Hello David.
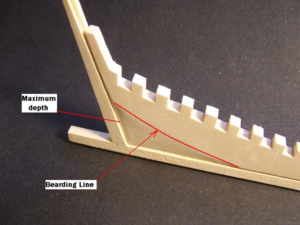
You did a good job on planking, and for sure, the next time it will be much better. If you don't mind, I want to discuss a couple of points. I have noticed that some planks are wider than others. At least they appeared to be on you your photo. I am not sure what kit manufacturer suggested in the kit, but hull planks should be the same width (for the most part) expect the garboard plank. Speaking about the 'garboard' plank. Take a look close to the stern post. This plank has to merged in to 'rabbet' in the kill and make smooth transition. This is where you missed to cut both a 'rabbet ' and 'bearding lines ( image courtesy of @Winston ) from Model Shipbuilder forum
The 'Garboard plank' is the only odd plank with its own shape and width. The rest of the planks have to be the same width. This is why you get a bit of mashup at the bow area. The next time you would calculate the number of planks needed to cover the hull as the will be the same size.
If you decide towards painting the hull, you can use pretty much any type of filler to fill the gaps and imperfections. Also take into consideration and work out the garboard plank. At this point sand off flash with 'deadwood' area .
Hope it will help
You did a good job on planking, and for sure, the next time it will be much better. If you don't mind, I want to discuss a couple of points. I have noticed that some planks are wider than others. At least they appeared to be on you your photo. I am not sure what kit manufacturer suggested in the kit, but hull planks should be the same width (for the most part) expect the garboard plank. Speaking about the 'garboard' plank. Take a look close to the stern post. This plank has to merged in to 'rabbet' in the kill and make smooth transition. This is where you missed to cut both a 'rabbet ' and 'bearding lines ( image courtesy of @Winston ) from Model Shipbuilder forum
The 'Garboard plank' is the only odd plank with its own shape and width. The rest of the planks have to be the same width. This is why you get a bit of mashup at the bow area. The next time you would calculate the number of planks needed to cover the hull as the will be the same size.
Yes, before stain the planks, you should fill the gaps with a filler, but... you have to make sure the filler is stainable and match the color of you timber.My question is if I am staining the planking should I use a wood filler to fill the gaps?
Also if I paint the planks should I fill the gaps?
If you decide towards painting the hull, you can use pretty much any type of filler to fill the gaps and imperfections. Also take into consideration and work out the garboard plank. At this point sand off flash with 'deadwood' area .
Hope it will help
- Joined
- Mar 27, 2019
- Messages
- 821
- Points
- 403

I finally finished the planking on the 18th century Longboat. Through many mistakes (probably the entire planking) I think I have learned a little more on planking.
My question is if I am staining the planking should I use a wood filler to fill the gaps?
Also if I paint the planks should I fill the gaps?
Final question.....from what you can see did I do the planking correctly?View attachment 152518View attachment 152519
It gets better and better every planking you do. My suggestion with the larger cracks is to take tiny little slivers of the same wood strip, a little yellow glue in the crack then jam the wood sliver into it. Take your time, keep whittling away at the sliver until you have something that is just a tiny bit too big for the crack. After the glue dries, and sanding, I doubt you'll be able to see the crack anymore at all. Especially if you're going to paint it's much more important to have a smooth surface.
SUGESTION GUYS FOR PLANKING, THE BEST BOOK IS THE LITTLE PLANKING BOOK FROM MODEL EXPO BY JIM ROBRTS VERY ESY TO READ AND UNDERSTAND AND IT IS CHEAP, IT IS THE BEST AS I HAVE TO RE READ MANY TIMES TO UNDERSTAND ITEMS, THIS ONE IS EASY READING. GOD BLESS STAY SAFE Don
- Joined
- Mar 30, 2020
- Messages
- 141
- Points
- 113

Thank you for your reply. I guess I got confused with the plans as it said to..."take the lowest plank or garboard, twist it to nearly 45 degrees as it ends up flat on the keel towards the stern". Looking at the photo they provided (which is isn't very good) this is where I got confused and where the planks went wrong for the build of the planks. The spacing of the bow planking really confused me, I used a planking fan to determine the planks on the bow, guessing that was wrong also to use. Again thanks for your help.Hello David.
You did a good job on planking, and for sure, the next time it will be much better. If you don't mind, I want to discuss a couple of points. I have noticed that some planks are wider than others. At least they appeared to be on you your photo. I am not sure what kit manufacturer suggested in the kit, but hull planks should be the same width (for the most part) expect the garboard plank. Speaking about the 'garboard' plank. Take a look close to the stern post. This plank has to merged in to 'rabbet' in the kill and make smooth transition. This is where you missed to cut both a 'rabbet ' and 'bearding lines ( image courtesy of @Winston ) from Model Shipbuilder forum
The 'Garboard plank' is the only odd plank with its own shape and width. The rest of the planks have to be the same width. This is why you get a bit of mashup at the bow area. The next time you would calculate the number of planks needed to cover the hull as the will be the same size.
Yes, before stain the planks, you should fill the gaps with a filler, but... you have to make sure the filler is stainable and match the color of you timber.
If you decide towards painting the hull, you can use pretty much any type of filler to fill the gaps and imperfections. Also take into consideration and work out the garboard plank. At this point sand off flash with 'deadwood' area .
Hope it will help
As others have said, your next effort will be better. A few observations based on having built this model. Sorry, I do not have any pictures to share. Your garboard strake rose too high on the stem. It should barely extend beyond the keel scarf. Because of this you did not have enough room for the rest of the planks at the bow. The rest of the planks would taper as they approach the bow. A little boat like this would not have any dropped planks. Your best option is to use wood filler and then paint the hull as in real life.


