#3 Support: Planking the hull

Joined
Feb 18, 2019
Messages
685
Points
353

Last edited:
The station molds are in place.
It is now time to figure out the line (course) of the first plank, especially if an accent plank is to be included (if one is to be used, I normally place it as the 3rd plank)
The nice thing about building this type of model is that the builder has the latitude of using his or her vision as to what the completed model is going to look like.
Laying the first plank is one of those "nice things".

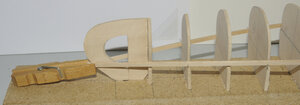
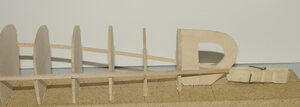
This is only the dry-fitting stage yet but at this point, one can decide the final curve followed by the planks at the stem.
Important note:
The first plank / strip is the most important step in planking the vessel. This is as true for the construction of a canoe as it is for the construction of any vessel. The strip should run in smooth curves in all direction but especially so in the curve along the length of the hull: from stem to stern. The curves should be natural: no sudden turn at any station as such will be amplified and make laying the subsequent strips more difficult.

Installing the first plank takes place as explained in the guide.
But, at both ends at station #6 you can alter the course of the first plank. You can either let it run its natural course or you can give it a bit of an upward curve (upward curve when the canoe is right side up). If you decide to accentuate the curve at the stems, all you have to do is make sure the plank as been secured every second station from the center, including station #6 and slightly push down the end of the plank at the outer edge of the stem. You can go as much as a little over 1/8" (3.2 mm): anything much more than that will cause some issues planking further up and especially when the time comes to close the hull.

First plank dry fitted and following its natural curve

_DSC0738 a copy.jpg

_DSC0739 a copy.jpg

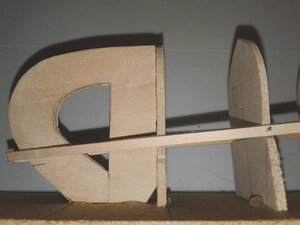
Now a close-up view of where the end of the plank will "fall" at the stems, marked with a pencil line... a little over 1/16 " (1.6 to 2 mm): not much ... but it does make a difference.
One can of course experiment with this as the plank is fitted.

20200620_095744 copy.jpg

As much as 1/8" (3.2) will still give a fairly natural overall curve .... over that, it will cause issues later as mentioned above, and more importantly it will look like the end of the plank is taking a curve at station #6.

Again this is a nice feature to apply when an accent plank is used to "dress-up" the planking on each side of the vessel. That accent plank can be a different colour wood. If no other type of wood is used for such a plank, it can also be a lighter tone plank of the same wood species. Chances are, not all planks will be exactly the same colour in the strips you have: as long as you have 2 similar contrasting tone planks, you are good to go...

Anyways, food for thoughts ....
G.
 
Last edited:
Setting up the first strip:

View attachment 20200714_215239.mp4


Once you have pinned the strip as seen on the video, and as explained in the construction guide, you have the option of lowering the tip of the strip at the stem station by no more than 3/32" (2.5mm) to 1/8" (3mm) giving a slight curve. The best is about 3/32" or 2.5 mm: or you may leave it where it naturally falls.
Then you can pin the strip at station 4 as well.
Replicate on the other side making sure that the strips are symmetrical.

Placing the pin at station 2 for the 17" canoe because it is the centre station mold. If you are building the 19" model, then the pin would be located at station 1, which is the centre station for that length.

G
 
Last edited:
Thanks for the video, Gilles!! How we determine the first plank position, by the notches on each former station or? On the video, I didn't see the plank touches notch on the station 7.

Thanks in advance...
 
Thanks for the video, Gilles!! How we determine the first plank position, by the notches on each former station or? On the video, I didn't see the plank touches notch on the station 7.

Hi Jim.
That is right, the 1st strip doe not line up with the notch, shelf is the term used in the construction guide, please see page 11 and illustration / photo 2.1
In the video above, I am pinning the strip at station 6 and 2 because the strip actually rests in these notches and gives the canoe's sheer a natural curve.
At station 7 the notch is further down and that space is part of the planking that will be built up once the canoe is removed from the form.
G.
 
Filling drilled holes.
Pinning the first strip to secure it to the station molds...
Drilling holes in the first strip to secure it to the station mold.

1)Avoid drilling if you think the holes and subsequent traces will be a detriment to the finish.

2)Pinning the strips in place can be done in the section of hull between the two stations 5 as this is about where the sheer will start being raised to the top of the stems. This area will be built up at a later stage.

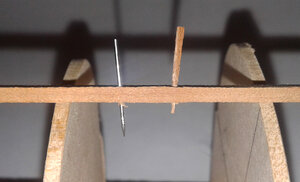
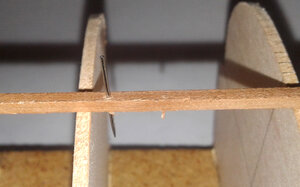
Here are some photos quickly put together.
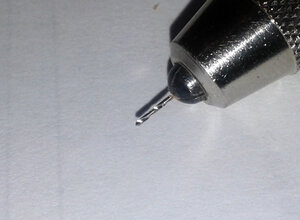
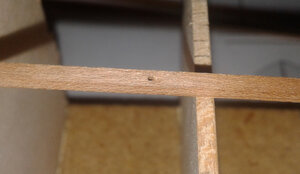
The hole is pre-drilled. The drill bit used is 0.5 mm or 0.020”

20200715_115526 copy.jpg

20200715_082634 copy.jpg


The pin, a small sewing pin, is 0.56 mm or 0.025”.
Filling can be done by
1) simply applying a tiny amount of glue in the hole and immediately sanding the area.
But you can also do the following.
2) Testing the filler or plug that will eventually be needed to fill the hole, if the hole is not covered by the gunwale, a sliver or appropriately sized wedge taken from a strip is inserted right through to hole.

20200715_110220 copy.jpg


20200715_110258 copy.jpg


Option one generally works better but that is easy enough for anyone to do a test.
The problem with option 2 is that the sliver or wedge is going to end up showing a cross grain cut which will darken the fill in the tiny hole. Done right, the hole (or what would become a dot) will basically disappear: except if you are into macro photography!.

G.
 
To all builders of the 19" canoe,
Please refer (and possibly make a note of this) to the following link for an important note regarding planking your canoe:
If you need clarifications and have questions, please post them right here in the "planking support thread"...
Thank you.
G
 
Well, my pear wood still hasn’t arrived yet so a slight change of plans. I intended to build a total of 2 canoes within the scope of this project: one 19 and one 17 -inch. Today I decided to add one more: so if you felt a sigh of relief as my 19-inch model is now complete … well forget it, I am back with more, so some will have to endure seeing more activity on my part in the “group canoe build”.

This canoe (#2) will be built out of cherry as well but 17 inch long and as explained in a previous post, it will have a different look at the stem and stern. Furthermore, it will likely be built a bit slower than the first one since the pear wood canoe (#3) will be started as soon as the lumber arrives from Russia.

Anyways, here are the first steps in the construction.
The photos will hopefully be slightly different than the ones from the first canoe log, but there is only so much one can do about that. I will try to give complementary information as well so that I will not just be a repeat of canoe #1.

So, on with the construction:
A thin (1/32" - 0.8 mm) partial strip is included as a contrasting strip within the planking. Unfortunately, the thin cherry strip, the extension of the light basswood strip, is much darker that the rest of the planking, so we will see what the result is: although the colour should equalize when finish will be applied throughout.

View attachment 172415


View attachment 172416

Trying to keep the 2 sides as symmetrical as possible while laying down the planking strips: getting the strips end to be leveled from one side to the next.
I did cut a slight forward bevel in station 6 and 7.
Sorry, I could not get a "dead center" shot hand holding the camera so the stem piece shows a very slight offset / angle.

View attachment 172417

G
What size pins do you use as I could not push my small T-shaped ones through and had to use a No. 69 drill bit in my electric drill.? PT-2
 
I am using my wife's fine sewing needles with a plastic head, that allows me to twist and push to get pin in shallow drilled hole in the first side rail.
 
What size pins do you use as I could not push my small T-shaped ones through and had to use a No. 69 drill bit in my electric drill.? PT-2

@PT-2
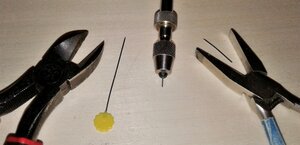
Here is what is used for pinning the first plank to the station molds:

20200817_064242 aa.jpg

from left to right:
- Pliers to cut the pin to a more manageable size.
- The pin: a small diameter sawing pin.
- A hand drill with 0.020" drill bit to pre-drill the hole in the strip /plank.
- A pair of small flat nose pliers.
- And lastly the shortened pin.

One hand holds the strip in place tight against the station mold. The other hand drills the hole, picks up the short pin, insert it in the hole (just enough to hold it in place as the hole is smaller in diameter than the pin), grab the flat nose pliers and pushes the pin through the strip and into the station mold.
Using the flat nose pliers, do not have much more than about 1/16 of an inch space between the tip of the pin and the pliers, push the pin in, move the pliers back another 1/16 and on. This eases the process as if the space is too long, the pin will bend when pushing: as a result it will damage the strip and the station mold as you need to apply some force to push it through.

G
 
@PT-2
Here is what is used for pinning the first plank to the station molds:

View attachment 173732

from left to right:
- Pliers to cut the pin to a more manageable size.
- The pin: a small diameter sawing pin.
- A hand drill with 0.020" drill bit to pre-drill the hole in the strip /plank.
- A pair of small flat nose pliers.
- And lastly the shortened pin.

One hand holds the strip in place tight against the station mold. The other hand drills the hole, picks up the short pin, insert it in the hole (just enough to hold it in place as the hole is smaller in diameter than the pin), grab the flat nose pliers and pushes the pin through the strip and into the station mold.
Using the flat nose pliers, do not have much more than about 1/16 of an inch space between the tip of the pin and the pliers, push the pin in, move the pliers back another 1/16 and on. This eases the process as if the space is too long, the pin will bend when pushing: as a result it will damage the strip and the station mold as you need to apply some force to push it through.

G
I will have to give that a try in the second canoe. It should give me better location precision with my vision than gradually approaching with the electric drill which may wander a bit from the center. :-((( PT-2
 
Back
Top