• LUCZORAMA SHIPWRECK SCAVENGER HUNT GIVEAWAY. 4 Weeks of Fun • 1 Legendary Prize ((OcCre’s Fram Ship)) • Global Crew Welcome!
    **VIEW THREAD HERE**

A fibreglassing question...how to lay the fabric

Hi,
I'm building Billing's Mary Ann, as an RC model, and it has been suggested that I should epoxy/fibreglass the hull to prevent future splitting of the planked hull (I had a recent post showing this problem). I’m seriously considering this (fabric is on order) but I have a question about how to lay the fabric.

My concern is at the stern. This hull has a lovely rounded stern (see photos below)…there is no transom with a hard edge to finish the fabric edge against. I plan to use a very fine fabric weight (30g/m or 0.88oz/yd).

I can see three potential options…
1) Do each side separately, with a join (or overlap??) at the centre of the stern
2) Try and do a wrap from bow to stern, around and back up the other side, ie wrap a single strip…I can’t see that going well though
3) Do it in three pieces…stern up to the prop shaft exit, then each side with a join/overlap.

I suspect that option 1, the conventional approach, is the most practical. I’m assuming that this weight of fabric is so thin that it will not be too difficult to either mould the shape without creases, and the resulting fabric overlap won’t be too hard to hide with appropriate filling and sanding after the epoxy coats.

I have very limited experience with epoxy other than simple gluing and coating the interior, have never used fabric. I’ve watched many YouTubes and other posts, but I’m not finding other examples with a rounded stern. I’ll probably make up a foam shape to run a practice on, but I’d appreciate thoughts from others who have coated a similar shaped hull.

View attachment 469539

View attachment 469540

Thanks
There might be something to be said for using a product such as “gluvit”
Hi,
I'm building Billing's Mary Ann, as an RC model, and it has been suggested that I should epoxy/fibreglass the hull to prevent future splitting of the planked hull (I had a recent post showing this problem). I’m seriously considering this (fabric is on order) but I have a question about how to lay the fabric.

My concern is at the stern. This hull has a lovely rounded stern (see photos below)…there is no transom with a hard edge to finish the fabric edge against. I plan to use a very fine fabric weight (30g/m or 0.88oz/yd).

I can see three potential options…
1) Do each side separately, with a join (or overlap??) at the centre of the stern
2) Try and do a wrap from bow to stern, around and back up the other side, ie wrap a single strip…I can’t see that going well though
3) Do it in three pieces…stern up to the prop shaft exit, then each side with a join/overlap.

I suspect that option 1, the conventional approach, is the most practical. I’m assuming that this weight of fabric is so thin that it will not be too difficult to either mould the shape without creases, and the resulting fabric overlap won’t be too hard to hide with appropriate filling and sanding after the epoxy coats.

I have very limited experience with epoxy other than simple gluing and coating the interior, have never used fabric. I’ve watched many YouTubes and other posts, but I’m not finding other examples with a rounded stern. I’ll probably make up a foam shape to run a practice on, but I’d appreciate thoughts from others who have coated a similar shaped hull.

View attachment 469539

View attachment 469540

Thanks
there might be something to be said for using a product named “ gluvit” this is a very good epoxy that stays somewhat flexible. Then you could skip the glass and all the itching
 
I covered something similar and it worked out very well. Don't be afraid of overlapping fiberglass or adding pieces to fill towards the stern, it sands down to an invisible seam. I made a video on the fiberglass, resin and paint application, you can check it out here if you like. Good luck with the project!!

Jarod.
I'm with Jarod. One thing to remember with both epoxy and polyester is "starvation'. These resins will soak into the wood pulling resin from the glass and causing air bubbles. If you seal coat, with your choice of resin, first and then lightly sand any roughness, you will be left with an even surface ready for laminating. This surface will let you lay out the piece for the side, say, and shift it around using the bias to conform to the shape without causing any pulls.
 
Pete,
This thread is truly interesting. I have done several fiberglass hulls in the distant past, but they were done as was done in the shipyard. A hull was made as a plug, then it was used to make a mold with gel coat first then glass and resin so more than one hull could be made. The mold was then used to make the hulls with gel coat followed by glass and resin. I did find that non-woven cloth worked better than woven material as the weave tended to show in a not so attractive way and creasing was never an issue. As you are just covering the hull with glass to waterproof, I am curious to see the appearance of having a layer of glass without gel coat. Please post photos for us to see as it could be a big help for anyone of us that wants to give it a try.

I'm with RTIbbs, go with resin made to be used with fiberglass. Outdoors is a good idea though.

Allan
Hi Allan, I imagine that the plug/mould technique would be a great idea if I were building more than the one hull, but I like the idea of this one being a wooden boat (it's my first one). The extra layer will just provide some waterproofing and extra protection.

The type of resin I'll be using is made for fibreglassing, ie a lower viscosity without added fillers...looks similar to the polyester resin, except it uses the epoxy chemistry. From reading...it is supposed to be stronger, have better adhesion to wood and itself, lower shrinkage and better for waterproofing (whether the difference is material in my application I don't know). It's not compatible with gel coat (a polyester product), but I'll be filling and sanding to get a smooth surface before using sprayed acrylic paint for the outer finish. I'll post some finished photos in a few weeks time.
 
I covered something similar and it worked out very well. Don't be afraid of overlapping fiberglass or adding pieces to fill towards the stern, it sands down to an invisible seam. I made a video on the fiberglass, resin and paint application, you can check it out here if you like. Good luck with the project!!

Jarod.
Hi Jarod, that's a great video, thanks. Showing the fabric being adjusted over the stern to remove the wrinkles gives me a little more confidence in getting the result I'm after. I also really liked the 'flexible drill bit'...nice simple idea!
 
Thanks Andy. I was wondering about the filler...I think I need to test that as well. Although it adheres well to the wood, it is just a filler rather than a glue/filler mix. I may have to sand it back and expose more of the wood before adding the glass layer.
The epoxy resin will stick fine to the filler. It will stick to anything that epoxy normally sticks to (which is just about everything. ).
 
Don't forget sealing the inside of the planking. I did this on 2 static models and it stabilizes the hull and strengthens it. Emma C. Berry of mine was balsa plank and the seal on the inside helped the build a lot.
 
Don't forget sealing the inside of the planking. I did this on 2 static models and it stabilizes the hull and strengthens it. Emma C. Berry of mine was balsa plank and the seal on the inside helped the build a lot.
Yes, thanks, I did the inside with clear epoxy in batches as I was doing the planking...I wanted to make sure I could get to all areas before they were closed in. I do have an area between two closed bulkheads that have a couple of planks that I couldn't get to after gluing them down, so I'm going to drill a hole in the ply deck and squirt in some thinned epoxy to get those before I plank the deck.
 
If it helps any, while I was an aircraft Composites Technitian, we would use clear plastic Vellum, fold it in half like a closed book, put the dry fabric and epoxy mix inside lay the top half of the vellum over the matrix and using a spreader, saturate and thin out till it is only as thick as the cloth itself. You can even draw a shape on the upper sheet if you needed to. Then cut out with scissors after spread thin. Since the FAA requires a 55% mix ratio, it worked quite well.
 
The end result…
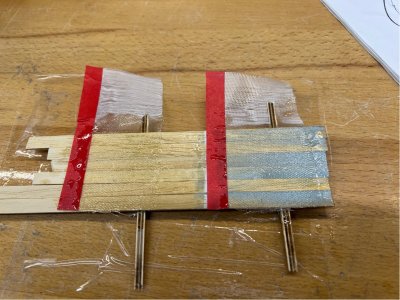
I’d been asked to post some ‘after’ shots of the fibreglassing. But first, I said that I would test a sample of the ‘filled’ vs ‘bare’ timber to see if it made any difference. Here is the test panel, with the epoxied glass already added.

1727337175983.jpeg

I let it harden for a few days before seeing which side of the panel had the better adhesion, and particularly whether the right side would fail between the filler and timber layer. As it turns out they both perform similarly when trying to strip the glass layer or when trying to separate the planks. The epoxy (with a diluent additive) appears to have soaked through the filler to the timber. So, I’ll proceeded with the hull without first sanding the filler from the surface.

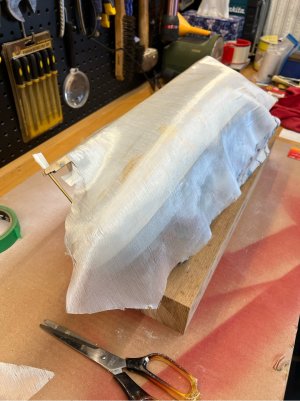
The 30gsm (0.88 oz/yd) cloth cuts and drapes over the hull nicely…

1727337247701.jpeg

I’m using epoxy rather than polyester resin…I think it probably depends what you are used to using, but I like the fact that it doesn’t smell and it is supposed to stick better, although it has to be protected from UV light in the longer term (this one is going to be painted anyway). I’m using Bote-Cote products, made here in Australia, and they also have a resin diluent/timber preservative product that is mixed into the resin for the first coat. It gives better penetration, as well as protects the timber from rot.

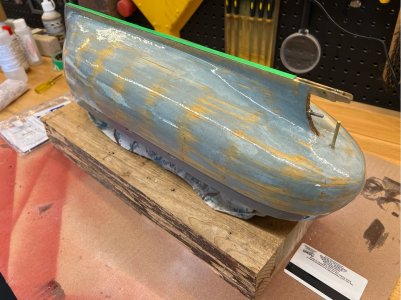
Here it is with the first coat on the first side. The cloth goes around that shapely stern without any drama, no creases, no need for any slits. I set it up for a small overlap in each direction when the other side is done. The epoxy was applied using an old credit card.

1727337309396.jpeg

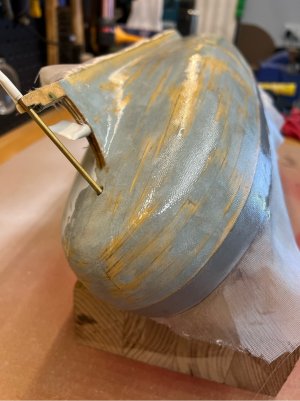
Once dry, the overhang is easily removed with sharp, fine sandpaper on a suitable edge (the bottom of the keel and the bulwark tops). Here it is with the second side complete and a light dry sand (at 240 grit) in preparation for another coat of resin only.

1727337400127.jpeg

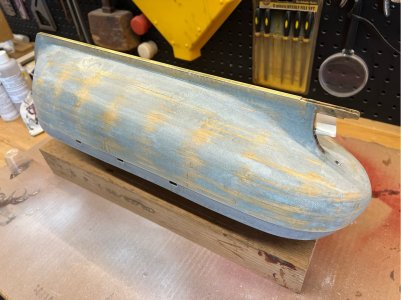
And here it is with the second coat on. It’s dry in this photo, it is really surprising how quickly it fills the fabric weave and starts to give a gloss surface. The second coat was applied with one of those foam wedge 'brushes'.

1727337454162.jpeg

Since that photo, it has had a wet & dry at 300 grit. There are still a few minor imperfections, some of which will disappear under the final epoxy coat, before I move onto a light fill and paint. Unfortunately, the weather has turned cold and wet here, so that will have to wait until next week (if you want to follow along, the build log is linked in my signature).

Overall, the fibreglassing task has gone very smoothly and I wouldn’t hesitate to use it again in future builds. Thanks to everyone for your advice, suggestions, and confidence to give it a go.
 
Apart from seeing quite a nice build, this is also a very informative thread regarding epoxy and such. Thanks!
 
I'm with Jarod. One thing to remember with both epoxy and polyester is "starvation'. These resins will soak into the wood pulling resin from the glass and causing air bubbles.
It's correct that resin will soak into the wood, which is, of course, a good thing. Enough resin should be applied to soak the fiberglas cloth. The balancing act becomes adding enough resin but not too much so as to cause runs. But the usual cause of bubbles is rising temperature. If resin is applied when the temperature is rising significantly gas will move out of the wood causing bubbles. This is more often a concern with full size boats being built outside. Fair winds!
 
That looks good. :) I've used that method quite a few times in RC planes (which have many of the same curves as a ships hull) and always had great success.
I wouldn't use epoxy to make it smooth, just paint it with sandable primer which will be lighter and work great. :)
 
Back
Top