Airfix 1/600 HMS Hood

Joined
May 31, 2021
Messages
231
Points
113

Location
Kommetjie, Western Cape, South Africa
After the diappointment with the Airfix 1/600 Graf Spee due to a paint work going very bad, I have decided to start some work with the Airfix Vintage Classic, the HMS Hood. I have started as not per instructions with the hull and had some significant challenges to put is together without significant gaps between the two halves. Mission was accomplished and with some styrene strips and putty I will be able to get a decent fit.

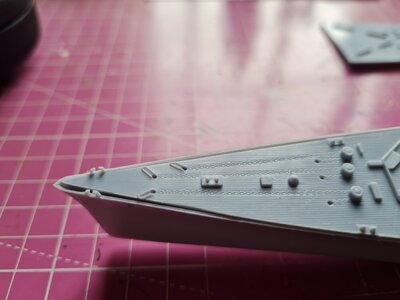
Then came the front deck ...Redface. Due to, I believe old moulds the deck was slightly warped, and the locations inside of the hull are now soft and poorly defined. So, if one put the deck onto the hulle this is the best fit ... (see picture). truly the best fit. With some glue and tweakes I may be able to get it a bit better but not much. Spent most of Saturday sanding and dry fitting, trying to get a decent fit. Any suggestions and help? Would welcome some pointers by some of our more experienced members. From the beginning I knew that there may be work on this kit, from reviews etc, but perhaps there is good advice out there (and emotional support ...:eek:).

Are there some good diagrams out there to help me to add some detail?

So this coming week, I will try to get a decent fit between the forward deck and the hull.

A Airfix HMS Hood.jpg

C Airfix HMS Hood.jpg

B HMS Airfix Hood.jpg
 
Back again.

After many days, work on getting to fit the deck to the hull as good as I can continues.

Gaps were filled with styrene strips, the styrene rods and putty. Will not get it to be perfect, but then I suppose as near as perfect as can be will also be acceptable.

I have also drilled out the port holes on the side of the hulle and has started with some work on the superstructure. This is going aon while the putty needs to dry as well as the primer that is put on from time to time to identifiy some spots that need more work.

I did not realise that ships take such a long time to build. But I am getting use to it, and do enjoy it. Been a week ago sice I have strated on this kit. And at least three days were used just to think about plans to get a decent fit between the decks and the hull.

Hood C.jpg

Hood D.jpg
 
Good Luck.
I am building an Airfix 1/400 Titanic and I am having the same problems fitting the decks to the hull.
While trying to figure it out I discovered that 4 pieces of the hull sub-assemblies were missing.
Apparently the four pieces were the only ones on a plastic sprue (?) and they forgot to include it in the kit.
Sent an e-mail to Airfix yesterday and they informed me they will try to get it out in the next 28 days.
this is my fourth build and 2 have been missing parts. is this normal?
 
Hi Steven,

I have built numerous Airfix kits over the years and only encountered the problem of missing parts when building the 1/72 Heinkel III. Half of the canopy was missing. Since then (about two years ago), with their ship models, the 1/600 scale ones, never had the problem of missing parts. The not-fitting of the parts though is another story, always had that. Especially with the older adn so called "classic" kits. But then, when you buy an Airfix kit thats is probably what you sign up for.;) Are you doing a log of your Titanic build?
 
Sunday 13/11/2022

Today I have spent a bit more time on the hull-deck fitting, and this (see picture) is probably the best I will be able to get it. Will do a bit more work on it, but we will see. I may be able to disguise some of the remaining issues/flaws with paint ...?

In my mind I am thinking about how to fit some parts of the superstructure (parts #17, #6 and #5). After some dry fitting, gap problems and poor fit is looming again, and I thought that after completing the hull and the deck fitting it will be a breeze. Redface .

So ... I have started on the 5.5. inch guns (Do I have the facts correct?). And this is what I got from the box. I will keep them, as this is mostly a OTB project. The have signifcant ejection marks and dents (holes rather ??) on the top.

But we carry on regardless.

Hood F.jpg

Hood E.jpg
 
Back again.

Had some bench time tonight. I have cleaned up 10 5.5 guns and believe me, there was quite a lot of cleaning up to do. Some flash on the barrels had to be removed, and sink holes on the top, and both sides of the guns had to be filled (styrene rod and putty) and sanded 10 of the 5.5's were fitted this evening.

I think, regarding the unsightly gaps where the deck was joined to the hull side near the bow, I got the gaps reasonably under control. As I have said, not striving for perfection here.

I have also fitted two parts at the back (aft?) of the lower part of the superstructure, fitting the parts #5 and #6. Again the fit was not good and there were some gaps between the parts and where they meet the deck. Again some time went into sanding and filling.

Well she is coming along slowly but surely. And I am, despite some frustrations and lack of patience, still enjoying this project.

Hood H.jpg

Hood G.jpg

Hood I.jpg
 
19 November 2022

Got some work done (in between house hunting) today.

Fitted 10 of the 5.5 inch guns and other bits and bobs. The latter perhaps not entirely correct, but it may add a bit of detail to places that are scarcely populated by detail (see pictures).

The hull still needs some work, and then some painting needs to be done. Hopefully next Saturday. Then the superstructure will be added and other detail such as the main guns etc.

Hood H.jpg

Hood L (2).jpg

Hood J (3).jpg
 
26/11/2022

I hope that I will have some bench time during today. Few chores to do and need to replace the front windscreen on my car ;) .

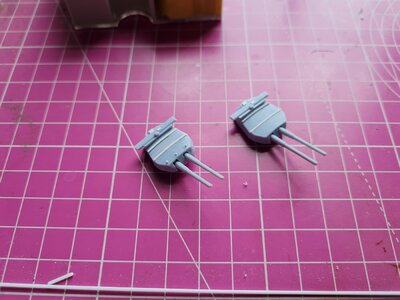
I have thought of fitting the lower part of the super structure today (part #17) and to do some more work on the hull and the deck, but saw that the gun turrets need quite a bit of work (as all the other bits in this kit). So today I will spent most of the available time on cleaning the four gun turrets (parts #20,#24,#28 and #32) as well as the barrels (numbers 18, 19,22,23,26,27,30 and 31) and the other pieces numbers 21,25,29,and 33).

I am also planning to add some limited detail to the gun turrets to make them look a little more "busy". Also planning on drilling out the barrels.

As per picture; one turret and barrels cleaned up (that was on 21/11/2022).

Hood N.jpg
 
09/12/2022

I am still working on the HMS Hood, albeit slowly. About a week ago I have added some bits and pieces to the four turrets to make them look a little bit more busy. But I need to add, this was done with some artistic liscence. I do know that there is a wealth of information out there on the Hood, but as a newbie I do get lost among all the detail and photographs with even more info. And I think one can do only so much in 1/600 scale ... Will post some pictures over the weekend. And work is still being done on the hull as well, mainly filling and sanding and cleaning things up. If I am lucky she will be reasy ro receive her last coat of Tamiya light grey primer.
 
11/12/2022

1. Finished two of the four turrets today.

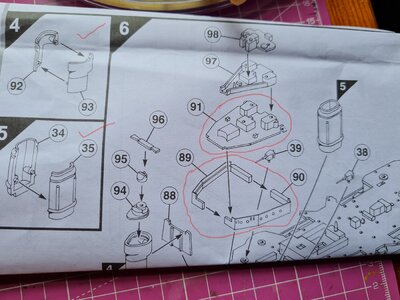
2. I have also started some cleaning up of parts #89 and #90 as well as #91. The fit of parts #89 and # 90 onto part #17, the top part of the forward super structure does not seem too bad. Will see how #91 fits onto #89 and #90 when they are glued together. I have also started to clean up and glueing together parts #92, #93, #34 and #35 - and a lot of flash to be removed. Some sanding and filing will also be needed to clean up quite prominent seams.

But we soldier on. As I am currently in a hotel room (moving into the new house will only happen in February/March 2023) I need to do all spray work outside. And in a 35+km/h South Easter that is quite a challenge ...

Hood P.jpg

Hood Q (2).jpg
 
12/12/2022 - 01/01/2023

To all of my shipmates, for 2023 I wish you many completed models, and may you never loose a part to the ever present carpet monster and may your paint dry smoothly.

The period since christmas was quiet, due to the holidays, festive days and all other distractions. But in the said period and today, new year's day I had some bench time. Working mostly on the forward part of the super structure, added a bit of detail to the forward funnel, added bits an pieces (as per picture) and gave it a coat of Tamiya light grey primer. The latter helps to identify some areas that needs a bit mor sanding and filling. The build is going slow, but now I find it quite ok. I have learned that ship building takes a LOT of patience.

I have also included a picture of some of the challenges that I need to address, mainly because of the old moulds - lots and lots of flash. And the cleaning up takes a lot of time. Oh the joy of the old Airfix kits.

Hood T.jpg

Hood U.jpg

Hood S.jpg

Hood V.jpg
 
08/12/2023

It is a new year, and I am still working away at the HMS Hood. Perhaps I am too busy with reading naval books as well :eek:. I had some good bench time this week-end. Work continued withadding the aft (?) funnel, and a more work on the super structure such as adding some more parts - the unpainted ones. It took me up to 15 - 20 minutes to clean up the one mast for example. And today another few minutes more cleaning up another mast - the structure aft of the aft funnel. But I am enjoying the project immensely. Will se if I can add another few parts week and then I will prepaare her for some painting i.e. the hull, the waterline and the decks. Will see.

Hood W.jpg
 
Back
Top