
Thanks!

You are using an out of date browser. It may not display this or other websites correctly.
You should upgrade or use an alternative browser.
You should upgrade or use an alternative browser.
Armed Virginia Sloop - Lauck Street Shipyards, POF 1:32 Scale, Admiralty Style by DocBlake [COMPLETED BUILD]
I'm working on the gun carriages, but as a diversion I did complete the rudder. I really hate cutting the rabbets for the straps!. I'll fit the rudder to the ship today, and continue to work on finishing up the carriages.
I'm working on the 3-pounder carriage guns. The kit provides parts to build the carriages made of cherry. They are perfectly fine, but I wanted some contrast between the carriage wood and the black hardware. I chose boxwood carriages. In my kit, the cannons are brass.
I built a little jig to support the brackets while gluing up the axles. I added the transom and bolster, and rounded the axles to fit the trucks. lastly, I added the hardware and the quoin.
The trunions for the cannons are too short to span across the full distance between the brackets, so I'll have to get some 5/64" brass rod and replace them. The cap square isn't fitted yet.


Very good work - on a beautiful kit - looking really good
Thanks, guys!
I mounted the rudder to the hull. The system used to create the gudgeons and pintles is different from what I've been used two. In my last two rudders, the pintles were short lengths of brass rod, soldered to the brass strap that attached them to the rudder. The gudgeons were likewise brass tubing soldered to the straps attaching them to the hull. This method is different. After cutting the recesses into the rudder to allow the pintles to slip over the gudgeons and into place, the straps are glued in place. The pintles are simply pins pushed into the wood of the rudder. No soldering! The gudgeons are made of little wood semi-circles with a hole drilled in to receive the pintles. They are then painted black. The straps for the gudgeons are just strips of bras glued and nailed to the hull on each side. Again, no soldering!
The rudder has no false keel and is mounted so the bottom edge is about even with the bottom of the keel itself.
I missed your question, Jeff! Here’s a link:Wow! Doc. This model is awesome. I wish I could build to such detail. I love that saw your are using to cut off the aft roof frames. I will have to look for one.
Would one like this work? https://www.woodcraft.com/products/hishika-dozuki-120mm-small-work-saw
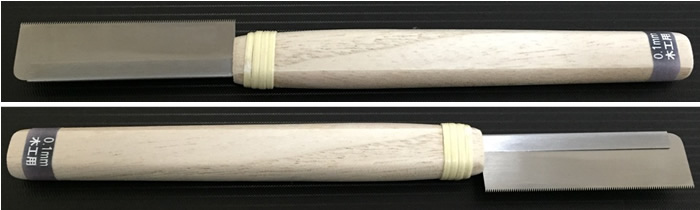
A Super Fine-Cut Japanese Hobby Saw – Hishika Industries
Several months ago, I made a purchase from Zootoyz, which is my usual source for Woody Joe kits. When I received the package, I’d discovered that the owner, Mr. Kazunori Morikawa, sent me som…
 shipmodeler.wordpress.com

Thats a really beautiful model Dave. ")
Thanks, Brian!
I spent some time yesterday carving the timberheads. They are made of boxwood for a nice contrast with the black rail. The plans call for 12 : 6 per side. Also, the plans say they should be 3/8" tall. I thought 12 looked too busy, so I decided on 8 total instead. I also went back to Dr. Feldman's book on constructing the original AVS and found that his timberheads were 1/4" tall. I made mine 9/32" tall; sort of a compromise!

Sorry, Shota. Thew build was 5 years ago. these are all I have!
Had to do a little work on the cannons and swivel guns. The cannons themselves needed the bore enlarged. A 3 pounder had a bore of about 3" - 3/32" at this scale. The cannons were at 1/16" so I bored them out with a 3/32" bit. I got the swivel gun barrels from Cornwall Model boats. The problem was that the bore was way too big for a 1/2 pound swivel gun. The specs call for slightly over 1-1/2 ", or about a #54 or #55 drill size. I filled the bore with solder and re-drilled the bore with a #55 drill. I've got some Jax Pewter Blackener which should blacken both the brass and the solder.
I soldered the handles to the swivel guns. The "helping hands" worked great to hold the parts together. I used paste solder and a micro torch. They need to be cleaned up and blackened. I'm working on the mounting brackets now.


I soldered the handles to the swivel guns. The "helping hands" worked great to hold the parts together. I used paste solder and a micro torch. They need to be cleaned up and blackened. I'm working on the mounting brackets now.
I've been working on fiddly things. I finished the gun carriages, but I had to order 5/64" brass rod to make new trunnions. The supplied ones were too short.
Next up was the cap squares...an annoying bit of work I have been putting off!. I decided I wanted them made of blackened brass, so here is how I made them (a tip of the hat to John Earl at "modelboatyard.com" for his idea).
I took a length of 5/64" brass rod and filed it flat, creating a half-round. I then soldered this to a piece of brass bar stock 3/32" thick. This was my "mold". I then inserted the brass bar and a strip of blackened brass in the jaws of a machinist's vice and clamped down. Bend the strip over the brass half-round with a needle nosed pliers. Release from the vice and trim to size. The squares need to have holes drilled for the bolts and have the blackening touched up before mounting on the carriages.
The timberheads were pinned and epoxied in place.
I'm getting serious about finishing the model now. Although I'm retired, I have a consulting business that's been taking a lot of my time. I'm turning my attention to completing the great cabin. The window seat at the stern is built "admiralty style" also - completely frames, but only some of the planking and raised panel front paneling installed. I've completed the tiller and seized 4 of the 10 blocks required to their eyebolts. Next I install the rudder-to-wheel rigging and start laying the roof beams. I installed the ship's wheel and the framing for the window seat. Then I rigged the tiller to the wheel. The walls of the great cabin looked a little drab so I added some art work!


I'm getting serious about finishing the model now. Although I'm retired, I have a consulting business that's been taking a lot of my time. I'm turning my attention to completing the great cabin. The window seat at the stern is built "admiralty style" also - completely frames, but only some of the planking and raised panel front paneling installed. I've completed the tiller and seized 4 of the 10 blocks required to their eyebolts. Next I install the rudder-to-wheel rigging and start laying the roof beams. I installed the ship's wheel and the framing for the window seat. Then I rigged the tiller to the wheel. The walls of the great cabin looked a little drab so I added some art work!
I did fit the cap rails at the stern of the ship. The kit doesn't include a taffrail so I made my own and installed it. It gives a finished look to the transom. The taffrail and cap rails are stained with Fiebing's leather dye. No poly yet. There are five roof beams for the great cabin to install, as well as 5 planks of cabin roofing in the midline, I'm planning to use swiss pear rather than holly decking stock, because technically, the roof is a roof, not a poop deck. Once those things are installed, there are just the stern lights to fabricate and the aft of the model is complete. I'd like to make my own stern lights out of holly. The kit has some nice 3-D printed windows provided, but I want to do it myself. I'm just not sure how, right now!


I glued the great cabin roof beams in place, then glued and treenailed the roof planking (I used swiss pear). There is one coat of poly on the beams, planking, taffrail and cap rails. Getting closer to the end!


I remade the trunnions (they were too short) and blacken them with my new favorite blackening agent for brass: Jax Pewter Black. The stuff is amazing! Just paint it on with a brush and when black enough, wipe with a rag or paper towel. No "crusting" and I didn't do any acid washing or acetone rinsing like with Blacken-It. It also blackens solder. You should try it!
Each gun carriage was given a pin sticking down from the front axle to fix them in place and holes were drilled in the deck. I then fastened the cap squares in place.


Each gun carriage was given a pin sticking down from the front axle to fix them in place and holes were drilled in the deck. I then fastened the cap squares in place.
Hello Dave, Does this Jax solution works on alloys other than Pewter? It is really cool that you can blacken it on the spots, as the often time you need just to fix the spot on the final assembly.
Hello Dave, Does this Jax solution works on alloys other than Pewter? It is really cool that you can blacken it on the spots, as the often time you need just to fix the spot on the final assembly.
It does, Jim! Brass and solder, and certainly steel (not stainless steel). It helps if you can wash the parts, degrease with acetone and etch with muriatic acid (HCl acid) before using the product.