• LUCZORAMA SHIPWRECK SCAVENGER HUNT GIVEAWAY. 4 Weeks of Fun • 1 Legendary Prize ((OcCre’s Fram Ship)) • Global Crew Welcome!
    **VIEW THREAD HERE**

Aslan Balaur of Washington

Building that cheap Halcon kit is more difficult than better kits because it totally lacks instructions. If you are trying to learn the basic skills of hull planking and rigging, the kit will not teach your how, but reference books and tutorials from other sources will, and the kit will merely be the model you practice on. There are a lot of kits out there aimed at beginners, with step-by-step instructions to help you learn as you go. The Halcon has cheap materials, no plans for rigging, and assumed you know how to plank a hull. You get what you pay for. In the hands of an experienced modeler, the Halcon can be assembled and modified with added parts to make a simple and attractive model, but it will still look like a toy. Look in the beginners section of this forum and see which kits are suited for your current skill level, then go from there.

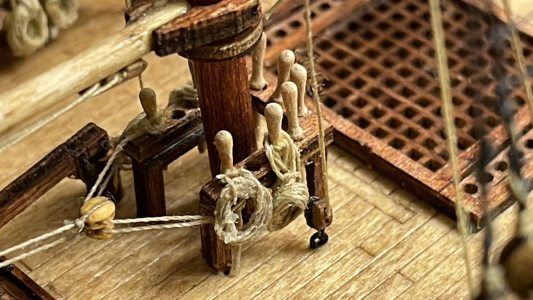
Example of modified and properly rigged Halcon, with $60 worth of parts added to it.
View attachment 489923
I am saving that picture for reference. Where did you find small enough belaying pins, dead eyes and blocks? I haven't found any that come across as less than a foot or more across, in scale.
 
I am saving that picture for reference. Where did you find small enough belaying pins, dead eyes and blocks? I haven't found any that come across as less than a foot or more across, in scale.
I have a small parts box full of model ship parts like blocks, cleats, cannon barrels, eyelets, and other things for bashing models. The tiny belaying pins were 9mm Falkonet pin from Russia, no longer available. Using them on the Halcon was like putting a diamond ring on a pig. I recommend using the tiniest brass belaying pins from Dry-Dock Models and Parts. They are the best I have found, and are very strong, so they won't break like the wooden ones.

1735076988254.png
 
I forgot to mention, you can make the brass belaying pins brown using browning solution, an acid solution which is similar to blackening solution, except you get brown, of course. Or, you can just make then tarnish using ammonia fumes. WASH the brass parts in denatured alcohol, and only hendl them afterwards with rubber gloves to prevent finger print oils getting on them. Get small, sealable container, pour a little houseolh ammonia in, and place piece of styrofoam or wood inside to float like a raft, place the brass parts on the raft, NOT in the ammonia, seal the container, then place it in a warm area like in a warm room in sunlight. I just leav the container on top of the water heater in the house. Five hours later, you have brown parts.
 
I forgot to mention, you can make the brass belaying pins brown using browning solution, an acid solution which is similar to blackening solution, except you get brown, of course. Or, you can just make then tarnish using ammonia fumes. WASH the brass parts in denatured alcohol, and only hendl them afterwards with rubber gloves to prevent finger print oils getting on them. Get small, sealable container, pour a little houseolh ammonia in, and place piece of styrofoam or wood inside to float like a raft, place the brass parts on the raft, NOT in the ammonia, seal the container, then place it in a warm area like in a warm room in sunlight. I just leav the container on top of the water heater in the house. Five hours later, you have brown parts.
Wow thanks for the tip on coloring the brass. Now I just need to find pins at between 2, and 2½mm long.
 
I am going to try using wire pieces on mine. I'll try paper clips and staples. I think the piano wire would be too hard. But maybe you have the right idea. I was thinking of hanging them upside down and putting a drop of glue on them for the shape of the handle part. :)
 
Now I just need to find pins at between 2, and 2½mm long.
You mentioned a scale of 1:100. Pins 0.5mm diameter and 4.5mm long would be about right. For 2mm - 2.5mm pins the vessel would have to be about 1:200 scale. If you go with brass wire you can shape them with a small drill press, hand drill, or hand hobby drill like Dremel. I would also try the method Jeff mentions, it sounds like a nice alternative.
Allan

1735225717980.jpeg
 
Wow. You won't pins pins THAT small. I used 9mm wooden pins cut down to 6mm. Perhaps you can use small segments of piano wire? That would be small and strong enough. Good luck tying lines to them!

View attachment 491734
Well, not trying to do math late at night would also do wonders, too, LOL I was thinking 20cm was a lot bigger than it is. For Americans like me, that's ~8 inches. So depending on the pin, maybe 4mm is more appropriate? Around ~16 inches?
 
I am going to try using wire pieces on mine. I'll try paper clips and staples. I think the piano wire would be too hard. But maybe you have the right idea. I was thinking of hanging them upside down and putting a drop of glue on them for the shape of the handle part. :)
I like your idea for forming them, though if I had to grind the shape out of wire, I'd get some brass wire at the store and use that, and grind the shape against a sanding block using my Dremel to spin the pins. Grip the handle end and grind down the pin diameter, then the pin end to shape the handle.
 
You mentioned a scale of 1:100. Pins 0.5mm diameter and 4.5mm long would be about right. For 2mm - 2.5mm pins the vessel would have to be about 1:200 scale. If you go with brass wire you can shape them with a small drill press, hand drill, or hand hobby drill like Dremel. I would also try the method Jeff mentions, it sounds like a nice alternative.
Allan

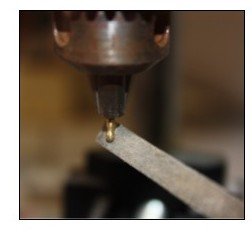
View attachment 491758
Looks like you are using a drill press and a file to do what I described to Jeff. And the file looks like a better idea, at least for the roughing out, than a sanding block.
Yes, I blew the simple math of figuring out the size the pin needed to be to fit correctly in scale.:oops: Live and learn. And, Christmas Rum MIGHT have been involved!
 
Well, not trying to do math late at night would also do wonders, too, LOL I was thinking 20cm was a lot bigger than it is. For Americans like me, that's ~8 inches. So depending on the pin, maybe 4mm is more appropriate? Around ~16 inches?
4mm would only leave you 1.2mm of free pin on top and bottom because of the thickness of the rack, but if you’re very careful, and have precise tweezers, you could attach the lines with a simple overhead knot, and cover the top of the pin with a hank of rope later. The idea of thickening the top portion of the pen with a drop of glue and painting. It works really well at this scale if the upper portions ofpins are consistent in size on the rack.
 
Back
Top