- Joined
- Sep 23, 2021
- Messages
- 137
- Points
- 113

PART 2 Progress to End-of-October
I had to put the model on hold for a while, but I have now made some progress since my last posting. I will split the build log into his part and hopefully post some images of the finished model as the final part.
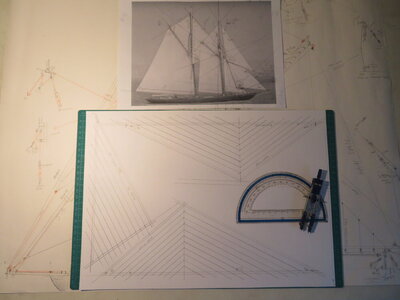
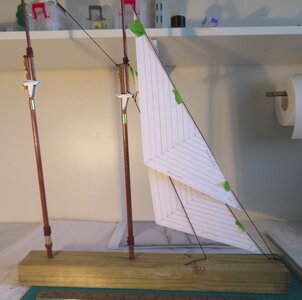
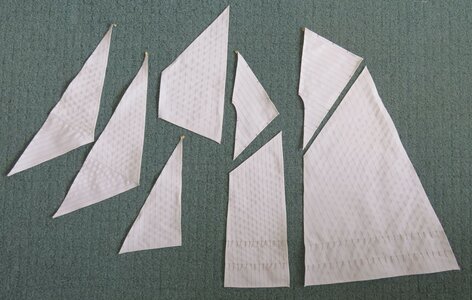
In order to stop any fraying, I applied some dilute clear PVA along the cut lines on the cloth. I allowed 3mm for the hems (which was about the limit of my sewing machine's capability - and my eyesight). Looking at various pictures and completed models, I decided to emulate the sail construction as used on the Bluenose, with narrow panels and chevron patterns on the jib and balloon jib. I think the model will look very smart done that way ( it is not really correct because the modern sails fitted to BN II use much wider panel sections in the construction of the sails). I used a slightly darker thread in order to highlight the stitching against the sail cloth.
A lot of concentration and many meters of sewing thread later - the sails were done. The process went very well and I was able to make up the whole set over a few evenings. Considering this was my first attempt at sail making from scratch, I was very pleased with the end result. Where required for rigging, I attached 2mm rings (which I made in bulk from 0.5mm stainless wire) &/or pulleys to the sail corners and used the same stainless rings for the hanks (I prefer the stainless over brass because it does not tarnish). For the clew-lines on the two top sails ( I am not 100% sure of the correct way this is done), I think there is a single line that runs around the sail and is used to pull the sail into the top masts when not in use). In the end I opted to add some 3mm pulleys on the sail corners and some hanks which will hold the clew-line to the edges of the sail.
3. Rigging Underway.
I have looked at lots of BN-II images so that I could try to reproduce the rigging as best as I can on the model. Bob Elliot from SOS put me onto LB Jenson's book on the Bluenose & I managed to find a copy on ebay in the US (which arrived a couple of days ago), so I am now scouring through that and making notes.
The A-L supplied rigging thread was (surprise) not very good quality, so I purchased some decent stuff together with extra rigging blocks and belays because the kit had only enough to achieve a very basic rig. The upper set of deadeyes for the shrouds will also be replaced for heart shaped ones (as they should be) rather than the round ones supplied in the kit (I also had another delay because the package was lost in the post!).
I am doing the standing rigging in black and the running rigging in tan/beige. Thread sizes are based on the rope sizes I can see in pictures so the choice of size is very subjective on my part - 0.75mm for the shrouds which are the heaviest, down to 0.25mm for foot ropes and ratlines. Running rigging - 0.45mm tan thread.
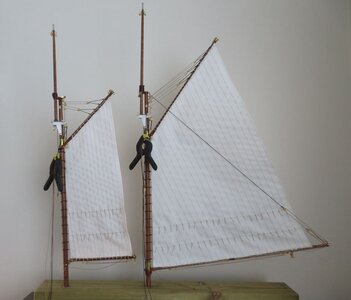
The fore/main booms, gaffs and sails have been rigged off the ship. I lashed the sails using clove hitch which looks very smart. The foremast boom/gaff and fore sail were straight forward to rig. The only issue was that I had to make a gooseneck for the fore-boom attachment from some brass tube and rod because the kit included a yoke, which is not correct.
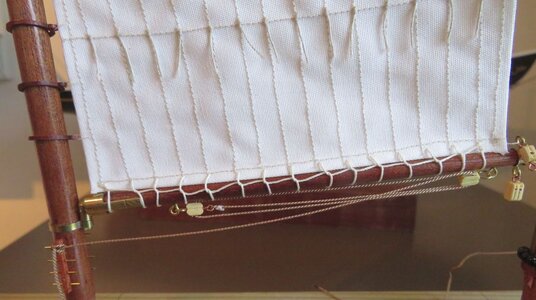
Rigging the main boom/gaff and main sail was however, frustrating work - it’s a very big sail - lots of lashings and lots of mistakes! I lost count of the number of times I had to work backwards because of trapped threads and readjusting the tension so that the sail was pulled to the correct shape. The main boom topping lift was also quite complicated as it runs through the boom twice and is connected to the mast crown via a pendant running on the port side of the sail. They are now ready to be stepped.
4. New stand
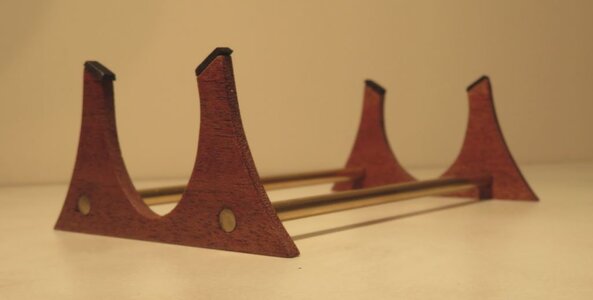
I decided to replace the kit stand with a cradle (which I prefer for my models). I measured up using the scrap frame cut-outs for the templates and then made the up-stands from some scrap mahogany pieces that I had and brass rod. I added some foam pads to the tops of the legs.
Some interesting points for the next stage of rigging:
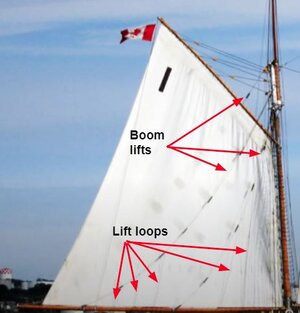
a):- On BN-II there are aft quarter and mid lifts on each side of the boom (image) that run up to pairs of rigging blocks attached to the mast and then down to the port & starboard rails (I need to check which pins they are tied off to). The image also shows that the aft quarter and mid- lifts have loops attached (I think they are called “lazy jacks”?) that run under the boom and connect both sides of the lifts. The loops run through wooden eyes on both sides of the boom, but I didn’t know about these when I made it. However, I think it would be very difficult (for me) to make tiny wooden eyelets at 1:75 that would work and not be over-sized. Instead I opted to add pairs of 0.5mm copper eyelets on each side of the boom which will act as the guides for the loops in order to keep them in the correct position. I will rig the lifts and jack-loops once I have stepped the masts. My attempts at making baggywrinkles failed, so I will not be adding them!
b):- On BN-II, the modern rigging blocks have eyelets at one or both ends and are not seized. I have therefore added small or medium eyelets to the blocks as I go by using a pin drill and gluing the eyelets into the block and then clearing the thread hole. It takes about the same time as tieing them.
c):- As far as I can find out, on BN-II there are no back-stays on the fore or main masts - which is very surprising for such big masts! So, I will not be including any in the build.
Next-up:
The end is in sight. I hope to step the masts and rig the shrouds and stays over the next couple of weeks. I will then finish rigging the remaining sails, add the finishing touches and post some images of the completed model as the final part of this build log.
I had to put the model on hold for a while, but I have now made some progress since my last posting. I will split the build log into his part and hopefully post some images of the finished model as the final part.
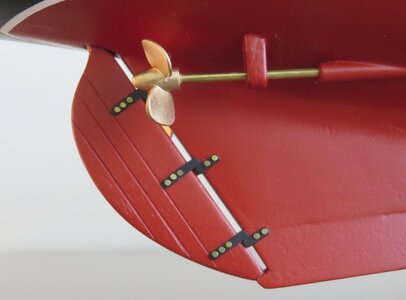
- Rudder irons.

- Making new Sails to replace the awful Artesania-Latina ones.


In order to stop any fraying, I applied some dilute clear PVA along the cut lines on the cloth. I allowed 3mm for the hems (which was about the limit of my sewing machine's capability - and my eyesight). Looking at various pictures and completed models, I decided to emulate the sail construction as used on the Bluenose, with narrow panels and chevron patterns on the jib and balloon jib. I think the model will look very smart done that way ( it is not really correct because the modern sails fitted to BN II use much wider panel sections in the construction of the sails). I used a slightly darker thread in order to highlight the stitching against the sail cloth.
A lot of concentration and many meters of sewing thread later - the sails were done. The process went very well and I was able to make up the whole set over a few evenings. Considering this was my first attempt at sail making from scratch, I was very pleased with the end result. Where required for rigging, I attached 2mm rings (which I made in bulk from 0.5mm stainless wire) &/or pulleys to the sail corners and used the same stainless rings for the hanks (I prefer the stainless over brass because it does not tarnish). For the clew-lines on the two top sails ( I am not 100% sure of the correct way this is done), I think there is a single line that runs around the sail and is used to pull the sail into the top masts when not in use). In the end I opted to add some 3mm pulleys on the sail corners and some hanks which will hold the clew-line to the edges of the sail.

3. Rigging Underway.
I have looked at lots of BN-II images so that I could try to reproduce the rigging as best as I can on the model. Bob Elliot from SOS put me onto LB Jenson's book on the Bluenose & I managed to find a copy on ebay in the US (which arrived a couple of days ago), so I am now scouring through that and making notes.
The A-L supplied rigging thread was (surprise) not very good quality, so I purchased some decent stuff together with extra rigging blocks and belays because the kit had only enough to achieve a very basic rig. The upper set of deadeyes for the shrouds will also be replaced for heart shaped ones (as they should be) rather than the round ones supplied in the kit (I also had another delay because the package was lost in the post!).
I am doing the standing rigging in black and the running rigging in tan/beige. Thread sizes are based on the rope sizes I can see in pictures so the choice of size is very subjective on my part - 0.75mm for the shrouds which are the heaviest, down to 0.25mm for foot ropes and ratlines. Running rigging - 0.45mm tan thread.
The fore/main booms, gaffs and sails have been rigged off the ship. I lashed the sails using clove hitch which looks very smart. The foremast boom/gaff and fore sail were straight forward to rig. The only issue was that I had to make a gooseneck for the fore-boom attachment from some brass tube and rod because the kit included a yoke, which is not correct.

Rigging the main boom/gaff and main sail was however, frustrating work - it’s a very big sail - lots of lashings and lots of mistakes! I lost count of the number of times I had to work backwards because of trapped threads and readjusting the tension so that the sail was pulled to the correct shape. The main boom topping lift was also quite complicated as it runs through the boom twice and is connected to the mast crown via a pendant running on the port side of the sail. They are now ready to be stepped.

4. New stand
I decided to replace the kit stand with a cradle (which I prefer for my models). I measured up using the scrap frame cut-outs for the templates and then made the up-stands from some scrap mahogany pieces that I had and brass rod. I added some foam pads to the tops of the legs.

Some interesting points for the next stage of rigging:
a):- On BN-II there are aft quarter and mid lifts on each side of the boom (image) that run up to pairs of rigging blocks attached to the mast and then down to the port & starboard rails (I need to check which pins they are tied off to). The image also shows that the aft quarter and mid- lifts have loops attached (I think they are called “lazy jacks”?) that run under the boom and connect both sides of the lifts. The loops run through wooden eyes on both sides of the boom, but I didn’t know about these when I made it. However, I think it would be very difficult (for me) to make tiny wooden eyelets at 1:75 that would work and not be over-sized. Instead I opted to add pairs of 0.5mm copper eyelets on each side of the boom which will act as the guides for the loops in order to keep them in the correct position. I will rig the lifts and jack-loops once I have stepped the masts. My attempts at making baggywrinkles failed, so I will not be adding them!

b):- On BN-II, the modern rigging blocks have eyelets at one or both ends and are not seized. I have therefore added small or medium eyelets to the blocks as I go by using a pin drill and gluing the eyelets into the block and then clearing the thread hole. It takes about the same time as tieing them.
c):- As far as I can find out, on BN-II there are no back-stays on the fore or main masts - which is very surprising for such big masts! So, I will not be including any in the build.
Next-up:
The end is in sight. I hope to step the masts and rig the shrouds and stays over the next couple of weeks. I will then finish rigging the remaining sails, add the finishing touches and post some images of the completed model as the final part of this build log.

