- Joined
- Sep 23, 2021
- Messages
- 137
- Points
- 113

The aim for this year's project was a model of the Bluenose II as a tribute on the 100th anniversary year of the launch of the original ship.
Link Bluenose 100 | Bluenose II (novascotia.ca)
Build Start Date: 22 Jan. 2021. Completed 5 Dec. 2021 - (just made it!).
Please look back to my build logs Parts 1 & 2 for the modifications/progress that I made through the build. Unfortunately I had already made up the hull before joining SOS, so my build logs are a bit sparse and I split the logs into two threads rather than run them together (my mistake). Here are some images of the completed model and for those interested, I have included a short summary review of building this kit at the end.
(My 2022 build project has recently arrived, so I will set-up a new log soon starting with a “what’s in-the-box” review and some history ).
).
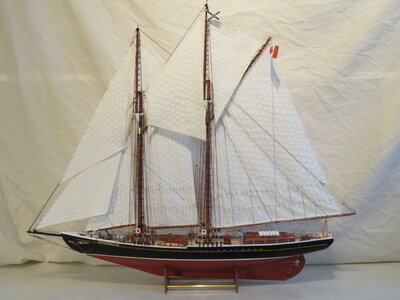
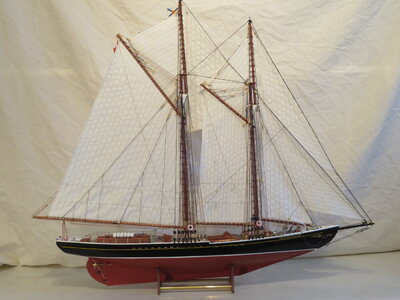
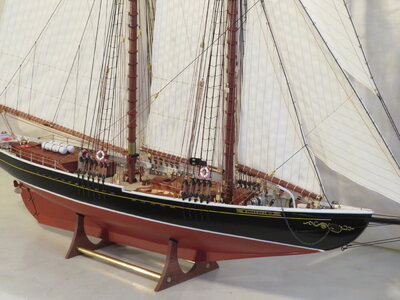
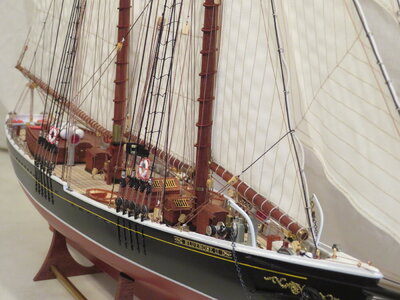
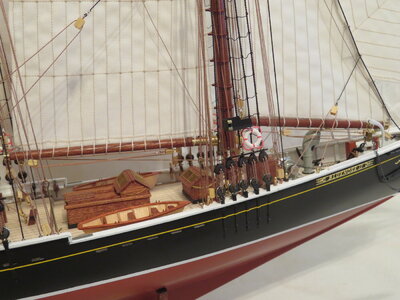
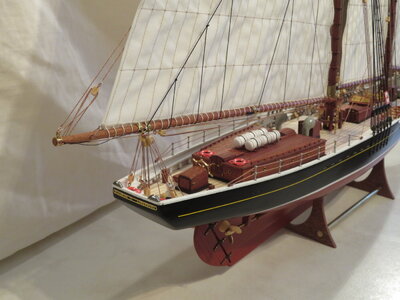
Summing up the build of the Artesania-Latina Bluenose-II:-
For modellers with limited experience, like myself, I was looking for a good model kit of the Bluenose/Bluenose II which I could complete out-of-the-box and enhance it to some extent by adding some more detail. I went with the A-L model of the Bluenose II because it was all that was available in stock in the UK at the time and, they proudly state: “The Bluenose II wooden model, created by Artesania Latina, is without any exaggeration the best on the market for its quality, details and by far the most complete assembly instructions.” It is one of the less expensive kits and having completed it, I think it will make a perfectly acceptable model if completed to the A-L instructions, but I think it is an “exaggeration” for them to say that it is the “best”.
It was my first experience with an Artesania Latina kit and overall, I was a bit disappointed, mainly because I expected much better quality from one of the main manufacturers. After I began the build (following the A-L instructions) and comparing it with BN-II pictures, I did not think that the model is a good representation of the actual ship. I therefore went down the path of using it as a base kit to improve my model bashing skills and hopefully end up with a better model of the BN-II (Note: as a base kit, I think it would be better to go for either the Model Shipways or Billing Boats versions - reviews of those kits indicate better quality fittings, more detail and included 1:1 plan sets. They also do not cost that much extra and in fact, because I decided to replace most of the A-L fittings, rigging thread, sails and bought a full set of good quality mast hoops, I ended up spending much more than either of the alternatives).
On the plus side, reworking the model made it more satisfying to build. Making new sails was a challenge and, for a first attempt at making sails from pictures, I was very pleased with the end result. Rigging the ship is probably one of the hardest parts of any build and I spent a long time looking at images and finding out about each run in order to try to fully rig the model. This was actually a great learning exercise for me and I learnt a lot about sail ship rigging and terminology. I added most of the rigging that should be on the ship (or at least all that I could fathom out) but I am sure that I have got some things wrong and I certainly could-have-done-better in places but, overall, l was quite happy with the end result.
Some points on building the A-L model kit:
*Thanks to Bob Elliot from SOS for putting me onto J.B. Jenson’s book. This was absolutely invaluable because I had no proper rigging plans to work from. Using this book as a reference together with images of the BN-II, I was able to add all (or as much as I could fathom) of the correct rigging to the model. I actually ditched the A-L rigging booklet from the start and just used Jenson’s book as my main reference - if it was in the book, I tried to put it on the model as best that I could. Had I had this book earlier I would have also spotted and corrected some of the errors on the hull. I would really recommend buying this book to anyone who is new to model building and wants a go-to reference for building the Bluenose and learning about the Atlantic Schooners.
Link Bluenose 100 | Bluenose II (novascotia.ca)
Build Start Date: 22 Jan. 2021. Completed 5 Dec. 2021 - (just made it!).
Please look back to my build logs Parts 1 & 2 for the modifications/progress that I made through the build. Unfortunately I had already made up the hull before joining SOS, so my build logs are a bit sparse and I split the logs into two threads rather than run them together (my mistake). Here are some images of the completed model and for those interested, I have included a short summary review of building this kit at the end.
(My 2022 build project has recently arrived, so I will set-up a new log soon starting with a “what’s in-the-box” review and some history


Summing up the build of the Artesania-Latina Bluenose-II:-
For modellers with limited experience, like myself, I was looking for a good model kit of the Bluenose/Bluenose II which I could complete out-of-the-box and enhance it to some extent by adding some more detail. I went with the A-L model of the Bluenose II because it was all that was available in stock in the UK at the time and, they proudly state: “The Bluenose II wooden model, created by Artesania Latina, is without any exaggeration the best on the market for its quality, details and by far the most complete assembly instructions.” It is one of the less expensive kits and having completed it, I think it will make a perfectly acceptable model if completed to the A-L instructions, but I think it is an “exaggeration” for them to say that it is the “best”.
It was my first experience with an Artesania Latina kit and overall, I was a bit disappointed, mainly because I expected much better quality from one of the main manufacturers. After I began the build (following the A-L instructions) and comparing it with BN-II pictures, I did not think that the model is a good representation of the actual ship. I therefore went down the path of using it as a base kit to improve my model bashing skills and hopefully end up with a better model of the BN-II (Note: as a base kit, I think it would be better to go for either the Model Shipways or Billing Boats versions - reviews of those kits indicate better quality fittings, more detail and included 1:1 plan sets. They also do not cost that much extra and in fact, because I decided to replace most of the A-L fittings, rigging thread, sails and bought a full set of good quality mast hoops, I ended up spending much more than either of the alternatives).
On the plus side, reworking the model made it more satisfying to build. Making new sails was a challenge and, for a first attempt at making sails from pictures, I was very pleased with the end result. Rigging the ship is probably one of the hardest parts of any build and I spent a long time looking at images and finding out about each run in order to try to fully rig the model. This was actually a great learning exercise for me and I learnt a lot about sail ship rigging and terminology. I added most of the rigging that should be on the ship (or at least all that I could fathom out) but I am sure that I have got some things wrong and I certainly could-have-done-better in places but, overall, l was quite happy with the end result.
Some points on building the A-L model kit:
- There were no 1:1 plans making it very difficult to add detail or make modifications.
- The “complete” instruction booklets needed to be supplemented by doing plenty of research on-line and looking at images of the BN-II.
- Some of the laser cut parts had poor fits due to being cut to the incorrect size (parts seemed to be cut not allowing for plank thickness?). I had to replace some and rework others in order to get them to fit properly (precision laser cutting to the wrong size isn’t much use!).
- I did not like the use of the thin plywood panels that made up the gunwales. It was a real struggle to stop the ply pieces from warping. I did the best that I could, but I am definitely not a fan of this build method. It would have been much easier to continue the strip planking up to the rail heads. Unfortunately, the laser cut bulkheads do not have stanchions so it is not possible to do that on this model. I will avoid models with this type of construction in the future.
- The fittings and rigging thread were not very good quality and there were certainly not enough rigging blocks, belays and hank rings to fully rig the model if that is your intention.
- Big Issue - there were no proper wooden mast hoops supplied - the kit only had 10 brass rings in total for both lower masts and none for the upper masts to secure the topsails - that was woefully inadequate as the ship needs 28 large rings for the lower, 20 small rings for the upper masts - and they should certainly not be brass. Purchasing a full set of the correct size wood hoops from Vanguard Models in the UK was expensive but worth the outlay - excellent quality and were perfect for the model.
- A Bigger Issue - the pre-sewn sails were very bad - probably the worst part of the kit (poor material, badly sewn and were the wrong size). Considering that the sails are one of the most prominent features of the Atlantic schooners, for me they should be a key focus point and really add the “wow” factor to the model. I thought that the kit sails were in fact totally unusable and would have really spoiled the model if I had fitted them.
- The rigging booklet at best only represents about 30% of the rigging (much of that is incorrect, but adequate if you just want to do a simplified rig). I went down the full-rig path as shown in J.B. Jensen's book* on the Bluenose II, supplemented with plenty of additional research.
- The etched brass parts were OK, but I ended up making new deadeye loops because the ones supplied were slightly undersized and it was extremely difficult to fit them without damaging the straps.
- The Canadian flag was a horrible vinyl plastic one which I ditched for a nice cloth Becc’s flag (also bought a nice Nova Scotia flag as flown on the BN-II).
*Thanks to Bob Elliot from SOS for putting me onto J.B. Jenson’s book. This was absolutely invaluable because I had no proper rigging plans to work from. Using this book as a reference together with images of the BN-II, I was able to add all (or as much as I could fathom) of the correct rigging to the model. I actually ditched the A-L rigging booklet from the start and just used Jenson’s book as my main reference - if it was in the book, I tried to put it on the model as best that I could. Had I had this book earlier I would have also spotted and corrected some of the errors on the hull. I would really recommend buying this book to anyone who is new to model building and wants a go-to reference for building the Bluenose and learning about the Atlantic Schooners.


