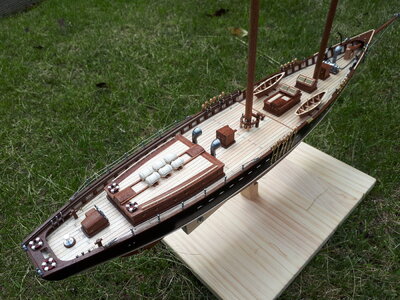
Bluenose II Build (Artesania Latina) 1:75 by Nomad [Completed Build]

There were just a few other small things to take care of on deck, such as securing the anchors to their bases ...

View attachment 272779

Threading the anchor chain through the davit pulleys, bowsprit stays and hauseholes and securing them to the windlass ...

View attachment 272780

And installing the warp line rails and filling the pin racks with belaying pins :)

View attachment 272781
Hey Mark that is a cool shipyard you have there in Aussie. ;)ROTFROTF. Going to repeat myself here- fantastic build.
 
I have now completed the first of Artesania's instruction booklets that covers the hull and deck. I will assume that I am now roughly halfway with this model and at liberty to move on to the second booklet, into the dark and unfamiliar art of masting and rigging :cool:

0560_20211202_bluenose_II_build.jpg
 
Last edited:
I have now completed the first of Artesania's instruction booklets that covers the hull and deck. I will assume that I am now roughly halfway with this model and at liberty to move on to the second booklet, into the dark and unfamiliar territory of masting and rigging :cool:

View attachment 272782
Looks great so far! Going to be a beautiful ship when done! ;)
 
Beautiful work on that bowsprit. And she looks crisp and pointed in the natural light outside. Great job!
Thanks Heinrich, much appreciated. I guess only we can know the flaws of our own models, and hide as much of them as we can from the camera lens ROTF

By the way I have bookmarked your build of the Batavia and I really look forward to reading through it all. But 71 pages!? I might need to save it for a holiday read sometime, or for one of those sleepless long-haul flights :)

- Cheers, Mark
 
There is no need to remove the bowsprit during rigging. You want it solid to take the tension from the stays. ;)
Fair enough, I'll take your word on that Dean. Of course, if I come unstuck later on I will always have you to blame ROTF
- Mark (just kidding, as usual)
 
Good morning Mark. That is a stunning Bluenose. I have always love the lines and shape of her. Well done. Your bowsprit rigging looks great- nice clean knots and seizing.
Thanks Grant, much appreciated Thumbsup
I must admit I found the seizing process quite tricky, especially with wire so thin I could barely see it and I'm sure there must be an easier way. On other builds it looks like they are so perfect it seems they were done by machine Redface
- Cheers, Mark
 
Looks great so far! Going to be a beautiful ship when done! ;)
Thanks Dean, I hope so. I am starting to think that once you get through your first model you can tackle the next one with far more confidence, not so afraid to bend your planks with heat, or drill holes in the hull, or stare in blind wonder at the workings of all the rigging :)
- Cheers, Mark
 
Hey Mark that is a cool shipyard you have there in Aussie. ;)ROTFROTF. Going to repeat myself here- fantastic build.
Grant, you can repeat yourself as much as you like if you are doling out compliments ROTF
Yes, the shipyard. Unfortunately the real shipyard is indoors, in amongst all the tools and supplies and lost parts on the floor. I still need to invest in some decent lighting for all this miniature work, which, combined with my rather ordinary mobile camera is the reason I take the ship outdoors for the build log photos. The natural light does give a more accurate reflection of the ships real look and colour, but also tends to magnify any little flaw you make :p
- Cheers, Mark
 
There were just a few other small things to take care of on deck, such as securing the anchors to their bases ...

View attachment 272779

Threading the anchor chain through the davit pulleys and hawseholes and securing them to the windlass ...

View attachment 272780

And installing the warp line rails and filling the pin racks with belaying pins :)

View attachment 272781
Very nice clean and precise work as you proceed. You will be pleased with the outcome. Rich (PT-2)
 
Very nice clean and precise work as you proceed. You will be pleased with the outcome. Rich (PT-2)
Thanks Rich. I just feel so slow though. There you are in leaps and bounds with the Kyrenia, your Bluenose probably just a distant memory by now, and me here yet to taper my masts and string the first thread of my rigging :)
- Mark
 
Thanks Rich. I just feel so slow though. There you are in leaps and bounds with the Kyrenia, your Bluenose probably just a distant memory by now, and me here yet to taper my masts and string the first thread of my rigging :)
- Mark
For all of us it is always just one more task ahead of the bow. While we live in the moment we cannot disregard what may be in the future which is part of what keeps this hobby engrossing. Rich
 
I have now completed the first of Artesania's instruction booklets that covers the hull and deck. I will assume that I am now roughly halfway with this model and at liberty to move on to the second booklet, into the dark and unfamiliar art of masting and rigging :cool:

View attachment 272782
Congratulations on reaching this major milestone!
Enjoy the next leg of your journey.
 
I have now completed the first of Artesania's instruction booklets that covers the hull and deck. I will assume that I am now roughly halfway with this model and at liberty to move on to the second booklet, into the dark and unfamiliar art of masting and rigging :cool:

View attachment 272782
Hi Mark. Your BN looks great! And in the daylight, the pictures shows all the natural colors and painting well.
I am shure you will find your way through the rigging proces and building up the masts.
Regards, Peter
 
Hi, I am also doing this model and I am in the home stretch. I have modified my model because I struggled with the A-L instructions and was a bit disappointed with the general quality of the kit, but you've done a really great job! One of the big issues I had was the poor quality of the pre-sewn sails that came with the kit. I thought they were really bad and would have really spoiled the model if I had put them on. In the end I made a complete set of new ones from scratch using some pictures of the BN (see my log part 2) and they really look the part now that I have them on the model. I would consider ditching the ones from the kit as you have made such a good job of the hull! The A-L booklet is also very lacking in detail and does not include a lot of the rigging that should be on the model. Bob Elliot from SOS put me onto J.B. Jensons book - "Bluenose II, Saga of the Great Fishing Schooners". This was absolutely invaluable because I was able to add all of the rigging that should be on the model and correct a lot of mistakes in the A_L instruction booklet. I was able to buy a copy off e-bay and I really would recommend getting a copy so that you can really make the model as complete as possible. I am hoping to finish my build over the next few days and I will post some pictures so you will be able to see how I finished off the rigging. Looking forward to seeing your completed model pics.
 
Hi again,

Some very stormy weather in the UK today, so I sat in my work room and have just put the finishing touches to the ship. I will take some pictures of the completed model and post them on the forum in a day or two. Having gone through the rigging process (hell) and adding all of the details that I could find, I thought to pass on some reference notes (in MS pdf printer format, so I hope they are readable) from my build which includes some snips of the rigging that I found really useful to see where everything goes! I hope you find it useful, good luck with the rigging!
 

Attachments

  • Bluenose II reference pics and notes.pdf
    2 MB · Views: 25
Hi again,

Some very stormy weather in the UK today, so I sat in my work room and have just put the finishing touches to the ship. I will take some pictures of the completed model and post them on the forum in a day or two. Having gone through the rigging process (hell) and adding all of the details that I could find, I thought to pass on some reference notes (in MS pdf printer format, so I hope they are readable) from my build which includes some snips of the rigging that I found really useful to see where everything goes! I hope you find it useful, good luck with the rigging!
Your photos are excellent reference checks against all plans and book illustrations to help you make your own rigging decisions as to what will work best in the scale of your BN presentation. Great progress. Rich (PT-2)
 
Back
Top