Bluenose II Build (Artesania Latina) 1:75 by Nomad [Completed Build]

Came out well Mark. I’m also thinking how to do my mast and booms. Gonna have to hand sand them as well (tool limited )and your method may be something I can attemptThumbsup
Thanks Grant. I am also a bit tool-limited, by which I also mean: I don't really know what tools to get or use anyway ROTF
Sanding the masts by hand certainly takes longer than I'm sure it would with a lathe or an electric drill, but without any spare masts to play with I wasn't going to gamble on that one slip that would reduce them to rubble. It gives you a bit of wrist pain, but it allows you to recover more easily from mistakes and gives you a certain control over the finished product. At least that's what I keep telling myself :)
 
I used to put mine in a drill (wrap with masking tape to prevent damaging the end in drill), and then turn while filing or sanding. You have to stop to let it cool off, will get hot and burn your hand, as I support the end with my hand while removing material. :p
Makes sense Dean. I suppose the drill will get hot as well, especially if operated at a low speed. I am keen to try the drill method you describe in a future build, although I might try my hand at it on a few spare dowels beforehand Thumbsup
 
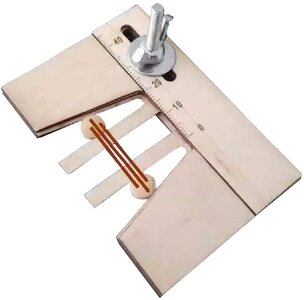
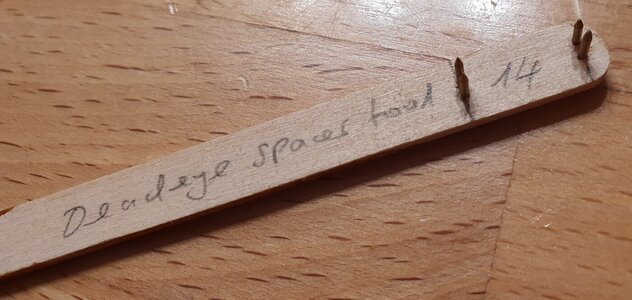
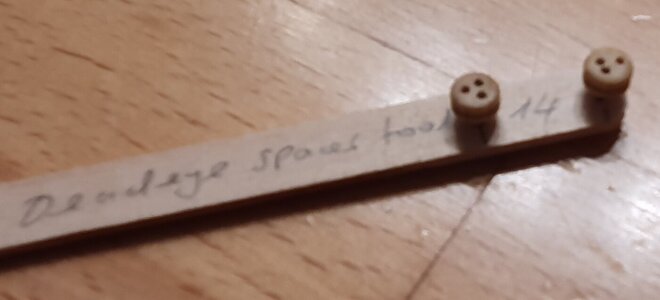
For the pitch between the deadeyes I used a very simple 2-pin jig. Very cumbersome. Next time I'll take on board the 6-pin design Domcee shared.

The furling itself is not complex, there are quite a few videoclips out there showing how it could be done. The royal pain was that all riggin, yards, gaffs, booms and mastrings were already in place. That meant accessibility issues. One better attaches the sails to the yards, booms or gaffs, prior to attaching those mast parts.
Thanks Johan. I am still assembling the hardware on the masts and it has spared me - temporarily at least - from making those decisions which I know are yet to come, and which are not really spelt out in Artesania's instructions. The foremost of which is when to step the masts permanently into the ship; before adding the shrouds, or after? Before adding the booms and gaffs, or after? Do I add sails, or not, or furl them? And when do I do that? Arggh, decisions, decisions. I'm sure it will become clearer in time. Or in the shower, as it seems to for so many successful musicians :)
 
Thanks Johan. I am still assembling the hardware on the masts and it has spared me - temporarily at least - from making those decisions which I know are yet to come, and which are not really spelt out in Artesania's instructions. The foremost of which is when to step the masts permanently into the ship; before adding the shrouds, or after? Before adding the booms and gaffs, or after? Do I add sails, or not, or furl them? And when do I do that? Arggh, decisions, decisions. I'm sure it will become clearer in time. Or in the shower, as it seems to for so many successful musicians :)
Those decisions are the appetizers before the smorgasbord!!! Rich (PT-2)
 
The jig is a good idea. I personally would leave the lower pin of the out of the two goups, as the two upper pins would retain the deadeye in the correct position.
The only problem with the jig is that the holes in the deadeyes must all have the same distance to each other. Maybe the difference in the holes can be compensated by tapering the pins, thus taking up any dimensional differences. Just a thought.

Trevor
This jig is advertised quite frequently on model ship supplier's websites. I'm not sure how useful they are. The concept seems straightforward enough, but I can't think it would be any good in instances where, as with the Bluenose, the one deadeye is fixed to the end of a chainplate?

deadeye_mooring_jig.jpg

The two (or three) prong jig seems a far better prospect. Far cheaper too :)
 
H
Thanks Grant. I am also a bit tool-limited, by which I also mean: I don't really know what tools to get or use anyway ROTF
Sanding the masts by hand certainly takes longer than I'm sure it would with a lathe or an electric drill, but without any spare masts to play with I wasn't going to gamble on that one slip that would reduce them to rubble. It gives you a bit of wrist pain, but it allows you to recover more easily from mistakes and gives you a certain control over the finished product. At least that's what I keep telling myself :)
Hello Mark. I’m the exact same space as you here. I’m going to follow your example in my last making. Non the the less your Masts came out really well - you could sell them to the wand shop in Diagon Ally - “Walnut and a touch of dragons hair I guess” ( for Harry Potter fansROTF)
 
Hi Mark. The masts are looking very nice. And about all the decisions: it is good you have all those steps in mind. And shift them step by step in order for a plan. It would be less when you forgot a (major) item. But luckily you started with the masts. ROTF
Regards, Peter
 
Thanks Johan. I am still assembling the hardware on the masts and it has spared me - temporarily at least - from making those decisions which I know are yet to come, and which are not really spelt out in Artesania's instructions. The foremost of which is when to step the masts permanently into the ship; before adding the shrouds, or after? Before adding the booms and gaffs, or after? Do I add sails, or not, or furl them? And when do I do that? Arggh, decisions, decisions. I'm sure it will become clearer in time. Or in the shower, as it seems to for so many successful musicians :)
Hello Mark,

Yep, when to step the masts permanently, that's a valid question.
Since I depended on the shrouds to keep the masts positioned properly in both XZ- and XY-planes I can't really tell you which would be the best procedure. What I do know, is that it was a very time consuming task, tensioning the shrouds, left, right, maintaining a similar pitch for the deadeyes, making sure the mast was sitting right; in short nerve-wracking. So for my next build I seriously consider to have the mast fixation poured in concrete, before adding the shrouds and stays. I am not sure whether or not this is going to work, but it should beat my earlier experience...
 
Hi Nomad,

Your masts are looking very nice! I hand sanded the masts for my first model - what a pain to get right- took ages! After that experience l tried the electric drill method and found that much easier and faster. I clamped the drill to my work bench, put the dowel in the chuck with a bit of tape to protect the end and I made a support for the other end of the dowel using a plastic roller bearing (salvaged from a draw runner!) which I fitted into a block of wood and clamped in a drill press vice. I just wrapped the dowel with some masking tape to fit the hole size in the bearing just beyond the point where I wanted to finish. With everything aligned and clamped down it was very easy to just run a broad file up and down from the point where the taper starts to the top of the mast and then finish off with sand paper ( I practiced on some cheap dowel lengths from my local DIY store first - trick was to use light pressure, slow/medium speed and run the taper away from the drill).

If you are fitting sails it is best to fit the booms and gaffs off the ship and attach the sails first. I stepped the masts and fitted and adjusted the shrouds using the little jigs and then left them loose while I did everything else. The masts fit quite tightly in the hull and I found there was no problem keeping them perpendicular so I was not relying on the shrouds to hold them straight. Lashing the deadeyes together was one of the last things I did.

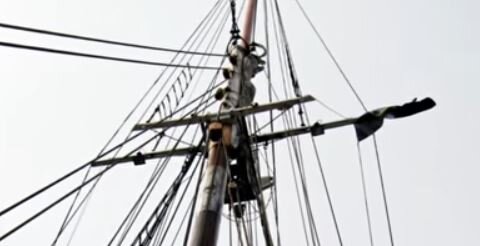
PS. You might want to consider how to rig the upper mast shrouds. The A-L instructions use deadeyes, but on the BN-II, the shrouds just come down to the cross-trees as you can see in the picture. I just added some eyelets on the trees and tied the shrouds off to them.
 

Attachments

  • upper shrouds.JPG
    upper shrouds.JPG
    25.1 KB · Views: 16
Hi Mark. The masts are looking very nice. And about all the decisions: it is good you have all those steps in mind. And shift them step by step in order for a plan. It would be less when you forgot a (major) item. But luckily you started with the masts. ROTF
Regards, Peter
Thanks Peter. Yes, masts first, phew. Can't build a roof without the walls ROTF
 
Hello Mark,

Yep, when to step the masts permanently, that's a valid question.
Since I depended on the shrouds to keep the masts positioned properly in both XZ- and XY-planes I can't really tell you which would be the best procedure. What I do know, is that it was a very time consuming task, tensioning the shrouds, left, right, maintaining a similar pitch for the deadeyes, making sure the mast was sitting right; in short nerve-wracking. So for my next build I seriously consider to have the mast fixation poured in concrete, before adding the shrouds and stays. I am not sure whether or not this is going to work, but it should beat my earlier experience...
Hi Johan, it's good to know that it isn't an exact science! I have been following Mastini's Ship Modelling Simplified as a guide and he advocates stepping the masts only after all the spars, shrouds and sails have been prepared and assembled. Makes sense I suppose, especially as any procedure that delays the glue to the very last has generally been a good one. A concrete base sounds like a great idea, as even now I am starting to wonder how and where to apply glue that will serve to hold both masts in a firm and upright position :p
 
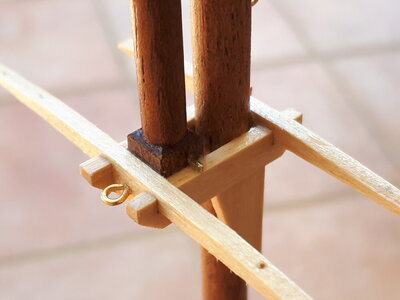
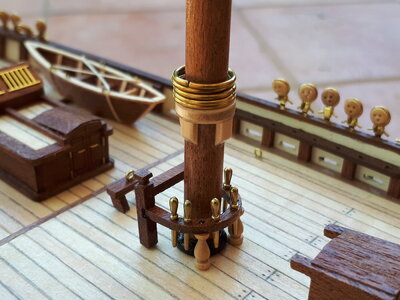
I completed the mainmast and foremast assemblies, including most of the hardware that attaches directly to the masts. I added a wire dowel to the block at the base of both topmasts to give them additional support when housed in the trestletrees, an idea taken from another build of the same model.

0600_20211216_bluenose_II_build.jpg

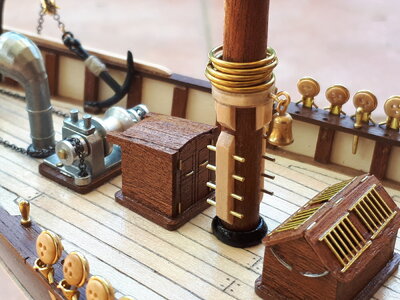
The foremast included a small brass ship's bell, which was a nice touch, and I remembered just in time to slip the sail hoops on before fixing the boom-rest and trestletree to the mast Redface

0605_20211216_bluenose_II_build.jpg

There was little difference between the construction of the mainmast and foremast in this model. Just minor differences in length, number of eyebolts, and a pin-rack and ship's bell situated on the foremast only.

0610_20211216_bluenose_II_build.jpg

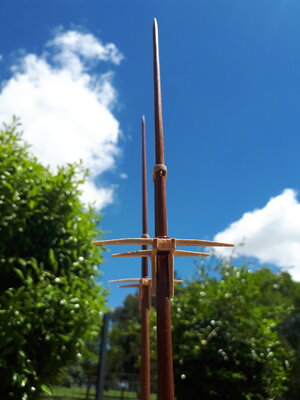
All in all I enjoyed putting the masts together as I felt I had it under control. Rigging might be something else, time will tell. I coated the masts with a clear satin varnish and stepped them temporarily to verify the fit. Both masts are reasonable perpendicular by rack of eye, although not entirely parallel with each other, which I'm guessing will mean more careful precision when adjusting the shrouds and stepping the masts for good :cool:

0615_20211216_bluenose_II_build.jpg
 
Beautiful clean articulate work Mark - and obviously against that backdrop - stunning. If I have asked you this, please forgive me, but where in South Africa do you live? (My memory - or rather lack thereof - these days is scary!
 
This jig is advertised quite frequently on model ship supplier's websites. I'm not sure how useful they are. The concept seems straightforward enough, but I can't think it would be any good in instances where, as with the Bluenose, the one deadeye is fixed to the end of a chainplate?

View attachment 275464

The two (or three) prong jig seems a far better prospect. Far cheaper too
:)
I agree on the cost. I made a jig for my deadeyes and tapered the pins to take up any difference in the spacing of the holes.
Trevor


.20211216_155419.jpg20211216_155522.jpg
 
Hi Nomad,

Your masts are looking very nice! I hand sanded the masts for my first model - what a pain to get right- took ages! After that experience l tried the electric drill method and found that much easier and faster. I clamped the drill to my work bench, put the dowel in the chuck with a bit of tape to protect the end and I made a support for the other end of the dowel using a plastic roller bearing (salvaged from a draw runner!) which I fitted into a block of wood and clamped in a drill press vice. I just wrapped the dowel with some masking tape to fit the hole size in the bearing just beyond the point where I wanted to finish. With everything aligned and clamped down it was very easy to just run a broad file up and down from the point where the taper starts to the top of the mast and then finish off with sand paper ( I practiced on some cheap dowel lengths from my local DIY store first - trick was to use light pressure, slow/medium speed and run the taper away from the drill).

If you are fitting sails it is best to fit the booms and gaffs off the ship and attach the sails first. I stepped the masts and fitted and adjusted the shrouds using the little jigs and then left them loose while I did everything else. The masts fit quite tightly in the hull and I found there was no problem keeping them perpendicular so I was not relying on the shrouds to hold them straight. Lashing the deadeyes together was one of the last things I did.

PS. You might want to consider how to rig the upper mast shrouds. The A-L instructions use deadeyes, but on the BN-II, the shrouds just come down to the cross-trees as you can see in the picture. I just added some eyelets on the trees and tied the shrouds off to them.
Thanks DomCee, that all strikes me as very sound advice and very similar to the suggestions offered in Mastini's Ship Modelling Simplified guide. I will certainly give the drill-method of tapering spars a go next time round; it sounds like one of those things that gets easier with practice and will certainly shave minutes if not hours off the time it takes to sand them. Interesting that AL departs from the real BNII by using deadeyes for the upper shrouds, although by looking at the various flavours of BNII models on this forum I suspect that is just one of several designs that has been altered for this kit. Thanks for sharing the photo, more food for thought Thumbsup
 
Back
Top