
Thank. Also a good way to slow me down.Great attention to detail Charlie.

You are using an out of date browser. It may not display this or other websites correctly.
You should upgrade or use an alternative browser.
You should upgrade or use an alternative browser.
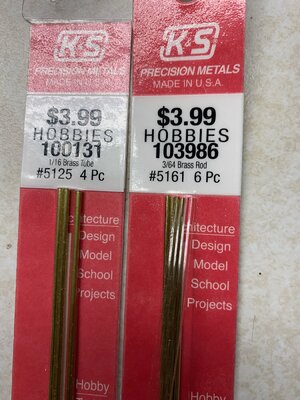
The new stanchions are definitely a step up. What size of tubing did you use?
Found them at Hobby Lobby. An impulse my when I was looking for the hose material. Glad I found them.The new stanchions are definitely a step up. What size of tubing did you use?
Attachments
I continue to work my way aft building the deck furniture. NOTE: If you build this model drill the holes for the lifeline stanchions before installing the deck furniture. I was able to use the drill press to get nice perpendicular holes so the stanchions will align vertically. Won't be possible after all the parts are glued down. The only thing I added in this section was to put hinges on the locker boxes. At least some of the kit supplied stanchions came in handy.


Completed the helm and companion way. Next up are a lot of stanchions. Unlike the bow that was a single lifeline, the rest are double lifelines. Will build a jig and try to get all of them equal. A lot of work but still way better than the kit supplied parts. You can see the holes I've already drilled for them.


Looking great! The white at the ends of the spokes are an interesting touch.
figured it needed a little spicing up.Looking great! The white at the ends of the spokes are an interesting touch.
First off, Jeff T's comment about the spokes on the wheel convinced me to change them from white to brown. Thanks Jeff T. Looks better now. So the stanchion building got a whole lot tougher. The bow was a snap but the rest of the lifelines are two ropes and the soldering was difficult. I tried several jigs and finally came up with one that worked 75% of the time. Hard to heatsink parts that are only 5mm. They have a tendency to clump up into a ball when heated. I used two pins held everything together while soldering and after sanding with the Dremel they were ready to paint. After installation it was worth the trouble. Much better looking then the ones supplied with the kit.


The stanchions look great. After seeing your initial post for the bow I started thinking I could do that as well when I get to the Endurance. The stern ones are giving me second thought. My soldering abilities are below novice skills.First off, Jeff T's comment about the spokes on the wheel convinced me to change them from white to brown. Thanks Jeff T. Looks better now. So the stanchion building got a whole lot tougher. The bow was a snap but the rest of the lifelines are two ropes and the soldering was difficult. I tried several jigs and finally came up with one that worked 75% of the time. Hard to heatsink parts that are only 5mm. They have a tendency to clump up into a ball when heated. I used two pins held everything together while soldering and after sanding with the Dremel they were ready to paint. After installation it was worth the trouble. Much better looking then the ones supplied with the kit.
View attachment 265399View attachment 265400View attachment 265401View attachment 265402View attachment 265403View attachment 265404
I like the all brown wheel better too.
Thanks. It will take a while to do but as I've been reminded by others, it isn't a race so I'm keeping it slow and careful this time. Only 48 stations to go.The stanchions look great. After seeing your initial post for the bow I started thinking I could do that as well when I get to the Endurance. The stern ones are giving me second thought. My soldering abilities are below novice skills.
I like the all brown wheel better too.


Just catching up on your build log. Looking good. ")
Just completed sheet "Q" which was mainly lifelines and a couple of odds and ends, ladders and a companionway. I had to skip a step a week ago putting on some deadeyes. I'm using ebony ones that were backordered but came in this week so will backtrack and finish those up next.


Completed the first set of deadeyes. Finally got the backordered ebony ones. Most kits supply a light colored wood, pear maybe, but I think most were black as were the rigging because they were most likely tarred. Found a photo of the real Endurance that showed them. Just noticed I need a little touchup on the paint on the belaying pins also. Closeup shots really review the little errors.


Hello Charlie,
I was cruising through the forum and found your build here. I see you've been at it a couple months and it looks like your about to start going up with mast and rigging. You have a fine looking vessel and your metal work on the railing is fantastic. The decking looks superb with just the right amount of caulking between planks, something I have not yet mastered. I shall enjoy watching the rest of your build with the standing room only crowd.
I was cruising through the forum and found your build here. I see you've been at it a couple months and it looks like your about to start going up with mast and rigging. You have a fine looking vessel and your metal work on the railing is fantastic. The decking looks superb with just the right amount of caulking between planks, something I have not yet mastered. I shall enjoy watching the rest of your build with the standing room only crowd.
Hey Daniel
Thanks for the kind words. I'm finally starting to get the knack if this kit building. Might go back and build one the same models again.
Thanks for the kind words. I'm finally starting to get the knack if this kit building. Might go back and build one the same models again.
Installed the sled dog kennels and the deadeye channels today. You're supposed to install the boat davits next but I'm holding off as long as possible. I have a bad habit of breaking off parts that stand out from the hull with my sleeve while reaching for glue and other things. Wish I could find a couple of 1:70 dogs to add in the kennels.


OO Scale railroad, popular in UK, is 1:76. Maybe look at some of the UK hobby shops for some dogs?Installed the sled dog kennels and the deadeye channels today. You're supposed to install the boat davits next but I'm holding off as long as possible. I have a bad habit of breaking off parts that stand out from the hull with my sleeve while reaching for glue and other things. Wish I could find a couple of 1:70 dogs to add in the kennels.
View attachment 267860
HO Scale here in the US is 1:87.
Glenn
Thanks - Good idea. I have done some searching in US but not much in Europe. Will renew the hunt.OO Scale railroad, popular in UK, is 1:76. Maybe look at some of the UK hobby shops for some dogs?
HO Scale here in the US is 1:87.
Glenn