Build Log: OcCre Polaris - first build ever

Joined
Jan 25, 2022
Messages
10
Points
38

This is the build log of my first ever wooden ship model, the OcCre Polaris Schooner.
Since the project is on the way, I won´t flood you with all the pictures I´ve taken during the process.
It has been a huge learning experience and every step has been like a project of its own. I´ve made mistakes in every step, but they have also been very valuable learnings in their own.

Here is a brief history:

The process began with attaching the bulkheads to the false keel, which was pretty straightforward task. I made sure that the ribs are aligned in 90 degree angle relative to the keel, but during the process one of the bulkheads had tilted a very slightly to starboard side. Perhaps attaching a counter weight could help if I encounter a similar situation in the future. Need to pay more attention to this kind of a situation in the future.

Next was the planking of the deck. I prepared the caulking with a soft lead pencil and glued the strips to the deck with a contact glue recommended by the friendly gentlemen from a hobby store. I glued the strips as a whole instead of cutting them into appropriate length strips. Just to make things a little bit easier. Again, I messed up! Despite my best efforts, I did not manage to draw a straight line through the deck. Maybe it was because I had to measure one of the horizontal ”check points” across the deck twice and then drew the line across a wrong point. I also need a longer ruler to make the line in one stroke. It´s a cosmetic thing but still an annoying mistake. I need to be more precise in the future. The results of caulking were should I say variable. In some parts it looks good, in some its not visible, and in some its outright terrible. I also need practice in marking the nails on the deck.

Then I added the wooden parts on the bow and on the stern. I don´t know what they are officially called, but as you likely know already I mean the parts that provide an extra base for the planks so they can be attached more securely. Sanding the bow parts was quite a laborious task but the end result was in my opinion very nice. Sanding the bow, bulkheads and the stern ”blocks” took a long time. I wanted to do it as well as possible so that I have a good base to start adding the planks to the frame. I also sanded the stern of the false keel a bit thinner. Perhaps now I don´t have to sand the planks on the stern side so much after the planking is done.

The current state of the project is that I have installed the bulwarks. I added the one on the starboard side first. I soaked the wood for about 15 minutes in warm water and started gently bending it to a proper shape. Once I felt that it looked good enough after dry fitting, I did some extra bending with Artesania Latina´s electric plank bender, which should be called a plank burner instead! Then I added carpenters glue to the middle section of the deck and secured the bulwark on the deck with cheap clamps I found from a local supermarket. Those really saved the day and so did Amati´s Keel Klamper tool in which I had attached the frame! It proofed its worth in this case! Next was the bow section. I used glue and a small nail just in case. The last came the stern section with a similar approach to the bow section. I also used a clamp for extra hold.

With the port side bulwark the approach was the same, however a little bit easier now that I had some experience under my belt. Finally I added the plank in the stern in between the bulwarks.

Next comes the dreaded planking! I am more than a bit concerned with using the electric plank bender/burner for this. Should I get a plank nipper or use my wife´s curling iron? Any insights and suggestions are extremely welcome!

This is how the project looks like at the moment. Burn marks clearly visible!
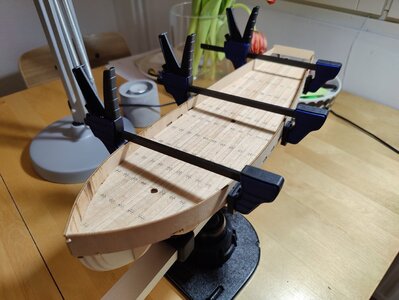
IMG_20220129_232403.jpg
 
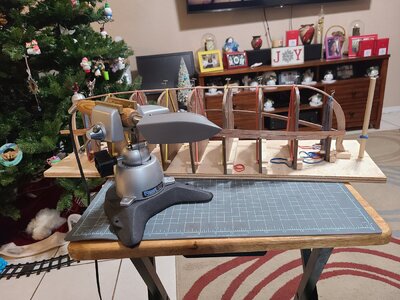
The method that works for me using heat to bend planks is to securely clamp the iron in place and hold the plank in my hands. Place the wet plank on the iron and watch it, when the wet wood begins to dry it is hot enough that it should begin to bend down around the iron. As soon as this point is bent move it slightly and continue bending the plank. Like anything technique improves with experience.

Here is the iron i use in my vise.
20211230_185008.jpg

Glenn
 
This is the build log of my first ever wooden ship model, the OcCre Polaris Schooner.
Since the project is on the way, I won´t flood you with all the pictures I´ve taken during the process.
It has been a huge learning experience and every step has been like a project of its own. I´ve made mistakes in every step, but they have also been very valuable learnings in their own.

Here is a brief history:

The process began with attaching the bulkheads to the false keel, which was pretty straightforward task. I made sure that the ribs are aligned in 90 degree angle relative to the keel, but during the process one of the bulkheads had tilted a very slightly to starboard side. Perhaps attaching a counter weight could help if I encounter a similar situation in the future. Need to pay more attention to this kind of a situation in the future.

Next was the planking of the deck. I prepared the caulking with a soft lead pencil and glued the strips to the deck with a contact glue recommended by the friendly gentlemen from a hobby store. I glued the strips as a whole instead of cutting them into appropriate length strips. Just to make things a little bit easier. Again, I messed up! Despite my best efforts, I did not manage to draw a straight line through the deck. Maybe it was because I had to measure one of the horizontal ”check points” across the deck twice and then drew the line across a wrong point. I also need a longer ruler to make the line in one stroke. It´s a cosmetic thing but still an annoying mistake. I need to be more precise in the future. The results of caulking were should I say variable. In some parts it looks good, in some its not visible, and in some its outright terrible. I also need practice in marking the nails on the deck.

Then I added the wooden parts on the bow and on the stern. I don´t know what they are officially called, but as you likely know already I mean the parts that provide an extra base for the planks so they can be attached more securely. Sanding the bow parts was quite a laborious task but the end result was in my opinion very nice. Sanding the bow, bulkheads and the stern ”blocks” took a long time. I wanted to do it as well as possible so that I have a good base to start adding the planks to the frame. I also sanded the stern of the false keel a bit thinner. Perhaps now I don´t have to sand the planks on the stern side so much after the planking is done.

The current state of the project is that I have installed the bulwarks. I added the one on the starboard side first. I soaked the wood for about 15 minutes in warm water and started gently bending it to a proper shape. Once I felt that it looked good enough after dry fitting, I did some extra bending with Artesania Latina´s electric plank bender, which should be called a plank burner instead! Then I added carpenters glue to the middle section of the deck and secured the bulwark on the deck with cheap clamps I found from a local supermarket. Those really saved the day and so did Amati´s Keel Klamper tool in which I had attached the frame! It proofed its worth in this case! Next was the bow section. I used glue and a small nail just in case. The last came the stern section with a similar approach to the bow section. I also used a clamp for extra hold.

With the port side bulwark the approach was the same, however a little bit easier now that I had some experience under my belt. Finally I added the plank in the stern in between the bulwarks.

Next comes the dreaded planking! I am more than a bit concerned with using the electric plank bender/burner for this. Should I get a plank nipper or use my wife´s curling iron? Any insights and suggestions are extremely welcome!

This is how the project looks like at the moment. Burn marks clearly visible!
Hallo Mikko,
Many Thanks for starting your building log of this model
 
The method that works for me using heat to bend planks is to securely clamp the iron in place and hold the plank in my hands. Place the wet plank on the iron and watch it, when the wet wood begins to dry it is hot enough that it should begin to bend down around the iron. As soon as this point is bent move it slightly and continue bending the plank. Like anything technique improves with experience.

Here is the iron i use in my vise.
View attachment 287727

Glenn
Thank you Glenn!

I was figuring that if I'm going to use the bender I would need something sturdy to which I can secure it. A vise seems to be an excellent choice for this. That's a very interesting iron by the way

Mikko
 
Looking good! As for the mistakes, the American Indian never made anything perfect. They believed only the gods made things perfect.
 
Thank you Glenn!

I was figuring that if I'm going to use the bender I would need something sturdy to which I can secure it. A vise seems to be an excellent choice for this. That's a very interesting iron by the way

Mikko
You're welcome Mikko!

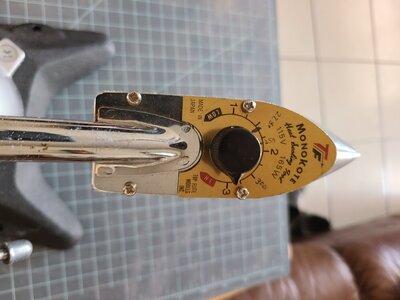
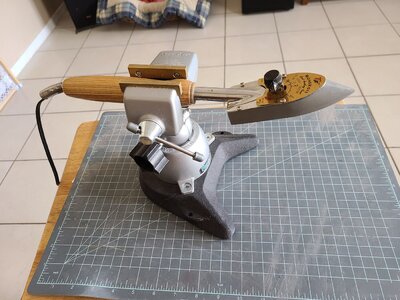
I've had that iron for about 40 years, but you can still get them new. They are used for the covering on RC airplanes, check online hobby shops that sell RC supplies.

20220201_123552.jpg20220201_123604.jpg

Glenn
 
Very nice for your first kit - I would not have known as everything looks really nice so far. I assume that you are applying a little water to your planks and then using the heat - makes the plank(s) bend easier without breaking. Also, no burn marks. I use a Plank Bending tool (the one that has the little wooden cradle) to help shape parts.
 
You're welcome Mikko!

I've had that iron for about 40 years, but you can still get them new. They are used for the covering on RC airplanes, check online hobby shops that sell RC supplies.

Glenn
A sealing iron could indeed be a good tool to try! I found one store here in Finland that sells them, but the price tag is pretty hefty. Roughly 70 in USD. Yeah, everything is expensive in Finland, but if I find this somewhere cheaper I think I'll give it a try. Since I'm new to this hobby, I am more than willing to try different approaches until I find what works best for me. Again, thanks for the tip Glenn!
 
Very nice for your first kit - I would not have known as everything looks really nice so far. I assume that you are applying a little water to your planks and then using the heat - makes the plank(s) bend easier without breaking. Also, no burn marks. I use a Plank Bending tool (the one that has the little wooden cradle) to help shape parts.
Thank you Donnie for your kind words! I am going to soak those planks well before I start trying to bend them. I'm not sure what kind of wood the planks are, but they are already quite flexible without soaking. With this model, people recommend soaking them for at least 20 minutes so that would be the minimum also for me :) I also have the cradle for bending and hopefully it'll help with bending. I am actually a bit nervous about how things will turn out. Planking has, hopefully an undeserved reputation of being a some kind of a dark art. Well, I'll soon find out and will definitely learn in the process.

I don't really know why I burned the bulwarks. I soaked them for 15 minutes, but maybe it was not enough.
 
Mikko,
Another thing I have considered is a Luthier's bending iron. They are available with or without adjustable temperature control. I linked to Amazon but they are available from different sources like Ebay and AliExpress. I would personally get one of these if the sealing iron hadn't worked.

The wood is scorching because the iron you are using is too hot. Too hot=scorching, too cold=wood doesn't bend. Water helps in my experience. Some types of wood are much easier to bend than others.

Some members have reported good results with DIY steamboxes.

Glenn
 
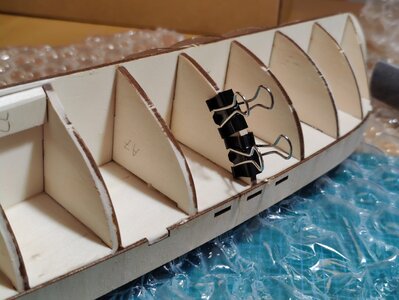
Not much of an update, but the project is still alive. Things have been pretty hectic lately and I haven't had much of energy to work with her. I started the preparations for planking and while dry fitting a plank against the bulkheads I noticed that in one point there would be a major depression on the hull if I don't do something about it. So I marked the spot and glued a couple of 0.6mm strips to that section. The other side of that same bulkhead was ok. Hopefully the strips are enough to cover the issue. While I was at it, I also sanded the stern a bit to make it more symmetrical. I hope I can start the planking tomorrow!

Bulkhead fix.jpg
 
This is the build log of my first ever wooden ship model, the OcCre Polaris Schooner.
Since the project is on the way, I won´t flood you with all the pictures I´ve taken during the process.
It has been a huge learning experience and every step has been like a project of its own. I´ve made mistakes in every step, but they have also been very valuable learnings in their own.

Here is a brief history:

The process began with attaching the bulkheads to the false keel, which was pretty straightforward task. I made sure that the ribs are aligned in 90 degree angle relative to the keel, but during the process one of the bulkheads had tilted a very slightly to starboard side. Perhaps attaching a counter weight could help if I encounter a similar situation in the future. Need to pay more attention to this kind of a situation in the future.

Next was the planking of the deck. I prepared the caulking with a soft lead pencil and glued the strips to the deck with a contact glue recommended by the friendly gentlemen from a hobby store. I glued the strips as a whole instead of cutting them into appropriate length strips. Just to make things a little bit easier. Again, I messed up! Despite my best efforts, I did not manage to draw a straight line through the deck. Maybe it was because I had to measure one of the horizontal ”check points” across the deck twice and then drew the line across a wrong point. I also need a longer ruler to make the line in one stroke. It´s a cosmetic thing but still an annoying mistake. I need to be more precise in the future. The results of caulking were should I say variable. In some parts it looks good, in some its not visible, and in some its outright terrible. I also need practice in marking the nails on the deck.

Then I added the wooden parts on the bow and on the stern. I don´t know what they are officially called, but as you likely know already I mean the parts that provide an extra base for the planks so they can be attached more securely. Sanding the bow parts was quite a laborious task but the end result was in my opinion very nice. Sanding the bow, bulkheads and the stern ”blocks” took a long time. I wanted to do it as well as possible so that I have a good base to start adding the planks to the frame. I also sanded the stern of the false keel a bit thinner. Perhaps now I don´t have to sand the planks on the stern side so much after the planking is done.

The current state of the project is that I have installed the bulwarks. I added the one on the starboard side first. I soaked the wood for about 15 minutes in warm water and started gently bending it to a proper shape. Once I felt that it looked good enough after dry fitting, I did some extra bending with Artesania Latina´s electric plank bender, which should be called a plank burner instead! Then I added carpenters glue to the middle section of the deck and secured the bulwark on the deck with cheap clamps I found from a local supermarket. Those really saved the day and so did Amati´s Keel Klamper tool in which I had attached the frame! It proofed its worth in this case! Next was the bow section. I used glue and a small nail just in case. The last came the stern section with a similar approach to the bow section. I also used a clamp for extra hold.

With the port side bulwark the approach was the same, however a little bit easier now that I had some experience under my belt. Finally I added the plank in the stern in between the bulwarks.

Next comes the dreaded planking! I am more than a bit concerned with using the electric plank bender/burner for this. Should I get a plank nipper or use my wife´s curling iron? Any insights and suggestions are extremely welcome!

This is how the project looks like at the moment. Burn marks clearly visible!
Hallo @Mikko
we wish you all the BEST and a HAPPY BIRTHDAY
Birthday-Cake
 
Hi all,

Hopefully everyone is doing fine!

It´s been a while since the last update! The project is still alive, even though I have progressed slowly with it.

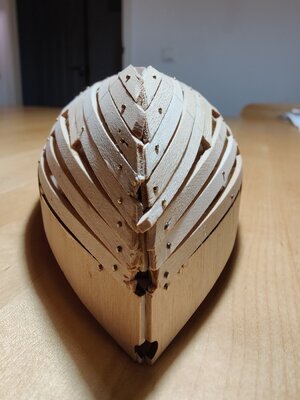
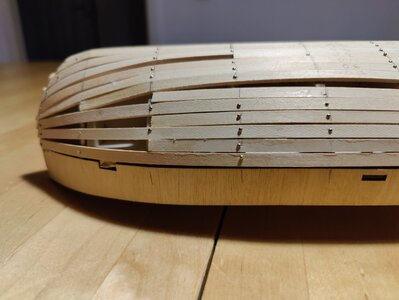
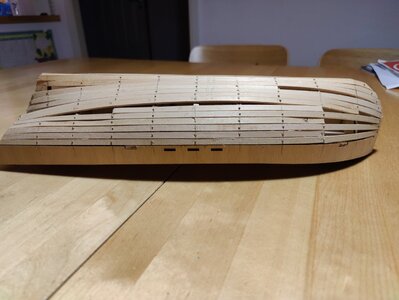
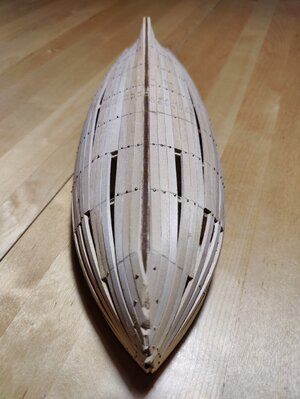
The main planking is now done. I used three different techniques while bending the planks.
  1. Plank scissors or plank nippers. Quite fast way for bending the planks and no need to soak them. Works quite ok, if you don't have to twist the plank. Cracked few blanks though.
  2. Electric plank bender. Worked nicely with planks that don´t require a twist. My skills are not so good that I could manage twisting with a plank bender at the moment
  3. I soaked the planks, attached them temporarily to the bulkheads, let them dry and then gluing and nailing them in. Time consuming, but as of now my preferred method. With this approach I found that I could get the best "fit" for the planks. Still, I want to practice more with the electric bender and master that at some point.
I did quite a few mistakes especially in the beginning. I was pretty nervous when I started, and the first planks at the deck level are not particularly well aligned. I was also struggling with cutting the planks on the bow at first. Later on, the process got easier and I (at least I think so) got a bit better idea how to cut the planks.

As you can see on the picture of the bow, I also managed to misalign the fourth plank pair from the keel side. Because of this, I had to taper a few planks to get them to fit. Altogether, planking took quite a lot of time and asked some nerves. Again, this was a huge learning experience for me. Hopefully I can use that in my next project.

What I think is a bit strange is that the printed instructions and OccRe video instructions for planking have a different approach to planking this ship. To me its a bit confusing. I followed the video instructions, but with the future projects I'll follow the printed ones. Well, since my mistakes with the planking I was not able to follow both, so I had to come up with my own solution. Let's see how my mistakes and solutions to those will affect the second planking later on. But first I'll install all the wedges. The, a lot of sanding and putty for all the mistakes :)

If you wish to provide feedback, insights, etc., I would be very happy about it!

Resized 1.jpg

Resized 2.jpg

Resized 3.jpg

Resized 4.jpg
 
Hi Mikko,
My first build was the Albatros. The OcCre instructions said to file down the nail heads after the planks are set. I tried filing down a couple, which was quite difficult and wasn't working out well. Someone advised me not to file the nail heads down but to remove the nails. Basically, I had to dig them out, but I think it worked out for the best. This is what I used, got it from Amazon if you wanted to give that a shot. https://www.amazon.com/gp/product/B0878W6G55/ref=ppx_yo_dt_b_asin_title_o02_s00?ie=UTF8&psc=1
1654997201884.png
 
Hi Kramer,
Thank you for pointing this out! I had a hunch that sanding the nails down could be a very tedious job. I'll follow your advice on this and remove the nails. I also have a tool you suggested in my toolbox. Just tested it and it works nicely.

It was also a good advice not to drive the nails in completely. Thank you also for this

Do you know if the nails are reusable? If I can manage to to pull one out straight, can I use it somewhere else later?
Yes, they are reusable. If you don't bend them. You're sure to lose a few. Using the nails on my first build worked well, but I'm not sure I'm going to do it on my second. I might try some other techniques I found on SoS. Thanks, and good luck! If I see anything else you're doing that I learned about the hard way on my first build I'll mention it. I'm sure I'm going to learn a lot following your Polaris build.
 
Hi All,

and hopefully you are doing fine!

After the summer vacation and Covid-19, there has been some progress.
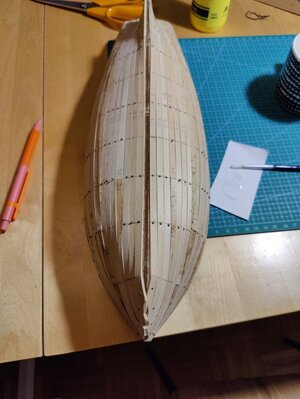
The first planking is finally done!

Cutting and installing the wedges was quite a task. Every wedge was more or less custom work and required a lot of sanding and test fitting. Especially shorter wedges were very difficult to bend so that they would follow the hull curvature nicely. I guess the shorter the wood strip is, the more challenging it is to bend.

I soaked wedges for about 30-40 minutes and then started very gently bending them with my fingers. I also used my the nail of my thumb as "plank nipper" by gently pressing small recesses along the wedge while bending it. With short wedges I used a hobby knife as well. This helped a little. In addition, I tried my electric plank bender as well. At least it helped to dry out the pieces.

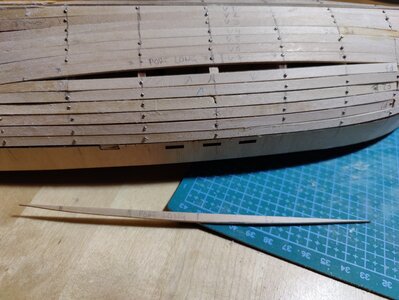
After I had installed the wedges, I started working with final long "filler planks". Sorry, I don´t know if they have a more formal name, but they are the ones that can be seen in the pictures below. For me, their installation required a more rigorous approach. Maybe it´s a bit overkill, but at least it worked out
  • I measured the required length of the strip
  • After cutting a proper length strip I marked the position of the centermost bulkhead to this strip
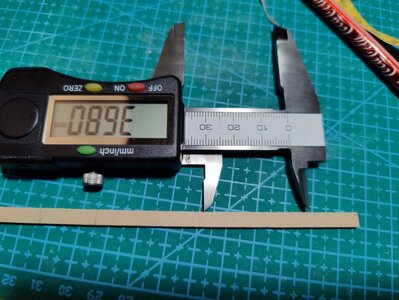
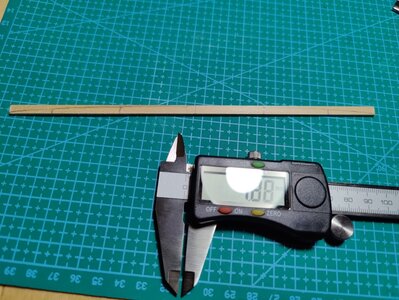
  • Using this mark as a reference, I used a caliber to measure the distances between the bulkheads both towards stem and stern and marked their position to the strip.
  • Next I used the caliber to measure the gap between the planks at each bulkhead. This gave me the required width of the strip at this position. I marked also this measure to the strip
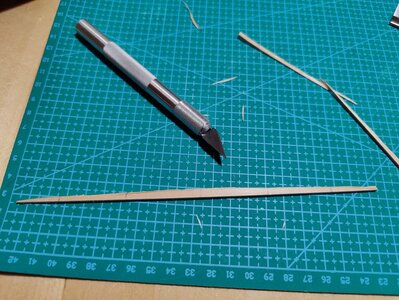
  • Now that I had the measures and markings in place, I was able to draw a rough cutting line to the strip and use a hobby knife to cut the strip into a coarse shape.
  • Finally, it was a lot of sanding and test fitting the strip. I sanded the strip one bulkhead´s width at a time and constantly test fitted it.
Installing these final strips was pretty straightforward and learned that you don´t need to soak a plank to use a blank bender. It is enough to just dip it in the water and start bending! I learned it from ;this YouTube video. I used this approach and it worked quite well with bending the strips to follow the hull curvature a bit better. I still need practice though!

Overall I am happy that I completed this step that worried me quite a lot before I started it. The hull won´t win any prices but I sure learned a lot.

Next will be removing the nails, a lot of filler and sanding!

Bulkhead measurement.jpg

Cutting line.jpg

Rough cut.jpg

Ready to be installed.jpg

Hull complete.jpg
 
Last edited:
Just ordered this kit. I have been focussed primarily on plastics for years so this will be my first wooden kit in a long time. I have all the tools I need so I’m looking forward to getting back to what I see as the real craft of modeling.

Not sure where you are on this build but looks good so far. I’ll be checking back in see.

Good luck and regards.
Great to hear that you're going start your own Polaris! Please, create a build log and share your work with us.

It's been a slow project, but second planking is almost done. I'll update this log once I'm done with that.
 
This is the build log of my first ever wooden ship model, the OcCre Polaris Schooner.
Since the project is on the way, I won´t flood you with all the pictures I´ve taken during the process.
It has been a huge learning experience and every step has been like a project of its own. I´ve made mistakes in every step, but they have also been very valuable learnings in their own.

Here is a brief history:

The process began with attaching the bulkheads to the false keel, which was pretty straightforward task. I made sure that the ribs are aligned in 90 degree angle relative to the keel, but during the process one of the bulkheads had tilted a very slightly to starboard side. Perhaps attaching a counter weight could help if I encounter a similar situation in the future. Need to pay more attention to this kind of a situation in the future.

Next was the planking of the deck. I prepared the caulking with a soft lead pencil and glued the strips to the deck with a contact glue recommended by the friendly gentlemen from a hobby store. I glued the strips as a whole instead of cutting them into appropriate length strips. Just to make things a little bit easier. Again, I messed up! Despite my best efforts, I did not manage to draw a straight line through the deck. Maybe it was because I had to measure one of the horizontal ”check points” across the deck twice and then drew the line across a wrong point. I also need a longer ruler to make the line in one stroke. It´s a cosmetic thing but still an annoying mistake. I need to be more precise in the future. The results of caulking were should I say variable. In some parts it looks good, in some its not visible, and in some its outright terrible. I also need practice in marking the nails on the deck.

Then I added the wooden parts on the bow and on the stern. I don´t know what they are officially called, but as you likely know already I mean the parts that provide an extra base for the planks so they can be attached more securely. Sanding the bow parts was quite a laborious task but the end result was in my opinion very nice. Sanding the bow, bulkheads and the stern ”blocks” took a long time. I wanted to do it as well as possible so that I have a good base to start adding the planks to the frame. I also sanded the stern of the false keel a bit thinner. Perhaps now I don´t have to sand the planks on the stern side so much after the planking is done.

The current state of the project is that I have installed the bulwarks. I added the one on the starboard side first. I soaked the wood for about 15 minutes in warm water and started gently bending it to a proper shape. Once I felt that it looked good enough after dry fitting, I did some extra bending with Artesania Latina´s electric plank bender, which should be called a plank burner instead! Then I added carpenters glue to the middle section of the deck and secured the bulwark on the deck with cheap clamps I found from a local supermarket. Those really saved the day and so did Amati´s Keel Klamper tool in which I had attached the frame! It proofed its worth in this case! Next was the bow section. I used glue and a small nail just in case. The last came the stern section with a similar approach to the bow section. I also used a clamp for extra hold.

With the port side bulwark the approach was the same, however a little bit easier now that I had some experience under my belt. Finally I added the plank in the stern in between the bulwarks.

Next comes the dreaded planking! I am more than a bit concerned with using the electric plank bender/burner for this. Should I get a plank nipper or use my wife´s curling iron? Any insights and suggestions are extremely welcome!

This is how the project looks like at the moment. Burn marks clearly visible!
Hallo @Mikko
we wish you all the BEST and a HAPPY BIRTHDAY
Birthday-Cake
 
Back
Top