
Amazing build

You are using an out of date browser. It may not display this or other websites correctly.
You should upgrade or use an alternative browser.
You should upgrade or use an alternative browser.
Construction U-552 Type VIIc Trumpeter 1:48 [ COMPLETED BUILD ]
- Thread starter Henk Liebre
- Start date
- Watchers 28
- Joined
- Oct 28, 2018
- Messages
- 660
- Points
- 403

Hallo Rob,Do I need specific tools for that?
Leuk om te horen dat mijn log je inspiratie geeft
Ik heb een Proxoxon Micromot NG 5/E op mijn werktafel staan , met regel bare knop kan ik het toerental verlagen,
Ik heb dar een flexibele slang daar op aangesloten, waar ik doorgaans een boortje inzet

Ik voor mijn U552 een slijpschijfje ingezet
Het tranparante plastic afgetekend met een watervaste stift , en met het slijpschijfje op de laagste toerental uitgevreesd
Omdat het plastic smelt en zich gaat verdragen als een lava na een vulkaan uitbarsting ( wat je makkelijk met de hand kan verwijderen ) ca 3 mm van de aftekenlijn gebleven
Daarna na elke zaagsnede laten koelen verder
Daarna met een vijl en schuurblokje afgewerkt
Mocht je nog meer vragen hebben kan je mij altijd een PM sturen via het forum
Succes
Henk
Hello Rob,
Nice to hear that my log has inspired you.
I have a Proxoxon Micromot NG 5/E on my work table, I can reduce the speed with an adjustable knob.
I have connected a flexible hose to it, where I usually I used a drill.
I used a grinding wheel for my U552.
The transparent plastic was marked with a waterproof marker and was drilled with the grinding wheel at the lowest speed.
Because the plastic melts and behaves like lava after a volcanic eruption (which you can easily do by hand). can remove ) remained approximately 3 mm from the scribe line
Then allow to cool further after each cut
Then finished with a file and sanding block
If you have any more questions you can always send me a PM via the forum
Good luck
Henk
- Joined
- Oct 28, 2018
- Messages
- 660
- Points
- 403
Thanks for the complimentAmazing build
- Joined
- Jun 5, 2023
- Messages
- 3
- Points
- 0
"Hello Captain Rob! Thank you for the extensive answer. Fortunately, I have a Proxxon with variable speed to prevent melting plastic while drilling the Thrumpether model to assemble the RC Subz photo-etched parts. With your instructions, I think I'll make good progress. It's great that you've documented everything so well, providing inspiration and solutions for others building their models.
Regards, Captain Rob"
Regards, Captain Rob"

- Joined
- Oct 28, 2018
- Messages
- 660
- Points
- 403
Hello Dave,Rcsubs photo etch but never came with instructions
Payment is not necessary.
I have saved the complete manual (25 pages) + the templates for the decks as a PDF.
I will send them to you via a PM as a PDF.
Let me know when you have received them .
Regards
Henk
- Joined
- Oct 28, 2018
- Messages
- 660
- Points
- 403
Hello Dave,
The solution is very easy.
I bought a rechargeable battery (that was the cheapest option for me) 12 V, (the blue box)
Then cut the battery wires and connected it to a large box with the outputs (...)
(I know the name not in English)
to which you connect a lamp) and then with more outputs
Then smd LED 0805 warm white wired 12v lights connected
Because photos sometimes say more than a thousand words, here are the photos
Regards
Henk
- Joined
- Oct 28, 2018
- Messages
- 660
- Points
- 403
Hello Dave,
Strangely enough I don't always get a notification when a message is posted to my post.
I have connected these lights
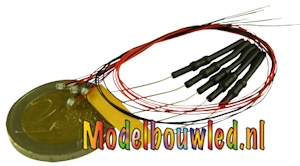
Regards
Henk
Strangely enough I don't always get a notification when a message is posted to my post.
I have connected these lights
Led 0805 Warm Wit Bedraad 12 Volt
Led verlichting voor de minialuur wereld. Modelbouwled LDT Producten
www.modelbouwled.nl
Regards
Henk
