• LUCZORAMA SHIPWRECK SCAVENGER HUNT GIVEAWAY. 4 Weeks of Fun • 1 Legendary Prize ((OcCre’s Fram Ship)) • Global Crew Welcome!
    **VIEW THREAD HERE**

Copper plating of a hull

Joined
Apr 7, 2018
Messages
14
Points
58

I am restoring an old barquentine model and the owner would like the bottom copper plated. I have never done copper plating before so I have some questions.
1. How difficult is it?
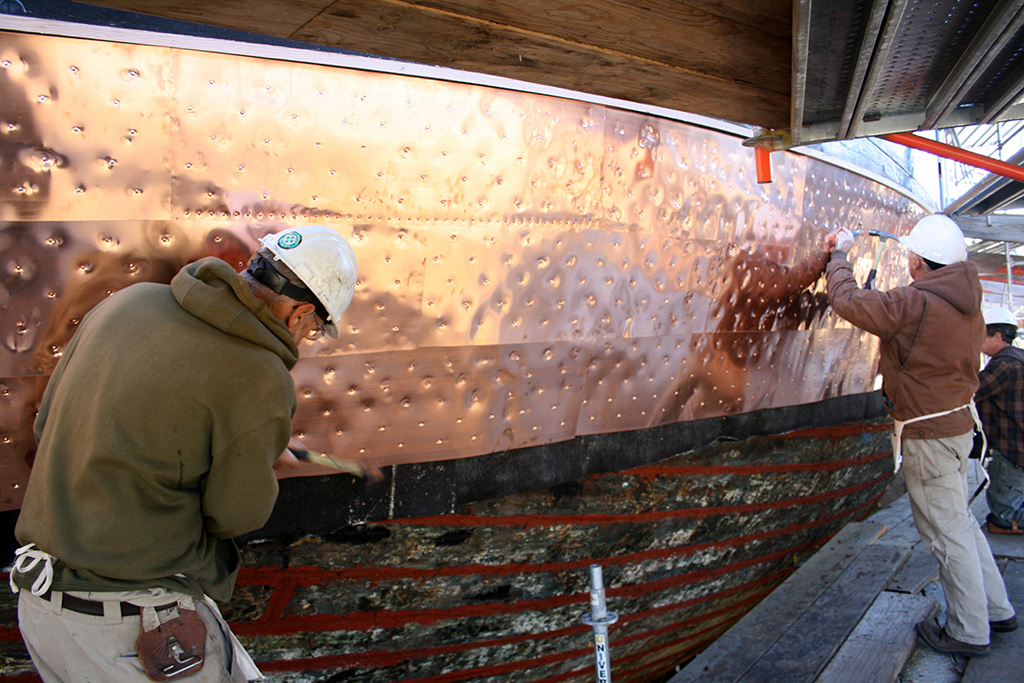
2. I know I should start from the stern and bottom. Should I overlap the plates or just butt them together?
3. Which is better, copper tape or pre-made plates?
4. What is the best glue to use?
5 lastly about the cut off line, should I do it half way up and then copper from the water line down of just go right up to the waterline, trim the ends and put a row of straight plates along the waterline?
 
1-- BECERİLERİNİZE BAĞLIDIR
2-- ÜSTTEN BAŞLAMANIZ GEREKİR, ORİJİNAL PLAKALAR ÜSTTEN BİRİNE YERLEŞTİRİLİR
3-- DÜŞÜNÜYORUM, ÖNCEDEN HAZIRLANMIŞ TABAKLAR
4-- HIZLI YAPIŞTIRICILAR
5--I CANNOT ANSWER THIS BECAUSE MY ENGLISH IS NOT GOOD
 
There are a number of different products, adhesive tape, non-adhesive foil, precut plate, plain or stamped with "nails", etc.. It really depends on what reasonably historically accurate representation you want. Also, decide on the type of finish, weathered, clean and bright?

The size plate will obviously vary with scale, commercially available tape comes in two widths. The actual ship builder technique was to apply individual plates which overlapped beginning at the stern, belts. There are a number of Forum posts regarding the process, there's some research involved and "patience". The position of the belts to the waterline may vary depending on the type of vessel.

Attached a couple of pictures from my current build, treated and cut individual plates from tape. Then applied using contact cement, a process I first leaned almost 30 years ago.

1000001340.jpg

20240421_145006.jpg

20240220_154916.jpg
 
I just used self adhesive copper tape. Tape’s adhesive is holding very well.
I use the copper tape as well. Using a gray primer as an under coat. Somehow the chemicals in a primer react with the adhesive on the back of the tape. After a week or so you have to use a razor blade to get the tape off if you need to make any adjustments. Still holding up well on my first model completed in 2014. The copper patinas well over time too.

IMG_0001.JPG

IMG_0004.JPG

IMG_0005.JPG

IMG_0007.JPG

IMG_0009.JPG
 
Did the rel ship of which the mode represents have a copper bottom ? I would try to determine that before actually coppering it. There is a wealth of info available on coppering, but it seems many modelers are not willing to search it out.
Copper plates were universally 44" x 14" wide. The "nails" were about 1 1/2" dia Flat heads and about 1 1/2" long. There were slight variations in the nail sizes depending on the maker. Thus, when the nails were pounded flush with the plate, the surface was smooth. The plates were overlapped by up to 2". There is an excellent article in the NRG "Shop notes" Volume !!, chapter 13 on "how to " , which you should be able to google. Today's modelers make many mistakes in coppering, and lose authenticity in appearance. The biggest mistakes I see are: (1) Having "Bumps" in the surface to represent nails. They were flush and flat.
(2) Having a shiny surface. The copper was never shiny, at any point in its life on a real ship. Certainly after a period at sea the copper became a light green, or dark brown color, but NEVER shiny. P>S> I am the author of the Article on coppering, which is also recommended by "Quint" above.
 
1-- BECERİLERİNİZE BAĞLIDIR
2-- ÜSTTEN BAŞLAMANIZ GEREKİR, ORİJİNAL PLAKALAR ÜSTTEN BİRİNE YERLEŞTİRİLİR
3-- DÜŞÜNÜYORUM, ÖNCEDEN HAZIRLANMIŞ TABAKLAR
4-- HIZLI YAPIŞTIRICILAR
5--I CANNOT ANSWER THIS BECAUSE MY ENGLISH IS NOT GOOD
Google translate for you ---
1-- IT DEPENDS ON YOUR SKILLS
2-- YOU MUST START FROM THE TOP, THE ORIGINAL PLATES ARE PLACED ON ONE OF THE TOP
3-- I THINK, PRE-PREPARED PLATES
4-- FAST ADHESIVES
 
I'm coppering for the first time too. My model of HMS Agamemnon came with copper plates so that is what I am using with CA glue. I would agree with other comments about the attempted representation of nails in the plates at this scale is probably unnecessary, but I am going with what I have got. I also attach a copy of the coppering plan for the real HMS Victory, which would indicate that the plates just followed the shape of the hull and there was no horizontal row at the water line. Hope this helps.

PXL_20240623_124351755.jpg

PXL_20240623_123600792.jpg
 
John, I have done several boats with played hulls. I can tell you my experience. The first point I will make is there is no way you can make a model as accurate as the full size ship. My attempts have been to make as real as possible and don’t “sweat the small stuff”as they say. As for copper plating I will address your five questions individually.
1. Copper plating the hull is not difficult but can be frustrating at times. You just have to take your time.
2. I have started from the keel and work up.
3. I have used both copper tape and pre-made plates, both supplied with the kit. Both turned out well. The tape is far more fragile due to its t
 
Sorry John, accidental hit the send button too soon. To continue, the tape is very fragile and in my case had to have the fake nails added by using my wife’s wheeled perforating gadget - can’t remember what it is called.
4. No glue was involved as the copper already had an adhesive back applied. If glue has to be used I would suggest not using a fast set as you may have to re-aline the copper if you misplace them. I have found the adhesive on the tape or plates to be good. I have only had to press several back in place after a year or so. All still ok after 4years now.
5. I started at the keel and went up to the waterline then added a straight line along the water line to finish. I have no idea how the real plating was done. Maybe other members can comment on that. At any rate my copper plating looks great even though it may not be 100% accurate.

Bill
 
The authorotative work on the VICTORY, Longridge's "The anatomy of Nelson's Ship" shows a definitive band of parallel plates along the waterline. How is it possible for anybody to have an "original" plan of the coppering ? There was probably never a plan for the coppering the actual ship.
 
There was probably never a plan for the coppering the actual ship.
You are likely correct, but if there is a contemporary drawing showing these I hope someone gives a link. The plating of the USS Constitution was replaced in recent years (picture below), perhaps the public historian Carl Herzog can shed some light even though it is an American ship. He is easy to reach by way of the USS Constitution website.
Allan
Copper plating USS Constitution.jpg
 
This is the page Allan already mentioned


Maybe also this building log could be interesting

 
The authorotative work on the VICTORY, Longridge's "The anatomy of Nelson's Ship" shows a definitive band of parallel plates along the waterline. How is it possible for anybody to have an "original" plan of the coppering ? There was probably never a plan for the coppering the actual ship.
I guess that most of the metal workers working on such sheathing with copper plates did know how to install and cover such a hull.
The only thing they had to know and get marked was the waterline etc.....
Therefore maybe not much drawings are existing or where even produced

Nevertheless there are some contemporary drawings existing - it is from the HMS Winchester 1822

j7337.jpg


j6475.jpg
Imogene (1831)
Scale 1:48. Plan showing the starboard copper sheathing expansion plan, illustrating Vivians [Possibly Andrew Vivian who owned a tin and copper mine in Cornwall and topped with Tiscothes steam engine.] experimental copper sheathing as fitted on Imogene (1831), a 28-gun, Sixth Rate vessel.

Signed by Thomas Roberts (Master Shipwright)

 
and maybe also interesting, although in german language written, but nowadays you can translate all docs in the www, a pdf document written by Klaus Prystaz, a swiss modeler


Attachments

Being "flush" the nail heads would have some degree of indentation into the copper. The reason for this is most likely that wave action across the hull could, over time, allow micro organisms to catch on the edges of the nail heads. Constant movement through the seas allows the growth to accumulate.
I allow the copper on my hulls to patina naturally, one of the few things where I depart from the real thing simply for aesthetic reasons. As you can see in these photos, the copper is no longer bright. These photos reflect 3 years of oxidation.

IMG_2245.JPG

IMG_2246.JPG

IMG_2247.JPG

1719082880488.jpeg
 
Back
Top