- Joined
- Sep 23, 2021
- Messages
- 137
- Points
- 113

Time for a new build (+ bonus video of a little holiday project at the end ).
After finishing my Bluenose II I took a break from the model building and I am now kicking off the first of my 2022 projects. I intend to build this model more as a practice piece in order to try some techniques, making parts from scratch and adding some details etc. It should still be an historically interesting ship to build and hopefully I will make it authentic to the era (we will see). It is a fairly simple model and I don’t expect that it will take me the whole year to build (one mast and not a lot of rigging!) so, I will be starting a second “long term” project later in the year which will be my main build and one that will probably run through 2023/4 (and beyond?).
Part 1 - About The Model
This model is produced by Yuanqing and I purchased it from ZHL model. They call it a “Sweden Yacht''. Scale is 1:50 and is plank on bulkhead with false keel construction. I am not familiar with the Yuanqing brand but their high end models have received positive comments from SOS team members. I have not found any reviews or builds of this particular model, so I will find out if the kit is any good as I go along. The kit itself was inexpensive so I am quite happy to try a few things out and if it doesn't work out as planned that is OK so long as I have learnt something.

Some History of the “Hunt” Ships
I did some research on these ships to find out a bit more about them. So far I have only found a limited amount of information, but I will search on and hopefully turn up some more detail.
Acknowledgment: most of the information has come from the Marine Preservation Society Website MSV-HEILIGENHAFEN E.V. (msv-heiligenhafen.de)
Ships of this type were developed by a number of States surrounding the Baltic and were very common throughout the 19th and into the early 20th century. They were very capable, sturdily built vessels of about 20T and were primarily used as light coastal cargo ships as well as for ferrying passengers and providing mail services. The type disappeared after the introduction of larger and powered vessels and there are no original surviving examples.
The construction of these ships was basic, functional and with very few adornments (if any). They were work-a-day vessels rigged for easy handling with minimum crew. As a gaff cutter rigged mostly with wide jib, they were equipped for sailing in all winds with the aim of reaching destinations quickly and safely. The type had a continuous mast, shallow draft and in the rear area was often an owner's cabin which sometimes had one or two stern windows. Otherwise, the ship had a fairly bulbous hull to provide a lot of loading space.
The largest number of these types of ship were built in Denmark and were primarily known as "Dansk Jagt” - Danish Hunt ships. Other Baltic States built variants including Norway “Norsk Jakt”, Germany “Deutsche Jagd ” and Sweden “Sverigejakt”. Where the “Hunt” type of ship actually originated is not known precisely but because many were built in Denmark, it is most likely that is where they began their development.
In Denmark they were nicknamed "Peare Skude", which I believe translates as Apple Pram (or Pramm?) and in German coastal areas they were called "Aeppelkaehne", or Apple Barge. This was because their primary cargos were the seasonal perishable crops of the Baltic states and islands such as pears and apples. The term “Hunt” is also a little lost to history, but as far as I have found out, they were called that because their main task was to transport the perishable harvests once per year but the permanent captains had to provide an up-keep on their own responsibility for the rest of the year. They would therefore need to “hunt” for cargo and trade ( it seems the most plausible reason for this term, but that may have been misinterpreted over the years?).
In the 1970’s and 80’s a number of replica ships were built by the Danish boat builder Michael Kiersgaard to a design that retained much of the original historic character of the “Danske Jagt'' but modified for pleasure use with the hold space converted into cabins and a galley with the inclusion of an auxiliary diesel engine. Nine ships were built over this period. The “Olifant”, launched July 1977, is one of those ships and is now preserved by the association "Museumsschiff Heiligenhafe e.V.'' as a museum ship based in Heiligenhafe in Northern Germany.
The Model Kit
Whilst looking for references I did come across another kit of this type by Billing Boats (BB800 - Regina), which was a plank on frame model but they stopped producing it some years ago. Comparing images of the two, it is very similar to the Yuanqing model so I will cross-reference between them and decide which way to go. I will also attempt to find out a bit more about the replica ships in order to glean some details of how they are fitted out and rigged. I don’t know if the kit follows the original historical design or if it is based on the replica ships (should be interesting to find out).
What’s- in-the-box?
Well…….not that much!
As expected the model, as is the ship, pretty basic. There is a CD instruction video that I have not explored yet but hopefully, it will provide enough information to complete the build. 1:1 drawing plans are included ( not very well printed) and there is also a deck plan with some instructions and construction drawings that are in Chinese (I will attempt to decipher them with a translation app.) but they are not very detailed (I expect all the information is on the CD). The construction of the model looks straightforward and I have found some detailed pictures on the ZHL website so I should be able to go about the build logically without too much reliance on the instructions anyway.
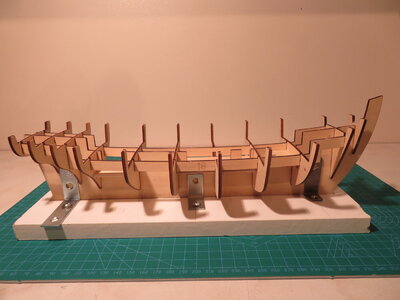
Overall, the kit parts look quite good quality. The main skeleton parts are of good quality 2mm birch ply and the laser cutting looks very well done. The other laser cut wood parts are in a variety of solid woods which vary in thickness from 2-2.7mm. There is a separate set of frames with a building jig and plastic former for the row boat together with some laser cut oak parts. The general fittings look of reasonable/good quality and are made in a variety of materials. The belays and anchors are white metal (I will replace the belays with wood ones). The waxed thread is in a variety of sizes and supplied in both black and tan colour for standing and running rigging. The deadeyes and blocks are CNC and look very good quality. Eyelets are standard brass. There is a set of pre-sewn sails included which I have not yet unpacked so I have not determined if they are fit for purpose (I am hoping that they are better than the ones that Artesania supplied for my Bluenose II - see my last log for my little rant!).
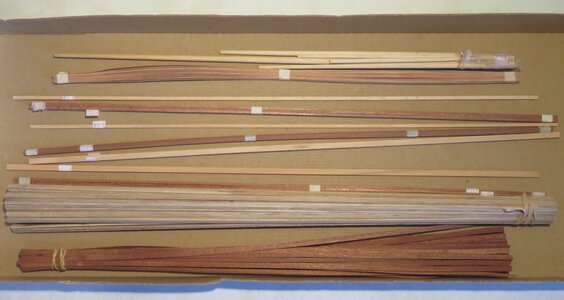
The strip wood all looks of good quality and there seems to be a more than ample supply of all the sizes. The planking strips are nicely finished and are very consistent in size. There is a set of laser cut and finished oak deck planking strips which are very nicely done. The 2nd planking decorative strips are in sapele and oak and are again well finished. Other strips are in a variety of woods - oak, birch and teak and are all well finished. The mast, bow-sprit, boom, gaff and spar are nicely pre-tapered and look to be in light oak.
I will gauge the quality of the laser cut parts once I start to assemble the bulkheads, deck and false keel and see how they all fit together.
As this will be my first complete log on SOS, I will update as I progress the build, but just out of the box, I think the quality is quite good and the model should come together nicely.
Everything in the box:

The frame Parts:

Laser cut parts:

Fittings packs

1:1 plan and deck plan


********************************************************************************************************
AND…….. Some new toys for Xmas!
I decided to treat myself to a few useful tools. A decent scroll saw, a mid-priced 5” disc sander, a mini 3” chop saw and a (very cheap) small bench drill. They seem to be “good enough” but there are a few quality issues and they are certainly not precision tools. The bench drill is probably the worst of the bunch and I will probably up-grade that for something better in the future. However, they all should be perfectly OK for my basic needs and I will make a few modifications and upgrades to improve them. They will certainly help to make things a lot quicker than using a coping saw and hand sanding everything.
I thought I would practice using them over the Xmas and New Year holidays while I was doing nothing else. I came across Ross McSweeney’s little dinghy kinetic wave sculpture on YouTube and thought it would be an interesting and fun little project to do and I could try out all my new tools. I figured out a design looking at his video but reduced the size by about 50%. I made up most of the parts from scrap wood and off-cuts. The base is made from an old kitchen chopping board, cut down and sanded. The only bits I bought were the ply discs to make the cams (£3 for 100 discs = not worth making my own for that price) and a big bag of ¼ x ¼” wood strip off-cuts which I obtained from a craft shop. Everything was done on the fly and I just winged it on measurements based on what I had available. The whole thing was done over a few evenings over the holiday period and was quite fun to do. All the parts were CA glued together.
The little sailing dinghy is made from birch veneer, some spare sapele strips, a bamboo skewer for the mast and a cocktail stick for the boom. It took me about 1 hr to make and I thought it came out quite well and since it was a “scratch build”, I can probably justify putting it up on SOS!
Hope you like the video.
View attachment Kinetic wave.mp4
********************************************************************************************************
After finishing my Bluenose II I took a break from the model building and I am now kicking off the first of my 2022 projects. I intend to build this model more as a practice piece in order to try some techniques, making parts from scratch and adding some details etc. It should still be an historically interesting ship to build and hopefully I will make it authentic to the era (we will see). It is a fairly simple model and I don’t expect that it will take me the whole year to build (one mast and not a lot of rigging!) so, I will be starting a second “long term” project later in the year which will be my main build and one that will probably run through 2023/4 (and beyond?).
Part 1 - About The Model
This model is produced by Yuanqing and I purchased it from ZHL model. They call it a “Sweden Yacht''. Scale is 1:50 and is plank on bulkhead with false keel construction. I am not familiar with the Yuanqing brand but their high end models have received positive comments from SOS team members. I have not found any reviews or builds of this particular model, so I will find out if the kit is any good as I go along. The kit itself was inexpensive so I am quite happy to try a few things out and if it doesn't work out as planned that is OK so long as I have learnt something.
Some History of the “Hunt” Ships
I did some research on these ships to find out a bit more about them. So far I have only found a limited amount of information, but I will search on and hopefully turn up some more detail.
Acknowledgment: most of the information has come from the Marine Preservation Society Website MSV-HEILIGENHAFEN E.V. (msv-heiligenhafen.de)
Ships of this type were developed by a number of States surrounding the Baltic and were very common throughout the 19th and into the early 20th century. They were very capable, sturdily built vessels of about 20T and were primarily used as light coastal cargo ships as well as for ferrying passengers and providing mail services. The type disappeared after the introduction of larger and powered vessels and there are no original surviving examples.
The construction of these ships was basic, functional and with very few adornments (if any). They were work-a-day vessels rigged for easy handling with minimum crew. As a gaff cutter rigged mostly with wide jib, they were equipped for sailing in all winds with the aim of reaching destinations quickly and safely. The type had a continuous mast, shallow draft and in the rear area was often an owner's cabin which sometimes had one or two stern windows. Otherwise, the ship had a fairly bulbous hull to provide a lot of loading space.
The largest number of these types of ship were built in Denmark and were primarily known as "Dansk Jagt” - Danish Hunt ships. Other Baltic States built variants including Norway “Norsk Jakt”, Germany “Deutsche Jagd ” and Sweden “Sverigejakt”. Where the “Hunt” type of ship actually originated is not known precisely but because many were built in Denmark, it is most likely that is where they began their development.
In Denmark they were nicknamed "Peare Skude", which I believe translates as Apple Pram (or Pramm?) and in German coastal areas they were called "Aeppelkaehne", or Apple Barge. This was because their primary cargos were the seasonal perishable crops of the Baltic states and islands such as pears and apples. The term “Hunt” is also a little lost to history, but as far as I have found out, they were called that because their main task was to transport the perishable harvests once per year but the permanent captains had to provide an up-keep on their own responsibility for the rest of the year. They would therefore need to “hunt” for cargo and trade ( it seems the most plausible reason for this term, but that may have been misinterpreted over the years?).
In the 1970’s and 80’s a number of replica ships were built by the Danish boat builder Michael Kiersgaard to a design that retained much of the original historic character of the “Danske Jagt'' but modified for pleasure use with the hold space converted into cabins and a galley with the inclusion of an auxiliary diesel engine. Nine ships were built over this period. The “Olifant”, launched July 1977, is one of those ships and is now preserved by the association "Museumsschiff Heiligenhafe e.V.'' as a museum ship based in Heiligenhafe in Northern Germany.
The Model Kit
Whilst looking for references I did come across another kit of this type by Billing Boats (BB800 - Regina), which was a plank on frame model but they stopped producing it some years ago. Comparing images of the two, it is very similar to the Yuanqing model so I will cross-reference between them and decide which way to go. I will also attempt to find out a bit more about the replica ships in order to glean some details of how they are fitted out and rigged. I don’t know if the kit follows the original historical design or if it is based on the replica ships (should be interesting to find out).
What’s- in-the-box?
Well…….not that much!
As expected the model, as is the ship, pretty basic. There is a CD instruction video that I have not explored yet but hopefully, it will provide enough information to complete the build. 1:1 drawing plans are included ( not very well printed) and there is also a deck plan with some instructions and construction drawings that are in Chinese (I will attempt to decipher them with a translation app.) but they are not very detailed (I expect all the information is on the CD). The construction of the model looks straightforward and I have found some detailed pictures on the ZHL website so I should be able to go about the build logically without too much reliance on the instructions anyway.
Overall, the kit parts look quite good quality. The main skeleton parts are of good quality 2mm birch ply and the laser cutting looks very well done. The other laser cut wood parts are in a variety of solid woods which vary in thickness from 2-2.7mm. There is a separate set of frames with a building jig and plastic former for the row boat together with some laser cut oak parts. The general fittings look of reasonable/good quality and are made in a variety of materials. The belays and anchors are white metal (I will replace the belays with wood ones). The waxed thread is in a variety of sizes and supplied in both black and tan colour for standing and running rigging. The deadeyes and blocks are CNC and look very good quality. Eyelets are standard brass. There is a set of pre-sewn sails included which I have not yet unpacked so I have not determined if they are fit for purpose (I am hoping that they are better than the ones that Artesania supplied for my Bluenose II - see my last log for my little rant!).
The strip wood all looks of good quality and there seems to be a more than ample supply of all the sizes. The planking strips are nicely finished and are very consistent in size. There is a set of laser cut and finished oak deck planking strips which are very nicely done. The 2nd planking decorative strips are in sapele and oak and are again well finished. Other strips are in a variety of woods - oak, birch and teak and are all well finished. The mast, bow-sprit, boom, gaff and spar are nicely pre-tapered and look to be in light oak.
I will gauge the quality of the laser cut parts once I start to assemble the bulkheads, deck and false keel and see how they all fit together.
As this will be my first complete log on SOS, I will update as I progress the build, but just out of the box, I think the quality is quite good and the model should come together nicely.
Everything in the box:
The frame Parts:
Laser cut parts:
Fittings packs
1:1 plan and deck plan
********************************************************************************************************
AND…….. Some new toys for Xmas!
I decided to treat myself to a few useful tools. A decent scroll saw, a mid-priced 5” disc sander, a mini 3” chop saw and a (very cheap) small bench drill. They seem to be “good enough” but there are a few quality issues and they are certainly not precision tools. The bench drill is probably the worst of the bunch and I will probably up-grade that for something better in the future. However, they all should be perfectly OK for my basic needs and I will make a few modifications and upgrades to improve them. They will certainly help to make things a lot quicker than using a coping saw and hand sanding everything.
I thought I would practice using them over the Xmas and New Year holidays while I was doing nothing else. I came across Ross McSweeney’s little dinghy kinetic wave sculpture on YouTube and thought it would be an interesting and fun little project to do and I could try out all my new tools. I figured out a design looking at his video but reduced the size by about 50%. I made up most of the parts from scrap wood and off-cuts. The base is made from an old kitchen chopping board, cut down and sanded. The only bits I bought were the ply discs to make the cams (£3 for 100 discs = not worth making my own for that price) and a big bag of ¼ x ¼” wood strip off-cuts which I obtained from a craft shop. Everything was done on the fly and I just winged it on measurements based on what I had available. The whole thing was done over a few evenings over the holiday period and was quite fun to do. All the parts were CA glued together.
The little sailing dinghy is made from birch veneer, some spare sapele strips, a bamboo skewer for the mast and a cocktail stick for the boom. It took me about 1 hr to make and I thought it came out quite well and since it was a “scratch build”, I can probably justify putting it up on SOS!
Hope you like the video.
View attachment Kinetic wave.mp4
********************************************************************************************************