• LUCZORAMA SHIPWRECK SCAVENGER HUNT GIVEAWAY. 4 Weeks of Fun • 1 Legendary Prize ((OcCre’s Fram Ship)) • Global Crew Welcome!
    **VIEW THREAD HERE**

Deck Plank Nailing pattern

Joined
Dec 26, 2023
Messages
73
Points
58

Location
Geelong, Australia
I am preparing my Bounty decks for nail markings. I do not propose to use any form of nails - just simulate with pencil.
I am thinking the following pattern which I have drawn on paper is reasonably realistic. The butt joints have the nails side by side and the fixings to the beams where there is no join have a pair of staggered nails. I would like to do something as authentic as practicable. Am I on the right track?

IMG_2403.jpeg
 
I am preparing my Bounty decks for nail markings. I do not propose to use any form of nails - just simulate with pencil.
I am thinking the following pattern which I have drawn on paper is reasonably realistic. The butt joints have the nails side by side and the fixings to the beams where there is no join have a pair of staggered nails. I would like to do something as authentic as practicable. Am I on the right track?

View attachment 462241
Yes, that is a standard pattern for trenails. One of the things I learned is that trenail marks should be very subtle and stand out, especially if you view the model from 1m away. They are only discernable up close.
 
Yes, that is a standard pattern for trenails. One of the things I learned is that trenail marks should be very subtle and stand out, especially if you view the model from 1m away. They are only discernable up close.
The pattern is typical for woodworking of all sorts. Two (or more, depending on the width of the plank) fastenings are needed at the butt end of a plank to hold it securely and avoid cupping (across-grain curving). But it's good practice to avoid two fasteners close together in the same grain line (in this case in the supporting beam), which can lead to splitting. At the butt, this can't be helped. However, at the crossing of a beam, the fasteners are staggered to be in different grain lines in the beam.

In regard to appearance on the model, as Dr. Darius suggests, it's a matter of scale. When looking at a model ship, it's like your brain is seeing a full size ship at some distance. If your were viewing a full-size vessel from 200 feet away, could you see the treenails in the deck? If the answer is no, maybe you don't need to mark them in any way to have an authentic representation.

Fair winds!
 
and please keep in mind, that treenails were only installed where a deck beam was - this means that the length of the planks are not regular, it depends on the locations of the beams - also butt joints were every time over a deck beams

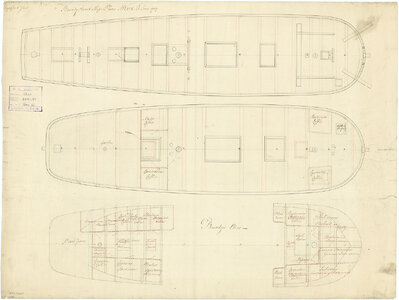
The deck beams are visible on this drawing - so all treenails have to be there

bounty.jpg

Bounty (purchased 1787)

Scale: 1:48. Plan showing the upper deck, lower deck, and fore & aft platforms for the Armed Transport Bounty (purchased 1797), as altered for carrying breadfruit plants from the Pacific (Tahiti).
Signed by Nicholas Ware [Master Shipwright, Deptford Dockyard, 1787-1795].


Maybe you take also a look at this topic, where I described the correct location also at the hatches etc.

 
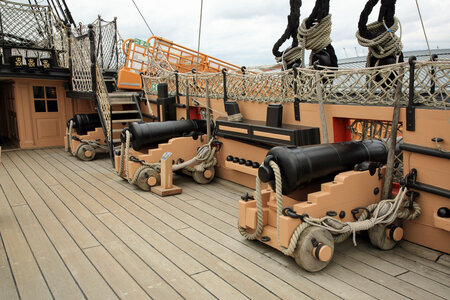
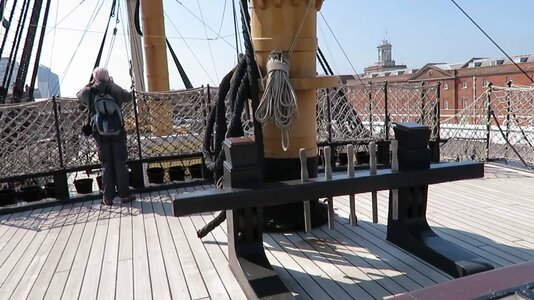
Sometimes a picture is worth a thousand words, and those two deck photos tell the story very clearly. Great info.
 
As a few have said, why bother. In trying to be realistic, adding them does the opposite. They're hardly noticable in reality, and disappear at any model scale.

View attachment 462609

View attachment 462610
I agree. Similarly it is easy to overdo the spike heads that secure copper plating. It shouldn't look like a riveted boiler plate in my view (but each to his own).
 
I agree, the nails are invisible, but the caulked seams certainly stand out very clearly.
True, I just mark each edge with soft lead, the caulk line looks fine. Some use thread, just my opinion,
that unnecessarily adds much more time to a very time consuming hobby.
 
Back
Top