• Win a Free Custom Engraved Brass Coin!!!
    As a way to introduce our brass coins to the community, we will raffle off a free coin during the month of August. Follow link ABOVE for instructions for entering.

Deck Planking Markings and Glues

Joined
Jun 5, 2025
Messages
30
Points
58

Location
Staten Island, NY
I am fairly new to the hobby. I have one completed build and two in process.

I am currently on the Model Shipways Sharpie Schooner. An older model, apparently, that instructs the builder to simply draw in parallel lines to represent the decking. I have done that, and it looks okay. As an early step in this journey I can live with this.

I have a stack of kits in the long term queue that, for the most part, include individual deck planks. Since getting interested in this hobby I have seen numerous techniques regarding the marking and installation of deck planking: from pencil marks to represent plank ends and nails, to holes drilled and filled with dark filler, to actual wooden plugs. I expect to try all at one point or another.

I am under no illusion that we are simply building recreations of actual, or suspected, designs of ships. As such, detail can only go so far, depending on scale and nature of the model. However, as a former theatrical set designer and builder, I am very much into the verisimilitude that goes with building representations of real life things.

So, to the point. In perusing the instructions for a number of my kits I am reading different approaches to representing the details in deck planking. Ignoring caulking in this post, I want to focus on deck 'nails', which I assume are wooden nails/plugs.
  • Some instructions have plank ends drawn in, rather than planks cut to length, and do not include nails.
  • Some show nails at plank ends, whether full length or cut.
  • Some show nails at cut ends as well as where the planks cross the deck timbers.
Regardless of preferences and/or techniques, at what point do these representations cease to be effective and just muddy up the deck finish? I am aware there are many opinions on this. I will likely receive the recommendations that "it depends on how it looks to me". I accept that, but I also want to expand my knowledge and skills.

Lastly, glues.

The two predominant glues I see being used for decking are PVA and contact cement (sometimes referred to as shoemakers glue, or is that different than regular contact cement). After typing this I just recalled a build log that used Titebond Hide Glue. Thoughts?

My main question has to do with the qualities of each glue, the pros and cons. Do builders generally prefer one over the other, or does it depend on the project?

Many thanks

Cheers
 
you will get a lot of opinions on this

Regardless of preferences and/or techniques, at what point do these representations cease to be effective and just muddy up the deck finish? I am aware there are many opinions on this. I will likely receive the recommendations that "it depends on how it looks to me". I accept that, but I also want to expand my knowledge and skills.

expanding ones knowledge and skills are the goal of ship model building for the most part.

first of all the iron planking spikes used on real decks are only about 1/2 inch so at a 1/4 to the foot scale model they would be .010 thousandths of an inch. In model ship building modelers will use way out of scale wooden pegs. but you would never see them at such a small scale.
on real decks the iron spikes were counter sunk and a wooden plug was used. So even on real decks the plugs would blend into the planking and hard to see.

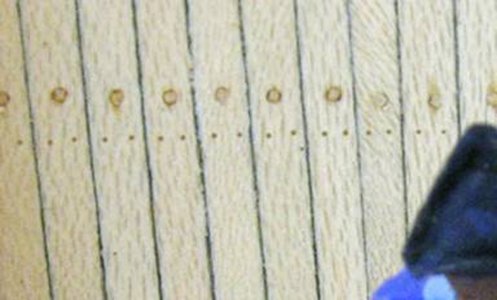
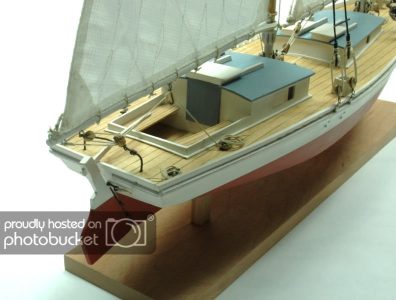
Realism vs artistic expression which way do you want to go? This picture shows pegs way out of scale but some builders love the look while other see it as ugly dots all over the deck

image006.jpg


actually the tiny little dots are true scale but looking at the model they would almost be invisible.

image005use.jpg
 
Last edited:
Regardless of preferences and/or techniques, at what point do these representations cease to be effective and just muddy up the deck finish?

It all depends upon the scale in which you are working. At 1:96, or even 1:24 scale, the detail you are addressing wouldn't be visible at all from "scale viewing distance." As Dave noted above, iron fastenings would never be visible because they are always countersunk and plugged on decks. Decks were maintained by "holystoning," which was the practice of rubbing rectangular blocks of stone over the deck planks to sand them clean periodically. The decks would collect pine tar dripping from the rigging or tracked by the sailors' feet and "tow" (bits of cordage fibers) that would turn them into a tacky black mess otherwise. Holystoning is not possible unless the plank fastenings are sunk below the level of the deck and plugged to prevent rusting (or trunnels are used as fasteners.)

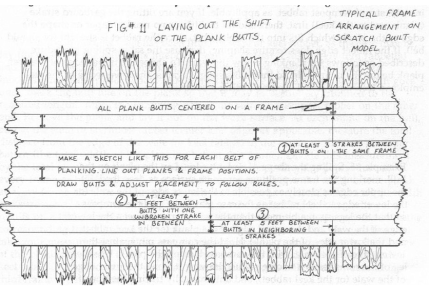
Note also that where plank fastenings were visible, they would be placed as per standard practices. A single fastening at a plank butt or on a deck frame would never occur. A minimum of two fasteners is used in such applications to properly secure the plank to the frame. Of course, where one purports to represent planking fastened to frames, such depictions must correspond to the actual frame placement below the planking in the prototype. Planking lengths and widths must also be to scale. Additionally, planking of any kind is always laid according to one of several minimum spacing schedules, as illustrated below. (Wider separations are permitted, but not any closer than indicated.)

1759947931447.png
(Note that in smaller craft with frame faces of less that about six inches wide, plank butts are not laid on top of frames, but rather the plank is joined inboard with a "butt block" which provides a stronger assembly and does not weaken the frame with too many fasteners in one area.)

The short answer is that techniques attempting to portray things the eye cannot see at scale viewing distance are always "ineffective and just muddy up the deck finish," not to mention that they are a "poke in the eye" of knowledgeable viewers and betray the modeler's inexperience or lack of attention to accurate detail. Note, however, that there are rare exceptions, particularly with older or folk-art models where (what I call) "impressionistic" techniques are used to suggest detail. This takes a lot of experience and restraint to pull off successfully, though. (I believe the photos Dave has posted above are of a model built by the late Harold Hahn, one of the master ship modelers of the second half of the twentieth century, who often worked very effectively in this "impressionistic" style. If asked, I'm sure Hahn would not have argued that the deck planking pictured was intended to be an accurate representation but rather an artistic impression.)

It bears noting that another often improperly represented deck detail is grossly oversized seam stopping (generally improperly called "caulking" by most lubberly modelers.) On a large vessel, such as an eighteenth century man of war, the seams at deck face level could have been as wide as 3/8" or even 1/2". At 1:48 scale, a .5" wide stopped seam would only be .005" wide on the model!

If their work is any indication, scale viewing distance is a concept which seems entirely foreign to most modelers, if not most kit designers. Scale viewing distance is simply shorthand for "what something looks like when viewed from a given distance. If your 1:48 scale model is going to be viewed from two feet away, the scale viewing distance is 96 feet, so the question a modeler working in 1:48 scale whose model will be viewed by two feet away must ask is "What does this detail look like when viewed from about 100 feet away? There are two factors to be considered, 1) acuity and 2) color. Acuity is simply a function of the viewer's eyes' ability to discern detail. The standard "eye chart" is a good example of a test for acuity. At some distance, the line of random letters becomes simply too small to read. Color is a more difficult thing to quantify and with this factor the modeler enters the realm of artistic expression to a greater extent. As the distance across which a detail is viewed increases, the atmospheric haze affects not only the visibility of the details, but also the values of the colors and the gloss level of the finishes viewed. Generally, colors will appear darker and require gentle toning down by adding a minute bit of black or burnt sienna. There should never be any gloss finish on a model as gloss is not visible from just about any scale viewing distance at any model scale. For example, pre-1850 standing rigging was soaked in pine tar which is a very dark brown color when thickly applied. When viewed from any appreciable distance, the color of a heavy coat of pine tar will appear black, not dark chocolate brown. Hence the appropriate color for standing rigging on a model is black, not dark brown. (And there never was a hemp deadeye lanyard that appeared white from any distance, either. Where that present fad came from is unfathomable to me.) (There is an excellent article in Volume II of the NRG's Ship Modeler's Shop Notes on adjusting color to compensate for scale viewing distance. I highly recommend getting a copy of this book as well as volume I of the series. They are goldmines of "tricks of the trade.")

As a former theatrical set designer, you are in good company modeling ships. As I recall, David Antscherl, one of the preeminent ship modelers of our time, was also a set designer by profession before turning to ship modeling full time. (See: https://seawatchbooks.com/collections/david-antscherl)
Your experience in that field will serve you well. Like set design, the whole aim of ship modeling is to produce an historically accurate three-dimensional model artistically creates a compelling impression of realism.

Perhaps the most valuable knowledge a ship modeler can acquire is a good familiarity with how the ships they model are built and actually appear in real life. As so often is the case with modelers who are simply following assembly instructions out of an often inaccurately designed boxed kit of prefabricated parts, the finished product loudly proclaims the fact that the model's builder really has no idea what a vessel of the type he's modeling actually looked like in real life. As I am sure you are well aware from your set designing experience, in order to create a compelling impression of reality, accurate research and meticulous attention to detail are essentials.


The two predominant glues I see being used for decking are PVA and contact cement (sometimes referred to as shoemakers glue, or is that different than regular contact cement). After typing this I just recalled a build log that used Titebond Hide Glue. Thoughts?

My main question has to do with the qualities of each glue, the pros and cons. Do builders generally prefer one over the other, or does it depend on the project?

"What glue should I use?" is one of the most common questions asked on ship modeling forums. The answer is a resounding, "It depends." The appropriate adhesive is a matter of the materials to be joined, the forces with which the adhesive must contend, the archival quality of the adhesive material, and the modeler's preference. Using this forum's search engine, you should fine many discussions of the best adhesives to use for various modeling purposes. In my experience, the best approach to choosing an adhesive is an incremental process of elimination:

Question 1.: What's it sticking together? Metal to wood is a tough one and a mechanical fastening is always to be preferred, together with the builder's preference between epoxy, Duco (nitrocellulose, polystyrene, etc.), shellac, hide glue, or PVA. Wood to wood always works well with hide glue and PVA. Shellac is a great all-purpose sealer and paper and cardstock adhesive. Metal to metal is a job for solder, preferably silver solder. Cyanoacrylates, ("CA") such as "Super Glue," have their place for occasional particular purposes, such as "tacking" pieces where extremely fast adhesion is desired, but, in my experience, are otherwise undesirable for any other use whatsoever due to CA's brittleness when cured, poor shear strength, and questionable archival qualities, not to mention the severe acquired respiratory and dermal allergic sensitivity to CA that so many users report.

Question 2.: How long do you want it to last? Archival quality is an important consideration. The minimum archival expectation of the museum and investment collector's community is one hundred years without significant degradation. The modern adhesives simply haven't been around long enough to have proven their properties for that long. Some, such as the styrene plastics, are already known to be archivally unsuitable for serious modeling. Many modelers could not care less whether their models outlast their makers, or last even less, but such attitudes are rightly not respected by serious fine arts ship modelers. Many will take a chance on PVA's archival properties for wood-to-wood adhesion, but the professional archival standards are the various hide glues and shellac. Hot hide glues can be messy to work with, but the newer "liquid" hide glue products, such as TiteBond's Liquid Hide Glue, do not require heating to prepare for use.

Question 3.: Do you want the adhesive to be reversible? This question really involves all the others. I believe it best to always use the most easily reversible adhesive otherwise suitable for the job. This is because 1.) you will make mistakes and have to deconstruct work from time to time, and 2.) every model worthy of the time spent creating it deserves to enjoy the highest archival potential possible and all old models will from time to time require repair and restoration, at which point reversible adhesives are extremely desirable. There are two readily reversible, yet highly archival adhesives: the hide (and fish) glues and shellac. Animal protein adhesives are readily reversed by the application of heat and water. Shellac is readily reversed by the application of alcohol. Duco cement (old fashioned plastic model kit cement) is also easily reversible with acetone, although acetone poses the risk of adversely affecting adjacent painted surfaces, unlike hot water and alcohol. There is a "rumor" going around that PVA is reversible using isopropyl alcohol and this is so, but it's much harder to do than to say, particularly after the PVA has taken a hard set. Note that the epoxies, like diamonds, "are forever." Don't use them unless you are good with having to destroy the parts entirely and refabricate them. There's practically nothing short of destructive heat or sawing and grinding that will separate epoxy-joined parts.

"Contact," "shoemaker's," or "rubber" cement should never be used for putting models together. It may sometimes have a use in patternmaking or the like, but it is decidedly not archivally suitable. It degrades with relative rapidity, drying out and losing its adhesion, as anybody who have ever used it for scrapbooking fairly quickly learns. There are those who, I am sure, will say that the copper foil sheathing they applied to their model with rubber cement ten or twenty years ago are still holding well and I say, "More power to them." Whether this is attributable to the builders' particular techniques or just a fluke, the fact is, the stuff isn't dependably stable. It's also nasty to work with, so I save it for laying linoleum and cork flooring, if anything at all. Others, however, appear willing to risk their hundreds of "real copper" foil plates one day dropping off their models like maple leaves in fall, as some have. Go figure!

Generally speaking, the most convenient, most potentially archival, most adaptable, most reversible, and least expensive, modeling adhesives are the hide glues and shellac. Other's will have their favorites, but I doubt they can cite sustainable reasons for them when compared to the other options.


I am fairly new to the hobby. I have one completed build and two in process. ...
... I have a stack of kits in the long term queue that, for the most part, include individual deck planks.

I'd urge you to finish the two kits you have "in process," building them with an eye to technical perfection and the correction of whatever errors and shortcomings may be inherent in those unfinished kits.

Meanwhile, cut your losses and sell your "stack of kits" to other beginners who are looking to try their hand at modeling and want to (sort of) get their feet wet playing with a kit model. Then, take the proceeds of your liquidated kit collection and invest that in some decent tools as the need arises along the way as you transition to the more mature scratch building part of the hobby. Building more than three kit models is unlikely to teach you much more than how to build more kit models, which three of them should already have been enough to do. Beyond that, building more kits is much like doing "paint-by-numbers" kits when you are capable of painting original works. The kit manufacturers make lots of money marketing the "sizzle" instead of the "steak" to beginning modelers when the real action is within the fine arts scratch building end of ship modeling. As a professional theatrical set designer, you should have more than sufficient research skills to easily scratch build just about whatever strikes your fancy, and you probably already possess all the basic design drafting, engineering, and craft related skills you need. I'm betting that after you complete the two kits upon which you're presently working, the rest of your "stack of kits" are going to bore you to tears and you'll be hankering to start creating your own artistically expressive original works.


I am currently on the Model Shipways Sharpie Schooner. An older model, apparently, that instructs the builder to simply draw in parallel lines to represent the decking. I have done that, and it looks okay. As an early step in this journey I can live with this.

Why settle for just "living with" something when you don't have to? Why not lay a real separately planked deck on top of the plywood deck provided in the kit?

What you do is take a plank of clear (no knots, no grain figuring) pine and plane long paper-thin shavings off the edge of it. Use a sharp hand plane. The shavings should come off in tightly curled lengths. Heat these well with a hot hair dryer and quickly uncurl them and lay them on a flat surface while still hot and cover with a pane of glass or other somewhat heavy flat weight and let them cool. (You can also try ironing them with a steam iron on a flat surface.) That should flatten them out. (If not, toss them in a pot of boiling water until they soften and can be uncurled, place under a weight and let cool. When hot, they should be quite pliable. When cooled, they should hold the flat shape you've held them in under the weight. Then use a straight edge and a craft knife or scissors to cut them into strips the width of your planking.

Apply any stain you wish, if any at all, only to the top side of the planking stock. (You want to leave the bottom bare wood so it will glue well to the adjacent bare wood.) If you want the deck to look "new," no stain is required at all. Either way, thereafter, apply a single coat of thinned clear shellac to the top side of the planking stock. (2 pound cut or so. Zinsser Bulls Eye brand in the can from the hardware store is fine. Get some denatured alcohol at the hardware store at the same time for thinning your shellac if needed and for cleaning your brush.)

Cut the planks to the length of your planking schedule, staggering the butts as required by the schedule. (Drawing your planking schedule layout on the plywood deck underlayment will be helpful.) Glue the planking strips to the deck face plywood with PVA taking care not to get the PVA on the finished top faces of your planks. The glue residue will interfere with further finishing otherwise. In the same manner, lay covering boards and whatever deck planking layout detail is appropriate with your planking strips cut to the required shapes. Butt the plank seams tightly and evenly.

When the planking is glued down and dry, Lightly sand it smooth as a baby's butt with about 320 grit sandpaper. (If you've used stain, take care not to sand through the staiin to bare wood again. If that happens, re-stain the bare wood.) After sanding, dust very well (use a tack cloth from the hardware store to remove all dust specks) and apply another thin coat of clear shellac to the top of the plank only. (Never so much that the shellac dries with a gloss. If it does, use a finer grit of sandpaper, a Scotchbrite pad, or fine steel wool to take the gloss off the surface. Then mix a very thin wash of medium gray to dark grey paint, a bit darker than your stain, if you've used stain, or lighter if you have not, and wipe it off across the plank seams before it dries. A thin residue line of gray wash should collect evenly along the thin plank seams, but be completely removed from the plank tops..

Important!: As with all such techniques with which you may be unfamiliar, practice on a sacrificial test piece first to get the hang of it before attacking the final product!

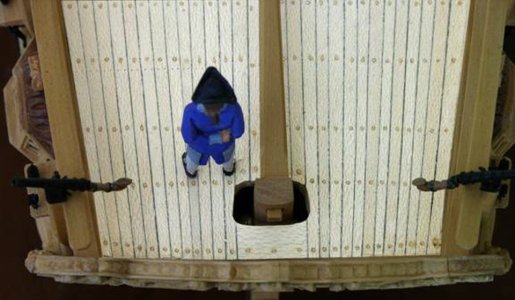
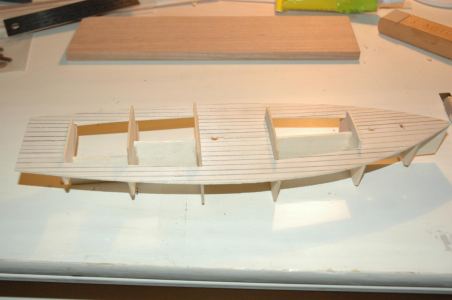
The result should look something like these photos, although your version will also show proper butt spacing and perhaps covering boards, if you want to show that detail. If your plank seams are less pronounced than those in the pictures, so much the better. What you are aiming for is a very subtle suggested detail. What you want is just the barest suggestion of visible plank seams. The trick is to fool the viewer's brain into realizing they are there when their eyes aren't actually seeing them. This is something beginning modelers usually miss. They often mistakenly do the reverse: they know a detail is there and think they must put a grossly overscale detail into a model, not because it's visible to their eyes at scale viewing distance, but rather because their brain tells them it's supposed to be there.

1759969885488.png

1759969908365.png

As you can tell, I had time on my hands. :) I decided to spend it on a comprehensive illustrative commentary which I thought might be helpful to you and others. The real "sport" in ship modeling is always trying to better your "personal best" in a constantly improving trajectory of accomplishment. That demands research, thoughtful planning, an obsessive attention to accuracy, and, often, a bit more time and tedium than one bent on instant gratification might expect, but the results are worth the time and effort required to raise your finished model above the level of all the other builds of the same kit.
 
Last edited:
It all depends upon the scale in which you are working. At 1:96, or even 1:24 scale, the detail you are addressing wouldn't be visible at all from "scale viewing distance." As Dave noted above, iron fastenings would never be visible because they are always countersunk and plugged on decks. Decks were maintained by "holystoning," which was the practice of rubbing rectangular blocks of stone over the deck planks to sand them clean periodically. The decks would collect pine tar dripping from the rigging or tracked by the sailors' feet and "tow" (bits of cordage fibers) that would turn them into a tacky black mess otherwise. Holystoning is not possible unless the plank fastenings are sunk below the level of the deck and plugged to prevent rusting (or trunnels are used as fasteners.)

Note also that where plank fastenings were visible, they would be placed as per standard practices. A single fastening at a plank butt or on a deck frame would never occur. A minimum of two fasteners is used in such applications to properly secure the plank to the frame. Of course, where one purports to represent planking fastened to frames, such depictions must correspond to the actual frame placement below the planking in the prototype. Planking lengths and widths must also be to scale. Additionally, planking of any kind is always laid according to one of several minimum spacing schedules, as illustrated below. (Wider separations are permitted, but not any closer than indicated.)

View attachment 548958
(Note that in smaller craft with frame faces of less that about six inches wide, plank butts are not laid on top of frames, but rather the plank is joined inboard with a "butt block" which provides a stronger assembly and does not weaken the frame with too many fasteners in one area.)

The short answer is that techniques attempting to portray things the eye cannot see at scale viewing distance are always "ineffective and just muddy up the deck finish," not to mention that they are a "poke in the eye" of knowledgeable viewers and betray the modeler's inexperience or lack of attention to accurate detail. Note, however, that there are rare exceptions, particularly with older or folk-art models where (what I call) "impressionistic" techniques are used to suggest detail. This takes a lot of experience and restraint to pull off successfully, though. (I believe the photos Dave has posted above are of a model built by the late Harold Hahn, one of the master ship modelers of the second half of the twentieth century, who often worked very effectively in this "impressionistic" style. If asked, I'm sure Hahn would not have argued that the deck planking pictured was intended to be an accurate representation but rather an artistic impression.)

It bears noting that another often improperly represented deck detail is grossly oversized seam stopping (generally improperly called "caulking" by most lubberly modelers.) On a large vessel, such as an eighteenth century man of war, the seams at deck face level could have been as wide as 3/8" or even 1/2". At 1:48 scale, a .5" wide stopped seam would only be .005" wide on the model!

If their work is any indication, scale viewing distance is a concept which seems entirely foreign to most modelers, if not most kit designers. Scale viewing distance is simply shorthand for "what something looks like when viewed from a given distance. If your 1:48 scale model is going to be viewed from two feet away, the scale viewing distance is 96 feet, so the question a modeler working in 1:48 scale whose model will be viewed by two feet away must ask is "What does this detail look like when viewed from about 100 feet away? There are two factors to be considered, 1) acuity and 2) color. Acuity is simply a function of the viewer's eyes' ability to discern detail. The standard "eye chart" is a good example of a test for acuity. At some distance, the line of random letters becomes simply too small to read. Color is a more difficult thing to quantify and with this factor the modeler enters the realm of artistic expression to a greater extent. As the distance across which a detail is viewed increases, the atmospheric haze affects not only the visibility of the details, but also the values of the colors and the gloss level of the finishes viewed. Generally, colors will appear darker and require gentle toning down by adding a minute bit of black or burnt sienna. There should never be any gloss finish on a model as gloss is not visible from just about any scale viewing distance at any model scale. For example, pre-1850 standing rigging was soaked in pine tar which is a very dark brown color when thickly applied. When viewed from any appreciable distance, the color of a heavy coat of pine tar will appear black, not dark chocolate brown. Hence the appropriate color for standing rigging on a model is black, not dark brown. (And there never was a hemp deadeye lanyard that appeared white from any distance, either. Where that present fad came from is unfathomable to me.) (There is an excellent article in Volume II of the NRG's Ship Modeler's Shop Notes on adjusting color to compensate for scale viewing distance. I highly recommend getting a copy of this book as well as volume I of the series. They are goldmines of "tricks of the trade.")

As a former theatrical set designer, you are in good company modeling ships. As I recall, David Antscherl, one of the preeminent ship modelers of our time, was also a set designer by profession before turning to ship modeling full time. (See: https://seawatchbooks.com/collections/david-antscherl)
Your experience in that field will serve you well. Like set design, the whole aim of ship modeling is to produce an historically accurate three-dimensional model artistically creates a compelling impression of realism.

Perhaps the most valuable knowledge a ship modeler can acquire is a good familiarity with how the ships they model are built and actually appear in real life. As so often is the case with modelers who are simply following assembly instructions out of an often inaccurately designed boxed kit of prefabricated parts, the finished product loudly proclaims the fact that the model's builder really has no idea what a vessel of the type he's modeling actually looked like in real life. As I am sure you are well aware from your set designing experience, in order to create a compelling impression of reality, accurate research and meticulous attention to detail are essentials.


"What glue should I use?" is one of the most common questions asked on ship modeling forums. The answer is a resounding, "It depends." The appropriate adhesive is a matter of the materials to be joined, the forces with which the adhesive must contend, the archival quality of the adhesive material, and the modeler's preference. Using this forum's search engine, you should fine many discussions of the best adhesives to use for various modeling purposes. In my experience, the best approach to choosing an adhesive is an incremental process of elimination:

Question 1.: What's it sticking together? Metal to wood is a tough one and a mechanical fastening is always to be preferred, together with the builder's preference between epoxy, Duco (nitrocellulose, polystyrene, etc.), shellac, hide glue, or PVA. Wood to wood always works well with hide glue and PVA. Shellac is a great all-purpose sealer and paper and cardstock adhesive. Metal to metal is a job for solder, preferably silver solder. Cyanoacrylates, ("CA") such as "Super Glue," have their place for occasional particular purposes, such as "tacking" pieces where extremely fast adhesion is desired, but, in my experience, are otherwise undesirable for any other use whatsoever due to CA's brittleness when cured, poor shear strength, and questionable archival qualities, not to mention the severe acquired respiratory and dermal allergic sensitivity to CA that so many users report.

Question 2.: How long do you want it to last? Archival quality is an important consideration. The minimum archival expectation of the museum and investment collector's community is one hundred years without significant degradation. The modern adhesives simply haven't been around long enough to have proven their properties for that long. Some, such as the styrene plastics, are already known to be archivally unsuitable for serious modeling. Many modelers could not care less whether their models outlast their makers, or last even less, but such attitudes are rightly not respected by serious fine arts ship modelers. Many will take a chance on PVA's archival properties for wood-to-wood adhesion, but the professional archival standards are the various hide glues and shellac. Hot hide glues can be messy to work with, but the newer "liquid" hide glue products, such as TiteBond's Liquid Hide Glue, do not require heating to prepare for use.

Question 3.: Do you want the adhesive to be reversible? This question really involves all the others. I believe it best to always use the most easily reversible adhesive otherwise suitable for the job. This is because 1.) you will make mistakes and have to deconstruct work from time to time, and 2.) every model worthy of the time spent creating it deserves to enjoy the highest archival potential possible and all old models will from time to time require repair and restoration, at which point reversible adhesives are extremely desirable. There are two readily reversible, yet highly archival adhesives: the hide (and fish) glues and shellac. Animal protein adhesives are readily reversed by the application of heat and water. Shellac is readily reversed by the application of alcohol. Duco cement (old fashioned plastic model kit cement) is also easily reversible with acetone, although acetone poses the risk of adversely affecting adjacent painted surfaces, unlike hot water and alcohol. There is a "rumor" going around that PVA is reversible using isopropyl alcohol and this is so, but it's much harder to do than to say, particularly after the PVA has taken a hard set. Note that the epoxies, like diamonds, "are forever." Don't use them unless you are good with having to destroy the parts entirely and refabricate them. There's practically nothing short of destructive heat or sawing and grinding that will separate epoxy-joined parts.

"Contact," "shoemaker's," or "rubber" cement should never be used for putting models together. It may sometimes have a use in patternmaking or the like, but it is decidedly not archivally suitable. It degrades with relative rapidity, drying out and losing its adhesion, as anybody who have ever used it for scrapbooking fairly quickly learns. There are those who, I am sure, will say that the copper foil sheathing they applied to their model with rubber cement ten or twenty years ago are still holding well and I say, "More power to them." Whether this is attributable to the builders' particular techniques or just a fluke, the fact is, the stuff isn't dependably stable. It's also nasty to work with, so I save it for laying linoleum and cork flooring, if anything at all. Others, however, appear willing to risk their hundreds of "real copper" foil plates one day dropping off their models like maple leaves in fall, as some have. Go figure!

Generally speaking, the most convenient, most potentially archival, most adaptable, most reversible, and least expensive, modeling adhesives are the hide glues and shellac. Other's will have their favorites, but I doubt they can cite sustainable reasons for them when compared to the other options.


I'd urge you to finish the two kits you have "in process," building them with an eye to technical perfection and the correction of whatever errors and shortcomings may be inherent in those unfinished kits.

Meanwhile, cut your losses and sell your "stack of kits" to other beginners who are looking to try their hand at modeling and want to (sort of) get their feet wet playing with a kit model. Then, take the proceeds of your liquidated kit collection and invest that in some decent tools as the need arises along the way as you transition to the more mature scratch building part of the hobby. Building more than three kit models is unlikely to teach you much more than how to build more kit models, which three of them should already have been enough to do. Beyond that, building more kits is much like doing "paint-by-numbers" kits when you are capable of painting original works. The kit manufacturers make lots of money marketing the "sizzle" instead of the "steak" to beginning modelers when the real action is within the fine arts scratch building end of ship modeling. As a professional theatrical set designer, you should have more than sufficient research skills to easily scratch build just about whatever strikes your fancy, and you probably already possess all the basic design drafting, engineering, and craft related skills you need. I'm betting that after you complete the two kits upon which you're presently working, the rest of your "stack of kits" are going to bore you to tears and you'll be hankering to start creating your own artistically expressive original works.


Why settle for just "living with" something when you don't have to? Why not lay a real separately planked deck on top of the plywood deck provided in the kit?

What you do is take a plank of clear (no knots, no grain figuring) pine and plane long paper-thin shavings off the edge of it. Use a sharp hand plane. The shavings should come off in tightly curled lengths. Heat these well with a hot hair dryer and quickly uncurl them and lay them on a flat surface while still hot and cover with a pane of glass or other somewhat heavy flat weight and let them cool. (You can also try ironing them with a steam iron on a flat surface.) That should flatten them out. (If not, toss them in a pot of boiling water until they soften and can be uncurled, place under a weight and let cool. When hot, they should be quite pliable. When cooled, they should hold the flat shape you've held them in under the weight. Then use a straight edge and a craft knife or scissors to cut them into strips the width of your planking.

Apply any stain you wish, if any at all, only to the top side of the planking stock. (You want to leave the bottom bare wood so it will glue well to the adjacent bare wood.) If you want the deck to look "new," no stain is required at all. Either way, thereafter, apply a single coat of thinned clear shellac to the top side of the planking stock. (2 pound cut or so. Zinsser Bulls Eye brand in the can from the hardware store is fine. Get some denatured alcohol at the hardware store at the same time for thinning your shellac if needed and for cleaning your brush.)

Cut the planks to the length of your planking schedule, staggering the butts as required by the schedule. (Drawing your planking schedule layout on the plywood deck underlayment will be helpful.) Glue the planking strips to the deck face plywood with PVA taking care not to get the PVA on the finished top faces of your planks. The glue residue will interfere with further finishing otherwise. In the same manner, lay covering boards and whatever deck planking layout detail is appropriate with your planking strips cut to the required shapes. Butt the plank seams tightly and evenly.

When the planking is glued down and dry, Lightly sand it smooth as a baby's butt with about 320 grit sandpaper. (If you've used stain, take care not to sand through the staiin to bare wood again. If that happens, re-stain the bare wood.) After sanding, dust very well (use a tack cloth from the hardware store to remove all dust specks) and apply another thin coat of clear shellac to the top of the plank only. (Never so much that the shellac dries with a gloss. If it does, use a finer grit of sandpaper, a Scotchbrite pad, or fine steel wool to take the gloss off the surface. Then mix a very thin wash of medium gray to dark grey paint, a bit darker than your stain, if you've used stain, or lighter if you have not, and wipe it off across the plank seams before it dries. A thin residue line of gray wash should collect evenly along the thin plank seams, but be completely removed from the plank tops..

Important!: As with all such techniques with which you may be unfamiliar, practice on a sacrificial test piece first to get the hang of it before attacking the final product!

The result should look something like these photos, although your version will also show proper butt spacing and perhaps covering boards, if you want to show that detail. If your plank seams are less pronounced than those in the pictures, so much the better. What you are aiming for is a very subtle suggested detail. What you want is just the barest suggestion of visible plank seams. The trick is to fool the viewer's brain into realizing they are there when their eyes aren't actually seeing them. This is something beginning modelers usually miss. They often mistakenly do the reverse: they know a detail is there and think they must put a grossly overscale detail into a model, not because it's visible to their eyes at scale viewing distance, but rather because their brain tells them it's supposed to be there.

View attachment 549013

View attachment 549014

As you can tell, I had time on my hands. :) I decided to spend it on a comprehensive illustrative commentary which I thought might be helpful to you and others. The real "sport" in ship modeling is always trying to better your "personal best" in a constantly improving trajectory of accomplishment. That demands research, thoughtful planning, an obsessive attention to accuracy, and, often, a bit more time and tedium than one bent on instant gratification might expect, but the results are worth the time and effort required to raise your finished model above the level of all the other builds of the same kit.
Thanks for the inciteful and thoughtful reply. Very helpful.

Cheers
 
As you can tell, I had time on my hands. :) I decided to spend it on a comprehensive illustrative commentary which I thought might be helpful to you and others. The real "sport" in ship modeling is always trying to better your "personal best" in a constantly improving trajectory of accomplishment. That demands research, thoughtful planning, an obsessive attention to accuracy, and, often, a bit more time and tedium than one bent on instant gratification might expect, but the results are worth the time and effort required to raise your finished model above the level of all the other builds of the same kit.
Hello Dave, your post speaks from my heart. If you build according to this principle, you always have to expect “negative” reviews from visitors. That's the way it is and will probably remain that way. I hope that as many people as possible read your post. Thank you very much for your work.
 
For example, pre-1850 standing rigging was soaked in pine tar which is a very dark brown color when thickly applied. When viewed from any appreciable distance, the color of a heavy coat of pine tar will appear black, not dark chocolate brown. Hence the appropriate color for standing rigging on a model is black, not dark brown.
In Post #3, Cap'n Cleek has given us a great deal of thoughtful and accurate information. However, I disagree with his conclusion on use of black for standing rigging on a model. Atmospheric perspective, including the effect of haze mentioned in the post, makes dark colors appear less dark and intense colors less intense as distance increases so that the smaller the scale of a model the more the colors should be lightened and muted to appear realistic. Black objects will tend to look brown at distance, not the reverse; therefore, brown standing rigging is likely to look more realistic than black. Fair winds!
 
In Post #3, Cap'n Cleek has given us a great deal of thoughtful and accurate information. However, I disagree with his conclusion on use of black for standing rigging on a model. Atmospheric perspective, including the effect of haze mentioned in the post, makes dark colors appear less dark and intense colors less intense as distance increases so that the smaller the scale of a model the more the colors should be lightened and muted to appear realistic. Black objects will tend to look brown at distance, not the reverse; therefore, brown standing rigging is likely to look more realistic than black. Fair winds!

I agree completely in theory, but the devil's in the details. Dark colors do appear less dark as distance increases and the smaller the scale of a model, the greater the scale viewing distance, so the more the dark colors should be lightened to appear realistic in theory. However, the degree of lightening occurring due to atmospheric effects depends upon 1) the viewing distance and 2) the amount of atmospheric haze. Assuming one wants to portray their model as the vessel would be viewed on a sunny day with clean air, at a scale viewing distance of even 300 feet, the atmospheric perspective lightening effect would not be very perceptible. Consider watching a football game. When you're sitting in the endzone (the only seats I can afford these days! :rolleyes:), the players' dark or bright colored uniforms don't appear noticeably different when they are at the other end of the field.

The use of pine tar on natural fiber standing rigging went by the boards when synthetic cordage which stands up to the weather much better came into general use and white or weathered gray lanyards will be seen on many modern vessels. although now black synthetic line is made for those who wish a period appearance.

I was, in fact, addressing the current fad for using light colored, or even white, deadeye lanyards on pre-1950 period vessels. In my not insignificant experience, I've not noticed any color lightening when looking at black deadeye lanyards on full-sized vessels at a distance of 300 feet or even more. For pine tar, a very, very dark brown is fine, but there's so little difference between pine tar brown and coal black that it's of no moment on a model.

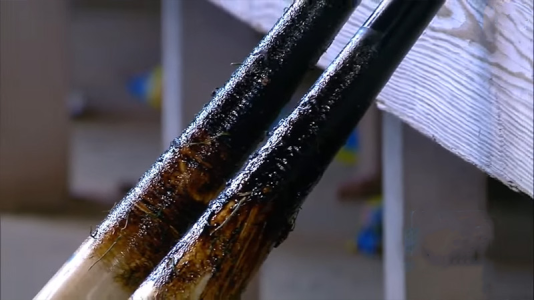
Pure pine tar:

1760406484445.png\

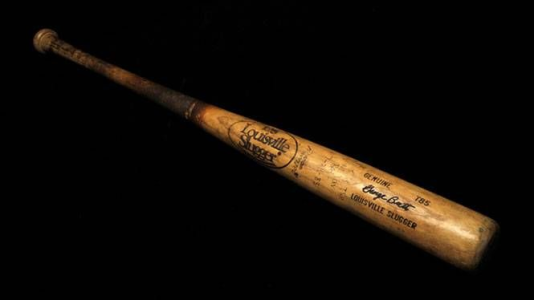
Pine tar on baseball bats to improve the batter's grip:

1760406716420.png

1760406870001.png

For those who want to get the color exactly right, and everybody should, here's an example of how black and white start to look gray and bright colors tend to fade at a distance:

1760408035649.png
 
Last edited:
Back
Top