Dr. Y Bluenose [COMPLETED BUILD]

A lot of big steps you took!
At the moment I'm not familiar with this build, so maybe I'm putting my foot in my mouth, but...
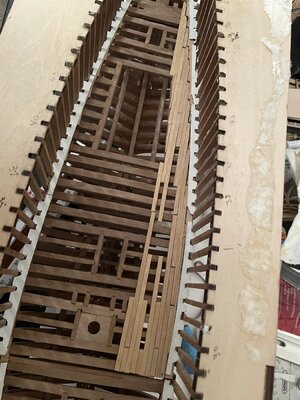
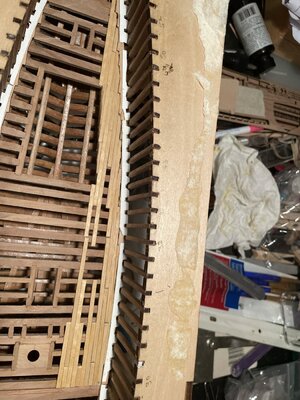
On your pictures, apart from the deck issue, I see that some of the floor beams do not align vertically with the notches of the frames. I am assuming that these notches are located, due to the frame assembly and the assembly jig, on the appropriate height and can/must be used as a reference for the deck installation. So I think it could it be worth the effort to check the vertical positions of your floorbeams. A visit to Peter Voogt's or Dean62's build logs may prove very insightful. :)
Johan
 
Looking good, you have made a lot of progress! Prior to installing the deck sheets or planks, I would be sure to sand all the deck beams level. I can’t tell if you have done this yet? But it is critical that your deck beams are all flush and level to ensure the deck sits level. I found it was best to use a file to do this. Or a small sanding block in the areas you can get to, and a small file for the harder to reach areas. I actually built the deck beam sub assemblies off the ship and filed level prior to installation. But you still have to average all of them together. No short cuts here.

The filler block at the bow is installed 90 degrees out. The boards should be running top to bottom. That is why your deck sheet is not fitting. You can also tell from top view. You either have to remove it and reinstall correctly, or file out the extra material in the way of the deck sheet, which would be difficult at best! To install correctly, take the port side off and install on the starboard side 90 degrees out from current orientation, with boards running up and down. And same for the opposite side. Hope that makes sense. The thick areas in the top view go at the bottom on the keel, and against frame no 1. ;)

On the fit of the deck sheets, many have had problems with the openings lining up with the beams. You either have to adjust the beams or consider planking the deck with individual boards. I chose to do that and cut out the edges of the deck sheet as a guide for the nibbing. It’s a lot of work, but worth it in my opinion because you can ensure your deck boards align with all openings and mast holes perfectly. ;)
Hi Phil,
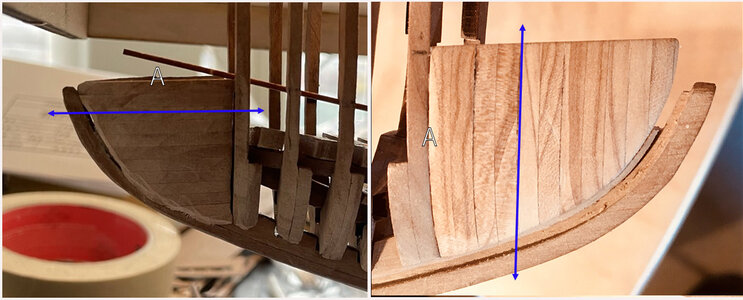
A picture to show what Dean has described above:
Boeg.jpg
On the left picture your part on the port side. The arrow shows the horizontal direction of your parts.
They have to run vertical.
When you take of your part on the port side, turn it 45 dgr anti clockwise and put it on the starboard side, as show on the right picture.
Side A has to fit to frame 1.
Regards, Peter
 
Hi Phil,

Many steps you have made

I would do the following to correct :
Follow Dean's advice for the planks the decking beams
It's more work, and take your time, you can then correct that by doing this, and the loose planks will look much better later

For the picture of Peter,
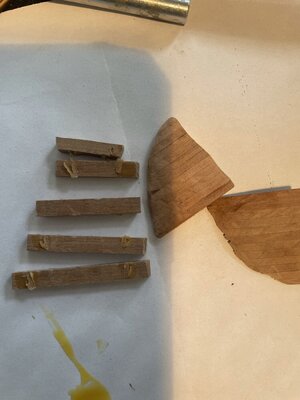
I would do the following, if you used wood glue
Soak everything with a small brush with warm water where the glue joints are and let it soak for 5 minutes
Repeat this several times
With a sharp knife you can carefully loosen the part between the glue residues
Take your time, you will absolutely get it off in this way
This part no longer fits because it no longer runs in the line or for the height, make a new part, this is easy to do.
It is wood and you can solve this in several ways.
Think of a piece of balsa wood, sand it to size and plank it with small slats.

I understand you completely if our co-builder points out mistakes, and that doesn't make you happy.

Making mistakes is not a bad thing, you learn from it, and remember you can still correct a lot in this phase, it will cost you more time, but that's not a bad thing, isn't it

It's all about the result that counts, and the time spent on it is subordinate to this

I've learned, there are multiple solutions for every problem

Regards
Henk
 
A lot of big steps you took!
At the moment I'm not familiar with this build, so maybe I'm putting my foot in my mouth, but...
On your pictures, apart from the deck issue, I see that some of the floor beams do not align vertically with the notches of the frames. I am assuming that these notches are located, due to the frame assembly and the assembly jig, on the appropriate height and can/must be used as a reference for the deck installation. So I think it could it be worth the effort to check the vertical positions of your floorbeams. A visit to Peter Voogt's or Dean62's build logs may prove very insightful. :)
Johan
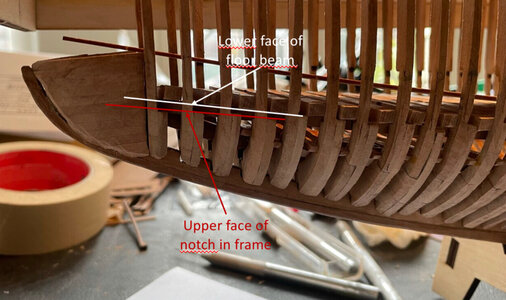
The first picture below is what I meant with my earlier post. There's a gap between the lower face of the beams and the notch of the frames. Not sure if it's supposed to be like this.
I hope this will clarify my rather abstract description...
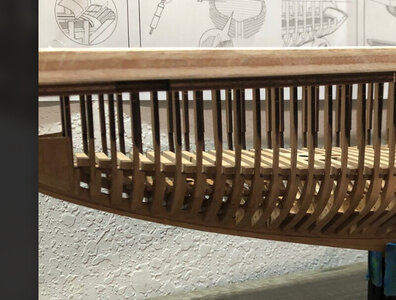
The second picture is a photo from Dean's build log (apologies Dean, for copyright infringement...) This shows the vertical position of his floorbeams, relative to the notches.
I hope this helps.

Johan

D30FBC74-F5C2-4BF5-9325-7BF0D7D55A14.jpegD14150D9-DB3C-405E-BA49-3EF8D27E85FA.jpeg
 
HI All.
Thanks for all your help and attention. I am definitely planning to sand the deck beams flat. and will work to correct the instillation of the parts, most important is the filler. As Johan also pointed out the deck is a little off at the far forward part. To correct, I have to take off a five of the forward deck beams and then adjust the deck support beams beneath them.
After I accomplish these things, I am still thinking that planking the deck myself using the instructions and the supplied deck parts as guides (what to plank and what to leave open). Also will have to figure out exactly what lumber to order and where to purchase. If anyone has thoughts, they will be appreciated.
Phil
 
Hi Phil. I am glad to see that those parts came off without a problem. :) With the guidance that you have already received, you can now move ahead with confidence.
 
I don’t know why I missed your posts from a few weeks ago. The e-mail allert does not function well. I agree with Heinrich that’s good to see you can fix the problem and can go on. Hope to see the results soon.
Regards, Peter
 
Thank you very much Peter and Heinrich. I appreciate your help. Starting to work again after a couple of weeks off because of family obligations.
Now looking for some 1X3 mm wood strips for constructing my own deck and planning to do some further sanding of the hull while I search and wait. Thinking of beechwood, but not really sure of the wood type or the best source. Any thoughts will be appreciated. Best wishes.
Beechwood is nice, but is a medium shade. I used Ramin, as it is light and has a nice tight grain that works well with small scales. Stained, the Ramin is light to medium. The Beechwood stained, tends to get dark quick. So might just clear coat if you use beechwood, but it depends on the look you’re after.
The size I used was 1mm thick x 3mm wide.
I ordered from Ages of Sail, located in California (agesofsail.com) and usually delivered within a week here to Texas.
 
Last edited:
Hi Dean,
Thank you for the advice. I decided on the Ramin and ordered from
Ages of Sail, which seems like a great source and they are in my home state.
Hope you are doing well and I will post photos when progress is made.
Best wishes,
Phil
 
Hi Dean,
Thank you for the advice. I decided on the Ramin and ordered from
Ages of Sail, which seems like a great source and they are in my home state.
Hope you are doing well and I will post photos when progress is made.
Best wishes,
Phil
No problem, glad I could help! ;)
Look forward to your progress!
 
Hi Dean,
Thank you for the advice. I decided on the Ramin and ordered from
Ages of Sail, which seems like a great source and they are in my home state.
Hope you are doing well and I will post photos when progress is made.
Best wishes,
Phil
I recently ordered some stripwood from AoS. Fast shipping and very well packed. Arrived safe and sound.

Glenn
 
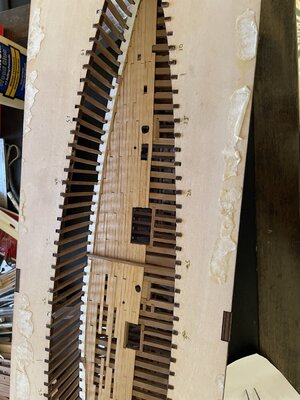
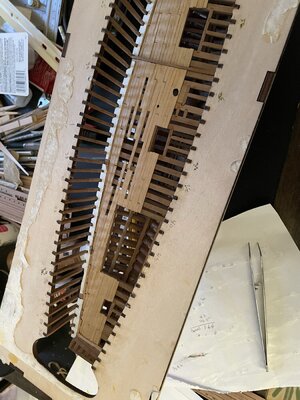
And finally after sanding. Plan to stain after the jig is cut off, so that I can mask more easily to protect other areas. Any suggestions for cutting the jig would be welcome. I have a fine saw, but it is scary because any mistakes are sort of final! Will also fill and paint some of the white side timbers I broke and repaired.

AIMG_0615.JPEGIMG_0616.JPEGnd finally
 
And finally after sanding. Plan to stain after the jig is cut off, so that I can mask more easily to protect other areas. Any suggestions for cutting the jig would be welcome. I have a fine saw, but it is scary because any mistakes are sort of final! Will also fill and paint some of the white side timbers I broke and repaired.

AView attachment 274895View attachment 274896nd finally
Looking good! I cut my frames with a dremel tool, then sanded them flush afterwards. ;)
 
Hi Phil.
Nice to see a new post of your build. And that the Ramin has arrived. Now you can go on. The open deck looks good.
For the cutting I just can say: try to support the frames a bit and put almost no tension on the saw. Let the (sharp) saw do the work with its weight.
Regards, Peter
 
Back
Top