Enterprise Maryland 1799 1:51 [COMPLETED BUILD]

A recap of work on the gunwales.

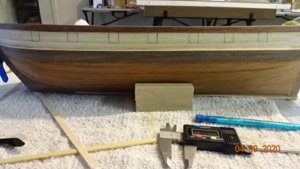
I used a crud measurement method, basically just laid a cut of the plan on top of the ship.
I used some planks to support the image.
DSC01327.JPG
DSC01328.JPG

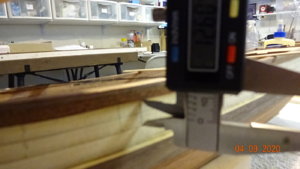
Next I marked the width of each port using my caliper.
DSC01329.JPG

DSC01330.JPG

Then I used the calipers to measure the length of each port.
DSC01332.JPG

Finally filled in the lines. Port and Starboard views.
DSC01333.JPGDSC01335.JPG


Next post the drilling and cutting of the ports.
 

Attachments

  • DSC01331.JPG
    DSC01331.JPG
    129.4 KB · Views: 5
  • DSC01333.JPG
    DSC01333.JPG
    185.8 KB · Views: 5
I used a dremel like tool for the drilling.
Started with a 1/8" typical steel bit but after a while smoke started bellowing (used that word because boats have bellows, lol) from the drilling surface. No pictures of the smoke, sorry.

I did have some mini drill bits , ordered from amazon , and they seemed to be for wood.
The bits were, Wayin Top 50pcs PCB Drill Bit Set, in case anyone is interested.

They made the job go much faster and the drill holes were much cleaner.
DSC01336.JPG
DSC01337.JPG

Next I chiseled and cut .... chiseled and cut ... chiseled and cut ...... you get it .
Port and starboard views of the port holes chiseled, cut out and sanded.

DSC01338.JPG DSC01339.JPG

Everything was fun until I started to frame the port holes.
DSC01340.JPG

Holy crap, batman ..... what a terrible look. Frightened me, almost :eek:
So, I stopped here and queried the community, Pathfinder65 suggested glueing sandpaper to a small square dowel.


Here's what I made, functionality over beauty...
DSC01343.JPG

I cut the piece so it fits the port holes and glued on some 220 grit sandpaper.
I would be sanding through 4.5mm of wood so wanted something that would make a dent.

Using this and some finesse cutting I ended up with a product I'm happy with.
DSC01341.JPG

Still have another side to work on but the starboard side is done.
DSC01342.JPG

I was initially worried about my crappy first cut that I pondered on the idea of just getting another ship.
I won't lie , this isn't the first time I had this thought :D.

Bye now.
 
Last edited:
Hi Rowboat,
Your boat and progress looks great, I have to say, I'm learning much for taking a look at your progress. I've considered doing a build log but simply haven't pulled the trigger on learning how to actually do it.
I am at the scary part of 1st initial planking. I have some minor fairing to do to a few bulkheads because the shapes are just a hair off causeing a bump or depression when laying some test planks. I'm at a loss as to how and when to attach the stem on this boat. seeing your pictures and progress has helped. Thanks
 
@JohnBlackthorne , @Pathfinder65

thanks for check’n on my work.

Funny johnblackthorne mentioned the stem, anyone notice it’s missing the top part on my ship:(.

The problem is that instead of leaving the ship docked On the work bench while working on it, I’m picking it up , turning it over, swinging it like a baseball bat (ok, not that last part), so eventually I smack it agains the work bench.:mad:


My work chair swivels and rolls, not the best choice when I’m handling a delicate ship.
Just need to train myself to be more careful.
 
@JohnBlackthorne

setting up a build log was fairly easy.
Just follow naming standards, throw in some pics, add a few comments, done!
Lol, just kidding, it can be intimidating the first time.

I feel your nervousness over starting the planking. Lots of advice on this site to assist us.
Definitely the next time I do a planking I’ll feel prepared.

Good luckShip-1
 
Those darn port holes (actually port squares :)
There are still some gaps that are concerning to me..
DSC01345.JPG

My solution ( this idea is from another modeler) is the following.

Sand some of the wood I used to make the frames into a pile.
DSC01346.JPG

Mix some glue with water to thin the solution.
DSC01347.JPG

Apply glue around the frames and press the sandings into the holes.

DSC01351.JPG

Then sanded with 100 grit sand paper.
DSC01352.JPG

DSC01355.JPG

DSC01373.JPG

DSC01354.JPG

Still needs a little more attention but overall it's much better looking than what I started with...

Well, I started this build on Oct 21, 2019 so that makes it 7 months.

Wow, 7 months to get the hull built!
At this rate I'll be done in 4 years ;).

Having a great time and enjoy all the fellow modelers builds and comments.
What a great day.
 
Last edited:
...no worries about the timing. Are you in a hurry? Don't worry, we will wait for you updates. Time and patience are the greatest help building models. ;)
 
I agree with Jimsky, there's no hurry to enjoyment. I started my Enterprise build in 2017 and finished it in December of 2019. It was my first foray into wooden ship modeling.

Jan
 
Just a quick post to show some of the main tools used on the build.
May be helpful info for newbies (like myself).
Priced from 5 to 30 US dollars.

The black saw is a fine tooth saw purchased at the local hobby shop, $16.00
It works great and is used for most small cuts I make. I recommend picking up a quality saw.
The metal files work so-so, I had these previously to work on my RC helis and planes hobby .
Would be better if they were made specifically for wood.
A good measuring tool is a necessity, the caliper below has been used frequently when milling my own wood.

A small wood planer, not necessary but handy to have.
Xacto blades, definately needed and buy more blades. Don't cut with blunt blades!

A handheld drill and miniature wood drill bits, seems like something always needs to be drilled.

A small hammer, the one below has a brass and rubber ends. Any small hammer will sufice.

Tweezers, for those places where your fingers won't fit.


DSC01357.JPG

DSC01358.JPG

DSC01359.JPG

Another wood cutting tool, although this one is designed to crimp the wood so it can be bent.
It can cut through the wood but squeezes the cut end so it's not a flat cut.
I haven't had much success with crimping process and I prefer the fine tooth saw over this tool.


DSC01380.JPG

Hope that helps .......
 
The next step in the manual is to set the support timbers around the cannon holes.
The plans called for a 1mmX3mm piece of wood for the timbers, which I did not have.
DSC01382.JPG

So milled a 2mm X 4.5mm down.
This is close enough.
DSC01366.JPGDSC01367.JPG

next, measure, cut, glue and clamp.
Used the fine tooth saw for the cuts.
DSC01368.JPG

Let dry overnight then do the other side.
Notice I have cut out the scuppers which had been covered by the second planking.
I ran the timbers above the scupper where needed, hope that was right.
DSC01385.JPG

I did use those crimping cutters to trim any excess wood sticking above the top rail.

Next I'll discuss my cannon issue :mad:
 
Last edited:
I may have already mention in a previous post that I'm not to happy with the cannon carriages.

Here's what the manual calls for.
DSC01383.JPGDSC01384.JPG

.... here's what I got in the kit ...
to make matters worse, missing two wheels:mad:
DSC01371.JPGDSC01370.JPG

Not wanting to give up entirely on these I decided to build one.
The base frame is trapezoid shape so lining up the axles is a problem, had to file a straight line.

Here's my mess..... I had to attach the axles to the bottom as if I put them on top the wheels did not touch the ground ?//?
One can see that the cuts on the side pieces don't align so I need to file them straight.. to hold the cannon.

DSC01379.JPGDSC01378.JPG


Does this look like any cannon you would want to fire? Maybe better if the enemy had it, lol.
DSC01375.JPGDSC01374.JPGDSC01374.JPGDSC01377.JPG

I though placing it on the ship might improve its look ..
DSC01386.JPGDSC01388.JPG

Turns out it made my ship look worse ;).

So, looking for input.
Any thoughts, comments, snide remarks .... all welcomed.

Happy Hobbying,
Rowboat.
 
Last edited:
Hello Rowboat, well... unfortunately, some of the kit manufacturers, doesn't pay much attention for details of their kits, and you kit is just an example of it. But , I think we can try to make them a bit better looking.

1. Cut off alone the wheel holes on both sides just enough to remove those notches
2. Cut the bottom (trapezoid) part from both side so it will go inside between both sides. Pay attention that the length of all three parts (bottom and both sides) are the same.
3. from spare square stock, cut the axles (front and rear), they should extruded 2mm from the base (each side). On both ends of the axles drill the holes same diameter as you have wire for the wheels and insert\glue pieces of wire. Glue on the bottom wooden axles.
4. Large wheels should go in front axles, small on the back

Alternatively, you can always make your own carriages, from scratch or.... purchase aftermarket parts. ;)
 
Looking at your kit parts versus the instructions from my kit, your cannons are different. My kit had carronades, that’s why there is only one set of wheels shown in the picture you posted. The carronades were designed to swivel. I was going to change out the carronades but decided not to.

Jan
 
Looking at your kit parts versus the instructions from my kit, your cannons are different. My kit had carronades, that’s why there is only one set of wheels shown in the picture you posted. The carronades were designed to swivel. I was going to change out the carronades but decided not to.
Good catch, Jan!!
 
I may have already mention in a previous post that I'm not to happy with the cannon carriages.

Here's what the manual calls for.
View attachment 146982View attachment 146983

.... here's what I got in the kit ...
to make matters worse, missing two wheels:mad:
View attachment 146986View attachment 146985

Not wanting to give up entirely on these I decided to build one.
The base frame is trapezoid shape so lining up the axles is a problem, had to file a straight line.

Here's my mess..... I had to attach the axles to the bottom as if I put them on top the wheels did not touch the ground ?//?
One can see that the cuts on the side pieces don't align so I need to file them straight.. to hold the cannon.

View attachment 146992View attachment 146991


Does this look like any cannon you would want to fire? Maybe better if the enemy had it, lol.
View attachment 146988View attachment 146989View attachment 146989View attachment 146990

I though placing it on the ship might improve its look ..
View attachment 146993View attachment 146994

Turns out it made my ship look worse ;).

So, looking for input.
Any thoughts, comments, snide remarks .... all welcomed.

Happy Hobbying,
Rowboat.
Hi,

The manual is not coresponding with the gun carriage supplied. As mentioned above not a carronade.
You have to fit the base plate between the two gun carriage sides and not on top.
The axles will then fit in the two slots at the bottom of the side plates and you gun carriage fits and is better suited to meet the enemy. :)

Hope it helps.
 
Decided to take a break from the ship building and instead concentrate on a docking station.
I needed something that both held the ship in place and supported it when not working on it, and it should look good.

This is an image from the web that caught my eye.
DSC01410.JPG

Ready set go!
First let's get a sound foundation.
DSC01408.JPG

DSC01409.JPG

DSC01414.JPG

Just about ready

DSC01414.JPG

Check to see if the keel will fit the docking station.

DSC01415.JPG

Glue has dried and clamps now come off, let's get a first look without all the clamps.
DSC01417.JPG

So far so good, now add support beams.
DSC01419.JPG

Finish all the support beams.
DSC01422.JPG

Let's see the new home for my ship.
DSC01423.JPG


:)
DSC01424.JPG

All right, a few days of 4 to 5 hours and it's almost done.
Still needs those small touches but that will be for another day.
For now, I'm quite happy with this.:)
 
Been working on the bowspirit and ran into an issue, well more then one but I'll keep this short.
The manual calls for the following eyebolts.
DSC01407.JPG


Well, I couldn't find any in the kit so I ordered the following.
They are 9mm long, 7mm to the eyebolt and the eyebolt is 1.5mm
DSC01404.JPG

DSC01405.JPG

These eyebolts seem very small but I'm not sure if they are the right size.
The manual just says 7mm, no talk of thickness, eyebolt size.

Any thoughts ?
 
Hi,

The manual is not coresponding with the gun carriage supplied. As mentioned above not a carronade.
You have to fit the base plate between the two gun carriage sides and not on top.
The axles will then fit in the two slots at the bottom of the side plates and you gun carriage fits and is better suited to meet the enemy. :)

Hope it helps.
I’ll check if putting the sides on the outside of the base instead of on top works any better.

Thanks
 
Turns out one can make there own eyebolts, lol.
I did find a small number of the eyebolts in the kit, well not exactly in the kit, I had previously moved them when inventorying the kit.

I will still try to make some, just for the experience.


Currently though I'm building the masts.

Happy to see that my emblem has gained a new stripe, private to Petty Officer Second Class :) !
 
Last edited:
Back
Top