Enterprise Maryland 1799 1:51 [COMPLETED BUILD]

@Uwek ,
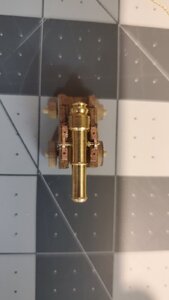
Did not know the cathead had wheels/sheves, I was wondering why the need for the 4 holes when 2 would have worked .. now I know.
Thanks for that info. Trying to sand/trim the holes to mimic the look.
The wood is dark so it does not show the details as well.
Definitely no room for inserting any wheels/sheves.

@Pathfinder65
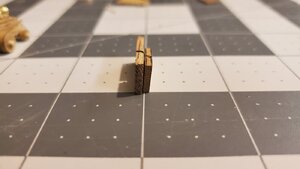
I drilled the holes for the foremast and there is little to no rake.
I knew there was supposed to be one but I went with the standard straight up and down as I did not feel confident in drilling at an angle.
I might be able to whittle/sand the hole to the correct rake angle but hesitant about doing that.
 
Last edited:
A little work on the channels and chain plates.

Basically wrap a wire around the deadeyes and attach the chainplate arm.
Tryed to keep the center hole of the deadeye the lowest, some need further adjusting.

.DSC01496.JPG

Then trimmed off excess wire.
DSC01501.JPG

Working on deck fixtues, placed but not glued.
There is another hatch covering but I ran out of the grating, shorted 6 pieces.
DSC01507 (1).JPG

DSC01506 (1).JPG

DSC01505.JPG
 
I have come to the realization that sometimes one just has to "cut off" the bad stuff and start over.

I try to fix things that did not quite work out as we all probably do.
I did not want my time spent working on the item to be wasted so I hack (literally) something together.
Spend more time adjusting, sanding, adjusting, sanding ..... you get it.

Here's my example, the beakheads.
Now, I tried to use the metal lower curved trim pieces (which came with the kit) with the wood curve piece(s) I made.
After many attempts to get the curves to match this was the end product.
DSC01498.JPGDSC01499.JPG

Turns out the starboard side beakhead is larger then the portside.
Also because the metal curved pieces were to large to begin with I angled them when attaching, otherwise they would have interfered with the anchor holes.

I then spent time trimming the metal piece to match the curve of the wood piece, sanding the wood to match the metal, ect..

Then I spent some time reading and looking at other's beakhead builds.
It was at this time I realized I just wasted my time :( , my beakheads needed to go and I needed to start from scratch.

Saying this, or thinking it, is much easier than actually performing the procedure.
Would I damage the hull or the stem in my attempt to remove? What if I could not make a better beakhead?

But the reality is if I wanted better beakheads then I needed to remove the old ones and create new ones.
Which is what I did.
DSC01509.JPGDSC01512.JPGDSC01511 (1).JPG

I am pleased with how these turned out.
Much better than my first attempt.

Which is my point, beginners rarely want to improve their first attempt by removing it all and restarting.
Better to just keep hacking on it :rolleyes:.
We put precious time and effort into it and don't want that to be wasted.

The reality is that we must learn to trash those "works" and rebuild, that's how we will get better.
Only after reading about fellow builders making not one or two but four or more attempts to get the right piece , did I realize I needed to move away from this mindset of "just get it to work".

In the end my build will be better for all of this and that makes me happy.

Thanks!
 
Last edited:
Looking good, I would wait to fasten the chainplate until you do the Shrouds. The outer ones have a different angle than the inner. Just a suggestion ;)

Jan

Good idea Jan.
I'm perusing your build and finding a couple of suggestions on pushing off attaching items till later as they interfere with the rigging.
What about the deck hatches, should I wait on these?
 
What about the deck hatches, should I wait on these?

No, I found that they weren’t in the way while rigging. One of the “mistakes” I made was fully assembling the masts. I wound up taking the tops off so I could rig the Stays, Rat lines and add the main sail hoops.

Jan
 
Jan, that's exactly what i was looking for.

After some rereading i found that I need some "cat holes" (121) according to this diagram.
20200620_101107.jpg

Had to read ahead to find that. Then finally i found the section where the anchor line (118) runs to the "cat holes".

Now i can measure the distance.

Thanks20200620_101153.jpg
 
Last edited by a moderator:
Where can I find some .25mm soft wire?

I have 4mm blocks that get wrapped with it.
My kit came with 5mm, which is to bulky for those small blocks.

I found some on ebay (from Constructo) but they want 25 dollars to ship a 4 dollar part, estimated shipping time is over a month. That's crazy expensive!
 
Well, I got ahead of myself. I was to excited when i found the K&S .51mm wire that I didn't pay enough attention to what block size I was using.
If you guessed I used a 5mm block instead of 4mm , you are correct.

The 5mm blocks are also 3.5mm wide but the 4mm blocks are only 2.5mm wide.
When i tried tightening the 5mm wire around the smaller blocks they all broke.
In these pics the broken blocks are on the left.
20200625_150619.jpg

20200625_150707.jpg

So I continue my search for that Unicorn at the end of rainbow where that pot of gold lies
 
About to start putting in the hardware for holding the cannons in place. Earlier I built one of the kit cannon cariages and posted my dissapointment on my build log.

Here is the beta viewing of my cannon build. I will put the old picture along with what i'm working on.

132037-ff4c7ffeadf00064e1bd03a335f51caa.jpg20200629_153559.jpg

132036-672fc6739c3cfb0b72eebcbae68844f6.jpg20200629_152750.jpg

132038-db84080dc6b6796afeb0bed2c2b0de4f.jpg20200629_153516.jpg

132042-574f23b7713781aa2aca5e4d511dca81.jpg20200629_152933.jpg20200629_152857.jpg

After purchasing a few cannon kits I figured out how to solve my dislike. Turns out the kit that came with the model has a thickness of 1.9mm and my beta model uses 2.3mm.
The difference is barely noticeable for one piece of wood as shown here.
20200629_154109.jpg

However, when the entire carriage is built that extra .4mm, per piece of wood, makes the carriage robust looking. Is it to scale , not sure but it's what I like.
20200629_155250.jpg20200629_155232.jpg

I built the base, sides, axles, wedge that helps raise/lower the cannon angle. I pulled the wheels from 2 different cannon kits. The cannon is from the original kit. The axles are approximately 1.7mm diameter. The front wheels are 8mm and the back are 5mm. The sides are 22.4mm in length and 9.5mm tall.

Took a number tries to find the right thickness of the wood. Ended up planeing down 6mm to 2.3mm poplar wood.

Not quite done with the design.......

-- Rowboat
 

Attachments

  • 20200629_151356.jpg
    20200629_151356.jpg
    194.4 KB · Views: 3
  • 20200629_151220.jpg
    20200629_151220.jpg
    90.8 KB · Views: 3
  • 20200629_151126.jpg
    20200629_151126.jpg
    102.9 KB · Views: 4
  • 20200629_151648.jpg
    20200629_151648.jpg
    163.2 KB · Views: 3
  • 20200629_152831.jpg
    20200629_152831.jpg
    75.7 KB · Views: 2
  • 20200629_154048.jpg
    20200629_154048.jpg
    72.8 KB · Views: 1
Last edited:
Back
Top