-

Win a Free Custom Engraved Brass Coin!!!
As a way to introduce our brass coins to the community, we will raffle off a free coin during the month of August. Follow link ABOVE for instructions for entering.
You are using an out of date browser. It may not display this or other websites correctly.
You should upgrade or use an alternative browser.
You should upgrade or use an alternative browser.
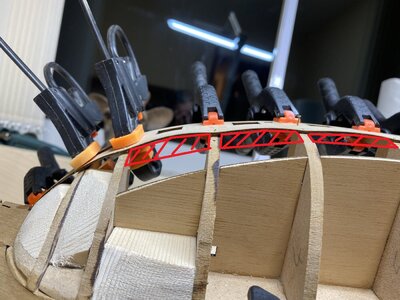
seems, that the distance from stern to bow is on the red line shorter than on the green line at the top, so your gunport template is slightly not adjusting this difference. At the bottom the template is a little bit too long.
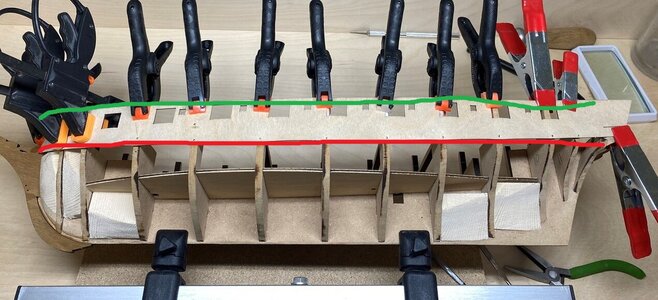
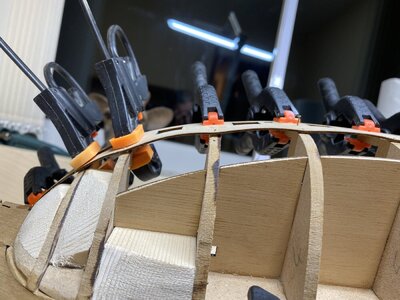
The only thing to correct is to check the correct location of the template, means is the template at the stern at the correct height (related to the keel) installed, one or two millimeter higher and the bulges would be much smaller.
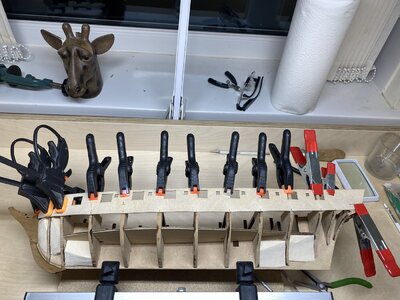
But if the height / location is correct, there is the only way to sand over and reduce the bulges. If necessary you could add from inside some wooden blocks, like you did already at the bow
after installation of your first planking layer you have definitely use some filler and sand the complete hull, so that you have a smooth (without bulges) basis for the much more important second planking layer, which will cover completely also your gunport template

The only thing to correct is to check the correct location of the template, means is the template at the stern at the correct height (related to the keel) installed, one or two millimeter higher and the bulges would be much smaller.
But if the height / location is correct, there is the only way to sand over and reduce the bulges. If necessary you could add from inside some wooden blocks, like you did already at the bow

after installation of your first planking layer you have definitely use some filler and sand the complete hull, so that you have a smooth (without bulges) basis for the much more important second planking layer, which will cover completely also your gunport template
I'm thinking that if you cut it in half lengthwise just below the ports and then try again it should fit better. It's just too wide to conform so you may have to spile a bit. It's a big step so don't take my word as gospel, I'm still rather new at this. 
I also had problems with the gun port patterns in this kit.
I solved it by cutting off the bottom of the pattern before I glued it in place. I removed between 5 and 8 mm to make it look right, then started first planking from the new bottom edge of the pattern .
This solved the problem for me.
John
I solved it by cutting off the bottom of the pattern before I glued it in place. I removed between 5 and 8 mm to make it look right, then started first planking from the new bottom edge of the pattern .
This solved the problem for me.
John
- Joined
- Oct 15, 2017
- Messages
- 1,189
- Points
- 443

Rob,
Uwek's observation is spot on. Typically, the solution would be to make small cuts along the short side, in this case the top, which would allow it those cuts to expand, just a little and ease the tension on the piece. This would be risky, I think in this case as the wood could further split into your gun ports and cause other issues. All the suggestions above are great recommendations. Each having their pros and cons.
You could cut into smaller pieces, reducing the tension. If you do, cuts should be made only where they would be supported by bulkheads underneath. Effort wise this seems to be the easiest. On the down side you would not be able to make cuts wherever a bulkhead intersected with a gun port. Also, the other issue with this method is you would need to spend some time ensuring the individual pieces are correctly aligned to ensure ports are aligned.
Uwek's suggestion is probably the way I would go. Rough cutting lime or bass wood blocks as you did for your bow. Cut them proud of the bulkheads, then sand them down to the bulkheads. This provides you with a greater surface to lay and attach your piece to. This is certainly more effort, but it would be the way I would choose as I've had success with it in the past.
Thanks guys. I think first approach is to fit the in fill blocks. If that fails nothing lost except a bit of time. Then try cutting the pattern length wise below the gun ports and fit in two parts. If that fails go old school, planking it and cut the gun ports
Because the kit maker was trying to form a shape with double curvature with a wide, flat strip of wood, the resulting puckers will result. The wood can't stretch easily in two directions, unless you steam it over a form, and it just isn't worth the hassle. In fact, because plywood contains wood sheet running in two directions, it is designed NOT to stretch, or bend easily on one axis. Don't fight it.
Instead, cut the gun port piece all along the bottom of the gun ports and use only the top half, because this section will only have to curve in one direction, over a vertical axis. Save the lower half to use as a pattern later (you'll see why). The lower section of the of port piece can be replaced with wood strips just like the rest of the hull. The top strip forms the bottom edges of the gun ports. The lower half of the plywood you saved shows you exactly what area you need to cover with the strips, because it is your pattern.
The advantage is that the flatter sections of the hull use plywood for speed in construction, but the strips below the ports will form the proper curves of the hull with a lot less trouble. And, the new strips you insert will blend in perfectly with hull strips below them. Fighting a piece of plywood over a double curve is a waste of time in my opinion, and in this case, you really don't have to. Basswood strips for doing first planking hull forming are cheap and easy to find if you need more wood.
Sometimes when a kit maker tries to simplify construction, thinking they will save the builder time planking, they create more problems. Such is the case here.
- "The longest distance between any two points is called a shortcut."
Last edited:
Because the kit maker was trying to form a shape with double curvature with a wide, flat strip of wood, the resulting puckers will result. The wood can't stretch easily in two directions, unless you steam it over a form, and it just isn't worth the hassle. In fact, because plywood contains wood sheet running in two directions, it is designed NOT to stretch, or bend easily on one axis. Don't fight it.
Instead, cut the gun port piece all along the bottom of the gun ports and use only the top half, because this section will only have to curve in one direction, over a vertical axis. Save the lower half to use as a pattern later (you'll see why). The lower section of the of port piece can be replaced with wood strips just like the rest of the hull. The top strip forms the bottom edges of the gun ports. The lower half of the plywood you saved shows you exactly what area you need to cover with the strips, because it is your pattern.
The advantage is that the flatter sections of the hull use plywood for speed in construction, but the strips below the ports will form the proper curves of the hull with a lot less trouble. And, the new strips you insert will blend in perfectly with hull strips below them. Fighting a piece of plywood over a double curve is a waste of time in my opinion, and in this case, you really don't have to. Basswood strips for doing first planking hull forming are cheap and easy to find if you need more wood.
Sometimes when a kit maker tries to simplify construction, thinking they will save the builder time planking, they create more problems. Such is the case here.
- "The longest distance between any two points is called a shortcut."
The more I think about it the more I’m favouring this plan. Even if I install extra wood forms between the ribs all I will be doing is still trying to force the bulge down. It’s a while since I built a full ship but I seem to remember one of the rules being never force a plank.
Hmmm…you are experiencing a very typical problem with these thin ply pattern templates. They rarely fit. Anyway, forum responses above all suggest solutions you can fiddle with. What I would do is set aside the template entirely and go to regular planking. You can use the templates to mark the gun port locations but I would just use planking strips instead. Actually would be easier to get a good smooth planked hull.
- Joined
- Oct 17, 2020
- Messages
- 1,687
- Points
- 488

Hello, sorry, have you checked the frames if they are in sequence?Hi everyone and thanks for your help. I cut the templates down and re fitted them. I’m still not happy with the results so I’m going over plank them with 1mm lime wood. Sand them then cut the gunports
That solves that problem. Have you made allowance for the difference in thickness between the planking+MDF and the planking only which will cover the frames below that? It's hard to tell from the photo.
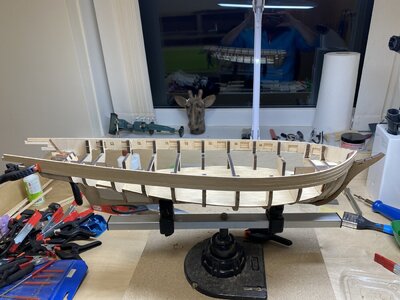
Hallo @RobsterI’ve just started Amati Russian brig Marcury. I have fitted one of the gun port patterns and I seem to have “bulges” between the frames. Any help solving this would be appreciated.
we wish you all the BEST and a HAPPY BIRTHDAY

Hope you solved the problem with the gunports!?!
How is your work on the ship model going?


