H.M.S. Victory Constructo - by Wooden Ship Crafts

A quick update
First one, I went to a few local shops and bought more tools that will help me to ensure 90 degrees for my first frame setup. Also, I bought a CA glue (random one) and other tools that I will share in the upcoming days.

Compare my previous setup vs this one - much better. I am more confident now, that everything will go smooth with the first frame :).
Screenshot 2019-12-17 at 00.08.12.png

Update No 2
I finished the text for the next video. Tomorrow I am going to finish and upload. I hope you will like it.

See you tomorrow.
 
Last edited:
G'day Max, if you want to strengthen your bulkheads and keep them square at the same, use some 3/4" strip wood and glue and clamp a piece each side of the bulkhead you are fixing just like in the pic above, just make sure that they are not too long and interfere with your planking,

best regards John,
 
Finally, I've made it.

I applied glue to the Frame No 3 and installed it to the false keel. That's is an official start for me and for my HMS Victory.
I was preparing myself that sometimes I have to do this. Now it is the time. For some of you, it may be a daily routine, for me, this is the start of the long journey.

So today, I went with the sandpaper and sand sticks to clean up the char areas. I've cleaned half of the frames as the sanding process is a dirty one. I really wanted to go with the first frame glue installation.

After sanding, I added glue to the frame no 3 and put it to the false keel. I bought two bricks and clamps so that I can ensure the frame is going to be 90 degrees glued. I did check with the ruler 10 times just to be sure that everything is fine. In the end, I applied CA glue, only drop of it to the frame to keel part, so that it can hold two pieces while PVA glue will take effect in a few hours. CA glue is just one I found in a local shop, still have to spend some time and buy a proper one. Let's see how this glue goes.

Screenshot 2019-12-17 at 23.10.37.png

Screenshot 2019-12-17 at 23.10.45.png

Screenshot 2019-12-17 at 23.10.54.png

I feel I need more clamps and a ruler with the level.

Thanks for all your likes and comments. You really support me.
 
Good morning, wonderful people!

The first thing I did before anything else I usually do early in the morning, guess what... I've checked how is the first frame sitting on the keel.
It was as expected. But, when I tried to unplug 2 sticks that were helping me to ensure 90 degrees position something happened. Obviously, if I put sticks right between the keel and the frame, some glue was applied to them as well.
One of the sticks has been deadly attached to my model. I did my best to unplug it, but this what happened.
Screenshot 2019-12-18 at 07.01.42.png
and the remaining part of the frame:
Screenshot 2019-12-18 at 07.01.49.png

My assumption is that on the other side I applied CA glue, and the glue went all the way through the whole between the frame and the keel and appeared on the stick. As I can't imagine such an effect from PVA glue.

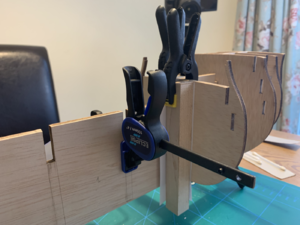
Moving to the next frame. Know, I am one frame more knowledgeable, so I applied my experience to the next one :).
You see... baby steps :).

Screenshot 2019-12-18 at 07.01.58.png

My wife's father asked me when he saw the size of the H.M.S. Victory box: When are you going to make it, you have so many projects going on in your life?

Happy crafting!
 
G'day Max, if you want to strengthen your bulkheads and keep them square at the same, use some 3/4" strip wood and glue and clamp a piece each side of the bulkhead you are fixing just like in the pic above, just make sure that they are not too long and interfere with your planking,

best regards John,

Thanks for the advice, I use the square bricks clamped to the frame to hold it and every quite often checks the 90 degrees. By the way, I have to buy a proper metallic ruler.
 
Something I learned while building H.M.S. Race Horse (Mantua Models) was that planking one side at a time led to a warped hull. From either side the model looked great, but from either end the asymmetry was obvious. Getting everything straight and square is critical in early steps, and it's important to avoid messing that up later on.
 
Something I learned while building H.M.S. Race Horse (Mantua Models) was that planking one side at a time led to a warped hull. From either side the model looked great, but from either end the asymmetry was obvious. Getting everything straight and square is critical in early steps, and it's important to avoid messing that up later on.

Thanks for the tip with planking. It's really something I didn't have experience.

That's one of the reasons I was worrying for a couple of days before starting the model. I am on the 5th frame now with the tools I have. Hopefully, all will go smoothly.
 
Yesterday, I did get good progress with the frames. The hardest one was the second frame as I wasn't sure about the 90 degrees angle.
I only found out how to properly measure only when I started putting the fourth frame. Also, the transparent ruler doesn't really help with its transparency. So today I bought a wooden ruler.

Screenshot 2019-12-19 at 15.33.23.pngScreenshot 2019-12-19 at 15.33.32.pngScreenshot 2019-12-19 at 15.33.47.pngScreenshot 2019-12-19 at 15.33.57.pngScreenshot 2019-12-19 at 15.34.05.pngScreenshot 2019-12-19 at 15.34.11.pngScreenshot 2019-12-19 at 15.34.21.pngScreenshot 2019-12-19 at 15.34.37.png

I can't wait to finish this part and start the next one.
 

Attachments

  • Screenshot 2019-12-19 at 15.33.39.png
    Screenshot 2019-12-19 at 15.33.39.png
    1.2 MB · Views: 7
Last edited:
I see you're using paper as a sacrificial layer between your wood square blocks and the bulked/keel. Is that wax paper? Would not wax paper work better as the glue would not adhere to it at all?

Love the build log, hope to be starting my Victory build after the holidays.
 
I see you're using paper as a sacrificial layer between your wood square blocks and the bulked/keel. Is that wax paper? Would not wax paper work better as the glue would not adhere to it at all?

Love the build log, hope to be starting my Victory build after the holidays.

I wasn’t even aware that there is some special type of paper that would allow me to have a clear surface after blocks removal. Thanks for the suggestion, I will have a look for wax paper.

Thanks for the feedback :).

P.S. let me know when you start your Victory model please.
 
Back
Top