Hello from the Eastern Shore of Chesapeake Bay !

Joined
Nov 18, 2018
Messages
96
Points
113

Location
Easton, Maryland, USA (The Delmarva Peninsula)
I have been receiving inspiration from this group for some some time now, always intending to jump in one day and get involved. I'm 74 now but have been a ship modeler since my teens. What can I say? You guys all know that this hobby is so much more than what it seems to be from any superficial perspective. It's how I meditate. It has brought me peace and joy when I needed them the most. But even when life is great, ship modeling has been a marvelous enhancement.

So I thought I would break the ice by sharing a few photos of a sub-project (that's like a sub-plot in a complex movie) that's related to my current model which is now 3 years (of my spare time) under way. Some of you will recognize this right away:DSC_0005.JPGDSC_0008.JPGDSC_0012.JPGDSC_0014.JPG
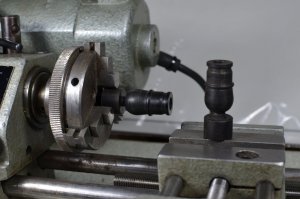
 
So these mortars and their bases and dolphin handles are all made from ebony. The first photo shows one barrel in the chuck being sealed with superglue which changes it from a wood appearance very nicely. Just a drop at a time is needed and then a soft cloth is applied while spinning the piece in the lathe. That is followed with a light rub from some very fine steel wool. I repeated the process about 3 times to cover nook and cranny and to eliminate all traces of wood grain.

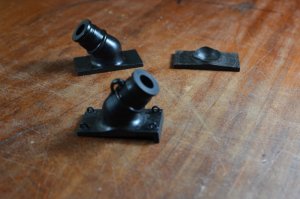
The second photo shows my method of producing these mortars by not only turning the barrels on the lathe, but also the bases. The extra base in this photo is one that didn't turn out perfectly due to a dull cutting tool. See the rough edges.

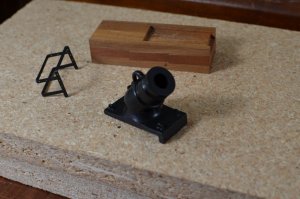
The third photo is pretty self-explanatory. The bit of iron work is drilled out (can you see the holes in the picture?) for the nails to fasten it to the aft end of the wooden mortar base.

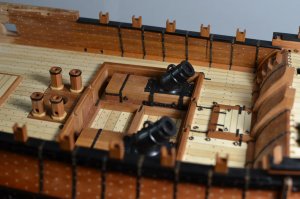
And the last photo is of course where I put these mortars once finished. Uwek, you have been a major inspiration for me in this project. As I said, I am 3 years into this build. It is 1:48 scale and scratch built from a pear tree that I had to cut down in the corner of my yard because it was leaning too much on my neighbor's fence. Of course I took photos every step of the way so can start a proper build log once I figure out a little better how to enter stuff here on the site.
 
Hallo Jimmy,
Recognizing the La Salamandre - and a very good model, what we can see on the photos.
Good that you decided to start posting!!!!
So I am looking forward to see your built in a building log - would be great.
And...... welcome to the active part of the forum.....good to have you on board
 
Welcome aboard SOS, Jim! We are glad you joined us and hope you will like it here as we all do! As Uwe mentioned, we would lobe to see more images from your La Salamandre project. Would you mind starting a build log? What do you think? It doesn't have to be from the beginning, but obviously - desirable. :cool:
 
very nice indeed - if only I had a lathe ... (And probably the skill to use it)
 
So I'm preparing to post my build log but the one thing that I haven't figured out is how to return to the "text window" again after attaching a picture file. In this "Introduce yourself" post, I merely entered all my photos and posted what I had at that point. Then I used "respond" to get back a new "text window" so I could explain the photos. I am assuming there must be a simple way to return to the text window after attaching a file photo. Could someone help me with that please?
 
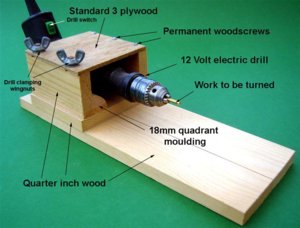
Rudimentary lathe - home-made - 12 Volts. Clamp it to desk with G clamp to use - Shape the work with small files, and part off with a jeweller's saw - I have a Unimat SL (same as above), but this simple type was good enough when I was modelmaking at sea -
Bob


32 - Homemade lathe.jpg
 
Back
Top