HMS Bounty - 1/110 Revell

Joined
May 13, 2020
Messages
7
Points
53

Here goes, my "first" ship kit build. I say first because the others I made were as a teenager and I didn't really put much time or effort into those.
Anyway, the HMS Bounty by Revell. Old mould that dates back to 1956. Was state of the art then, not so much anymore. The kit has many issues with flash and badly placed ejection pin marks. There are also some accuracy issues that I will attempt to remedy as best as I can. Though bear in mind I know practically nothing about ships and am learning along the way.

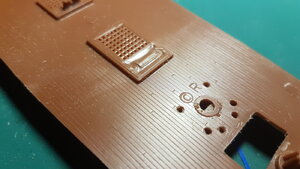
I started work with the deck. It has raised details which are not too bad. They would get the job done with a bit of paint, but what bothered me was ejection pin marks all over the deck as well as a bewilderingly placed copyright symbol.
20200509_211948.jpg

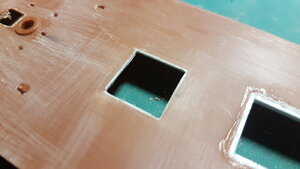
If I remedied those issues I'd be left with patches without the surface detail that would be very difficult to recreate. That's why I decided to sand the entire deck and re-scribe the planks. I also decided to simply cut out all the hatches because they just had surface detail. The holes did not go all the way through.
20200511_225923.jpg

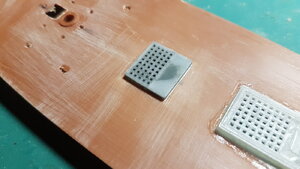
To replace the hatches I 3D modelled and printed new ones. I only have a cheap FDM 3D printer, but I think the result will be vastly superior to the original part. Here is a dry fit of the new parts.
20200511_225734.jpg

And although the interior would only be visible under the correct angle and with perfect lighting, I will probably scratch build some stairs leading down. Because I can. I will also scratch build or maybe 3D print a few other things for the deck, like the binnacle (just one of the many nautical terms I'm learning along the way) and flag locker, that are simply missing from the kit. That as well as a few other details make me think that this model was erroneously based on the Bethia, that the Bounty was converted from. At least in some details.

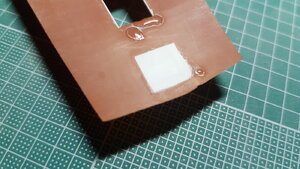
In the place of the flag locker, there was another of the hatches, but I removed that similar to the other ones and filled it in with some styrene. Here it is with some cyanoacrylate still curing.
20200513_220909.jpg

The work on the deck itself is mostly done now. I only realised half way through that, since I removed most of the details anyway, It'd be easier to just scratch build it. Maybe next time. I still have to scribe the planking and after that I will work on the hull, which has its own issues. It is missing the copper cladding and instead has wooden cladding. I will probably sand down the surface and scribe in plates. I don't consider myself good at scribing, so this model will provide plenty of practice.
I am also dreading all the rigging. I essentially have zero experience with it, so it'll be a big learning process.
 
Very interesting start of your building log
One question: Will you plank the deck with wooden veneer-strips ?
 
Good start on the build log.

Plastics have their own on pros and cons as wooden ship building.

At least with wood, you don't have ejections pins to and marks to deal with.
 
Thought I'd join in at an early stage. Of course I wish you a successful build and hope you enjoy it.
I'm curious to know why you chose the Revell kit over the Airfix one? I respect your choice, but my humble opinion favors the Airfix one.
Be that as may be, I'll follow your build. Can't wait for each new installment.
 
Very interesting start of your building log
One question: Will you plank the deck with wooden veneer-strips ?
LOL, Uwe. The next logical question would be 'Will you plank the hull with wooden veneer-strips?'
After that....'Why not throw away the plastic kit, buy a vastly overpriced (and innacurate) wooden kit/'......and so on.
 
Thanks for the kind words everybody! I am really not a ship builder, but a plastic model kit builder. Wood might as well be an alien material to me, which is part of the reason I decided not to use veneer strips. I am simply more comfortable with this method.

Thought I'd join in at an early stage. Of course I wish you a successful build and hope you enjoy it.
I'm curious to know why you chose the Revell kit over the Airfix one? I respect your choice, but my humble opinion favors the Airfix one.
Be that as may be, I'll follow your build. Can't wait for each new installment.

Oh, that's actually a very easy answer. This kit was a gift from my cousin, back when I built models with a "bash it together" mindset and didn't really have any preferences. If it was a kit I'd build it. Usually very fast, with unspectacular results. So I got this ship, my building style got more serious and a backlog formed. The bounty was just stuck in it until now. My cousin is not a model builder and just knew that one of the blue boxes with "Revell" on it is what I wanted (simply because that is the only brand available in regular supermarkets here).

I've done some sanding on the hull today and I've started scribing the deck. The process is fairly tedious, but I can switch between sanding, scribing and doing some scratch building, so it's not too bad. Quite an enjoyable build so far. I am liking the challenge of coming up with ways to improve the base model.
 
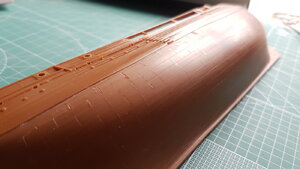
I have a bit of an update on the ship. Since my last post I've spent a lot of time sanding and scribing the hull. For the scribing I used some thicker bendy masking tape as a guide. It allowed me to bend it to shape on the hull, though I still found it quite challenging to set up a nice looking line. With the tape in place I just set my scribing tool next to it and followed the line. Unfortunately even this wasn't enough and I found myself veering off course once in a while, which was particularly costly as it required a long filling in, sanding and re-scribing process. In any case it is mostly done now.

20200602_125628.jpg

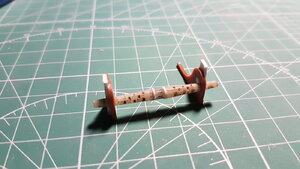
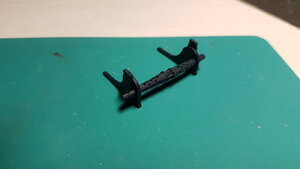
I worked on a few other odds and ends when the scribing became too tedious. The kit's windlass looks questionable to say the least, so I more or less made my own based on images from John McKay's Anatomy of The Ship book.
20200601_231716.jpg
The off white pieces are 3D printed, the white pieces are styrene and the brown are pieces from the kit.
I painted it in black.
20200604_221454.jpg

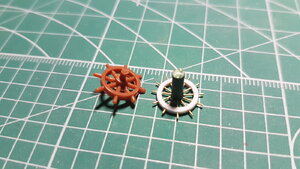
I also scratch built a new steering wheel as the kit piece's spokes are too thick, plus there aren't enough of them.

20200525_213346.jpg

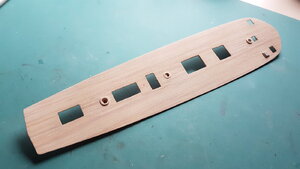
I also painted the deck. The painting was done in two stages with an undercoat of off-white with a few individual planks coloured for some variety between the individual wood planks.
20200605_144152.jpg

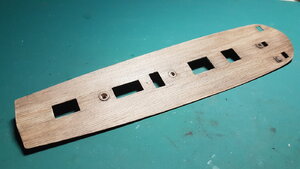
I used oil paints to get a fairly convincing wood grain effect.
20200605_214120.jpg
I've never tried this wood grain oil paint effect before, but I think it came out quite nice. At the time of posting it hasn't been clear coated yet, which is why it looks a bit shiny.

Next I need to clean up the two hull halves, so I can assemble them and the hull. This will make it a little easier to scratch build a few more details and continue with the build.

Thanks for reading!
 
Mmm....for the scale of that model, both the hull and deck planking is way too narrow, though I do like what you're up to.
 
Mmm....for the scale of that model, both the hull and deck planking is way too narrow, though I do like what you're up to.

You're probably right. At about 1mm plank width, that'd translate to just 11cm on the real thing. I'm not too fussed though.
 
I have a bit of an update on the ship. Since my last post I've spent a lot of time sanding and scribing the hull. For the scribing I used some thicker bendy masking tape as a guide. It allowed me to bend it to shape on the hull, though I still found it quite challenging to set up a nice looking line. With the tape in place I just set my scribing tool next to it and followed the line. Unfortunately even this wasn't enough and I found myself veering off course once in a while, which was particularly costly as it required a long filling in, sanding and re-scribing process. In any case it is mostly done now.

View attachment 155582

I worked on a few other odds and ends when the scribing became too tedious. The kit's windlass looks questionable to say the least, so I more or less made my own based on images from John McKay's Anatomy of The Ship book.
View attachment 155584
The off white pieces are 3D printed, the white pieces are styrene and the brown are pieces from the kit.
I painted it in black.
View attachment 155587

I also scratch built a new steering wheel as the kit piece's spokes are too thick, plus there aren't enough of them.

View attachment 155586

I also painted the deck. The painting was done in two stages with an undercoat of off-white with a few individual planks coloured for some variety between the individual wood planks.
View attachment 155588

I used oil paints to get a fairly convincing wood grain effect.
View attachment 155589
I've never tried this wood grain oil paint effect before, but I think it came out quite nice. At the time of posting it hasn't been clear coated yet, which is why it looks a bit shiny.

Next I need to clean up the two hull halves, so I can assemble them and the hull. This will make it a little easier to scratch build a few more details and continue with the build.

Thanks for reading!
Very good work - well done bashing with very good appearance !!!
 
It's been a little while since the last update. Sorry about that.

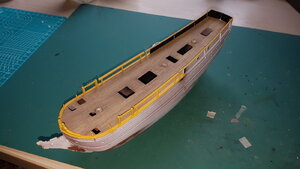
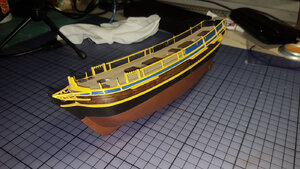
Since the last post I have finally attached the two hull pieces and put the deck in place. 20200615_124049.jpg

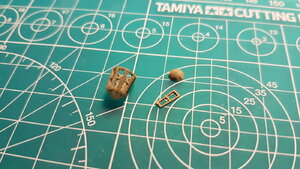
I scratchbuilt the flag locker and rudder head housing. The locker was missing from the kit and the rudder head housing was too small and simplified.
20200617_231715.jpg

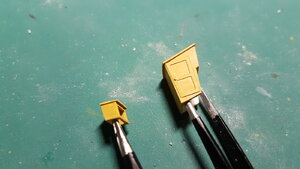
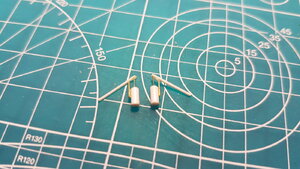
The kit also did not include any lanterns so I made my own with 3D printing. On the left is a nearly completed lantern (missing the top) and on the right are the pieces needed to make one. This was pretty fiddly and it looks messy, but they cleaned up nicely afterwards.
20200619_223218.jpg

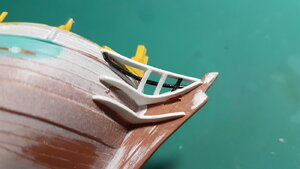
I didn't much like the kit pieces for the front, so I made my own.
20200704_235820.jpg

Some more scratchbuilding... the pumps this time.
20200731_135141.jpg

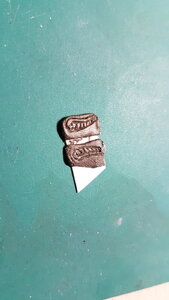
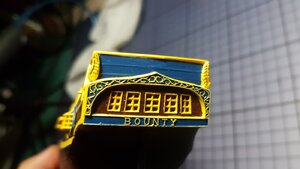
I also tried to sculpt some very crude details for the rear of the ship. I've never really sculpted anything before, plus I'm sure there are many better materials to use than epoxy putty. But it's what I had.
20200704_235944.jpg

And honestly, I think the result is pretty good. Much better than there being nothing there. Here you can also see that I've painted the ship.
20200801_233840.jpg

I decided to go for a fairly "standard" colour scheme. Yellow/blue seems to be quite a popular combination for the Bounty from the pictures I've seen. Mine looks very vivid and bright, but a lot of it is the camera. It is a bit more toned down under the naked eye.
20200801_233904.jpg

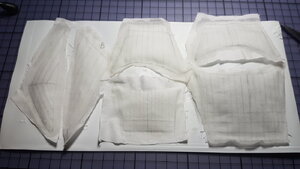
I am now working on the sails and the masts. I am making the sails out of fabric, using the vacuum-formed plastic ones as a guide. I've gone over the fabric with a 50% water, 50% PVA glue solution so they hold the bowed out shape, yet are still somewhat flexible.
20200801_233407.jpg

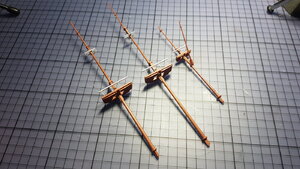
The masts also required some light scratch building and are awaiting paint.
20200801_233527.jpg

Thanks for reading!
 
Here goes, my "first" ship kit build. I say first because the others I made were as a teenager and I didn't really put much time or effort into those.
Anyway, the HMS Bounty by Revell. Old mould that dates back to 1956. Was state of the art then, not so much anymore. The kit has many issues with flash and badly placed ejection pin marks. There are also some accuracy issues that I will attempt to remedy as best as I can. Though bear in mind I know practically nothing about ships and am learning along the way.

I started work with the deck. It has raised details which are not too bad. They would get the job done with a bit of paint, but what bothered me was ejection pin marks all over the deck as well as a bewilderingly placed copyright symbol.
View attachment 151286

If I remedied those issues I'd be left with patches without the surface detail that would be very difficult to recreate. That's why I decided to sand the entire deck and re-scribe the planks. I also decided to simply cut out all the hatches because they just had surface detail. The holes did not go all the way through.
View attachment 151287

To replace the hatches I 3D modelled and printed new ones. I only have a cheap FDM 3D printer, but I think the result will be vastly superior to the original part. Here is a dry fit of the new parts.
View attachment 151288

And although the interior would only be visible under the correct angle and with perfect lighting, I will probably scratch build some stairs leading down. Because I can. I will also scratch build or maybe 3D print a few other things for the deck, like the binnacle (just one of the many nautical terms I'm learning along the way) and flag locker, that are simply missing from the kit. That as well as a few other details make me think that this model was erroneously based on the Bethia, that the Bounty was converted from. At least in some details.

In the place of the flag locker, there was another of the hatches, but I removed that similar to the other ones and filled it in with some styrene. Here it is with some cyanoacrylate still curing.
View attachment 151289

The work on the deck itself is mostly done now. I only realised half way through that, since I removed most of the details anyway, It'd be easier to just scratch build it. Maybe next time. I still have to scribe the planking and after that I will work on the hull, which has its own issues. It is missing the copper cladding and instead has wooden cladding. I will probably sand down the surface and scribe in plates. I don't consider myself good at scribing, so this model will provide plenty of practice.
I am also dreading all the rigging. I essentially have zero experience with it, so it'll be a big learning process.
Hallo @Apok
we wish you all the BEST and a HAPPY BIRTHDAY
Birthday-Cake
 
Back
Top