
Thanks and thank you for the advice. I don’t have a build log. I thought about creating one but I don’t feel inclined to write one. I am enjoying following yours. Your masts look beautiful!It didn't come with any turning tools so I had to buy those. Went to the local Woodcraft store and got a set made for turning pens for $80 bucks. WoodRiver - "Mini" Turning Tool Set, 5 piece. So far that's all I need. I mounted it on a 3/4" piece of ply and it was ready to go. Really like it, might try turning a few other things. Your Pegasus is looking great. Do you have a build log I can follow?

You are using an out of date browser. It may not display this or other websites correctly.
You should upgrade or use an alternative browser.
You should upgrade or use an alternative browser.

Seems like a lot of money for some masts. The advantage being having an awesome milling machine that I'm sure you'll make great use of. My Scottish roots are showing, will spend a few hours sanding rather then part with $$. I like the idea someone posted about using a drill as a lathe to turn the masts and then put in vice to finish the taper with a dremel type tool and sanding drum. Though the flat leading edge would be difficult to do with the drill-lathe. Perhaps I'll stick with hand tools...Thanks and thank you for the advice. I don’t have a build log. I thought about creating one but I don’t feel inclined to write one. I am enjoying following yours. Your masts look beautiful!

Thank you!a nice and very clean model. you have done it- from an old timer
el capi

I just finished scrolling through your build and what a beautiful ship you've made! I did not realize until recently there are at least 4 ships in the Swan Class, Pegasus, Kingfisher, Atalanta, and Fly. All are almost identical so now I shall watch your build closely when you start your rigging process. I ran my bowsprit cap square to the mast because it seemed beyond my skill level to modify it to the skew angle they call for. I see however you have done it very well so in the future I shall step up to any similar challenges and move on.
Thanks. Glad you like it so far. I'm still an amateur at this but ask any questions you like. Will post some shots on how I tie blocks to a mast later. Might help you to see how I do it.I just finished scrolling through your build and what a beautiful ship you've made! I did not realize until recently there are at least 4 ships in the Swan Class, Pegasus, Kingfisher, Atalanta, and Fly. All are almost identical so now I shall watch your build closely when you start your rigging process. I ran my bowsprit cap square to the mast because it seemed beyond my skill level to modify it to the skew angle they call for. I see however you have done it very well so in the future I shall step up to any similar challenges and move on.
OOPS! Posted to another build by mistake so repeating it here as it's part of my build.
I would guess everybody knows how to attach a block to a mast or spar so this will be old hat to most folks. I thought I’d show the process I use as the tools are a little bit different.
 1. Make a figure eight in the line to be tied.
2. Then clamp the ends between a fly-tying vice and a pair of hemostats secured in a vice.
3. Take another piece of line and tie a standard sizing knot around the middle of the lines.
4. I usually do five wraps checking between each wrap to make sure all the wraps are snugged up to each other.
5. Release the vice and insert a block leaving the loop in the jaws and tighten the vice.
6. Slide the knot down the line and push it tight to the block.
7. Take the assembly from the vice and hemostats and place the other loop on the mast or spar and pulling the other tag end close the loop over the mast.
8. Apply a small drop of CA to the knot and trim the tags. I use a small pair of fly-tying scissors that are great for getting close to the knot.
9. Trimmed and secured to the mast.
I would guess everybody knows how to attach a block to a mast or spar so this will be old hat to most folks. I thought I’d show the process I use as the tools are a little bit different.
1. Make a figure eight in the line to be tied.2. Then clamp the ends between a fly-tying vice and a pair of hemostats secured in a vice.
3. Take another piece of line and tie a standard sizing knot around the middle of the lines.
4. I usually do five wraps checking between each wrap to make sure all the wraps are snugged up to each other.
5. Release the vice and insert a block leaving the loop in the jaws and tighten the vice.
6. Slide the knot down the line and push it tight to the block.
7. Take the assembly from the vice and hemostats and place the other loop on the mast or spar and pulling the other tag end close the loop over the mast.
8. Apply a small drop of CA to the knot and trim the tags. I use a small pair of fly-tying scissors that are great for getting close to the knot.
9. Trimmed and secured to the mast.
That's awesome, for a beginner like me I would not have figured out the second loop part with tail by just starting with a figure eight.
After a few practice runs I'll have it. Thank you STGCS.
After a few practice runs I'll have it. Thank you STGCS.
Stepping the masts with a laser. The base wasn't exactly level so had to shim it with a toothpick do get the hull level as there was a slight starboard list to the model but better to have the masts aligned to the hull than the table top. Don't think it will be noticeable.


It is an amazing final product. This comes from a newcomer which mat gives some red faves on the more experienced builders. In my own privatewiev, only to me thE CHALKINGs somewhat out of scale, but this MY OWN OPINION.
EL CAPI
EL CAPI
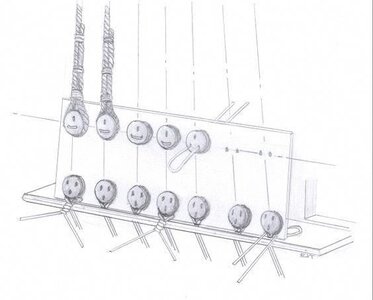
After stepping the masts, I start the shrouds. I didn’t attach the mast caps at this point, and this will explain why.
1. I start with the deadeye in the vice and tie two seizing’s at the deadeye.
2. Next seize a loop in the other end of the line. Measure the length of line needed from the deadeye to the masthead plus some extra to allow room to adjust the shroud later.
3. Bring the loop up through the lubber hole and over the top of the mast.
4. I made a jig by soldering two pieces of wire together and bent them to fit the deadeye holes at the distance I want them apart.
5. This shot shows the jig installed on a pair of deadeyes. Now slide the seizing toward the mast head to tighten the shroud.
6. Shot six is after removing the jig and tying them together.
7. This method helps keep all the deadeyes in a nice even row.
8. Also, the seizing’s at the mast head are aligned.
Hope this helps someone just getting started.
Very nice clean and precise work. I love that your using a fly tyers vice, not alot of us ship builders using them that I've seen. It's definitely a great tool for ship building. I had three that I use for fishing lure construction so one went missing years ago and happy in the shipyard now
Last edited:
Merry-Xmas-from Spain. Again some surprise from you. Just for your info. I have made a copy of this Image Then I will make 8 copies and with a Drawing program, cut each number out so that you have them separated. It is now easier to blow them up for details. your first set is done. Will send them to you. I will add a few images today- where you more and less has copied my way to align Deadeyes- happy for that-although there are other ways to do it. will add 3..After stepping the masts, I start the shrouds. I didn’t attach the mast caps at this point, and this will explain why.
1. I start with the deadeye in the vice and tie two seizing’s at the deadeye.
2. Next seize a loop in the other end of the line. Measure the length of line needed from the deadeye to the masthead plus some extra to allow room to adjust the shroud later.
3. Bring the loop up through the lubber hole and over the top of the mast.
4. I made a jig by soldering two pieces of wire together and bent them to fit the deadeye holes at the distance I want them apart.
5. This shot shows the jig installed on a pair of deadeyes. Now slide the seizing toward the mast head to tighten the shroud.
6. Shot six is after removing the jig and tying them together.
7. This method helps keep all the deadeyes in a nice even row.
8. Also, the seizing’s at the mast head are aligned.
Hope this helps someone just getting started.
View attachment 201249

Attachments
-
 808--ANGULO PALO TRINQUITA--MAST.jpg5.7 KB · Views: 22
 -
 1607-foremat-trinquita-- rigging (86).jpg10.1 KB · Views: 23
 -
 2121-RIGNING (19).jpg23.5 KB · Views: 20
 -
 2200-BLOCK.jpg33 KB · Views: 19
 -
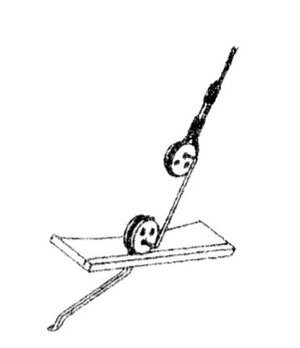 Image6-RiggingTips.jpg16.8 KB · Views: 20
 -
 08892292a168e8b8c2f50c8d16d38981 - Copy.jpg17.6 KB · Views: 21
 -
 a64499f3a74a8778cf53440181a7e29b.jpg37 KB · Views: 21
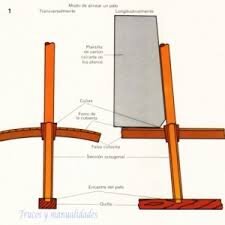
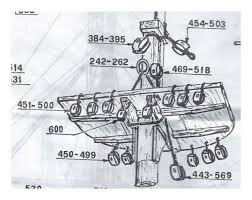
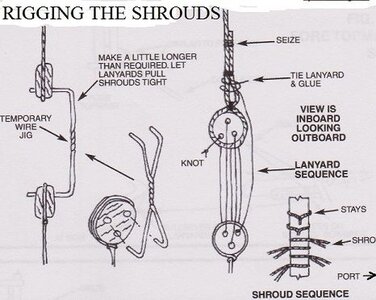
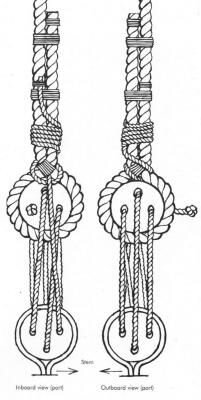
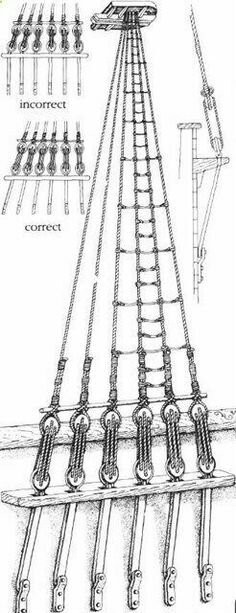
something went wrong. the 1Th 3Pics. are about the masts, its inclination -the 3 masts had a slightly different angel -foremast about 105º-main mast 90º and mizzenmast about 80 to 85º. the curve from the center and outway-waterways -which nearly no kits are taking care of. The 3 next are different ways vto align deadeyes. For the 1Th one, you take a piece of the wood, measure the exact point to drill small holes. now you double a thin wire, insert through the of the eyes -below and up, set this wire now through the 1Tf piece. to me not the best way. Nº 2 was the one I used. In beginning twisted the center, but later with a point melting metal-.Personally I made one set for each Deadeyes- Measured them all and bend them in the workbench.Merry-Xmas-from Spain. Again some surprise from you. Just for your info. I have made a copy of this Image Then I will make 8 copies and with a Drawing program, cut each number out so that you have them separated. It is now easier to blow them up for details. your first set is done. Will send them to you. I will add a few images today- where you more and less has copied my way to align Deadeyes- happy for that-although there are other ways to do it. will add 3.. the next one is only for one hole. the last two are how to rig tge deadeyes and throught.- SORRY but I cannot take awat the pic of the mast
View attachment 201334
Thanks for the info. Very interesting. I guess there are many ways to do deadeyes but the wire jig sure works well for me, and for you too I see. Appreciate the photos. Always better than a written explanation.Merry-Xmas-from Spain. Again some surprise from you. Just for your info. I have made a copy of this Image Then I will make 8 copies and with a Drawing program, cut each number out so that you have them separated. It is now easier to blow them up for details. your first set is done. Will send them to you. I will add a few images today- where you more and less has copied my way to align Deadeyes- happy for that-although there are other ways to do it. will add 3..
View attachment 201334
It seems like specialized tools from my other hobbies have found a home in the shipyard. The vice has been the most valuable asset so far. Got my airbrush years ago to paint fishing lures.Very nice clean and precise work. I love that you using a fly tyers vice, not alot of us ship builders using them that I've seen. It's definitely a great took for ship building. I had three that I use for fishing lure construction so one went missing years ago and happy in the shipyard now
Yep I tried some of the other tools from tying such as the whip finishing tool, pick, hackle spinner and such the hackle spinner is a fantastic tiny clamp I do better doing a whip finish without the tool on ship building. I use the bobbins for small line serving and siezing. Lastly the threads many are perfect for the hobby.It seems like specialized tools from my other hobbies have found a home in the shipyard. The vice has been the most valuable asset so far. Got my airbrush years ago to paint fishing lures.
Absolutely! Orvis scissors are great for snipping tags nice and close to a knot. My other favorite tools are a set of dental picks I talked my dentist out of.Yep I tried some of the other tools from tying such as the whip finishing tool, pick, hackle spinner and such the hackle spinner is a fantastic tiny clamp I do better doing a whip finish without the tool on ship building. I use the bobbins for small line serving and siezing. Lastly the threads many are perfect for the hobby.
Completed the lower shrouds. About 1,000 knots to tie next. I think boredom will set in somewhere around 200. I like to complete all running and standing rigging on the lower masts before I go up another level.


Though a daunting task with much repetition this is one of my favorite things to do on the rigging. Rat lines are usually the first thing the eye catches when looking at a ship model its also an area thats unforgiving of sloppy work as it stands out very well, so I take my time and make sure this is as close to perfect as I can get it. You will do fine here you have an eye for the details and the means in skill set to get it done. Looking forward to your posts.
Nice job STGCS! I am at the same stage you are and am going to steal your idea of the horizontal template for my rat lines as well. Seems to me the rat lines should be parallel to the keel which in turn means I can come off my work surface as a reference, I think. What are you using as a reference?
