HMS Speedy Footropes and Studdingsails
I only have the prototype instructions, so I apologize if the relevant sections below are incorporated into revised instructions.
1) If you will be rigging the studdingsails, on the studdingsail yards the sling cleats (center or 1/3 placement on studdingsail yard) and stop cleats (near the ends) should all point in the same direction. I apologize for the error in the instructions/drawings (I am the researcher) showing the sling cleats at 90 degrees to the stop cleats (mea culpa).
2) The texts usually omit cleats in their drawings of studding sail yards (especially since they were not a continental practice) but since Speedy is an English brig and we have Steels and other specific British warship reference books, cleats are the best choice for the most accurate model. Brian Lavery's Anatomy of the Ship
The 74-gun ship Bellona page 110 shows the studdingsail yards hung with all cleats vertical, as does Karl Heinz Marquardt,
Eighteenth-century Rigs & Rigging, page 239 figure 175, for sling cleats, there being no stop cleats shown. There are very few sources showing cleats on studding sail yards, and the Anatomy of the Ship drawings are often too small to determine what is happening though it appears several English ships have the studdingsail yard cleats horizontal. Lee 's
The Masting and Rigging of English Ships of War 1825-1860 page 18, clearly shows the cleats horizontal. So how to hang studding sail yards? According to the Internet:
"Upward
The direction of the sling cleats on studding sail yards is typically upward. This is because the yard is hoisted using the jeers, which are used to lift the yard into position. Once the yard is raised, it is supported by a sling, and the lifts raise the yardarms (the extremities of the yard). The jeers are then slacked to allow the yard to brace properly, preventing wear and ensuring the yard is held in its place. The sling cleats are used to secure the yard in place, with the direction of the cleats facing upward to ensure the yard remains fixed in the center of its position.
San Francisco Maritime National Park Association"
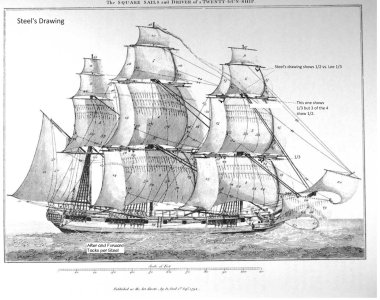
2) There is some controversy over whether the sling cleats are slung at 1/3 or 1/2 of the studding sail yards. Lee 's
The Masting and Rigging of English Ships of War 1825-1860 page 18 says the placement was 1/3 from the interior end until about 1816 (see amended drawing with yellow jpg) and then either centered or a mix thereafter. Steel's
The Elements and Practice of Rigging and Seamanship, 1794, shows 1/3 on Mast Plate 5 (attached) representing a 36-gun ship but in the full drawing of the square sails and drive of a 20-gun ship (attached, annotated), has a mix of 1/2 and 1/3. E.W. Petrejus,
MODELLING THE BRIG-OF-WAR "IRENE", an English brig surrendered to the Dutch in 1808, page 245 shows a different mix. Wolfram zu Mondfeld,
Historic Ship Models, page 239, also shows a mix. The drawings in the kit show a mix based on Steel's 20-Gun ship which is arguably the best choice of a bad lot. Unfortunately, the 3d color render of Speedy on the cover of the instructions, at least in my prototype instructions, is all 1/3's (i.e., does not match drawings) and has a reversed fore lower studding sail yard so ignore that!
3) Some additional info on how the footrope interior lines belay should you be a professional modeler:
a) on the Bowsprit (Spritsal) Yard, “Footrope is a single line seized in center to halyard block strop.”
b) on the lower yards, “Interior end of each footrope has eye lashed to the yard immediately adjacent to the exterior of the sling cleat on the opposite side (e.g, port rope to outside of starboard sling cleat).”
b) on the topsail and topgallant yards, “Interior end of each footrope has eye seized to parrel.”
4) I would not put holes in the ends of studdingsail yards where stop cleats are used at the same place on the yard (as opposed to holes with no stop cleats being used). As far as I am concerned the only studdingsail yard holes in HMS Speedy should be the interior end of a lower course studding sail yard, which has no stop cleat, see, e.g., Marquardt,
Eighteenth-century Rigs & Rigging, page 239 figure 17(a), and at the ends of the flying studding sail (free-floating) booms (as the cleats are at a different point on the spar than where the sails tie off). It seems to me that holes and stop cleats serve the same purpose of holding rigging in place so using both is redundant.
5) Most textual drawings of studding sail yards are either highly simplified (tapered sticks) or too small to see what is happening. Steel's Mast Plate 5 shows a flat-ended iron ferrule at the ends of a topsail studding sail yard whereas Lee shows rounded ends. You could do either for the topsail studding sails on HMS Speedy. I did not see any other texts with clear enough diagrams or an adequate textual description to discern ferrules. Steel did not show a topgallant studdingsail yard in the Mast Plates but I would do the same for the topgallant studdingsail yard as done on the topsail. Obviously rounded ends are easier and that is what the drawings for Speedy show. To do ferrules, I would get some thin paper, wrap a tiny bit around each end, and glue liberally to strengthen before painting black.

