HMS Victory Launch build log

Joined
Apr 20, 2021
Messages
93
Points
78

Location
Winnipeg Canada
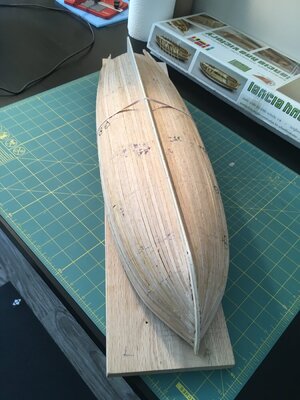
I would like to start a build, so many questions. Need everyone’s experienced advice and direction. This is the scratch build wood kit of the HMS Victory’s launch by Mantua. It has a double planked hull. I have started the build as you can see, the false bulkheads are in, squared up, level and perpendicular to keel, as best as I could get.
Top 3 planks and the Garboard plank are in place. The first layer of planking is 6mm wide while the outer layer of planking is 7 mm wide.
I want to use this build to move my model boat building skills to a more accomplished level like the fine and detailed ships I see on SOS Brian B


A92B23D2-03D3-43D3-9B2C-2E08595EAD42.jpeg


14EAA093-AA23-43F2-BCF2-68759493039D.jpeg
 
The first area of concern is with the planking.

1) when I try to put in a intermediate batten plank(see picture) it curves up to close to the top planks at the bow. Decided not to use this method to divide the bulk heads. Yes/no

Have measured the bulk heads (BH)and determined that 18 planks will be needed at the longest BH #4. The shortest a plank will need to be is 4.1 mm at Bh #1 and 4.7mm at the stern BH

2) so I intend to plank the hull from the GP up flat side of planks down and from the top plank down flat side of planks up, meeting in the middle. ?
 
Great to see, that you started your building log - I will follow with big interest.
Hope that you will get soon some comments on your questions...
 
Great to see, that you started your building log - I will follow with big interest.
Hope that you will get soon some comments on your questions...
Uwek need some help again. I have placed the build log in the section for ship build logs -wood. But this does not show up in the new post area. did I post this in the wrong area. would have preferred to see it in new post that way it would get some traction or replies.thanks Brian B
 
Uwek need some help again. I have placed the build log in the section for ship build logs -wood. But this does not show up in the new post area. did I post this in the wrong area. would have preferred to see it in new post that way it would get some traction or replies.thanks Brian B
In the new post area, the topic is marked with bolt letters....... it is "new posts" and not "new topics".
"new post area" is listing the latest posts made in the forum.
When you post a new post in your own topic, than for you it is not bolted letters, because the "bolt" disappears for every member who opened this topic - so this is a kind of "post marked as read". Immediatly when I now press on "Post reply" this actual posts is shown as actual in the list of "new posts", but after some more posts by other members in any area of the forum this is movin down in the listing. For your info, we have arround 200 posts each 24 hours.
You will understand the sytem in very short time.

Important is, that you started the building log in the correct area - traction and replies will grow with the time, especially if you post regular your progress
Thanks Uwek, appreciate the help and direction
 
I have a similar kit that I haven't started yet, This is a good opportunity for this monkey to see what problems you might encounter.
 
I have a similar kit that I haven't started yet, This is a good opportunity for this monkey to see what problems you might encounter.
Welcome aboard Matie. Will do some posting in the next day or so yes their have been a few problems that I can pass on during the early frame building and first later of planking
I have a similar kit that I haven't started yet, This is a good opportunity for this monkey to see what problems you might encounter.
the main problem is the false bulk heads(FBH), which are used to build the hull. These FBH are not glued to the keel but float on the keel, but are held in place by the false deck. Keeping these square to the keel and level across the tops has proved to be a issue. I have resorted to using elastics to keep the FBH tight to the keel. Have stared the 1st layer off planking, trying to keep in mind that this layer will be visible from inside of the launch so trying to make this 1st layer a final layerC0E50A40-0817-42C7-8F90-48CC11314D18.jpeg
 
HI I have just started this kit ( Newer box art but same kit.) I locked in the bulkheads & false deck with screws & wire as per Keith Julier (NEW Period ship handbook ISBN1-85486-233-2), You can normally pick this book up on Abes books quite cheaply. I got the whole set of 4 for around 10 uk pound or $20 AU
It has made planking a pleasure and the bulkheads have no movement art all. I managed to get 4 planks at the top without shaping and have now started to plank from the keel up. No special tools or soaking needed as its a gentle curve and the plank wood bends easily. have used Gorilla wood glue( heavy duty PVA - similars to Titebond wood glue. Its a thicker woodglue that holds the planks. Rub off the excess with a damp cloth inside and out as you go. Just make sure your first top plank is secured at every bulkhead. I have pinned( nailed each plank to the bulkhead) The brass pins are round topped so they can be easily pulled out prior to the second layer. I also used the bull clips to hold the plank edges togetherwhilst the glue dries.

Just take your time and do a plank at a time, let it dry and move on. Look at the plans you will see where to work fro the bottom up. They suggest only three planks top down.

So far its a fun kit.
 
You might take some time to read the general topics area for info on planking, I have seen some good examples on how to work different planing issues that helped me figure out how to get things done right.
 
You might take some time to read the general topics area for info on planking, I have seen some good examples on how to work different planing issues that helped me figure out how to get things done right.
Thanks Kurt, have reviewed several need to spend more time searching
 
UPDATE 1st layer of planking complete. 1st layer of planking is on, will need to do sanding and some wood filler at the front end. A little short on some planks, overall not bad at first attempt at doing planking properly, have done planking on two previous builds. Sequin tugboat by northwest and Pride of Baltimore by model ship ways. In both previous builds I put the plankin on with out sizing or soaking or bending. The planks were just bent in position and a lot of Epoxy applied to bulks heads to keep planking in place. Will post again when sanding and filling is done
be good and stay safe. Brian B
 

Attachments

  • BBF367CF-8455-477F-9AC1-C714291104F2.jpeg
    BBF367CF-8455-477F-9AC1-C714291104F2.jpeg
    251.9 KB · Views: 14
  • DD8BCBE6-787F-460B-BC51-F13CA75F3E5A.jpeg
    DD8BCBE6-787F-460B-BC51-F13CA75F3E5A.jpeg
    171.5 KB · Views: 16
  • 17CE67BC-0B74-4618-A794-740EBCEB8A11.jpeg
    17CE67BC-0B74-4618-A794-740EBCEB8A11.jpeg
    117.5 KB · Views: 15
The first layer is for shaping and in this kits case to provide a visual feedback on the inside as its on show. The 2nd planking being a different wood is for the outer side. As it is to be externally painted its more about getting the final shape correct. The wood is definately not for bare display so plank layout is not crucial I have just about finished the second layer on one side. This time I went as per the plans and did a 3 planks down, as shown on the plans,then up from gar-board till they met. I then went back to coming down till he boards would not lie flat on the first layer.

There is a little edge bevelling needed on some planks to make sure the seam between them is good. I have not had to resort to bending tools or soaking. The rest was just alternateing from bot or top as to the best fit. The only thing I did was to glue the bow tips of the planks where they met the keel or other planks first and let them dry and set before pressing the rest of the plank into position. I used sewing pins & lots of clamps per planks to hold in place. I only did 2 -3 planks per day, it is a slow process. I only used thick PVA ( titebond/ Gorilla wood glue) and the normal wet cloth wife off.
Thanks, appreciate the info
 
Back
Top