Hello SOS
My first log. Firstly thank you to the administrators for an awesome sight.
I bought a Mantua Victory kit from Ebay in January which took 3 months to arrive due to the South African postal service slow delivery. In hindsight this gave me sometime to look at build logs on SOS. As with many before me Covid decide to get me rather severely which effected my heart. My activities of racing dirt bike enduros and MTB downhill had to cease....for a while anyway. There was an old HMS Bounty (a hack job to say the least) in my garage which I decided to finish the rigging (while immobile) and making some scratch life boats - I enjoyed it. So my Wooden ship building hobby started.
Reviewing the SOS build logs I realized that attempting the Victory as a first boat is silly ambitious. I decided to give it a go anyway. The Mantua kit has had loads of criticism from those who have built it for its lack of reality and other issues. After working on it for 3 months I have loved it. I am not going to attempt a replication of this majestic and famous battle ship, just try make a good model. The kit also gives one the opportunity to make many changes and "scratch" build parts etc which is fun. The only frustration so far is there is little or no spare wood or parts to be too creative. This kit was also half the price of a Caldercraft (for example) Victory so I knew what to expect. After working with this kit I am super happy I bought it as you need to make so many parts and redesign aspects of the ship which was super fun. As you will see my skills are beginner so these do not look like those kits where these are almost supplied (or like Y.T.'s whose work on this ship is brilliant) but hey _ I made them which in my view is the whole point. To me this kit is super value for money depending on your build objective.
I bought the kit which doesn't have copper plates. When I received the kit it was wet (not damp) and many parts warped. This was not the supplier but the warehousing here in SA. So what...some heavy books and humidifier drier from my company sort that out 90%. This kit was obviously very old and the walnut wood dry. This did create challenges - fantastic.
Here is my build for 6 months.
Firstly thanks to Daliab who built the same ship which came out awesome. I have looked at his log time and time again. As I am six months in I will post some pics of where I am at with few comments. After this will keep a more timeous build log as I go.

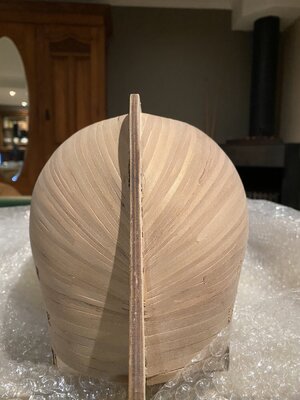
Building the frame went well other than misreading the instructions (a complaint about the kit, but this was my own error). The first bulkhead/frames I set these against the keel at the bow rather than at an angle. I had to make two additional frames as shown in picture and cut off the two parts (sorry nautical terms or lacking) which sit above the bow deck and fit them later. I also made the error of not fairing these and the rest of the frame enough which created many planking challenges.

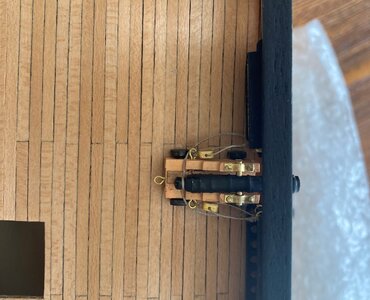
The dummy cannon barrel supports are included and painted black. I did not include the upper supports at the stern (again not seeing this in the instructions). As you will see later I have no idea how to fit these cannons. Any suggestions here on how to do this will be appreciated.
On to planking. I did not want to use the planking plan as suggested in the instructions. Doing this was way more difficult than expected. The lime while brittle was easy to bend with soaking and using a heat gun on a planking board I had made to get the correct bend. The stern was more difficult and some planks split.

My first dropper planks. I lined off the hull and made a lining table, however I battled to get the exact measurements when tapering the planks. This meant that I could not match my lining table and had to make continuous adjustments. I also found that using 8 planks without tapering at the beginning meant that I could not get the tapering at half the plank width later. As these pictures show I had to insert droppers where they should not have been. For my second layer I read a really good instruction manual on planking. (planking Colour PDF).


Here are split planks at Stern. I also again misread instructions and did not extend the stern planks to the end of the stern cabin support. Some fixing was required.

This is the outcome of the first layer and my decking. This photo has made the deck darker than it is. It is a pity that I had to plank the deck as one of the first processes as I learnt so much doing it and would have done it differently and more like the real ship if I did it again. I followed the plan pre printed from the kit. Looking at other members build logs made me wish I could have done it differently. E.g. the actual deck planking pattern and using more pencil or dye on the edge of each deck plank. The deck is such a large portion of the ship and does stand out. Anyway i lightly sanded it and covered it with a light coat of Matt poly just to protect it from damages while I build. I will finish more once get further with my build. Anyway my next ship will be done better.
The second layer: I sorted the Walnut strips according to colour as they had different shades. As the lower hull is not coppered I choose the variable shades as I enjoyed the lined or different shade effect....strange I know. Just me. I used a technique of using a drop of CA glue for nails and wood glue on each plank. I did not want nail holes in the planking.


Here the brittle and dry walnut became a challenge. As you can see from the first plank the edges are not smooth. I had to sand each plank, first with 200 grit then 800. This did not resolve the issue completely as tags developed. I could not toss too many planks as they where limited. Any suggestions on how to avoid this for my future ships?
I also tapered from plank 6 and this time and did my dropper using a 3 to 2 method. I also marked the hull with my lining numbers rather than using a table. The bottom planks meeting the keel where difficult. I was happy with the outcome though.


I used the stencil provided for the cannon ports and it fitted perfectly between the bulkheads. I did notice from other member builds that this was a problem with this kit however I marked each bulkhead during planking and had no issues. I also used a dremel tool to drill holes and cut the gun ports. This went relatively easy. I then sanded the hull lightly with 220 grit and followed by 800.


When I applied a thin layer of poly to the hull many planks lifted and shrank?? I thought they would expand as the planks were so dry. Old kit I guess. Any way some wood glue and pins rectified this. In addition cracks between my planks which occurred when the poly was applied and I had to repair with with some woodfiller. This annoyed me as I really wanted to plank without any filler as I will not be coppering the hull. I lightly sanded the hull. To my disappointment the walnut filler was pinkish...ouch.

Repaired my mess up at the stern.


I really did not like the etching provided by the kit. I was not disappointed as I knew what to expect. I really did not like the flat stern and while members achieved a good result, I wanted to get more volume and look through with the stern. Risk taker Grant came out and I took my dremel to the stern and cut it open. I had vision of the outcome and so gave it a go. I cut "doors into the bulkhead and opening's at the top to let light in. I knew these would not be seen once the stern cabins are completed.
I painted the etching provided and put on some thin planks to give it some volume. I also added some light blue to the interior and painted the floor and bulkhead white. I took some hard wood strips bent them and CA glued them to the inside of the side cabin etching parts supplied to give the sides of the cabin a curve. The balustrade is still a problem. I have no idea what to do and my painting skills will just mess this up. Any suggestions?
The colour choice of my Victory is not the yellow ochre which seems to be the finally agreed by the colour debate. I had my wife and daughter decide and they told me to go for the more the salmon pink (which so many photos of the victory show (clearly changes depending on the time of day and sun) . As the model (if I do a good enough job) will be in my lounge, the ladies of the house had the final say. Apologies to all the Victory experts out there.

This is where it is now however loads of work still needs to be done on the stern cabin. I know I don't have the scratch build skills yet to redo the entire stern cabin.


I painted the salmon strips . Used many thin layers , lightly sanding each coat in one direction with 800 grit paper. I ensured that for each wale strip that there was no paint so that they would adhere correctly. I individually painted the wales according to the instructions (again the kit does not follow the actual ship in this regard, however it looked good for my objective) using the same technique. I then bent each wale and glued it with wood glue and using CA glue as nails...so to speak. Here was my first missing pieces. There where 4 3x 1.5x600 walnut planks missing. As a substitute I painted the left over lime planks matt black and use these as my lower wales. I also decide to double these up as I have sort of decided not to paint a water line but leave the wood hull up to the wales. At this current point in my build I am still uncertain as whether I should do a full waterline effect or not. Any thoughts here would be appreciated.


I also made the stand which has come under huge criticism from many members. I love it. it is simple and does not detract from the shape and appearance of the ship. There is enough "bling" on this kit and an understated (almost dry dock look) appealed to me. Awesome.

I painted the gun port inserts red and CA glued them in place. There is so much "touch up" paint work to be done at this stage and I took many days just getting this right. (will post these pics as we go on) I am a messy builder and each phase of the build means I have to redo paint work somewhere on the build.
The bow. Once again the etching and parts supplied in the kit just didn't work for me. Being a novice I decided to use the kit parts with adjustments. The grating on the bow using the kit design had no look through and the grating was merely stuck onto a wooden platform. I cut each section out and made my own (using parts from the original kit) so one can see through this bow section. again just giving volume. I'm not sure how the real ship looks as I could not see this on Google or you tube. What I do find absolutely amazing is how each kit differs...from Mantua to Caldercraft to Deagositni etc etc. Surely manufacturers have studied and research the real Victory?? This did not only apply to the bow but so many sections of the ship. Anyway the Mantua kit once again gave me the license to play. This I will post next time.
My first log. Firstly thank you to the administrators for an awesome sight.
I bought a Mantua Victory kit from Ebay in January which took 3 months to arrive due to the South African postal service slow delivery. In hindsight this gave me sometime to look at build logs on SOS. As with many before me Covid decide to get me rather severely which effected my heart. My activities of racing dirt bike enduros and MTB downhill had to cease....for a while anyway. There was an old HMS Bounty (a hack job to say the least) in my garage which I decided to finish the rigging (while immobile) and making some scratch life boats - I enjoyed it. So my Wooden ship building hobby started.
Reviewing the SOS build logs I realized that attempting the Victory as a first boat is silly ambitious. I decided to give it a go anyway. The Mantua kit has had loads of criticism from those who have built it for its lack of reality and other issues. After working on it for 3 months I have loved it. I am not going to attempt a replication of this majestic and famous battle ship, just try make a good model. The kit also gives one the opportunity to make many changes and "scratch" build parts etc which is fun. The only frustration so far is there is little or no spare wood or parts to be too creative. This kit was also half the price of a Caldercraft (for example) Victory so I knew what to expect. After working with this kit I am super happy I bought it as you need to make so many parts and redesign aspects of the ship which was super fun. As you will see my skills are beginner so these do not look like those kits where these are almost supplied (or like Y.T.'s whose work on this ship is brilliant) but hey _ I made them which in my view is the whole point. To me this kit is super value for money depending on your build objective.
I bought the kit which doesn't have copper plates. When I received the kit it was wet (not damp) and many parts warped. This was not the supplier but the warehousing here in SA. So what...some heavy books and humidifier drier from my company sort that out 90%. This kit was obviously very old and the walnut wood dry. This did create challenges - fantastic.
Here is my build for 6 months.
Firstly thanks to Daliab who built the same ship which came out awesome. I have looked at his log time and time again. As I am six months in I will post some pics of where I am at with few comments. After this will keep a more timeous build log as I go.
Building the frame went well other than misreading the instructions (a complaint about the kit, but this was my own error). The first bulkhead/frames I set these against the keel at the bow rather than at an angle. I had to make two additional frames as shown in picture and cut off the two parts (sorry nautical terms or lacking) which sit above the bow deck and fit them later. I also made the error of not fairing these and the rest of the frame enough which created many planking challenges.
The dummy cannon barrel supports are included and painted black. I did not include the upper supports at the stern (again not seeing this in the instructions). As you will see later I have no idea how to fit these cannons. Any suggestions here on how to do this will be appreciated.
On to planking. I did not want to use the planking plan as suggested in the instructions. Doing this was way more difficult than expected. The lime while brittle was easy to bend with soaking and using a heat gun on a planking board I had made to get the correct bend. The stern was more difficult and some planks split.
My first dropper planks. I lined off the hull and made a lining table, however I battled to get the exact measurements when tapering the planks. This meant that I could not match my lining table and had to make continuous adjustments. I also found that using 8 planks without tapering at the beginning meant that I could not get the tapering at half the plank width later. As these pictures show I had to insert droppers where they should not have been. For my second layer I read a really good instruction manual on planking. (planking Colour PDF).
Here are split planks at Stern. I also again misread instructions and did not extend the stern planks to the end of the stern cabin support. Some fixing was required.
This is the outcome of the first layer and my decking. This photo has made the deck darker than it is. It is a pity that I had to plank the deck as one of the first processes as I learnt so much doing it and would have done it differently and more like the real ship if I did it again. I followed the plan pre printed from the kit. Looking at other members build logs made me wish I could have done it differently. E.g. the actual deck planking pattern and using more pencil or dye on the edge of each deck plank. The deck is such a large portion of the ship and does stand out. Anyway i lightly sanded it and covered it with a light coat of Matt poly just to protect it from damages while I build. I will finish more once get further with my build. Anyway my next ship will be done better.
The second layer: I sorted the Walnut strips according to colour as they had different shades. As the lower hull is not coppered I choose the variable shades as I enjoyed the lined or different shade effect....strange I know. Just me. I used a technique of using a drop of CA glue for nails and wood glue on each plank. I did not want nail holes in the planking.
Here the brittle and dry walnut became a challenge. As you can see from the first plank the edges are not smooth. I had to sand each plank, first with 200 grit then 800. This did not resolve the issue completely as tags developed. I could not toss too many planks as they where limited. Any suggestions on how to avoid this for my future ships?
I also tapered from plank 6 and this time and did my dropper using a 3 to 2 method. I also marked the hull with my lining numbers rather than using a table. The bottom planks meeting the keel where difficult. I was happy with the outcome though.
I used the stencil provided for the cannon ports and it fitted perfectly between the bulkheads. I did notice from other member builds that this was a problem with this kit however I marked each bulkhead during planking and had no issues. I also used a dremel tool to drill holes and cut the gun ports. This went relatively easy. I then sanded the hull lightly with 220 grit and followed by 800.
When I applied a thin layer of poly to the hull many planks lifted and shrank?? I thought they would expand as the planks were so dry. Old kit I guess. Any way some wood glue and pins rectified this. In addition cracks between my planks which occurred when the poly was applied and I had to repair with with some woodfiller. This annoyed me as I really wanted to plank without any filler as I will not be coppering the hull. I lightly sanded the hull. To my disappointment the walnut filler was pinkish...ouch.
Repaired my mess up at the stern.
I really did not like the etching provided by the kit. I was not disappointed as I knew what to expect. I really did not like the flat stern and while members achieved a good result, I wanted to get more volume and look through with the stern. Risk taker Grant came out and I took my dremel to the stern and cut it open. I had vision of the outcome and so gave it a go. I cut "doors into the bulkhead and opening's at the top to let light in. I knew these would not be seen once the stern cabins are completed.
I painted the etching provided and put on some thin planks to give it some volume. I also added some light blue to the interior and painted the floor and bulkhead white. I took some hard wood strips bent them and CA glued them to the inside of the side cabin etching parts supplied to give the sides of the cabin a curve. The balustrade is still a problem. I have no idea what to do and my painting skills will just mess this up. Any suggestions?
The colour choice of my Victory is not the yellow ochre which seems to be the finally agreed by the colour debate. I had my wife and daughter decide and they told me to go for the more the salmon pink (which so many photos of the victory show (clearly changes depending on the time of day and sun) . As the model (if I do a good enough job) will be in my lounge, the ladies of the house had the final say. Apologies to all the Victory experts out there.
This is where it is now however loads of work still needs to be done on the stern cabin. I know I don't have the scratch build skills yet to redo the entire stern cabin.
I painted the salmon strips . Used many thin layers , lightly sanding each coat in one direction with 800 grit paper. I ensured that for each wale strip that there was no paint so that they would adhere correctly. I individually painted the wales according to the instructions (again the kit does not follow the actual ship in this regard, however it looked good for my objective) using the same technique. I then bent each wale and glued it with wood glue and using CA glue as nails...so to speak. Here was my first missing pieces. There where 4 3x 1.5x600 walnut planks missing. As a substitute I painted the left over lime planks matt black and use these as my lower wales. I also decide to double these up as I have sort of decided not to paint a water line but leave the wood hull up to the wales. At this current point in my build I am still uncertain as whether I should do a full waterline effect or not. Any thoughts here would be appreciated.
I also made the stand which has come under huge criticism from many members. I love it. it is simple and does not detract from the shape and appearance of the ship. There is enough "bling" on this kit and an understated (almost dry dock look) appealed to me. Awesome.
I painted the gun port inserts red and CA glued them in place. There is so much "touch up" paint work to be done at this stage and I took many days just getting this right. (will post these pics as we go on) I am a messy builder and each phase of the build means I have to redo paint work somewhere on the build.
The bow. Once again the etching and parts supplied in the kit just didn't work for me. Being a novice I decided to use the kit parts with adjustments. The grating on the bow using the kit design had no look through and the grating was merely stuck onto a wooden platform. I cut each section out and made my own (using parts from the original kit) so one can see through this bow section. again just giving volume. I'm not sure how the real ship looks as I could not see this on Google or you tube. What I do find absolutely amazing is how each kit differs...from Mantua to Caldercraft to Deagositni etc etc. Surely manufacturers have studied and research the real Victory?? This did not only apply to the bow but so many sections of the ship. Anyway the Mantua kit once again gave me the license to play. This I will post next time.


") as we sit at our workbenches making little ships.
as we sit at our workbenches making little ships.


 The kit did not include these blocks and was my extra to appear more realistic. Difficult to fit I must say, and if anyone can advise me here it is appreciated.