Naval/Maritime History 24th of April - Today in Naval History - Naval / Maritime Events in History

Today in Naval History - Naval / Maritime Events in History
31 May 1805 - Bombardment of "HMS Diamond Rock" commenced.
The Battle of Diamond Rock took place between 31 May and 2 June 1805 during the Napoleonic Wars.


The Battle of Diamond Rock took place between 31 May and 2 June 1805 during the Napoleonic Wars. It was an attempt by Franco-Spanish force despatched under Captain Julien Cosmao to retake Diamond Rock, at the entrance to the bay leading to Fort-de-France, from the British forces that had occupied it over a year before.

1.JPG 2.JPG

The French in Martinique had been unable to oust the defenders from the strategically important rock, and the British garrison was able to control access to Fort-de-France Bay, firing on ships attempting to enter it with guns they had placed on the cliffs. The arrival of a large combined Franco-Spanish fleet in May changed the strategic situation. The French commander, Pierre de Villeneuve, had vague orders to attack British possessions in the Caribbean, but instead waited at Martinique for clearer instructions. He was finally persuaded to authorise an assault on the British position, and a Franco-Spanish flotilla was despatched to storm the rock. Already short of water, the defenders held on in the summit for several days, while the French, who had neglected to bring scaling ladders, could make little headway.

The British, short of both water and ammunition, eventually negotiated the surrender of the rock after several days under fire. As Diamond Rock was legally considered a Royal Navy vessel, and the commander was legally "captain" of it, after repatriation, he was tried by court-martial (as the law dictated in any case where a captain loses his ship, regardless of the cause), but was honourably acquitted.

Capture_of_Diamond_Rock.jpg
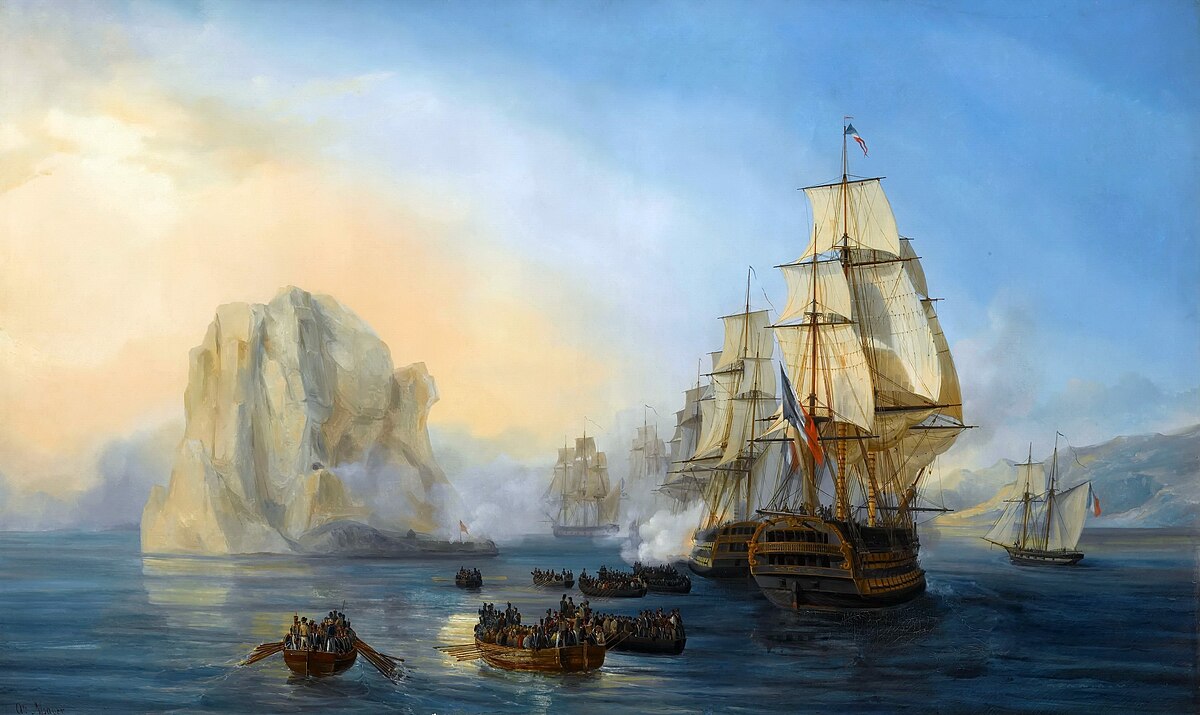
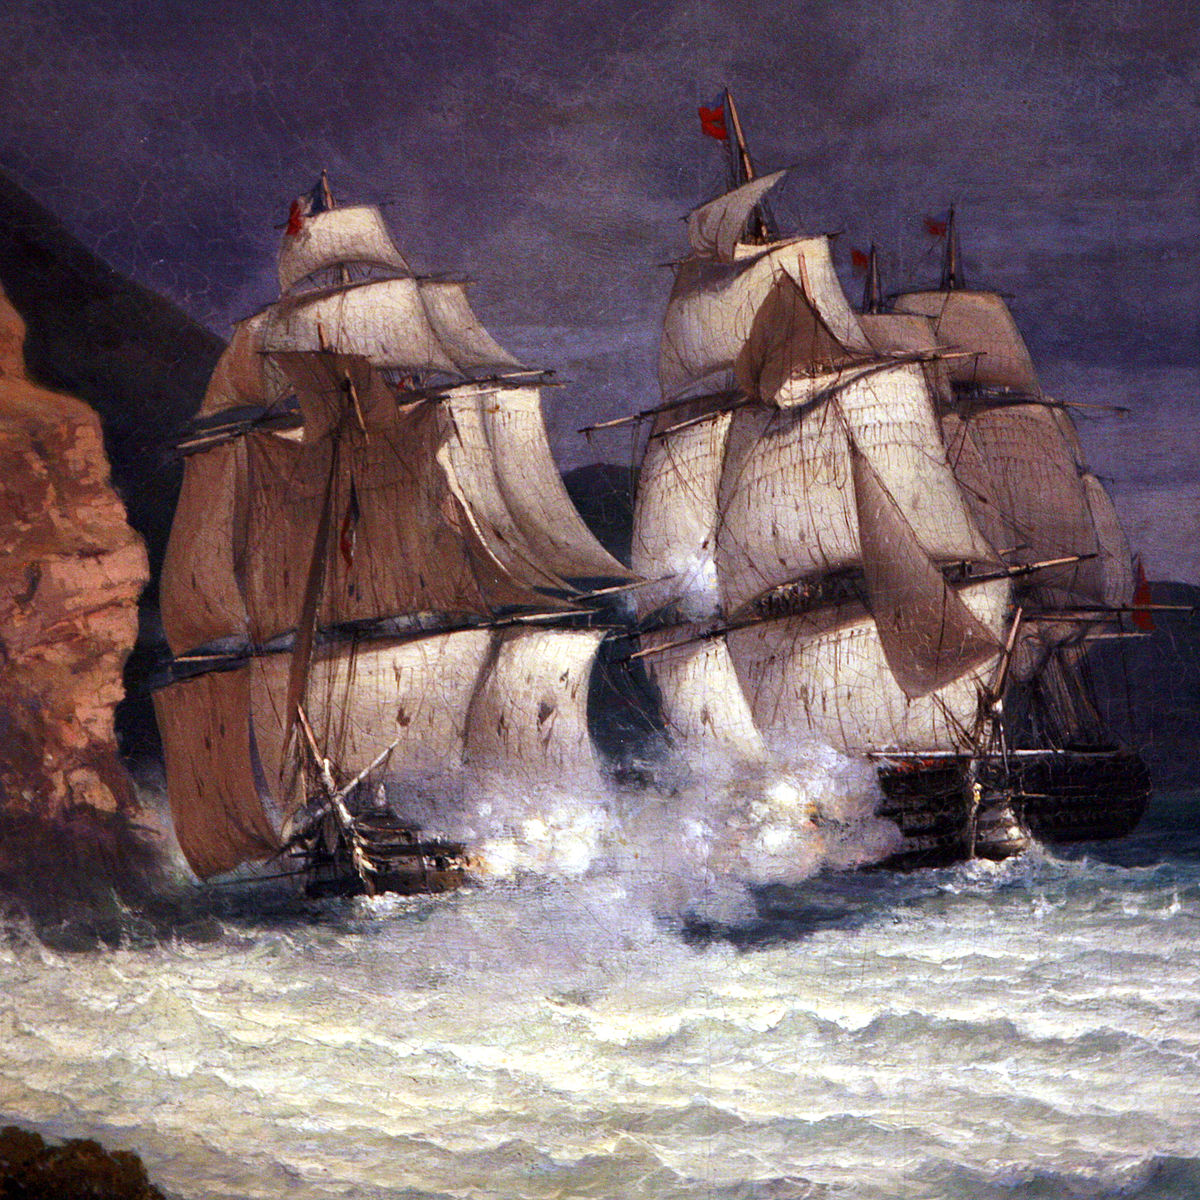
The Franco-Spanish combined fleet under Captain Cosmao attacking Diamond Rock, by Auguste Mayer

Background
Diamond Rock is fortified
Diamond Rock had been fortified in January 1804 on the orders of Commodore Samuel Hood. Hood had been active in the West Indies, protecting British convoys from French privateers issuing out of the two major naval bases the French retained in the Caribbean, at Guadeloupe and Martinique. The privateers had captured a number of valuable cargoes and were diverting British warships to protect the merchant fleets. Hood decided to blockade Martinique, and thus curtail the privateers and intercept supplies destined for the French garrison. Patrolling off the bay at the southern end of the island, in which one of Martinique's two main ports, Fort-de-France, was located, Hood saw that if Diamond Rock could be occupied, it would allow the British to effectively control the shipping approaching the ports on the western side, as the currents around the island made the easiest approaches mean passing within sight of Diamond Rock.

2062.jpg
A cannon is hauled up to the summit of the rock suspended by a cable lashed to the base of Centaur's mainmast

Hood reconnoitered Diamond Rock and considered it excellently defensible, with the only possible landing site being on the western side. He wrote that 'thirty riflemen will keep the hill against ten thousand ... it is a perfect naval post.' A party of men were landed on 7 January 1804, from Hood's flagship HMS Centaur, under the command of Centaur's first lieutenant James Wilkes Maurice. They promptly fortified the small cove they had landed at with their launch's 24-pounder, and established forges and artificers' workshops in a cave at the base of the rock. After fixing ladders and ropes to scale the sheer sides of the rock, they were able to access the summit and began to establish messes and sleeping areas in a number of small caves. Bats were driven out by burning bales of hay, and a space was cleared by blasting at the top of the rock in order to establish a battery. In February a number of guns were transferred over from Centaur, with two 24-pounders being installed in a cave near sea level, another 24-pounder halfway up the rock, and two 18-pounders in the battery at the top. In addition to this the men had use of a number of boats, with one armed with a 24-pounder carronade, which were used to intercept enemy ships.

Marshall's Naval Biography, when describing the process of hauling the guns to the summit, recorded that


Lieutenant Maurice having succeeded in scrambling up the side of the rock ..., and fastened one end of an 8-inch hawser to a pinnacle, the viol-block was converted into a traveller, with a purchase-block lashed thereto, and the other end of the hawser set up, as a jack-stay, round the Centaur's main-mast. The gun being slung to the viol, the purchase-fall was brought to the capstern. In this manner the desired object was effected in the course of a week, during which time Lieutenant Maurice and the working party on shore suffered most dreadfully from excessive heat and fatigue, being constantly exposed to the sun, and frequently obliged to lower themselves down over immense precipices to attend the ascent of the guns, and bear them off from the innumerable projections against which they swung whenever the ship took a shear...

French reactions
Despite the vulnerability of both Centaur and the Rock to a French gunboat attack while the process of fortification was being carried out, the French neglected to act. The governor of Martinique, Louis Thomas Villaret de Joyeuse ordered work to begin on building a road to the coast opposite the rock, and the establishment of a battery there, but the British were forewarned by the black population of the island who were largely sympathetic to the British. A party was sent onshore, which succeeded in capturing the engineer sent to construct the battery, and three of his men. Work on the battery was abandoned after further British raids on the area.

HM Fort Diamond
By early February the guns had been installed and tested. The 18-pounders were able to completely command the passage between the rock and the island, forcing ships to avoid the channel. The winds and currents meant that these ships were then unable to enter the bay. With work complete by 7 February Hood decided to formalise the administration of the island, and wrote to the Admiralty, announcing that he had commissioned the rock as a sloop, under the name Fort Diamond. Lieutenant Maurice, who had impressed Hood with his efforts while establishing the position, was rewarded by being made commander. Diamond Rock was to be considered a captured enemy ship, and was technically treated as a tender to one of the boats stationed there, commissioned by the Admiralty as the sloop Diamond Rock, superseding Hood's use of Fort Diamond. This was a mere technicality, and when the boat fell into French hands, another replaced it, and in time the rock became known as the 'Sloop Diamond Rock'. The batteries were also named, the two 18-pounders at the summit were known as 'Fort Diamond' or 'Diamond Battery', while the 24-pounder halfway up was known as 'Hood's Battery'.

Life on the Rock

2054.jpg

2060.jpg
Picturesque Views of the Diamond Rock... A Lodgement under the Rock on the South-west Side

Maurice had a party of around 100 men under his command on the rock, with the usual officers found on a British warship, including a surgeon, purser, and a junior lieutenant to command the small supply vessel. A hospital was established, and food, gunpowder and ammunition were brought to the rock in boats, at first from Centaur, and then from Martinique, where it was purchased from sympathetic inhabitants. Water also had to be brought from the island, and large cisterns were built to store it. The men on the rock ran the risk of falling from the heights or being bitten by the fer-de-lance, a venomous snake inhabiting the rock.

First French assault
With the British presence on Diamond Rock firmly established, Hood departed with Centaur, and the French saw an opportunity to attack. Four boatloads of soldiers were despatched at night, though the sailors who rowed there were extremely pessimistic as to their chances. Exhausted by the time they arrived at the rock, the men were not able to resist the pull of the strong current and were swept out to sea. They were eventually able to make it back to Martinique, with the British only learning of the attempt several days later. The British could have easily sunk the French boats had the French made a daylight assault. Disheartened by their failure, the French made no further attempts to attack the fort from the island. Maurice and his men devoted their time after this to raiding, cutting out ships from the Martinique coast, and interdicting trade.

Villeneuve arrives
1024px-Diamond_Rock.jpg
Diamond Rock in 2007
Main article: Trafalgar Campaign

On 14 May 1805, seventeen months after the British occupied the island, a large French fleet arrived in Fort-de-France Bay, having briefly exchanged fire with the British on Diamond Rock as they did so. The fleet, under Pierre de Villeneuve, was joined over the next few days by Spanish ships under Federico Gravina. As the Spanish ship San Rafael approached on 16 May, the British hoisted the French flag, luring the Spanish ship to pass close by. As she did so the British forces replaced the French colours with the British, and opened fire, taking the Spanish by surprise (such a false flag was considered a perfectly legitimate, indeed traditional, ruse de guerre during that era). Shortly after this it was discovered that the main cistern, holding a month's supply of water, had cracked in some earth tremors, and the leak had been made worse by the vibration from the guns. There was barely two weeks left, but fresh supplies were now unobtainable as a blockade of the rock began by a number of schooners, brigs and frigates.

The combined fleet carried a large number of soldiers, intended by Napoleon to be used to attack British possessions in the Caribbean. Villeneuve felt however that his orders were not clear, and remained at Fort-de-France, hoping to be joined by a fleet under Honoré Ganteaume, which unbeknownst to him had been unable to break the blockade of Brest. For two weeks Villeneuve lingered in the bay, until finally being persuaded by Villaret de Joyeuse to use his forces to capture Diamond Rock, a thorn in his side for the past seventeen months. Villeneuve gave Captain Julien Cosmao of the 74-gun Pluton command of the expedition. He was to take his ship, the 74-gun Berwick, the 36-gun Sirène, a corvette, schooner, eleven gunboats, and between three and four hundred soldiers (in addition to the ships' crews), and retake the rock.

Battle
Diamond_Rock_portraits.jpg
A collection of portraits of those involved in the establishment, operation and defence of Diamond Rock. Centre, top row, is Captain Murray Maxwell, commanding officer of HMS Centaur. Second from left, top row, is James Maurice, commander of the rock. His name is spelt here 'Morris'.

The flotilla left their anchorage on 29 May, but were not able to work into a position to attack windward of the rock until 31 May. Lieutenant Maurice assessed the overwhelming strength of the French, and having decided that it would be impossible to hold the lower stages, spiked the guns covering the landing stage, scuttled the launch, and withdrew his forces to defend the upper levels. Four Spanish gunboats from the ships San Rafael, Argonauta, España and Firme participated in the attack, with a Spanish gunboat being the first to disembark troops on the rock under fire from the British positions. Cosmao began an intense bombardment while the infantry forced their way onto the landing stage, losing three gunboats and two rowing boats full of soldiers as they did so. The attacking force had however neglected to bring any scaling ladders, and could not assault the sheer rock sides. Instead they were forced to besiege the British forces in the upper levels. By 2 June, with his ammunition almost exhausted and water supplies running critically short, Maurice opened negotiations.

At four o'clock that afternoon flag of truce was displayed and a senior French officer was despatched in a schooner to offer terms. By 5 Maurice had agreed to surrender Diamond Rock, the officers were to retain their swords and the men would remain under their orders. They were to be taken to Fort-de-France, and from there repatriated to a British settlement at the first opportunity, under parole. With these terms agreed, the British surrendered Diamond Rock. The British had two men killed and one man wounded in the battle. French casualties were harder to judge, Maurice estimated they amounted to seventy, the French commander of the landing force made a 'hasty calculation' of fifty. In addition to this the British had sunk five large boats, and potentially inflicted further casualties during the bombardment of the French warships. Maurice and his men were taken off the rock on the morning of 6 June and put on board the Pluton and Berwick.

Aftermath
Maurice was returned to Barbados by 6 June, and sent a letter dated that day to Horatio Nelson, who had recently arrived in the Caribbean in search of Villeneuve's fleet.


My Lord
IT is with the greatest sorrow I have to inform you of the loss of the Diamond Rock, under my command, which was obliged to surrender on the 2d ist., after three days' attack from a squadron of two sail of the line, one frigate, one brig, a schooner, eleven gun-boats and, from the nearest calculation, 1500 troops. The want of ammunition and water was the sole occasion of its unfortunate loss.... [our losses were] only two killed and one wounded. The enemy, from the nearest account I have been able to obtain, lost on shore 30 killed and 40 wounded: they also lost three gun-boats and two rowing boats.
Naval procedure at the time was that all commanders who lost their ships automatically faced a court martial. Accordingly, Maurice was tried by a court martial convened aboard the 28-gun HMS Circe in Carlisle Bay on 24 June. Maurice was honourably acquitted for the loss, the verdict noting

the Court is of the opinion that Captain J. W. Maurice, the Officers and Company of His Majesty's late sloop Diamond Rock did every thing in their power to the very last, in the defence of the Rock, and against a most superior force ... [Maurice] did not surrender the Diamond until he was unable to make further defence for want of water and ammunition, the Court do therefore honourably acquit Captain Maurice accordingly.
Villeneuve had retaken the rock, but the day the attack began the frigate Didon had arrived with orders from Napoleon. Villeneuve was ordered to take his force and attack British possessions, before returning in force to Europe, hopefully having in the meantime been joined by Ganteaume's fleet. But by now his supplies were so low that he could attempt little more than harassing some of the smaller British islands. Anti-French feelings grew in the Spanish commander Don Federico Gravina after the capture of the Diamond Rock. Gravina wanted to invade the island of Trinidad, under British rule since its capture from the Spanish a couple of years before. Villeneuve left Fort-de-France on 5 June, and on 7 June two French frigates sighted a convoy of 16 British merchants, and Villeneuve signalled general chase. The Spanish 80-gun ship of the line Argonauta and the two frigates chased down and captured 15 of the 16 merchants. The convoy was laden with sugar, rum, coffee, cotton and other products. From them he learnt that Nelson had arrived in the West Indies, in hot pursuit of Villeneuve. Shocked, Villeneuve abandoned his plans to raid the British colonies and immediately began preparations for the return voyage. The fleet got under-way on 11 June, causing one of the army officers attached to the fleet, General Honoré Charles Reille, to note:

We have been masters of the sea for three weeks with a landing force of 7000 to 8000 men and have not been able to attack a single island.
The capture of Diamond Rock and the seizing of 15 merchant ships were the only successes that the combined fleet had during their Caribbean campaign. The rock remained in French hands until the capture of Martinique in 1809.


https://collections.rmg.co.uk/collections.html#!csearch;searchTerm=Diamond_Rock;start=0
 
Today in Naval History - Naval / Maritime Events in History
31 May 1806 – Launch of USS Vesuvius, a bomb ketch, and the first ship of the United States Navy named for the Italian volcano


USS Vesuvius
was a bomb ketch, and the first ship of the United States Navy named for the Italian volcano.

Vesuvius was built by Jacob Coffin at Newburyport, Massachusetts. She was launched on 31 May 1806 and commissioned in or before September 1806, with Lieutenant James T. Leonard in command.

1.JPG 2.JPG

Service history
Vesuvius departed Boston, Massachusetts, for the Gulf of Mexico, but, while en route on 19 October, ran aground in the Gulf of Abaco. The ship lost her rudder and floated free only after her crew had jettisoned all of her guns and their carriages; her shot and shell; and even part of the kentledge. She finally reached New Orleans, Louisiana, on 27 November.

Repaired and rearmed with ten 6-pounders (2.7 kg), the ship subsequently sailed for Natchez, Mississippi, and operated out of that port from February 1807 until returning to New Orleans on 30 May. Vesuvius was then ordered north for further repairs and arrived at New York City on 16 August.

The ship apparently remained in the New York area until the spring 1809, when she again sailed for New Orleans. Embarking upon duties to suppress slave traders and pirates operating out of the trackless bayous, Vesuvius cruised off the mouth of the muddy Mississippi River and into the Gulf of Mexico, alert for any sign of illegal activity.

The crew's vigilance was rewarded in February 1810 when, under the command of Lieutenant Benjamin F. Read, Vesuvius gave chase to a pirate vessel off the mouth of the Mississippi and captured Duc de Montebello, a schooner named by Frenchmen who had been expelled from Cuba by the Spanishgovernment. Dispatched to New Orleans, the buccaneer ship was condemned. In the same month, boats from Vesuvius, under the command of Midshipman F.H. Gregory, captured pirate schooner Diomede and slaver Alexandria, the latter with a full cargo of slaves on board and flying British colors.

Four months later, Commander David Porter, commander of the New Orleans station, embarked in Vesuvius before the bomb ketch departed New Orleans on 10 June 1810, bound via Havana, Cuba, for Washington, DC. Also making the passage were Porter's wife and the Porters' ward, eight-year-old James Glasgow Farragut. The lad would later change his name to David Glasgow Farragut and ultimately become the Navy's first admiral.

After repairs at the Washington Navy Yard, the ketch pressed on for New York and arrived on 6 September 1810. Vesuvius was placed in ordinary, and her crew was transferred to USS Enterprise.

In 1816, Vesuvius served as a receiving ship at New York. A survey conducted in April 1818 revealed that the cost to repair and refit the ship would be, in the survey's words, "exorbitant." Still carried on the Naval Vessel Registry as a receiving ship through 1821, Vesuvius was broken up in June 1829 after being damaged beyond repair on 4 June when the old steamship Fulton exploded alongside.


Today in Naval History - Naval / Maritime Events in History
31 May 1809 - Action of 31 May 1809


The Action of 31 May 1809 was a naval skirmish in the Bay of Bengal during the Napoleonic Wars. During the action, an Honourable East India Company convoy carrying goods worth over £500,000 was attacked and partially captured by the French frigate Caroline. The three East Indiamen that made up the convoy fought against their opponent with their own batteries of cannon but ultimately were less powerful, less manoeuvrable and less trained than their opponent and were defeated one by one; only the smallest of the three escaped. The action was the first in a string of attacks on important convoys in the Indian Ocean by French cruisers operating from Île de France and Île Bonaparte during a concerted campaign against British shipping in the region.

1.JPG 2.JPG

Background
In November 1808, a squadron of powerful French frigates sailed for Île de France under Commodore Jacques Hamelin. This squadron was under orders to attack and capture or destroy British shipping in the Indian Ocean, particularly the heavily armed convoys of East Indiamen that carried millions of pounds worth of trade goods from British India and the Far East to Britain. These convoys were operated by the Honourable East India Company(HEIC), which ran British India and maintained a private army and navy to secure the colony and its trade routes. During the late Napoleonic Wars, French naval strategy focused on the disruption of this trade with the use of fast and well-armed frigates to operate independently along British trade routes and capture British merchant ships. This affected the British economy, which was already severely stretched by the war, and forced the Royal Navy to divert resources to distant parts of the world to protect British trade.

During the late spring of 1809, following the end of the Indian Ocean hurricane season, Hamelin ordered his ships to operate in the Bay of Bengal. One of these frigates was the 40-gun Caroline, which was built in Antwerp in 1806 and had a burthen of 1,078 tons (bm). Caroline was commanded by Jean-Baptiste-Henri Féretier, newly promoted following the sudden death of her previous captain. Féretier was the first of Hamelin's captains to find a British convoy, spotting three sails on the horizon on 31 May. These belonged to a Britain-bound convoy of East Indiamen, which had departed the Hooghly River on 2 May. Laden with over £500,000 worth of silk and other trade goods, these ships were an important asset to the HEIC and had originally been part of a larger convoy, guarded by the sloop HMS Victor and consisting of five Indiamen and several smaller vessels. On 24 May a storm divided the convoy; Victor and the small ships separated from the Indiamen. Two of the Indiamen, Monarch and Earl Spencer separated from the other three on 25 May; Monarch had sprung a serious leak and needed to deviate to Penang, and Earl Spencer accompanied her.

The three remaining Indiamen, Streatham, Europe, and Lord Keith, were large, and more importantly, armed. Streatham and Europe of 800 tons (bm) each and carried 30 cannon, whereas the smaller Lord Keith was 600 tons (bm) and carried 12 guns. Four years earlier, a convoy of East Indiamen had driven off a French ship of the line and attached frigates under Admiral Linois in similar waters by forming a battle line and firing on their opponents as they closed. The crews of these East Indiamen were not of Royal Navy standard, however, with insufficient training and large numbers of Portuguese, Chinese, and lascar seamen, who proved unreliable in combat.

Battle
One of the smaller ships from the convoy, an American merchant ship named Silenus, had separated from the main body in the storm and arrived at the Nicobar Islands. There she had encountered Carolineand the American captain had reported the location and value of the convoy to Féretier.[8] Setting all sail, Féretier took Caroline to the north-west, and sighted the convoy at 05:30, only a few days after leaving the Nicobar Islands. The British ships, under the loose command of John Dale in Streatham, originally mistook the French frigate for the missing Victor and it was not until another half-hour had passed that Dale realised the danger his ships were in. Ordering the Indiamen to form a line of battle, Dale placed his ship in the centre, with the small Lord Keith ahead and Europe behind.[9] However, the lack of naval experience on the British ships resulted in the Indiamen sailing too far from one another in line, thus leaving them unable to provide effective mutual support.

Able to attack the HEIC ships individually, Caroline pulled alongside Europe at 06:30 and began a heavy fire into the merchant ship, which intermittently replied with her available guns. Within 30 minutes, Europe's rigging was tattered, many of her guns dismounted and a number of her crew wounded or killed. Moving past his now disabled opponent, Féretier next attacked Streatham, which had slowed in an unsuccessful attempt to support Europe. Now alone against the frigate, Streatham came under heavy fire at 07:00 and by 08:00 was badly damaged, with casualties in her crew, her guns all dismounted and her lascars hiding below decks. With further resistance hopeless, Dale hauled down the company flag and surrendered.

During the engagement between Streatham and Caroline, Lord Keith and Europe had fired sporadically at the French ship with little effect. Pulling away from his surrendered opponent, Féretier then fired on Lord Keith, whose captain, Peter Campbell, realised that his ship stood no chance against the frigate and turned eastward, running before the wind to escape despite suffering severe damage to Lord Keith's rigging as he did so.[9] William Gelston, captain of Europe, also attempted to flee, but his battered ship was in no condition to outrun the virtually untouched frigate, and he surrendered at 10:00. Lord Keith eventually arrived safely at Penang on 9 June. Casualties on the British ships were six killed and at least four wounded, while the French lost one killed and three wounded.

Aftermath
Féretier repaired his captures at sea and returned to Île de France, arriving two months later on 22 July. Discovering the presence of a British frigate squadron under Josias Rowley off Port Louis, Féretier diverted to Saint Paul on Île Bonaparte. Among the goods removed from the ships were the £500,000 worth of silk, which was stored in warehouses near the docks. In the British raid on Saint Paul on 21 September 1809, the British burned the warehouses and their contents and captured Caroline, Streatham, and Europe. Despite these subsequent losses, Féretier was highly commended for his leadership in the action and received a promotion from Governor Charles Decaen. He also received letters from the captains of Streatham and Europe, thanking him for his attention and courtesy to their crews and passengers during their period of captivity.


Caroline was a 40-gun Hortense-class frigate of the French Navy. She was launched in 1806 and sent to the Indian Ocean in 1809. There she was captured by the British during the Napoleonic Wars. The British renamed the ship to HMS Bourbonaise, as the capture was near Île Bourbon during the British campaign to seize that island and Mauritius, and the British had a ship in service named Caroline.

1280px-Flore-IMG_2242.jpg


Streatham was launched in 1805 as an East Indiaman for the British East India Company (EIC). She made seven voyages for the EIC. On her second voyage the French captured her, but the British Royal Navy recaptured her some months later. She was broken up in 1821.


Europe was launched in 1803 as an East Indiaman for the British East India Company (EIC). She made six voyages for the EIC. On her third voyage the French captured her, but the British Royal Navy recaptured her some months later. In 1817 her owners sold her for a hulk but new owners continued to sail her between London and India. She is last listed in 1824.


Lord Keith was launched in 1804 by and for Peter Everitt Mestaer. He chartered her to the East India Company (EIC) for six voyages, and she then went on to make another two voyages for the EIC. On her second voyage, and unusually for an East Indiaman, she participated in the proceeds for the recapture of a former British Royal Navy brig and possibly in a skirmish with a French ship. On her third voyage she participated in a notable action. She was broken up c.1820.


https://en.wikipedia.org/wiki/Action_of_31_May_1809
 
Today in Naval History - Naval / Maritime Events in History
31 May 1813 – Launch of HMS Blenheim, a 74-gun third rate ship of the line of the Royal Navy, at Deptford Dockyard


HMS Blenheim
was a 74-gun third rate ship of the line of the Royal Navy, launched on 31 May 1813 at Deptford Dockyard.

1.JPG 2.JPG 3.JPG

Blenheim_(ship,_1813)_Oswald_Walters_Brierly_&_R._Carrick_-_The_Fleet_becalmed_(cropped).jpg

a5008.jpg
The English & French fleets in the Baltic, 1854. (Plate No.5). The fleets becalmed. Screw ships getting steam up (shows H.M.S. Princess Royal and Blenheim) (PAH8362)

She was placed on harbour service in 1831. Her captain, Humphrey Fleming Senhouse, died on board Blenheim in the morning of 13 June 1841, from fever contracted during operations in Canton in May 1841.

800px-HMS_Blenheim_(1813)_mast_with_cannonball_from_1855.jpg
Mast with cannonball from 1855, on exhibit at the National Maritime Museum, Greenwich

In 1854/5 she saw service in the Baltic as a 60-gun steam screw. During this service she received a 32-pounder cannonball to her mast.

Blenheim was eventually broken up in 1865.

pz6595.jpg
Print inscribed, 'This Print representing the East India Ship 'Vernon', Geo Denny Commander, on her voyage out, fitted with a Steam Engine of 30 horse power, passing HM ships 'Edinburgh' & 'Blenheim' ,74s, beating down Channel on the 21st of September 1839 off Benbridge [sic], Isle of Wight...'. The ship is Green's 'Vernon' of 1838. This print from an original painting by John Lynn (see BHC3686) shows her with her original auxiliary paddles, later removed. See also PAJ2634, another copy (illustrated), PAH9327 and PAH9330. Her sister ship, 'Earl of Hardwick' (see PAH9320) was also originally fitted with paddles. This print is stored in a mount with another copy (PAI6594) in the NMM collection. The Museum has a further image (BHC3202) of the 'Earl of Hardwick'

j3307.jpg
Scale: 1:48. Contemporary copy of a plan showing the body plan, sheer lines, and longitudinal half-breadth for 'Conquestadore' (1810), 'Armada' (1810), 'Vigo' (1810), 'Cressey' (1810), 'La Hogue' (1811), 'Vindictive' (1813), 'Poictiers' (1809), 'Vengeur' (1810), 'Edinburgh' (1811), 'Dublin' (1812), 'Duncan' (1811), 'Indus' (1812), 'Rodney' (1809), 'Cornwall' (1812), 'Redoutable' (1815), 'Anson' (1812), 'Agincourt' (1817), 'Ajax' (1809), 'America' (1810), 'Barham' (1811), 'Benbow' (1813), 'Berwick' (1809), 'Blenheim' (1813), 'Clarence' (1812), 'Defence' (1815), 'Devonshire' (1812), 'Egmont' (1810), 'Hercules' (1815), 'Medway' (1812), 'Pembroke' (1812), 'Pitt' (1816), 'Russell' (1822), 'Scarborough' (1812), 'Stirling Castle' (1811), 'Wellington' (1816), 'Mulgrave' (1812), 'Gloucester' (1812), all 74-gun Third Rate, two-deckers. The plan includes alterations for a rounded bow and circular stern

j0581.jpg
Scale: 1:12 and half-size. Plan showing the elevation, sections and plan of the seaman's bench (stool) illustrating the method of fixing it in the raised position for firing the guns on Blenheim (1813), a 74-gun Third Rate, two-decker. The plan also includes explanation key. Signed by William Blessley [Foreman of Shipwrights, Chatham Dockyard]

b3829.jpg
Figurehead of HMS 'Blenheim', a 74-gun third rate warship built at Deptford Dockyard in 1813. The figurehead represents a male bust-length figure in military dress with a sash over the left shoulder and the Garter star on the left breast, wearing a laurel wreath. It sits on a fiddle-head scroll bearing the Spencer-Churchill arms on the sides, as granted to the family in 1733. It may be intended as a portrait of Marlborough, the great general of the reign of Queen Anne and victor of the Battle of Blenheim in 1704, but (the date of the arms apart) the dress is at best late 18th-century and probably early 19th. The ship was used as a quarter vessel at Stangate Creek on the Medway from 1815, placed in harbour service in 1831 and converted to auxiliary screw power in 1837. She served in the China Wars, 1839-42 and the Baltic campaign of the Crimean War in 1854 before becoming a coastguard vessel and and being broken up in 1865


Today in Naval History - Naval / Maritime Events in History
31 May 1851 - HMS Reynard was an 8-gun screw sloop of the Royal Navy. She was launched in 1848, conducted anti-piracy work in Chinese waters and was wrecked on the Pratas Islands in the South China Sea on 31 May 1851


HMS Reynard was an 8-gun screw sloop of the Royal Navy. She was launched in 1848, conducted anti-piracy work in Chinese waters and was wrecked on the Pratas Islands in the South China Sea on 31 May 1851.

1.JPG 2.JPG 3.JPG

HMS_Reynard_(1848)_wrecked_on_the_Pratas_Islands.jpg
The ship's company of Reynard on a raft, with the ship aground behind them on the Pratas Islands in 1851

Construction
The Admiralty originally ordered the ship on 25 April 1847 from Woolwich Dockyard as the steam schooner Plumper. She was re-ordered from Deptford Dockyard as the screw sloop Reynard on 12 August 1847 to a design by John Edye, and laid down in August that year. She was launched on 21 March 1848 at Deptford and commissioned at Woolwich on 1 August 1848.

Reynard was the only ship ever built to the design. She was constructed of wood, was 147 feet 0 inches (44.8 m) long and 27 feet 10 inches (8.5 m) in the beam, and had a mean draught of 11 feet 6 inches (3.5 m). She had a displacement of 656 tons.

She was powered by a J. and G. Rennie two-cylinder horizontal single-expansion steam engine driving a single screw. Rated at 60 nominal horsepower, and developing 165 indicated horsepower, this unit was capable of driving her at 8.2 knots (15.2 km/h).

Her armament of 8 guns consisted of two 32-pounder (56 cwt) muzzle-loading smooth-bore guns and six 32-pounder (25 cwt) muzzle-loading smooth-bore guns mounted to fire in a traditional broadside arrangement.

1920px-HMS_Reynard_(1848)_design.jpg
The original plans of Reynard

Service
After commissioning, Reynard served in the Channel Fleet under Sir Charles Napier. On 15 September 1848, she ran aground at Cobh, County Cork. She was refloated. Reynard took part in an abortive amphibious landing against Riff pirates in February 1849. On leaving the Channel Fleet. she sailed for the East Indies, leaving Singapore in company with HMS Cleopatra for Labuan and China on 10 October 1849, and arriving in Hong Kong on 14 November. She served on the China Station in an anti-piracy role, recapturing two junks and apprehending 15 Chinese pirates on 23 March 1850. She left Hong Kong to return to Woolwich to pay off, but on her way was required to accompany the brig HMS Pilot to rescue the crew of the brig Velocipede, which had run aground on Pratas shoal, 170 miles southeast of Hong Kong.

Fate
In rescuing the crew of Velocipede, Reynard herself was wrecked on the Pratas Islands in the South China Sea on 31 May 1851. The whole crew survived the sinking and were rescued by HMS Pilot, which also rescued the crew of Velocipede. The ship could not be saved, and she was paid off as a total loss on 27 February 1852


Today in Naval History - Naval / Maritime Events in History
31 May 1878 - SMS Grosser Kurfürst – The ironclad sank on her maiden voyage in a collision with the ironclad SMS König Wilhelm. The two ships, along with SMS Preussen were steaming in the English Channel on 31 May 1878 when they encountered a group of fishing boats and, in turning to avoid them, Grosser Kurfürst inadvertently crossed too closely to König Wilhelm. The latter rammed Grosser Kurfürst which sank in the span of about eight minutes taking between 269 and 276 of her crew with her.

SMS_Grosser_Kurfurst_collision.png
König Wilhelm collides with Grosser Kurfürst

SMS Grosser Kurfürst (or Großer) was an ironclad turret ship of the German Kaiserliche Marine. She was laid down at the Imperial Dockyard in Wilhelmshaven in 1870 and completed in 1878; her long construction time was in part due to a redesign that was completed after work on the ship had begun. Her main battery of four 26 cm (10 in) guns was initially to be placed in a central armored battery, but during the redesign this was altered to a pair of twin gun turrets amidships.

1.JPG 2.JPG 3.JPG

SMS_Grosser_Kurfurst_under_sail.png

Grosser Kurfürst was sunk on her maiden voyage in an accidental collision with the ironclad SMS König Wilhelm. The two ships, along with SMS Preussen, were steaming in the English Channel on 31 May 1878. The three ships encountered a group of fishing boats, and in turning to avoid them, Grosser Kurfürst inadvertently crossed too closely to König Wilhelm. The latter rammed Grosser Kurfürst, which sank in the span of about eight minutes, taking between 269 and 276 of her crew with her. Her loss spurred a series of investigations into the circumstances of the collision, which ultimately resulted in the acquittal of both Rear Admiral Karl Ferdinand Batsch, the squadron commander, and Count Alexander von Monts, the captain of Grosser Kurfürst. Political infighting over the affair led to the ousting of Rear Admiral Reinhold von Werner from the navy.


Construction
Preussen_class_ironclad.png
Line-drawing of a Preussen-class ironclad

Grosser Kurfürst was ordered by the Imperial Navy from the Imperial Dockyard in Wilhelmshaven; her keel was laid in 1869 under construction number 2. The ship was launched on 17 September 1875 and commissioned into the German fleet on 6 May 1878. Grosser Kurfürst cost the German government 7,303,000 gold marks. As originally designed, Grosser Kurfürst was to have had her primary armament arranged in a central battery; after she was laid down, she was altered to mount her main guns in a pair of twin turrets. Although she was the first ship in her class of three vessels to be laid down, she was the last to be launched and commissioned. This was because she was redesigned after work had begun, and she was built by the newly established Imperial Dockyard. Her sister Preussen was built by an experienced commercial ship builder, and Friedrich der Grossewas laid down after the redesign was completed.

The ship was 96.59 meters (316.9 ft) long overall and had a beam of 16.30 m (53.5 ft) and a draft of 7.12 m (23.4 ft) forward. Grosser Kurfürst was powered by one 3-cylinder single expansion steam engine, which was supplied with steam by six coal-fired transverse trunk boilers. The ship's top speed was 14 knots (26 km/h; 16 mph), at 5,468 indicated horsepower (4,077 kW). She was also equipped with a full ship rig. Her standard complement consisted of 46 officers and 454 enlisted men.

She was armed with four 26 cm (10 in) L/22 guns mounted in a pair of gun turrets placed amidships.[c] As built, the ship was also equipped with two 17 cm (6.7 in) L/25 guns.[2] Grosser Kurfürst's armor was made of wrought iron and backed with teak. The armored belt was arrayed in two strakes. The upper strake was 203 mm (8.0 in) thick; the lower strake ranged in thickness from 102 to 229 mm (4.0 to 9.0 in). Both were backed with 234 to 260 mm (9.2 to 10.2 in) of teak. The gun turrets were protected by 203 to 254 mm (8.0 to 10.0 in) armor on the sides, backed by 260 mm of teak.

Service history
Collision and loss
SMS_Grosser_Kurfurst_sinking.png
SMS Grosser Kurfürst sinking on her maiden voyage

In April 1878, the armored squadron was reactivated for the annual summer training cycle, under the command of Rear Admiral Karl Ferdinand Batsch. Grosser Kurfürst joined the unit, which included her sisters Preussen and Friedrich der Grosse and the large ironclad König Wilhelm, after her commissioning on 6 May. A grounding by Friedrich der Grosse caused serious damage to her hull and prevented her from taking part in the upcoming training cruise. The three ships left Wilhelmshaven on the 29th. König Wilhelm and Preussen steamed in a line, with Grosser Kurfürst off to starboard. On the morning of the 31st, the three ships encountered a pair of sailing vessels off Folkestone. Grosser Kurfürst turned to port to avoid the boats while König Wilhelm sought to pass the two boats, but there was not enough distance between her and Grosser Kurfürst. She therefore turned hard to port to avoid Grosser Kurfürst, but the action was not taken quickly enough, and König Wilhelm found herself pointed directly at Grosser Kurfürst. König Wilhelm's ram bow tore a hole in Grosser Kurfürst.

A failure to adequately seal the watertight bulkheads aboard Grosser Kurfürst caused the ship to sink rapidly, in the span of about eight minutes. Figures for the number of fatalities vary. Erich Gröner reports that out of a crew of 500 men, 269 died in the accident, while Lawrence Sondhaus states that 276 men were killed. Many of the bodies ended up in Cheriton Road Cemetery, where there is a substantial memorial. Arthur Sullivan, on his way to Paris, witnessed the incident, writing, "I saw it all – saw the unfortunate vessel slowly go over and disappear under the water in clear, bright sunshine, and the water like a calm lake. It was too horrible – and then we saw all the boats moving about picking up the survivors, some so exhausted they had to be lifted on to the ships."[8] Among those rescued was the ship's captain, Count Alexander von Monts.

König Wilhelm was also badly damaged in the collision, with severe flooding forward. König Wilhelm's captain initially planned on beaching the ship to prevent it from sinking, but determined that the ship's pumps could hold the flooding to an acceptable level. The ship made for Portsmouth, where temporary repairs could be effected to allow the ship to return to Germany. In the aftermath of the collision, the German navy held a court martial for Rear Admiral Batsch, the squadron commander, and Captains Monts and Kuehne, the commanders of the two ships, along with Lieutenant Clausa, the first officer aboard Grosser Kurfürst, to investigate the sinking.

Inquiry
SMS_Grosser_Kurfurst_sinking_diagram.png
Diagram of the maneuvers of the German flotilla

In the ensuing inquiry, chaired by Rear Admiral Reinhold von Werner, Monts testified that he had not been given sufficient time to familiarize himself with the ship and its crew, who were themselves unfamiliar with the vessel. Monts argued that the mobilization process for the newly commissioned ship should have lasted four to six weeks, rather than the three he had been given. The day before the squadron left Wilhelmshaven, Batsch complained to General Albrecht von Stosch, the chief of the Kaiserliche Marine, that a significant number of dockyard workers were still finishing work on Grosser Kurfürst. Werner and the board determined that Admiral Batsch was at fault and exonerated Monts.

Stosch was infuriated that the proceedings had been allowed to become a forum for criticism of his policies, for which he blamed Werner. He appealed to Kaiser Wilhelm I, stating that the inquiry had unfairly blamed Admiral Batsch, and requested a new court martial for the involved officers. Simultaneously, Stosch began a campaign to force Werner out of the navy. This was in part to ensure that Batsch, his protégé, would be next in line after Stosch retired. Despite his popularity, particularly with Kaiser Wilhelm I and his son, Werner was unable to resist Stosch's efforts to force his ouster. On 15 October 1878, he requested retirement.

The second court martial again found Batsch guilty and Monts innocent of negligence. A third investigation, held in January 1879, reversed the decision of the previous verdicts and sentenced Monts to a prison term of one month and two days, though the Kaiser refused to implement the punishment. This necessitated another trial, which returned to the initial verdict and sentenced Batsch to six months in prison. The Kaiser commuted Batsch's sentence after he had served two months' time. Disappointed that his protégé had taken the blame for the sinking, Stosch requested another court martial for Monts, who was found not guilty. The Kaiser officially approved the verdict, which put an end to the series of trials over the sinking of Grosser Kurfürst.

Die_Gartenlaube_(1880)_b_844.jpg
Illustration of the memorial in Folkestone

The lives lost in the sinking of the Grosser Kurfürst are commemorated by a large stone obelisk erected at Cheriton Road Cemetery, in Folkestone.


SMS König Wilhelm(King William) was an armored frigate of the Prussian and later the German Imperial Navy. The ship was laid down in 1865 at the Thames Ironworks shipyard in London, originally under the name Fatih for the Ottoman Empire. She was purchased by Prussia in February 1867, launched in April 1868, and commissioned into the Prussian Navy in February 1869. The ship was the fifth ironclad ordered by the Prussian Navy, after Arminius, Prinz Adalbert, Friedrich Carl, and Kronprinz. She was built as an armored frigate, armed with a main battery of sixteen 24 cm (9.4 in) and five 21 cm (8.3 in) guns; several smaller guns and torpedo tubes were added later in her career.

SMS_König_Wilhelm_at_Gravesend.jpg

The ship was for a time the largest and most powerful warship in the German navy; she served as its flagship during the Franco-Prussian War in 1870–1871, though engine troubles prevented the ship from seeing action. In 1878, the ship accidentally rammed and sank the ironclad Grosser Kurfürst, with great loss of life. König Wilhelm was converted into an armored cruiser in 1895–1896; by early 1904, however, she had been superseded by newer vessels. In May of that year, she was placed out of active service and used as a floating barracks and training ship, a role she held through World War I. In 1921, the ship was ultimately broken up for scrap, after a career spanning 52 years and three German states.

Bundesarchiv_Bild_146-2008-0175,_Panzerfregatte__SMS_König_Wilhelm_.jpg
König Wilhelm after the 1895–1896 reconstruction into an armored cruiser


Today in Naval History - Naval / Maritime Events in History
31 May 1911 - Launch of RMS Titanic


RMS Titanic was a British passenger liner that sank in the North Atlantic Ocean in 1912 after the ship struck an iceberg during her maiden voyage from Southampton to New York City. Of the estimated 2,224 passengers and crew aboard, more than 1,500 died, making it one of modern history's deadliest peacetime commercial marine disasters. RMS Titanic was the largest ship afloat at the time she entered service and was the second of three Olympic-class ocean liners operated by the White Star Line. She was built by the Harland and Wolff shipyard in Belfast. Thomas Andrews, chief naval architect of the shipyard at the time, died in the disaster.

Titanic was under the command of Capt. Edward Smith, who also went down with the ship. The ocean liner carried some of the wealthiest people in the world, as well as hundreds of emigrants from Great Britain and Ireland, Scandinavia and elsewhere throughout Europe who were seeking a new life in the United States. The first-class accommodation was designed to be the pinnacle of comfort and luxury, with an on-board gymnasium, swimming pool, libraries, high-class restaurants and opulent cabins. A high-powered radiotelegraph transmitter was available for sending passenger "marconigrams" and for the ship's operational use. Although Titanic had advanced safety features such as watertight compartments and remotely activated watertight doors, it only carried enough lifeboats for 1,178 people—about half the number on board, and one third of her total capacity—due to outdated maritime safety regulations. The ship carried 16 lifeboat davits which could lower three lifeboats each, for a total of 48 boats. However, Titanic carried only a total of 20 lifeboats, four of which were collapsible and proved hard to launch during the sinking.

After leaving Southampton on 10 April 1912, Titanic called at Cherbourg in France and Queenstown (now Cobh) in Ireland before heading west to New York. On 14 April, four days into the crossing and about 375 miles (600 km) south of Newfoundland, she hit an iceberg at 11:40 p.m. ship's time. The collision caused the hull plates to buckle inwards along her starboard (right) side and opened five of her sixteen watertight compartments to the sea; she could only survive four flooding. Meanwhile, passengers and some crew members were evacuated in lifeboats, many of which were launched only partially loaded. A disproportionate number of men were left aboard because of a "women and children first" protocol for loading lifeboats. At 2:20 a.m., she broke apart and foundered with well over one thousand people still aboard. Just under two hours after Titanic sank, the Cunard liner RMS Carpathia arrived and brought aboard an estimated 705 survivors.

1024px-RMS_Titanic_3.jpg
RMS Titanic departing Southampton on 10 April 1912

The disaster was met with worldwide shock and outrage at the huge loss of life and the regulatory and operational failures that led to it. Public inquiries in Britain and the United States led to major improvements in maritime safety. One of their most important legacies was the establishment in 1914 of the International Convention for the Safety of Life at Sea (SOLAS), which still governs maritime safety. Additionally, several new wireless regulations were passed around the world in an effort to learn from the many missteps in wireless communications—which could have saved many more passengers.

The wreck of Titanic was discovered in 1985 (more than 70 years after the disaster) during a US military mission, and it remains on the seabed. The ship was split in two and is gradually disintegrating at a depth of 12,415 feet (3,784 m). Thousands of artefacts have been recovered and displayed at museums around the world. Titanic has become one of the most famous ships in history; her memory is kept alive by numerous works of popular culture, including books, folk songs, films, exhibits, and memorials. Titanic is the second largest ocean liner wreck in the world, only beaten by her sister HMHS Britannic, the largest ever sunk, although she holds the record as the largest sunk while actually in service as a liner due to Britannic being used as a hospital ship at the time of her sinking. The final survivor of the sinking, Millvina Dean, aged two months at the time, died in 2009 at the age of 97.


Background

The name Titanic derives from the Titan of Greek mythology. Built in Belfast, Ireland, in the United Kingdom of Great Britain and Ireland (as it was then known), the RMS Titanic was the second of the three Olympic-class ocean liners—the first was the RMS Olympic and the third was the HMHS Britannic. Britannic was originally to be called Gigantic and was to be over 1,000 feet long. They were by far the largest vessels of the British shipping company White Star Line's fleet, which comprised 29 steamers and tenders in 1912. The three ships had their genesis in a discussion in mid-1907 between the White Star Line's chairman, J. Bruce Ismay, and the American financier J. P. Morgan, who controlled the White Star Line's parent corporation, the International Mercantile Marine Co. (IMM).

The White Star Line faced an increasing challenge from its main rivals Cunard, which had recently launched the Lusitania and the Mauretania—the fastest passenger ships then in service—and the German lines Hamburg America and Norddeutscher Lloyd. Ismay preferred to compete on size rather than speed and proposed to commission a new class of liners that would be larger than anything that had gone before as well as being the last word in comfort and luxury. The company sought an upgrade in their fleet primarily in response to the Cunard giants but also to replace their oldest pair of passenger ships still in service, being the SS Teutonic of 1889 and SS Majestic of 1890. Teutonic was replaced by Olympic while Majestic was replaced by Titanic. Majestic would be brought back into her old spot on White Star's New York service after Titanic's loss.

The ships were constructed by the Belfast shipbuilders Harland and Wolff, who had a long-established relationship with the White Star Line dating back to 1867. Harland and Wolff were given a great deal of latitude in designing ships for the White Star Line; the usual approach was for the latter to sketch out a general concept which the former would take away and turn into a ship design. Cost considerations were relatively low on the agenda and Harland and Wolff was authorised to spend what it needed on the ships, plus a five percent profit margin. In the case of the Olympic-class ships, a cost of £3 million (£250 million in 2015 money) for the first two ships was agreed plus "extras to contract" and the usual five percent fee.

Harland and Wolff put their leading designers to work designing the Olympic-class vessels. The design was overseen by Lord Pirrie, a director of both Harland and Wolff and the White Star Line; naval architect Thomas Andrews, the managing director of Harland and Wolff's design department; Edward Wilding, Andrews' deputy and responsible for calculating the ship's design, stability and trim; and Alexander Carlisle, the shipyard's chief draughtsman and general manager. Carlisle's responsibilities included the decorations, equipment and all general arrangements, including the implementation of an efficient lifeboat davit design.

On 29 July 1908, Harland and Wolff presented the drawings to J. Bruce Ismay and other White Star Line executives. Ismay approved the design and signed three "letters of agreement" two days later, authorising the start of construction. At this point the first ship—which was later to become Olympic—had no name, but was referred to simply as "Number 400", as it was Harland and Wolff's four hundredth hull. Titanic was based on a revised version of the same design and was given the number 401.

Dimensions and layout

Cd51-1000g.gif
Titanic in 1912

Titanic was 882 feet 9 inches (269.06 m) long with a maximum breadth of 92 feet 6 inches (28.19 m). Her total height, measured from the base of the keel to the top of the bridge, was 104 feet (32 m). She measured 46,328 gross register tons and with a draught of 34 feet 7 inches (10.54 m), she displaced 52,310 tons.

All three of the Olympic-class ships had ten decks (excluding the top of the officers' quarters), eight of which were for passenger use.


Construction, launch and fitting-out

1024px-RMS_Titanic_ready_for_launch,_1911.jpg
Construction in gantry, 1909–11

1024px-Titanic_launched_at_Belfast.jpg
Launch, 1911 (unfinished superstructure)

1280px-Titanic_under_construction.jpg
Fitting-out, 1911–12

The sheer size of Titanic and her sister ships posed a major engineering challenge for Harland and Wolff; no shipbuilder had ever before attempted to construct vessels this size. The ships were constructed on Queen's Island, now known as the Titanic Quarter, in Belfast Harbour. Harland and Wolff had to demolish three existing slipways and build two new ones, the largest ever constructed up to that time, to accommodate both ships. Their construction was facilitated by an enormous gantry built by Sir William Arrol & Co., a Scottish firm responsible for the building of the Forth Bridge and London's Tower Bridge. The Arrol Gantry stood 228 feet (69 m) high, was 270 feet (82 m) wide and 840 feet (260 m) long, and weighed more than 6,000 tons. It accommodated a number of mobile cranes. A separate floating crane, capable of lifting 200 tons, was brought in from Germany.

The construction of Olympic and Titanic took place virtually in parallel, with Olympic's keel laid down first on 16 December 1908 and Titanic's on 31 March 1909. Both ships took about 26 months to build and followed much the same construction process. They were designed essentially as an enormous floating box girder, with the keel acting as a backbone and the frames of the hull forming the ribs. At the base of the ships, a double bottom 5 feet 3 inches (1.60 m) deep supported 300 frames, each between 24 inches (61 cm) and 36 inches (91 cm) apart and measuring up to about 66 feet (20 m) long. They terminated at the bridge deck (B Deck) and were covered with steel plates which formed the outer skin of the ships.

The 2,000 hull plates were single pieces of rolled steel plate, mostly up to 6 feet (1.8 m) wide and 30 feet (9.1 m) long and weighing between 2.5 and 3 tons. Their thickness varied from 1 inch (2.5 cm) to 1.5 inches (3.8 cm). The plates were laid in a clinkered (overlapping) fashion from the keel to the bilge. Above that point they were laid in the "in and out" fashion, where strake plating was applied in bands (the "in strakes") with the gaps covered by the "out strakes", overlapping on the edges. Commercial oxy-fuel and electric arc welding methods, ubiquitous in fabrication today, were still in their infancy; like most other iron and steel structures of the era, the hull was held together with over three million iron and steel rivets, which by themselves weighed over 1,200 tons. They were fitted using hydraulic machines or were hammered in by hand. In the 1990s some material scientists concluded that the steel plate used for the ship was subject to being especially brittle when cold, and that this brittleness exacerbated the impact damage and hastened the sinking. It is believed that, by the standards of the time, the steel plate's quality was good, not faulty, but that it was inferior to what would be used for shipbuilding purposes in later decades, owing to advances in the metallurgy of steelmaking. As for the rivets, considerable emphasis has also been placed on their quality and strength.

One of the last items to be fitted on Titanic before the ship's launch was her two side anchors and one centre anchor. The anchors themselves were a challenge to make with the centre anchor being the largest ever forged by hand and weighing nearly 16 tons. Twenty Clydesdale draught horses were needed to haul the centre anchor by wagon from the Noah Hingley & Sons Ltd forge shop in Netherton, near Dudley, United Kingdom to the Dudley railway station two miles away. From there it was shipped by rail to Fleetwood in Lancashire before being loaded aboard a ship and sent to Belfast.

The work of constructing the ships was difficult and dangerous. For the 15,000 men who worked at Harland and Wolff at the time, safety precautions were rudimentary at best; a lot of the work was dangerous and was carried out without any safety equipment like hard hats or hand guards on machinery. As a result, deaths and injuries were to be expected. During Titanic's construction, 246 injuries were recorded, 28 of them "severe", such as arms severed by machines or legs crushed under falling pieces of steel. Six people died on the ship herself while she was being constructed and fitted out, and another two died in the shipyard workshops and sheds. Just before the launch a worker was killed when a piece of wood fell on him.

Titanic was launched at 12:15 p.m. on 31 May 1911 in the presence of Lord Pirrie, J. Pierpont Morgan, J. Bruce Ismay and 100,000 onlookers. 22 tons of soap and tallow were spread on the slipway to lubricate the ship's passage into the River Lagan. In keeping with the White Star Line's traditional policy, the ship was not formally named or christened with champagne. The ship was towed to a fitting-out berth where, over the course of the next year, her engines, funnels and superstructure were installed and her interior was fitted out.

Although Titanic was virtually identical to the class's lead ship Olympic, a few changes were made to distinguish both ships. The most noticeable exterior difference was that Titanic (and the third vessel in class, Britannic) had a steel screen with sliding windows installed along the forward half of the A Deck promenade. This was installed as a last minute change at the personal request of Bruce Ismay, and was intended to provide additional shelter to First Class passengers. Extensive changes were made to B Deck on Titanic as the promenade space in this deck, which had proven unpopular on Olympic, was converted into additional First Class cabins, including two opulent parlour suites with their own private promenade spaces. The À la Carte restaurant was also enlarged and the Café Parisien, an entirely new feature which did not exist on Olympic, was added. These changes made Titanic slightly heavier than her sister, and thus she could claim to be the largest ship afloat. The work took longer than expected due to design changes requested by Ismay and a temporary pause in work occasioned by the need to repair Olympic, which had been in a collision in September 1911. Had Titanic been finished earlier, she might well have missed her collision with an iceberg.


Today in Naval History - Naval / Maritime Events in History
31 May 1916 - Battle of Jutland - Part I
The British Grand Fleet engages the High Seas Fleet in the largest naval battle of the war, which proves indecisive.


The Battle of Jutland (German: Skagerrakschlacht, the Battle of Skagerrak) was a naval battle fought between Britain's Royal Navy Grand Fleet, under Admiral Sir John Jellicoe, and the Imperial German Navy's High Seas Fleet, under Vice-Admiral Reinhard Scheer, during the First World War. The battle unfolded in extensive manoeuvring and three main engagements (the battlecruiser action, the fleet action and the night action), from 31 May to 1 June 1916, off the North Sea coast of Denmark's Jutland Peninsula. It was the largest naval battle and the only full-scale clash of battleships in that war. Jutland was the third fleet action between steel battleships, following the long range gunnery duel at the Yellow Sea (1904) and the decisive Battle of Tsushima in 1905, during the Russo-Japanese War. Jutland was the last major battle in world history fought primarily by battleships.

1.JPG 2.JPG 3.JPG

Germany's High Seas Fleet intended to lure out, trap, and destroy a portion of the Grand Fleet, as the German naval force was insufficient to openly engage the entire British fleet. This formed part of a larger strategy to break the British blockade of Germany and to allow German naval vessels access to the Atlantic. Meanwhile, Great Britain's Royal Navy pursued a strategy of engaging and destroying the High Seas Fleet, thereby keeping German naval forces contained and away from Britain and her shipping lanes.

The Germans planned to use Vice-Admiral Franz Hipper's fast scouting group of five modern battlecruisers to lure Vice-Admiral Sir David Beatty'sbattlecruiser squadrons into the path of the main German fleet. They stationed submarines in advance across the likely routes of the British ships. However, the British learned from signal intercepts that a major fleet operation was likely, so on 30 May Jellicoe sailed with the Grand Fleet to rendezvous with Beatty, passing over the locations of the German submarine picket lines while they were unprepared. The German plan had been delayed, causing further problems for their submarines, which had reached the limit of their endurance at sea.

1024px-Map_of_the_Battle_of_Jutland,_1916.svg.png

On the afternoon of 31 May, Beatty encountered Hipper's battlecruiser force long before the Germans had expected. In a running battle, Hipper successfully drew the British vanguard into the path of the High Seas Fleet. By the time Beatty sighted the larger force and turned back towards the British main fleet, he had lost two battlecruisers from a force of six battlecruisers and four powerful battleships—though he had sped ahead of his battleships of 5th Battle Squadron earlier in the day, effectively losing them as an integral component for much of this opening action against the five ships commanded by Hipper. Beatty's withdrawal at the sight of the High Seas Fleet, which the British had not known were in the open sea, would reverse the course of the battle by drawing the German fleet in pursuit towards the British Grand Fleet. Between 18:30, when the sun was lowering on the western horizon, back-lighting the German forces, and nightfall at about 20:30, the two fleets—totalling 250 ships between them—directly engaged twice.

Fourteen British and eleven German ships sank, with a total of 9,823 casualties. After sunset, and throughout the night, Jellicoe manoeuvred to cut the Germans off from their base, hoping to continue the battle the next morning, but under the cover of darkness Scheer broke through the British light forces forming the rearguard of the Grand Fleet and returned to port.

Both sides claimed victory. The British lost more ships and twice as many sailors but succeeded in containing the German fleet. The British press criticised the Grand Fleet's failure to force a decisive outcome, while Scheer's plan of destroying a substantial portion of the British fleet also failed. The British strategy of denying Germany access to both the United Kingdom and the Atlantic did succeed, which was the British long-term goal. The Germans' "fleet in being" continued to pose a threat, requiring the British to keep their battleships concentrated in the North Sea, but the battle reinforced the German policy of avoiding all fleet-to-fleet contact. At the end of 1916, after further unsuccessful attempts to reduce the Royal Navy's numerical advantage, the German Navy accepted that its surface ships had been successfully contained, subsequently turning its efforts and resources to unrestricted submarine warfare and the destruction of Allied and neutral shipping, which—along with the Zimmermann Telegram—by April 1917 triggered the United States of America's declaration of war on Germany.

Subsequent reviews commissioned by the Royal Navy generated strong disagreement between supporters of Jellicoe and Beatty concerning the two admirals' performance in the battle. Debate over their performance and the significance of the battle continues to this day.


Background and planning
German planning
With 16 dreadnought-type battleships, compared with the Royal Navy's 28, the German High Seas Fleet stood little chance of winning a head-to-head clash. The Germans therefore adopted a divide-and-conquer strategy. They would stage raids into the North Sea and bombard the English coast, with the aim of luring out small British squadrons and pickets, which could then be destroyed by superior forces or submarines.

In January 1916, Admiral von Pohl, commander of the German fleet, fell ill. He was replaced by Scheer, who believed that the fleet had been used too defensively, had better ships and men than the British, and ought to take the war to them. According to Scheer, the German naval strategy should be:

to damage the English fleet by offensive raids against the naval forces engaged in watching and blockading the German Bight, as well as by mine-laying on the British coast and submarineattack, whenever possible. After an equality of strength had been realised as a result of these operations, and all our forces had been made ready and concentrated, an attempt was to be made with our fleet to seek battle under circumstances unfavourable to the enemy.

800px-Almirante_Reinhard_Scheer.jpg
Reinhard Scheer, German fleet commander

On 25 April 1916, a decision was made by the German admiralty to halt indiscriminate attacks by submarine on merchant shipping. This followed protests from neutral countries, notably the United States, that their nationals had been the victims of attacks. Germany agreed that future attacks would only take place in accord with internationally agreed prize rules, which required an attacker to give a warning and allow the crews of vessels time to escape, and not to attack neutral vessels at all. Scheer believed that it would not be possible to continue attacks on these terms, which took away the advantage of secret approach by submarines and left them vulnerable to even relatively small guns on the target ships. Instead, he set about deploying the submarine fleet against military vessels.

It was hoped that, following a successful German submarine attack, fast British escorts, such as destroyers, would be tied down by anti-submarine operations. If the Germans could catch the British in the expected locations, good prospects were thought to exist of at least partially redressing the balance of forces between the fleets. "After the British sortied in response to the raiding attack force", the Royal Navy's centuries-old instincts for aggressive action could be exploited to draw its weakened units towards the main German fleet under Scheer. The hope was that Scheer would thus be able to ambush a section of the British fleet and destroy it.

Submarine deployments
A plan was devised to station submarines offshore from British naval bases, and then stage some action that would draw out the British ships to the waiting submarines. The battlecruiser SMS Seydlitz had been damaged in a previous engagement, but was due to be repaired by mid May, so an operation was scheduled for 17 May 1916. At the start of May, difficulties with condensers were discovered on ships of the third battleship squadron, so the operation was put back to 23 May. Ten submarines—U-24, U-32, U-43, U-44, UC-47, U-51, U-52, U-63, U-66, and U-70—were given orders first to patrol in the central North Sea between 17 and 22 May, and then to take up waiting positions. U-43 and U-44 were stationed in the Pentland Firth, which the Grand Fleet was likely to cross leaving Scapa Flow, while the remainder proceeded to the Firth of Forth, awaiting battlecruisers departing Rosyth. Each boat had an allocated area, within which it could move around as necessary to avoid detection, but was instructed to keep within it. During the initial North Sea patrol the boats were instructed to sail only north–south so that any enemy who chanced to encounter one would believe it was departing or returning from operations on the west coast (which required them to pass around the north of Britain). Once at their final positions, the boats were under strict orders to avoid premature detection that might give away the operation. It was arranged that a coded signal would be transmitted to alert the submarines exactly when the operation commenced: "Take into account the enemy's forces may be putting to sea".

Additionally, UB-27 was sent out on 20 May with instructions to work its way into the Firth of Forth past May Island. U-46 was ordered to patrol the coast of Sunderland, which had been chosen for the diversionary attack, but because of engine problems it was unable to leave port and U-47 was diverted to this task. On 13 May, U-72 was sent to lay mines in the Firth of Forth; on the 23rd, U-74 departed to lay mines in the Moray Firth; and on the 24th, U-75 was dispatched similarly west of the Orkney Islands. UB-21 and UB-22 were sent to patrol the Humber, where (incorrect) reports had suggested the presence of British warships. U-22, U-46 and U-67 were positioned north of Terschelling to protect against intervention by British light forces stationed at Harwich.

On 22 May 1916, it was discovered that Seydlitz was still not watertight after repairs and would not now be ready until the 29th. The ambush submarines were now on station and experiencing difficulties of their own: visibility near the coast was frequently poor due to fog, and sea conditions were either so calm the slightest ripple, as from the periscope, could give away their position, or so rough as to make it very hard to keep the vessel at a steady depth. The British had become aware of unusual submarine activity, and had begun counter patrols that forced the submarines out of position. UB-27 passed Bell Rock on the night of 23 May on its way into the Firth of Forth as planned, but was halted by engine trouble. After repairs it continued to approach, following behind merchant vessels, and reached Largo Bay on 25 May. There the boat became entangled in nets that fouled one of the propellers, forcing it to abandon the operation and return home. U-74 was detected by four armed trawlers on 27 May and sunk 25 mi (22 nmi; 40 km) south-east of Peterhead. U-75 laid its mines off the Orkney Islands, which, although they played no part in the battle, were responsible later for sinking the cruiser Hampshire carrying Lord Kitchener (head of the army) on a mission to Russia on 5 June. U-72 was forced to abandon its mission without laying any mines when an oil leak meant it was leaving a visible surface trail astern.


Today in Naval History - Naval / Maritime Events in History
31 May 1916 - Battle of Jutland - Part II
The British Grand Fleet engages the High Seas Fleet in the largest naval battle of the war, which proves indecisive.


Zeppelins
The Germans maintained a fleet of Zeppelins that they used for aerial reconnaissance and occasional bombing raids. The planned raid on Sunderland intended to use Zeppelins to watch out for the British fleet approaching from the north, which might otherwise surprise the raiders.

By 28 May, strong north-easterly winds meant that it would not be possible to send out the Zeppelins, so the raid again had to be postponed. The submarines could only stay on station until 1 June before their supplies would be exhausted and they had to return, so a decision had to be made quickly about the raid.

It was decided to use an alternative plan, abandoning the attack on Sunderland but instead sending a patrol of battlecruisers to the Skagerrak, where it was likely they would encounter merchant ships carrying British cargo and British cruiser patrols. It was felt this could be done without air support, because the action would now be much closer to Germany, relying instead on cruiser and torpedo boat patrols for reconnaissance.

Orders for the alternative plan were issued on 28 May, although it was still hoped that last-minute improvements in the weather would allow the original plan to go ahead. The German fleet assembled in the Jade River and at Wilhelmshaven and was instructed to raise steam and be ready for action from midnight on 28 May.

By 14:00 on 30 May, the wind was still too strong and the final decision was made to use the alternative plan. The coded signal "31 May G.G.2490" was transmitted to the ships of the fleet to inform them the Skagerrak attack would start on 31 May. The pre-arranged signal to the waiting submarines was transmitted throughout the day from the E-Dienst radio station at Brugge, and the U-boat tender Arcona anchored at Emden. Only two of the waiting submarines, U-66 and U-32, received the order.

Carte_Skagerrak-Kattegat2.png
The throat of the Skagerrak, the strategic gateway to the Baltic and North Atlantic, waters off Jutland, Norway and Sweden

British response
Unfortunately for the German plan, the British had obtained a copy of the main German codebook from the light cruiser SMS Magdeburg, which had been boarded by the Russian Navy after the ship ran aground in Russian territorial waters in 1914. German naval radio communications could therefore often be quickly deciphered, and the British Admiralty usually knew about German activities.

The British Admiralty's Room 40 maintained direction finding and interception of German naval signals. It had intercepted and decrypted a German signal on 28 May that provided "ample evidence that the German fleet was stirring in the North Sea." Further signals were intercepted, and although they were not decrypted it was clear that a major operation was likely. At 11:00 on 30 May, Jellicoe was warned that the German fleet seemed prepared to sail the following morning. By 17:00, the Admiralty had intercepted the signal from Scheer, "31 May G.G.2490", making it clear something significant was imminent.

Not knowing the Germans' objective, Jellicoe and his staff decided to position the fleet to head off any attempt by the Germans to enter the North Atlantic or the Baltic through the Skagerrak, by taking up a position off Norway where they could potentially cut off any German raid into the shipping lanes of the Atlantic or prevent the Germans from heading into the Baltic. A position further west was unnecessary, as that area of the North Sea could be patrolled by air using blimps and scouting aircraft.

John_Jellicoe,_Admiral_of_the_Fleet.jpg
John Jellicoe, British fleet commander

Consequently, Admiral Jellicoe led the sixteen dreadnought battleships of the 1st and 4th Battle Squadrons of the Grand Fleet and three battlecruisers of the 3rd Battlecruiser Squadron eastwards out of Scapa Flow at 22:30 on 30 May. He was to meet the 2nd Battle Squadron of eight dreadnought battleships commanded by Vice-Admiral Martyn Jerram coming from Cromarty. Hipper's raiding force did not leave the Outer Jade Roads until 01:00 on 31 May, heading west of Heligoland Island following a cleared channel through the minefields, heading north at 16 knots (30 km/h; 18 mph). The main German fleet of sixteen dreadnought battleships of 1st and 3rd Battle Squadrons left the Jade at 02:30, being joined off Heligoland at 04:00 by the six pre-dreadnoughts of the 2nd Battle Squadron coming from the Elbe River. Beatty's faster force of six ships of the 1st and 2nd Battlecruiser Squadrons plus the 5th Battle Squadron of four fast battleships left the Firth of Forth on the next day;[citation needed] Jellicoe intended to rendezvous with him 90 mi (78 nmi; 140 km) west of the mouth of the Skagerrak off the coast of Jutland and wait for the Germans to appear or for their intentions to become clear. The planned position would give him the widest range of responses to likely German moves.

Naval tactics in 1916
The principle of concentration of force was fundamental to the fleet tactics of this time (as in earlier periods). Tactical doctrine called for a fleet approaching battle to be in a compact formation of parallel columns, allowing relatively easy manoeuvring, and giving shortened sight lines within the formation, which simplified the passing of the signals necessary for command and control.

A fleet formed in several short columns could change its heading faster than one formed in a single long column. Since most command signals were made with flags or signal lamps between ships, the flagship was usually placed at the head of the centre column so that its signals might be more easily seen by the many ships of the formation. Wireless telegraphy was in use, though security (radio direction finding), encryption, and the limitation of the radio sets made their extensive use more problematic. Command and control of such huge fleets remained difficult.

Thus, it might take a very long time for a signal from the flagship to be relayed to the entire formation. It was usually necessary for a signal to be confirmed by each ship before it could be relayed to other ships, and an order for a fleet movement would have to be received and acknowledged by every ship before it could be executed. In a large single-column formation, a signal could take 10 minutes or more to be passed from one end of the line to the other, whereas in a formation of parallel columns, visibility across the diagonals was often better (and always shorter) than in a single long column, and the diagonals gave signal "redundancy", increasing the probability that a message would be quickly seen and correctly interpreted.

However, before battle was joined the heavy units of the fleet would, if possible, deploy into a single column. To form the battle line in the correct orientation relative to the enemy, the commanding admiral had to know the enemy fleet's distance, bearing, heading, and speed. It was the task of the scouting forces, consisting primarily of battlecruisers and cruisers, to find the enemy and report this information in sufficient time, and, if possible, to deny the enemy's scouting forces the opportunity of obtaining the equivalent information.

Ideally, the battle line would cross the intended path of the enemy column so that the maximum number of guns could be brought to bear, while the enemy could fire only with the forward guns of the leading ships, a manoeuvre known as "crossing the T". Admiral Tōgō, commander of the Japanese battleship fleet, had achieved this against Admiral Zinovy Rozhestvensky's Russian battleships in 1905 at the Battle of Tsushima, with devastating results. Jellicoe achieved this twice in one hour against the High Seas Fleet at Jutland, but on both occasions, Scheer managed to turn away and disengage, thereby avoiding a decisive action.


Ship design
Within the existing technological limits, a trade-off had to be made between the weight and size of guns, the weight of armour protecting the ship, and the maximum speed. Battleships sacrificed speed for armour and heavy naval guns (11 in (280 mm) or larger). British battlecruisers sacrificed weight of armour for greater speed, while their German counterparts were armed with lighter guns and heavier armour. These weight savings allowed them to escape danger or catch other ships. Generally, the larger guns mounted on British ships allowed an engagement at greater range. In theory, a lightly armoured ship could stay out of range of a slower opponent while still scoring hits. The fast pace of development in the pre-war years meant that every few years, a new generation of ships rendered its predecessors obsolete. Thus, fairly young ships could still be obsolete compared to the newest ships, and fare badly in an engagement against them.

Admiral John Fisher, responsible for reconstruction of the British fleet in the pre-war period, favoured large guns, oil fuel, and speed. Admiral Tirpitz, responsible for the German fleet, favoured ship survivability and chose to sacrifice some gun size for improved armour. The German battlecruiser SMS Derfflinger had belt armour equivalent in thickness—though not as comprehensive—to the British battleship HMS Iron Duke, significantly better than on the British battlecruisers such as Tiger. German ships had better internal subdivision and had fewer doors and other weak points in their bulkheads, but with the disadvantage that space for crew was greatly reduced. As they were designed only for sorties in the North Sea they did not need to be as habitable as the British vessels and their crews could live in barracks ashore when in harbour.


Today in Naval History - Naval / Maritime Events in History
31 May 1916 - Battle of Jutland - Part III
The British Grand Fleet engages the High Seas Fleet in the largest naval battle of the war, which proves indecisive.


Order of battle
Main article: Order of battle at Jutland
BritishGerman
Dreadnought
battleships
2816
Pre-dreadnoughts06
Battlecruisers95
Armoured cruisers80
Light cruisers2611
Destroyers7961
Seaplane carrier10
Warships of the period were armed with guns firing projectiles of varying weights, bearing high explosive warheads. The sum total of weight of all the projectiles fired by all the ship's broadside guns is referred to as "weight of broadside". At Jutland, the total of the British ships' weight of broadside was 332,360 lb (150,760 kg), while the German fleet's total was 134,216 lb (60,879 kg).[27] This does not take into consideration the ability of some ships and their crews to fire more or less rapidly than others, which would increase or decrease amount of fire that one combatant was able to bring to bear on their opponent for any length of time.

Jellicoe's Grand Fleet was split into two sections. The dreadnought Battle Fleet, with which he sailed, formed the main force and was composed of 24 battleships and three battlecruisers. The battleships were formed into three squadrons of eight ships, further subdivided into divisions of four, each led by a flag officer. Accompanying them were eight armoured cruisers (classified by the Royal Navy since 1913 as "cruisers"), eight light cruisers, four scout cruisers, 51 destroyers, and one destroyer-minelayer.


David Beatty, commander of the British battlecruiser fleet

The Grand Fleet sailed without three of its battleships: Emperor of India in refit at Invergordon, Queen Elizabeth dry-docked at Rosyth and Dreadnought in refit at Devonport. The brand new Royal Sovereign was left behind; with only three weeks in service, her untrained crew was judged unready for battle.

British reconnaissance was provided by the Battlecruiser Fleet under David Beatty: six battlecruisers, four fast Queen Elizabeth-class battleships, 14 light cruisers and 27 destroyers. Air scouting was provided by the attachment of the seaplane tender HMS Engadine, one of the first aircraft carriers in history to participate in a naval engagement.

The German High Seas Fleet under Scheer was also split into a main force and a separate reconnaissance force. Scheer's main battle fleet was composed of 16 battleships and six pre-dreadnought battleships arranged in an identical manner to the British. With them were six light cruisers and 31 torpedo-boats, (the latter being roughly equivalent to a British destroyer).


Franz Hipper, commander of the German battlecruiser squadron

The German scouting force, commanded by Franz Hipper, consisted of five battlecruisers, five light cruisers and 30 torpedo-boats. The Germans had no equivalent to Engadine and no heavier-than-air aircraft to operate with the fleet but had the Imperial German Naval Airship Service's force of rigid airships available to patrol the North Sea.

All of the battleships and battlecruisers on both sides carried torpedoes of various sizes, as did the lighter craft.[30] The British battleships carried three or four underwater torpedo tubes. The battlecruisers carried from two to five. All were either 18-inch or 21-inch diameter. The German battleships carried five or six underwater torpedo tubes in three sizes from 18 to 21 inch and the battlecruisers carried four or five tubes.

The German battle fleet was hampered by the slow speed and relatively poor armament of the six pre-dreadnoughts of II Squadron, which limited maximum fleet speed to 18 knots (33 km/h; 21 mph), compared to maximum British fleet speed of 21 knots (39 km/h; 24 mph). On the British side, the eight armoured cruisers were deficient in both speed and armour protection. Both of these obsolete squadrons were notably vulnerable to attacks by more modern enemy ships.

Battlecruiser action
The route of the British battlecruiser fleet took it through the patrol sector allocated to U-32. After receiving the order to commence the operation, the U-boat moved to a position 80 mi (70 nmi; 130 km) east of the Isle of May at dawn on 31 May. At 03:40, it sighted the cruisers HMS Galatea and Phaeton leaving the Forth at 18 knots (33 km/h; 21 mph). It launched one torpedo at the leading cruiser at a range of 1,000 yd (910 m), but its periscope jammed 'up', giving away the position of the submarine as it manoeuvred to fire a second. The lead cruiser turned away to dodge the torpedo, while the second turned towards the submarine, attempting to ram. U-32 crash dived, and on raising its periscope at 04:10 saw two battlecruisers (the 2nd Battlecruiser Squadron) heading south-east. They were too far away to attack, but Kapitänleutnant von Spiegel reported the sighting of two battleships and two cruisers to Germany.

U-66 was also supposed to be patrolling off the Firth of Forth but had been forced north to a position 60 mi (52 nmi; 97 km) off Peterhead by patrolling British vessels. This now brought it into contact with the 2nd Battle Squadron, coming from the Moray Firth. At 05:00, it had to crash dive when the cruiser Duke of Edinburgh appeared from the mist heading toward it. It was followed by another cruiser, Boadicea, and eight battleships. U-66 got within 350 yd (320 m) of the battleships preparing to fire, but was forced to dive by an approaching destroyer and missed the opportunity. At 06:35, it reported eight battleships and cruisers heading north.

The courses reported by both submarines were incorrect, because they reflected one leg of a zigzag being used by British ships to avoid submarines. Taken with a wireless intercept of more ships leaving Scapa Flow earlier in the night, they created the impression in the German High Command that the British fleet, whatever it was doing, was split into separate sections moving apart, which was precisely as the Germans wished to meet it.

Jellicoe's ships proceeded to their rendezvous undamaged and undiscovered. However, he was now misled by an Admiralty intelligence report advising that the German main battle fleet was still in port.[36]The Director of Operations Division, Rear Admiral Thomas Jackson, had asked the intelligence division, Room 40, for the current location of German call sign DK, used by Admiral Scheer. They had replied that it was currently transmitting from Wilhelmshaven. It was known to the intelligence staff that Scheer deliberately used a different call sign when at sea, but no one asked for this information or explained the reason behind the query – to locate the German fleet.

The German battlecruisers cleared the minefields surrounding the Amrum swept channel by 09:00. They then proceeded north-west, passing 35 mi (30 nmi; 56 km) west of the Horn's Reef lightship heading for the Little Fisher Bank at the mouth of the Skagerrak. The High Seas Fleet followed some 50 mi (43 nmi; 80 km) behind. The battlecruisers were in line ahead, with the four cruisers of the II scouting group plus supporting torpedo boats ranged in an arc 8 mi (7.0 nmi; 13 km) ahead and to either side. The IX torpedo boat flotilla formed close support immediately surrounding the battlecruisers. The High Seas Fleet similarly adopted a line-ahead formation, with close screening by torpedo boats to either side and a further screen of five cruisers surrounding the column 5–8 mi (4.3–7.0 nmi; 8.0–12.9 km) away. The wind had finally moderated so that Zeppelins could be used, and by 11:30 five had been sent out: L14 to the Skagerrak, L23 240 mi (210 nmi; 390 km) east of Noss Head in the Pentland Firth, L21 120 mi (100 nmi; 190 km) off Peterhead, L9 100 mi (87 nmi; 160 km) off Sunderland, and L16 80 mi (70 nmi; 130 km) east of Flamborough Head. Visibility, however, was still bad, with clouds down to 1,000 ft (300 m).

Contact
HMS_Warspite_and_HMS_Malaya_during_the_battle_of_Jutland.jpg
HMS Warspite and Malaya, seen from HMS Valiant at around 14:00 hrs

By around 14:00, Beatty's ships were proceeding eastward at roughly the same latitude as Hipper's squadron, which was heading north. Had the courses remained unchanged, Beatty would have passed between the two German fleets, 40 mi (35 nmi; 64 km) south of the battlecruisers and 20 mi (17 nmi; 32 km) north of the High Seas Fleet at around 16:30, possibly trapping his ships just as the German plan envisioned. His orders were to stop his scouting patrol when he reached a point 260 mi (230 nmi; 420 km) east of Britain and then turn north to meet Jellicoe, which he did at this time. Beatty's ships were divided into three columns, with the two battlecruiser squadrons leading in parallel lines 3 mi (2.6 nmi; 4.8 km) apart. The 5th Battle Squadron was stationed 5 mi (4.3 nmi; 8.0 km) to the north-west, on the side furthest away from any expected enemy contact, while a screen of cruisers and destroyers was spread south-east of the battlecruisers. After the turn, the 5th Battle Squadron was now leading the British ships in the westernmost column, and Beatty's squadron was centre and rearmost, with the 2nd BCS to the west.


(1) 15:22 hrs, Hipper sights Beatty.
(2) 15:48 hrs, First shots fired by Hipper's squadron.
(3) 16:00 hrs-16:05 hrs, Indefatigable explodes, leaving two survivors.
(4) 16:25 hrs, Queen Mary explodes, nine survive.
(5) 16:45 hrs, Beatty's battlecruisers move out of range of Hipper.
(6) 16:54 hrs, Evan-Thomas's battleships turn north behind Beatty.

At 14:20 on 31 May, despite heavy haze and scuds of fog giving poor visibility, scouts from Beatty's force reported enemy ships to the south-east; the British light units, investigating a neutral Danish steamer (N J Fjord), which was stopped between the two fleets, had found two German destroyers engaged on the same mission (B109 and B110). The first shots of the battle were fired at 14:28 when HMS Galatea and Phaeton of the British 1st Light Cruiser Squadron opened on the German torpedo boats, which withdrew toward their approaching light cruisers. At 14:36, the Germans scored the first hit of the battle when SMS Elbing, of Rear-Admiral Friedrich Boedicker's Scouting Group II, hit her British counterpart Galatea at extreme range.

Beatty began to move his battlecruisers and supporting forces south-eastwards and then east to cut the German ships off from their base and ordered Engadine to launch a seaplane to try to get more information about the size and location of the German forces. This was the first time in history that a carrier-based aeroplane was used for reconnaissance in naval combat. Engadine's aircraft did locate and report some German light cruisers just before 15:30 and came under anti-aircraft gunfire but attempts to relay reports from the aeroplane failed.

Unfortunately for Beatty, his initial course changes at 14:32 were not received by Sir Hugh Evan-Thomas's 5th Battle Squadron (the distance being too great to read his flags), because the battlecruiser HMS Tiger—the last ship in his column—was no longer in a position where she could relay signals by searchlight to Evan-Thomas, as she had previously been ordered to do. Whereas before the north turn, Tiger had been the closest ship to Evan-Thomas, she was now further away than Beatty in Lion. Matters were aggravated because Evan-Thomas had not been briefed regarding standing orders within Beatty's squadron, as his squadron normally operated with the Grand Fleet. Fleet ships were expected to obey movement orders precisely and not deviate from them. Beatty's standing instructions expected his officers to use their initiative and keep station with the flagship. As a result, the four Queen Elizabeth-class battleships—which were the fastest and most heavily armed in the world at that time—remained on the previous course for several minutes, ending up 10 mi (8.7 nmi; 16 km) behind rather than five. Beatty also had the opportunity during the previous hours to concentrate his forces, and no reason not to do so, whereas he steamed ahead at full speed, faster than the battleships could manage. Dividing the force had serious consequences for the British, costing them what would have been an overwhelming advantage in ships and firepower during the first half-hour of the coming battle.

With visibility favouring the Germans, Hipper's battlecruisers at 15:22, steaming approximately north-west, sighted Beatty's squadron at a range of about 15 mi (13 nmi; 24 km), while Beatty's forces did not identify Hipper's battlecruisers until 15:30. (position 1 on map). At 15:45, Hipper turned south-east to lead Beatty toward Scheer, who was 46 mi (40 nmi; 74 km) south-east with the main force of the High Seas Fleet.


Today in Naval History - Naval / Maritime Events in History
31 May 1916 - Battle of Jutland - Part IV
The British Grand Fleet engages the High Seas Fleet in the largest naval battle of the war, which proves indecisive.


Run to the south
Beatty's conduct during the next 15 minutes has received a great deal of criticism, as his ships out-ranged and outnumbered the German squadron, yet he held his fire for over 10 minutes with the German ships in range. He also failed to use the time available to rearrange his battlecruisers into a fighting formation, with the result that they were still manoeuvring when the battle started.

At 15:48, with the opposing forces roughly parallel at 15,000 yd (14,000 m), with the British to the south-west of the Germans (i.e., on the right side), Hipper opened fire, followed by the British ships as their guns came to bear upon targets (position 2). Thus began the opening phase of the battlecruiser action, known as the Run to the South, in which the British chased the Germans, and Hipper intentionally led Beatty toward Scheer. During the first minutes of the ensuing battle, all the British ships except Princess Royal fired far over their German opponents, due to adverse visibility conditions, before finally getting the range. Only Lion and Princess Royal had settled into formation, so the other four ships were hampered in aiming by their own turning. Beatty was to windward of Hipper, and therefore funnel and gun smoke from his own ships tended to obscure his targets, while Hipper's smoke blew clear. Also, the eastern sky was overcast and the grey German ships were indistinct and difficult to range.

HMS_Lion_(1910).jpg
Beatty's flagship HMS Lion burning after being hit by a salvo from SMS Lützow

1024px-HMS_Indefatigable_sinking.jpg
HMS Indefatigable sinking after being struck by shells from SMS Von der Tann

Beatty had ordered his ships to engage in a line, one British ship engaging with one German and his flagship HMS Lion doubling on the German flagship SMS Lützow. However, due to another mistake with signalling by flag, and possibly because Queen Mary and Tiger were unable to see the German lead ship because of smoke,[48] the second German ship, Derfflinger, was left un-engaged and free to fire without disruption. SMS Moltke drew fire from two of Beatty's battlecruisers, but still fired with great accuracy during this time, hitting Tiger 9 times in the first 12 minutes. The Germans drew first blood. Aided by superior visibility, Hipper's five battlecruisers quickly registered hits on three of the six British battlecruisers. Seven minutes passed before the British managed to score their first hit.

The first near-kill of the Run to the South occurred at 16:00, when a 30.5 cm (12.0 in) shell from Lützow wrecked the "Q" turret amidships on Beatty's flagship Lion. Dozens of crewmen were instantly killed, but far larger destruction was averted when the mortally wounded turret commander – Major Francis Harvey of the Royal Marines – promptly ordered the magazine doors shut and the magazine flooded. This prevented a magazine explosion at 16:28, when a flash fire ignited ready cordite charges beneath the turret and killed everyone in the chambers outside "Q" magazine. Lion was saved. HMS Indefatigable was not so lucky; at 16:02, just 14 minutes into the gunnery exchange, she was hit aft by three 28 cm (11 in) shells from SMS Von der Tann, causing damage sufficient to knock her out of line and detonating "X" magazine aft. Soon after, despite the near-maximum range, Von der Tann put another 28 cm (11 in) shell on Indefatigable's "A" turret forward. The plunging shells probably pierced the thin upper armour, and seconds later Indefatigable was ripped apart by another magazine explosion, sinking immediately with her crew of 1,019 officers and men, leaving only two survivors. (position 3).

Hipper's position deteriorated somewhat by 16:15 as the 5th Battle Squadron finally came into range, so that he had to contend with gunfire from the four battleships astern as well as Beatty's five remaining battlecruisers to starboard. But he knew his baiting mission was close to completion, as his force was rapidly closing with Scheer's main body. At 16:08, the lead battleship of the 5th Battle Squadron, HMS Barham, caught up with Hipper and opened fire at extreme range, scoring a 15 in (380 mm) hit on Von der Tann within 60 seconds. Still, it was 16:15 before all the battleships of the 5th were able to fully engage at long range.

At 16:25, the battlecruiser action intensified again when HMS Queen Mary was hit by what may have been a combined salvo from Derfflinger and Seydlitz; she disintegrated when both forward magazines exploded, sinking with all but nine of her 1,275 man crew lost.[53] (position 4). Commander von Hase, the first gunnery officer aboard Derfflingler, noted:

The enemy was shooting superbly. Twice the Derfflinger came under their infernal hail and each time she was hit. But the Queen Mary was having a bad time; engaged by the Seydlitz as well as the Derfflinger, she met her doom at 1626. A vivid red flame shot up from her forepart; then came an explosion forward, followed by a much heavier explosion amidships. Immediately afterwards, she blew up with a terrific explosion, the masts collapsing inwards and the smoke hiding everything.
1280px-Destruction_of_HMS_Queen_Mary.jpg
HMS Queen Mary blowing up

During the Run to the South, from 15:48 to 16:54, the German battlecruisers made an estimated total of forty-two 28 and 30.5 cm (11.0 and 12.0 in) hits on the British battlecruisers (nine on Lion, six on Princess Royal, seven on Queen Mary, 14 on Tiger, one on New Zealand, five on Indefatigable), and two more on the battleship Barham, compared with only eleven 13.5 in (340 mm) hits by the British battlecruisers (four on Lützow, four on Seydlitz, two on Moltke, one on von der Tann), and six 15 in (380 mm) hits by the battleships (one on Seydlitz, four on Moltke, one on von der Tann).

Shortly after 16:26, a salvo struck on or around HMS Princess Royal, which was obscured by spray and smoke from shell bursts. A signalman promptly leapt on to the bridge of Lion and announced "Princess Royal's blown up, Sir." Beatty famously turned to his flag captain, saying "Chatfield, there seems to be something wrong with our bloody ships today." (In popular legend, Beatty also immediately ordered his ships to "turn two points to port", i.e., two points nearer the enemy, but there is no official record of any such command or course change.)[56] Princess Royal, as it turned out, was still afloat after the spray cleared.

At 16:30, Scheer's leading battleships sighted the distant battlecruiser action; soon after, HMS Southampton of Beatty's 2nd Light Cruiser Squadron led by Commodore William Goodenough sighted the main body of Scheer's High Seas Fleet, dodging numerous heavy-calibre salvos to report in detail the German strength: 16 dreadnoughts with six older battleships. This was the first news that Beatty and Jellicoe had that Scheer and his battle fleet were even at sea. Simultaneously, an all-out destroyer action raged in the space between the opposing battlecruiser forces, as British and German destroyers fought with each other and attempted to torpedo the larger enemy ships. Each side fired many torpedoes, but both battlecruiser forces turned away from the attacks and all escaped harm except Seydlitz, which was hit forward at 16:57 by a torpedo fired by the British destroyer HMS Petard. Though taking on water, Seydlitz maintained speed. The destroyer HMS Nestor, under the command of Captain Barry Bingham, led the British attacks. The British disabled the German torpedo boat V27, which the Germans soon abandoned and sank, and Petard then torpedoed and sank V29, her second score of the day. S35 and V26 rescued the crews of their sunken sister ships. But Nestor and another British destroyer – HMS Nomad – were immobilised by shell hits, and were later sunk by Scheer's passing dreadnoughts. Bingham was rescued, and awarded the Victoria Cross for his leadership in the destroyer action.

Run to the north
As soon as he himself sighted the vanguard of Scheer's distant battleship line 12 mi (10 nmi; 19 km) away, at 16:40, Beatty turned his battlecruiser force 180°, heading north to draw the Germans toward Jellicoe.[58] (position 5). Beatty's withdrawal toward Jellicoe is called the "Run to the North", in which the tables turned and the Germans chased the British. Because Beatty once again failed to signal his intentions adequately, the battleships of the 5th Battle Squadron – which were too far behind to read his flags – found themselves passing the battlecruisers on an opposing course and heading directly toward the approaching main body of the High Seas Fleet. At 16:48, at extreme range, Scheer's leading battleships opened fire.

Meanwhile, at 16:47, having received Goodenough's signal and knowing that Beatty was now leading the German battle fleet north to him, Jellicoe signalled to his own forces that the fleet action they had waited so long for was finally imminent; at 16:51, by radio, he informed the Admiralty so in London.

The difficulties of the 5th Battle Squadron were compounded when Beatty gave the order to Evan-Thomas to "turn in succession" (rather than "turn together") at 16:48 as the battleships passed him. Evan-Thomas acknowledged the signal, but Lieutenant-Commander Ralph Seymour, Beatty's flag lieutenant, aggravated the situation when he did not haul down the flags (to execute the signal) for some minutes. At 16:55, when the 5BS had moved within range of the enemy battleships, Evan-Thomas issued his own flag command warning his squadron to expect sudden manoeuvres and to follow his lead, before starting to turn on his own initiative. The order to turn in succession would have resulted in all four ships turning in the same patch of sea as they reached it one by one, giving the High Seas Fleet repeated opportunity with ample time to find the proper range. However, the captain of the trailing ship (HMS Malaya) turned early, mitigating the adverse results.

For the next hour, the 5th Battle Squadron acted as Beatty's rearguard, drawing fire from all the German ships within range, while by 17:10 Beatty had deliberately eased his own squadron out of range of Hipper's now-superior battlecruiser force. Since visibility and firepower now favoured the Germans, there was no incentive for Beatty to risk further battlecruiser losses when his own gunnery could not be effective. Illustrating the imbalance, Beatty's battlecruisers did not score any hits on the Germans in this phase until 17:45, but they had rapidly received five more before he opened the range (four on Lion, of which three were by Lützow, and one on Tiger by Seydlitz). Now the only targets the Germans could reach, the ships of the 5th Battle Squadron, received simultaneous fire from Hipper's battlecruisers to the east (which HMS Barham and Valiant engaged) and Scheer's leading battleships to the south-east (which HMS Warspite and Malaya engaged). Three took hits: Barham (four by Derfflinger), Warspite (two by Seydlitz), and Malaya (seven by the German battleships). Only Valiant was unscathed.

The four battleships were far better suited to take this sort of pounding than the battlecruisers, and none were lost, though Malaya suffered heavy damage, an ammunition fire, and heavy crew casualties. At the same time, the 15 in (380 mm) fire of the four British ships was accurate and effective. As the two British squadrons headed north at top speed, eagerly chased by the entire German fleet, the 5th Battle Squadron scored 13 hits on the enemy battlecruisers (four on Lützow, three on Derfflinger, six on Seydlitz) and five on battleships (although only one, on SMS Markgraf, did any serious damage). (position 6).

The fleets converge
Jellicoe was now aware that full fleet engagement was nearing, but had insufficient information on the position and course of the Germans. To assist Beatty, early in the battle at about 16:05, Jellicoe had ordered Rear-Admiral Horace Hood's 3rd Battlecruiser Squadron to speed ahead to find and support Beatty's force, and Hood was now racing SSE well in advance of Jellicoe's northern force.[68] Rear-Admiral Arbuthnot's 1st Cruiser Squadron patrolled the van of Jellicoe's main battleship force as it advanced steadily to the south-east.

At 17:33, the armoured cruiser HMS Black Prince of Arbuthnot's squadron, on the far southwest flank of Jellicoe's force, came within view of HMS Falmouth, which was about 5 mi (4.3 nmi; 8.0 km) ahead of Beatty with the 3rd Light Cruiser Squadron, establishing the first visual link between the converging bodies of the Grand Fleet.[69] At 17:38, the scout cruiser HMS Chester, screening Hood's oncoming battlecruisers, was intercepted by the van of the German scouting forces under Rear-Admiral Boedicker.

Heavily outnumbered by Boedicker's four light cruisers, Chester was pounded before being relieved by Hood's heavy units, which swung westward for that purpose. Hood's flagship HMS Invincible disabled the light cruiser SMS Wiesbaden shortly after 17:56. Wiesbaden became a sitting target for most of the British fleet during the next hour, but remained afloat and fired some torpedoes at the passing enemy battleships from long range. Meanwhile, Boedicker's other ships turned toward Hipper and Scheer in the mistaken belief that Hood was leading a larger force of British capital ships from the north and east. A chaotic destroyer action in mist and smoke ensued as German torpedo boats attempted to blunt the arrival of this new formation, but Hood's battlecruisers dodged all the torpedoes fired at them. In this action, after leading a torpedo counter-attack, the British destroyer HMS Shark was disabled, but continued to return fire at numerous passing enemy ships for the next hour


Today in Naval History - Naval / Maritime Events in History
31 May 1916 - Battle of Jutland - Part V
The British Grand Fleet engages the High Seas Fleet in the largest naval battle of the war, which proves indecisive.


Fleet action
Deployment
Jutland_fleet_action.png
(1) 18:00 Scouting forces rejoin their respective fleets.
(2) 18:15 British fleet deploys into battle line
(3) 18:30 German fleet under fire turns away
(4) 19:00 German fleet turns back
(5) 19:15 German fleet turns away for second time
(6) 20:00
(7) 21:00 Nightfall: Jellicoe assumes night cruising formation

In the meantime, Beatty and Evan-Thomas had resumed their engagement with Hipper's battlecruisers, this time with the visual conditions to their advantage. With several of his ships damaged, Hipper turned back toward Scheer at around 18:00, just as Beatty's flagship Lion was finally sighted from Jellicoe's flagship Iron Duke. Jellicoe twice demanded the latest position of the German battlefleet from Beatty, who could not see the German battleships and failed to respond to the question until 18:14. Meanwhile, Jellicoe received confused sighting reports of varying accuracy and limited usefulness from light cruisers and battleships on the starboard (southern) flank of his force.

Jellicoe was in a worrying position. He needed to know the location of the German fleet to judge when and how to deploy his battleships from their cruising formation (six columns of four ships each) into a single battle line. The deployment could be on either the westernmost or the easternmost column, and had to be carried out before the Germans arrived; but early deployment could mean losing any chance of a decisive encounter. Deploying to the west would bring his fleet closer to Scheer, gaining valuable time as dusk approached, but the Germans might arrive before the manoeuvre was complete. Deploying to the east would take the force away from Scheer, but Jellicoe's ships might be able to cross the "T", and visibility would strongly favour British gunnery – Scheer's forces would be silhouetted against the setting sun to the west, while the Grand Fleet would be indistinct against the dark skies to the north and east, and would be hidden by reflection of the low sunlight off intervening haze and smoke. Deployment would take twenty irreplaceable minutes, and the fleets were closing at full speed. In one of the most critical and difficult tactical command decisions of the entire war, Jellicoe ordered deployment to the east at 18:15.

Windy Corner
Meanwhile, Hipper had rejoined Scheer, and the combined High Seas Fleet was heading north, directly toward Jellicoe. Scheer had no indication that Jellicoe was at sea, let alone that he was bearing down from the north-west, and was distracted by the intervention of Hood's ships to his north and east. Beatty's four surviving battlecruisers were now crossing the van of the British dreadnoughts to join Hood's three battlecruisers; at this time, Arbuthnot's flagship, the armoured cruiser HMS Defence, and her squadron-mate HMS Warrior both charged across Beatty's bows, and Lionnarrowly avoided a collision with Warrior. Nearby, numerous British light cruisers and destroyers on the south-western flank of the deploying battleships were also crossing each other's courses in attempts to reach their proper stations, often barely escaping collisions, and under fire from some of the approaching German ships. This period of peril and heavy traffic attending the merger and deployment of the British forces later became known as "Windy Corner".

Arbuthnot was attracted by the drifting hull of the crippled Wiesbaden. With Warrior, Defence closed in for the kill, only to blunder right into the gun sights of Hipper's and Scheer's oncoming capital ships. Defence was deluged by heavy-calibre gunfire from many German battleships, which detonated her magazines in a spectacular explosion viewed by most of the deploying Grand Fleet. She sank with all hands (903 officers and men). Warrior was also hit badly, but was spared destruction by a mishap to the nearby battleship Warspite. Warspite had her steering gear overheat and jam under heavy load at high speed as the 5th Battle Squadron made a turn to the north at 18:19. Steaming at top speed in wide circles, Warspite appeared as a juicy target to the German dreadnoughts and took 13 hits, inadvertently drawing fire from the hapless Warrior. Warspite was brought back under control and survived the onslaught, but was badly damaged, had to reduce speed, and withdrew northward; later (at 21:07), she was ordered back to port by Evan-Thomas. Warspite went on to a long and illustrious career, serving also in World War II. Warrior, on the other hand, was abandoned and sank the next day after her crew was taken off at 08:25 on 1 June by Engadine, which towed the sinking armoured cruiser 100 mi (87 nmi; 160 km) during the night.

InvincibleBlowingUpJutland1916.jpg
Invincible blowing up after being struck by shells from Lützow and Derfflinger

As Defence sank and Warspite circled, at about 18:19, Hipper moved within range of Hood's 3rd Battlecruiser Squadron, but was still also within range of Beatty's ships. At first, visibility favoured the British: HMS Indomitable hit Derfflinger three times and Seydlitz once, while Lützow quickly took 10 hits from Lion, Inflexibleand Invincible, including two below-waterline hits forward by Invincible that would ultimately doom Hipper's flagship. But at 18:30, Invincible abruptly appeared as a clear target before Lützow and Derfflinger. The two German ships then fired three salvoes each at Invincible, and sank her in 90 seconds. A 30.5 cm (12.0 in) shell from the third salvo struck Invincible's Q-turret amidships, detonating the magazines below and causing her to blow up and sink. All but six of her crew of 1,032 officers and men, including Rear-Admiral Hood, were killed. Of the remaining British battlecruisers, only Princess Royal received heavy-calibre hits at this time (two 30.5 cm (12.0 in) by the battleship Markgraf). Lützow, flooding forward and unable to communicate by radio, was now out of action and began to attempt to withdraw; therefore Hipper left his flagship and transferred to the torpedo boat SMS G39, hoping to board one of the other battlecruisers later.

Crossing the T
By 18:30, the main battle fleet action was joined for the first time, with Jellicoe effectively "crossing Scheer's T". The officers on the lead German battleships, and Scheer himself, were taken completely by surprise when they emerged from drifting clouds of smoky mist to suddenly find themselves facing the massed firepower of the entire Grand Fleet main battle line, which they did not know was even at sea. Jellicoe's flagship Iron Duke quickly scored seven hits on the lead German dreadnought, SMS König but in this brief exchange, which lasted only minutes, as few as 10 of the Grand Fleet's 24 dreadnoughts actually opened fire. The Germans were hampered by poor visibility, in addition to being in an unfavourable tactical position, just as Jellicoe had intended. Realising he was heading into a death trap, Scheer ordered his fleet to turn and disengage at 18:33. Under a pall of smoke and mist, Scheer's forces succeeded in disengaging by an expertly executed 180° turn in unison ("battle about turn to starboard", German Gefechtskehrtwendung nach Steuerbord), which was a well-practised emergency manoeuvre of the High Seas Fleet. Scheer declared:

It was now obvious that we were confronted by a large portion of the English fleet. The entire arc stretching from north to east was a sea of fire. The flash from the muzzles of the guns was seen distinctly through the mist and smoke on the horizon, although the ships themselves were not distinguishable.
Conscious of the risks to his capital ships posed by torpedoes, Jellicoe did not chase directly but headed south, determined to keep the High Seas Fleet west of him. Starting at 18:40, battleships at the rear of Jellicoe's line were in fact sighting and avoiding torpedoes, and at 18:54 HMS Marlborough was hit by a torpedo (probably from the disabled Wiesbaden), which reduced her speed to 16 knots (30 km/h; 18 mph). Meanwhile, Scheer, knowing that it was not yet dark enough to escape and that his fleet would suffer terribly in a stern chase, doubled back to the east at 18:55. In his memoirs he wrote, "the manoeuvre would be bound to surprise the enemy, to upset his plans for the rest of the day, and if the blow fell heavily it would facilitate the breaking loose at night." But the turn to the east took his ships, again, directly towards Jellicoe's fully deployed battle line.

Simultaneously, the disabled British destroyer HMS Shark fought desperately against a group of four German torpedo boats and disabled V48 with gunfire, but was eventually torpedoed and sunk at 19:02 by the German destroyer S54. Shark's Captain Loftus Jones was awarded the Victoria Cross for his heroism in continuing to fight against all odds.

Gefechtskehrtwendung
HMS_Birmingham_(1913)_Jutland.jpg
HMS Birmingham under fire

Commodore Goodenough's 2nd Light Cruiser Squadron dodged the fire of German battleships for a second time to re-establish contact with the High Seas Fleet shortly after 19:00. By 19:15, Jellicoe had crossed Scheer's "T" again. This time his arc of fire was tighter and deadlier, causing severe damage to the German battleships, particularly Rear-Admiral Behncke's leading 3rd Squadron (SMS König, Grosser Kurfürst, Markgraf, and Kaiser all being hit, along with SMS Helgoland of the 1st Squadron),[88] while on the British side, only the battleship HMS Colossus was hit (twice, by SMS Seydlitz but with little damage done).

At 19:17, for the second time in less than an hour, Scheer turned his outnumbered and out-gunned fleet to the west using the "battle about turn" (German: Gefechtskehrtwendung), but this time it was executed only with difficulty, as the High Seas Fleet's lead squadrons began to lose formation under concentrated gunfire. To deter a British chase, Scheer ordered a major torpedo attack by his destroyers and a potentially sacrificial charge by Scouting Group I's four remaining battlecruisers. Hipper was still aboard the torpedo boat G39 and was unable to command his squadron for this attack. Therefore, SMS Derfflinger, under Captain Hartog, led the already badly damaged German battlecruisers directly into "the greatest concentration of naval gunfire any fleet commander had ever faced", at ranges down to 4 mi (3.5 nmi; 6.4 km).

In what became known as the "death ride", all the battlecruisers except SMS Moltke were hit and further damaged, as 18 of the British battleships fired at them simultaneously. Derfflinger had two main gun turrets destroyed. The crews of Scouting Group I suffered heavy casualties, but survived the pounding and veered away with the other battlecruisers once Scheer was out of trouble and the German destroyers were moving in to attack. In this brief but intense portion of the engagement, from about 19:05 to about 19:30, the Germans sustained a total of 37 heavy hits while inflicting only two; Derfflingeralone received 14.

While his battlecruisers drew the fire of the British fleet, Scheer slipped away, laying smoke screens. Meanwhile, from about 19:16 to about 19:40, the British battleships were also engaging Scheer's torpedo boats, which executed several waves of torpedo attacks to cover his withdrawal. Jellicoe's ships turned away from the attacks and successfully evaded all 31 of the torpedoes launched at them – though, in several cases, only barely – and sank the German destroyer S35, attributed to a salvo from Iron Duke. British light forces also sank V48, which had previously been disabled by HMS Shark. This action, and the turn away, cost the British critical time and range in the last hour of daylight – as Scheer intended, allowing him to get his heavy ships out of immediate danger.

The last major exchanges between capital ships in this battle took place just after sunset, from about 20:19 to about 20:35, as the surviving British battlecruisers caught up with their German counterparts, which were briefly relieved by Rear-Admiral Mauve's obsolete pre-dreadnoughts (the German 2nd Squadron). The British received one heavy hit on Princess Royal but scored five more on Seydlitz and three on other German ships.[98] As twilight faded to night and HMS King George V exchanged a few final shots with SMS Westfalen, neither side could have imagined that the only encounter between British and German dreadnoughts in the entire war was already concluded


Today in Naval History - Naval / Maritime Events in History
31 May 1916 - Battle of Jutland - Part VI
The British Grand Fleet engages the High Seas Fleet in the largest naval battle of the war, which proves indecisive.


Night action and German withdrawal

Main article: Night action at the Battle of Jutland
At 21:00, Jellicoe, conscious of the Grand Fleet's deficiencies in night fighting, decided to try to avoid a major engagement until early dawn. He placed a screen of cruisers and destroyers 5 mi (4.3 nmi; 8.0 km) behind his battle fleet to patrol the rear as he headed south to guard Scheer's expected escape route. In reality, Scheer opted to cross Jellicoe's wake and escape via Horns Reef. Luckily for Scheer, most of the light forces in Jellicoe's rearguard failed to report the seven separate encounters with the German fleet during the night; the very few radio reports that were sent to the British flagship were never received, possibly because the Germans were jamming British frequencies. Many of the destroyers failed to make the most of their opportunities to attack discovered ships, despite Jellicoe's expectations that the destroyer forces would, if necessary, be able to block the path of the German fleet.

Jellicoe and his commanders did not understand that the furious gunfire and explosions to the north (seen and heard for hours by all the British battleships) indicated that the German heavy ships were breaking through the screen astern of the British fleet. Instead, it was believed that the fighting was the result of night attacks by German destroyers. The most powerful British ships of all (the 15-inch-guns of the 5th Battle Squadron) directly observed German battleships crossing astern of them in action with British light forces, at ranges of 3 mi (2.6 nmi; 4.8 km) or less, and gunners on HMS Malaya made ready to fire, but her captain declined, deferring to the authority of Rear-Admiral Evan-Thomas – and neither commander reported the sightings to Jellicoe, assuming that he could see for himself and that revealing the fleet's position by radio signals or gunfire was unwise.

While the nature of Scheer's escape, and Jellicoe's inaction, indicate the overall German superiority in night fighting, the results of the night action were no more clear-cut than were those of the battle as a whole. In the first of many surprise encounters by darkened ships at point-blank range, Southampton, Commodore Goodenough's flagship, which had scouted so proficiently, was heavily damaged in action with a German Scouting Group composed of light cruisers, but managed to torpedo SMS Frauenlob, which went down at 22:23 with all hands (320 officers and men).

1280px-HMSSpitfireJutlanddamage.jpg
Damage to HMS Spitfire after being rammed by SMS Nassau.

From 23:20 to approximately 02:15, several British destroyer flotillas launched torpedo attacks on the German battle fleet in a series of violent and chaotic engagements at extremely short range (often under 0.5 mi (0.80 km)). At the cost of five destroyers sunk and some others damaged, they managed to torpedo the light cruiser SMS Rostock, which sank several hours later, and the pre-dreadnought SMS Pommern, which blew up and sank with all hands (839 officers and men) at 03:10 during the last wave of attacks before dawn. Three of the British destroyers collided in the chaos, and the German battleship SMS Nassau rammed the British destroyer HMS Spitfire, blowing away most of the British ship's superstructure merely with the muzzle blast of its big guns, which could not be aimed low enough to hit the ship. Nassau was left with an 11 ft (3.4 m) hole in her side, reducing her maximum speed to 15 knots (28 km/h; 17 mph), while the removed plating was left lying on Spitfire's deck. Spitfire survived and made it back to port. Another German cruiser, SMS Elbing, was accidentally rammed by the dreadnought Posen and abandoned, sinking early the next day. Of the British destroyers, HMS Tipperary, Ardent, Fortune, Sparrowhawk and Turbulent were lost during the night fighting.

Just after midnight on 1 June, SMS Thüringen and other German battleships sank HMS Black Prince of the ill-fated 1st Cruiser Squadron, which had blundered into the German battle line. Deployed as part of a screening force several miles ahead of the main force of the Grand Fleet, Black Prince had lost contact in the darkness and took a position near what she thought was the British line. The Germans soon identified the new addition to their line and opened fire. Overwhelmed by point-blank gunfire, Black Prince blew up, (all hands – 857 officers and men – were lost), as her squadron leader Defence had done hours earlier. Lost in the darkness, the battlecruisers SMS Moltke and Seydlitz had similar point-blank encounters with the British battle line and were recognised, but were spared the fate of Black Princewhen the captains of the British ships, again, declined to open fire, reluctant to reveal their fleet's position.

At 01:45, the sinking battlecruiser Lützow – fatally damaged by Invincible during the main action – was torpedoed by the destroyer G38 on orders of Lützow's Captain Viktor von Harder after the surviving crew of 1,150 transferred to destroyers that came alongside. At 02:15, the German torpedo boat V4 suddenly had its bow blown off; V2 and V6 came alongside and took off the remaining crew, and the V2 then sank the hulk. Since there was no enemy nearby, it was assumed that she had hit a mine or had been torpedoed by a submarine.

At 02:15, five British ships of the 13th Destroyer Flotilla under Captain James Uchtred Farie regrouped and headed south. At 02:25, they sighted the rear of the German line. HMS Marksman inquired of the leader Champion as to whether he thought they were British or German ships. Answering that he thought they were German, Farie then veered off to the east and away from the German line. All but Moresby in the rear followed, as through the gloom she sighted what she thought were four pre-dreadnought battleships 2 mi (1.7 nmi; 3.2 km) away. She hoisted a flag signal indicating that the enemy was to the west and then closed to firing range, letting off a torpedo set for high running at 02:37, then veering off to rejoin her flotilla. The four pre-dreadnought battleships were in fact two pre-dreadnoughts, Schleswig-Holstein and Schlesien, and the battlecruisers Von der Tann and Derfflinger. Von der Tann sighted the torpedo and was forced to steer sharply to starboard to avoid it as it passed close to her bows. Moresby rejoined Champion convinced she had scored a hit.

Finally, at 05:20, as Scheer's fleet was safely on its way home, the battleship SMS Ostfriesland struck a British mine on her starboard side, killing one man and wounding ten, but was able to make port. Seydlitz, critically damaged and very nearly sinking, barely survived the return voyage: after grounding and taking on even more water on the evening of 1 June, she had to be assisted stern first into port, where she dropped anchor at 07:30 on the morning of 2 June.

The Germans were helped in their escape by the failure of the British Admiralty in London to pass on seven critical radio intercepts obtained by naval intelligence indicating the true position, course and intentions of the High Seas Fleet during the night. One message was transmitted to Jellicoe at 23:15 that accurately reported the German fleet's course and speed as of 21:14. However, the erroneous signal from earlier in the day that reported the German fleet still in port, and an intelligence signal received at 22:45 giving another unlikely position for the German fleet, had reduced his confidence in intelligence reports. Had the other messages been forwarded, which confirmed the information received at 23:15, or had British ships reported accurately sightings and engagements with German destroyers, cruisers and battleships, then Jellicoe could have altered course to intercept Scheer at the Horns Reef. The unsent intercepted messages had been duly filed by the junior officer left on duty that night, who failed to appreciate their significance. By the time Jellicoe finally learned of Scheer's whereabouts at 04:15, the German fleet was too far away to catch and it was clear that the battle could no longer be resumed.

Outcome
Reporting
At midday on 2 June, German authorities released a press statement claiming a victory, including the destruction of a battleship, two battlecruisers, two armoured cruisers, a light cruiser, a submarine and several destroyers, for the loss of Pommern and Wiesbaden. News that Lützow, Elbing and Rostock had been scuttled was withheld, on the grounds this information would not be known to the enemy. The victory of the Skagerrak was celebrated in the press, children were given a holiday and the nation celebrated. The Kaiser announced a new chapter in world history. Post-war, the official German history hailed the battle as a victory and it continued to be celebrated until after World War II.

In Britain, the first official news came from German wireless broadcasts. Ships began to arrive in port, their crews sending messages to friends and relatives both of their survival and the loss of some 6,000 others. The authorities considered suppressing the news, but it had already spread widely. Some crews coming ashore found rumours had already reported them dead to relatives, while others were jeered for the defeat they had suffered. At 19:00 on 2 June, the Admiralty released a statement based on information from Jellicoe containing the bare news of losses on each side. The following day British newspapers reported a German victory. The Daily Mirror described the German Director of the Naval Department telling the Reichstag: "The result of the fighting is a significant success for our forces against a much stronger adversary". The British population was shocked that the long anticipated battle had been a victory for Germany. On 3 June, the Admiralty issued a further statement expanding on German losses, and another the following day with exaggerated claims. However, on 7 June the German admission of the losses of Lützow and Rostock started to redress the sense of the battle as a loss. International perception of the battle began to change towards a qualified British victory, the German attempt to change the balance of power in the North Sea having been repulsed. In July, bad news from the Somme campaign swept concern over Jutland from the British consciousness.

Assessments
SMS_Seydlitz_damage.jpg
SMS Seydlitz was heavily damaged in the battle, hit by twenty-one main calibre shells, several secondary calibre and one torpedo. 98 men were killed and 55 injured.
At Jutland, the Germans, with a 99-strong fleet, sank 115,000 long tons (117,000 t) of British ships, while a 151-strong British fleet sank 62,000 long tons (63,000 t) of German ships. The British lost 6,094 seamen; the Germans 2,551. Several other ships were badly damaged, such as Lion and Seydlitz.

As of the summer of 1916, the High Seas Fleet's strategy was to whittle away the numerical advantage of the Royal Navy by bringing its full strength to bear against isolated squadrons of enemy capital ships whilst declining to be drawn into a general fleet battle until it had achieved something resembling parity in heavy ships. In tactical terms, the High Seas Fleet had clearly inflicted significantly greater losses on the Grand Fleet than it had suffered itself at Jutland, and the Germans never had any intention of attempting to hold the site of the battle, so some historians support the German claim of victory at Jutland.

However, Scheer seems to have quickly realised that further battles with a similar rate of attrition would exhaust the High Seas Fleet long before they reduced the Grand Fleet. Further, after the 19 August advance was nearly intercepted by the Grand Fleet, he no longer believed that it would be possible to trap a single squadron of Royal Navy warships without having the Grand Fleet intervene before he could return to port. Therefore, the High Seas Fleet abandoned its forays into the North Sea and turned its attention to the Baltic for most of 1917 whilst Scheer switched tactics against Britain to unrestricted submarine warfare in the Atlantic.

At a strategic level, the outcome has been the subject of a huge amount of literature with no clear consensus. The battle was widely viewed as indecisive in the immediate aftermath, and this view remains influential.

Despite numerical superiority, the British had been disappointed in their hopes for a decisive victory comparable to Trafalgar and the objective of the influential strategic doctrines of Alfred Mahan. The High Seas Fleet survived as a fleet in being. Most of its losses were made good within a month – even Seydlitz, the most badly damaged ship to survive the battle, was repaired by October and officially back in service by November. However, the Germans had failed in their objective of destroying a substantial portion of the British Fleet, and no progress had been made towards the goal of allowing the High Seas Fleet to operate in the Atlantic Ocean.

Subsequently, there has been considerable support for the view of Jutland as a strategic victory for the British. While the British had not destroyed the German fleet and had lost more ships than their enemy, the Germans had retreated to harbour; at the end of the battle the British were in command of the area.

The German fleet would only sortie into the North Sea thrice more, with a raid on 19 August, one in October 1916 and another in April 1918. All three were unopposed by capital ships and quickly aborted as neither side was prepared to take the risks of mines and submarines.

Apart from these three abortive operations the High Seas Fleet – unwilling to risk another encounter with the British fleet – confined its activities to the Baltic Sea for the remainder of the war. Jellicoe issued an order prohibiting the Grand Fleet from steaming south of the line of Horns Reef owing to the threat of mines and U-boats. A German naval expert, writing publicly about Jutland in November 1918, commented, "Our Fleet losses were severe. On 1 June 1916, it was clear to every thinking person that this battle must, and would be, the last one".

There is also significant support for viewing the battle as a German tactical victory, due to the much higher losses sustained by the British. The Germans declared a great victory immediately afterwards, while the British by contrast had only reported short and simple results. In response to public outrage, the First Lord of the Admiralty Arthur Balfour asked Winston Churchill to write a second report that was more positive and detailed.


A crew member of SMS Westfalen

At the end of the battle, the British had maintained their numerical superiority and had 23 dreadnoughts ready and four battlecruisers still able to fight, while the Germans had only 10 dreadnoughts. One month after the battle, the Grand Fleet was stronger than it had been before sailing to Jutland. Warspite was dry-docked at Rosyth, returning to the fleet on 22 July, while Malaya was repaired in the floating dock at Invergordon, returning to duty on 11 July. Barham was docked for a month at Devonport before undergoing speed trials and returning to Scapa on 8 July. Princess Royal stayed initially at Rosyth but transferred to dry dock at Portsmouth before returning to duty at Rosyth 21 July. Tiger was dry-docked at Rosyth and ready for service 2 July. Queen Elizabeth, Emperor of India and HMAS Australia, which had been undergoing maintenance at the time of the battle, returned to the fleet immediately, followed shortly after by Resolution and Ramillies. Lion initially remained ready for sea duty despite the damaged turret, then underwent a month's repairs in July when Q turret was removed temporarily and replaced in September.

A third view, presented in a number of recent evaluations, is that Jutland, the last major fleet action between battleships, illustrated the irrelevance of battleship fleets following the development of the submarine, mine and torpedo. In this view, the most important consequence of Jutland was the decision of the Germans to engage in unrestricted submarine warfare. Although large numbers of battleships were constructed in the decades between the wars, it has been argued that this outcome reflected the social dominance among naval decision-makers of battleship advocates who constrained technological choices to fit traditional paradigms of fleet action. Battleships played a relatively minor role in World War II, in which the submarine and aircraft carrier emerged as the dominant offensive weapons of naval warfare.


Today in Naval History - Naval / Maritime Events in History
31 May 1916 - Battle of Jutland - Part VII
The British Grand Fleet engages the High Seas Fleet in the largest naval battle of the war, which proves indecisive


British self-critique
The official British Admiralty examination of the Grand Fleet's performance recognised two main problems:
  • British armour-piercing shells exploded outside the German armour rather than penetrating and exploding within. As a result, some German ships with only 8 in (20 cm)-thick armour survived hits from 15-inch (38 cm) projectiles. Had these shells penetrated the armour and then exploded, German losses would probably have been far greater.
  • Communication between ships and the British commander-in-chief were comparatively poor. For most of the battle, Jellicoe had no idea where the German ships were, even though British ships were in contact. They failed to report enemy positions, contrary to the Grand Fleet's Battle Plan. Some of the most important signalling was carried out solely by flag instead of wireless or using redundant methods to ensure communications—a questionable procedure, given the mixture of haze and smoke that obscured the battlefield, and a foreshadowing of similar failures by habit-bound and conservatively minded professional officers of rank to take advantage of new technology in World War II.
Shell performance
German armour-piercing shells were far more effective than the British ones, which often failed to penetrate heavy armour. The issue particularly concerned shells striking at oblique angles, which became increasingly the case at long range. Germany had adopted trinitrotoluene (TNT) as the explosive filler for artillery shells in 1902, while the United Kingdom was still using a picric acid mixture (Lyddite). The shock of impact of a shell against armour often prematurely detonated Lyddite in advance of fuze function while TNT detonation could be delayed until after the shell had penetrated and the fuze had functioned in the vulnerable area behind the armour plate. Some 17 British shells hit the side armour of the German dreadnoughts or battlecruisers. Of these, four would not have penetrated under any circumstances. Of the remaining 13, one penetrated the armour and exploded inside. This showed a 7.5 per cent chance of proper shell function on the British side, a result of overly brittle shells and Lyddite exploding too soon.

The issue of poorly performing shells had been known to Jellicoe, who as Third Sea Lord from 1908 to 1910 had ordered new shells to be designed. However, the matter had not been followed through after his posting to sea and new shells had never been thoroughly tested. Beatty discovered the problem at a party aboard Lion a short time after the battle, when a Swedish Naval officer was present. He had recently visited Berlin, where the German navy had scoffed at how British shells had broken up on their ships' armour. The question of shell effectiveness had also been raised after the Battle of Dogger Bank, but no action had been taken. Hipper later commented, "It was nothing but the poor quality of their bursting charges which saved us from disaster."

Admiral Dreyer, writing later about the battle, during which he had been captain of the British flagship Iron Duke, estimated that effective shells as later introduced would have led to the sinking of six more German capital ships, based upon the actual number of hits achieved in the battle. The system of testing shells, which remained in use up to 1944, meant that, statistically, a batch of shells of which 70% were faulty stood an even chance of being accepted. Indeed, even shells that failed this relatively mild test had still been issued to ships. Analysis of the test results afterwards by the Ordnance Board suggested the likelihood that 30–70% of shells would not have passed the standard penetration test specified by the Admiralty.

Efforts to replace the shells were initially resisted by the Admiralty, and action was not taken until Jellicoe became First Sea Lord in December 1916. As an initial response, the worst of the existing shells were withdrawn from ships in early 1917 and replaced from reserve supplies. New shells were designed, but did not arrive until April 1918, and were never used in action.

Battlecruiser losses
British battlecruisers were designed to chase and destroy enemy cruisers from out of the range of those ships. They were not designed to be ships of the line and exchange broadsides with the enemy. One German and three British battlecruisers were sunk—but none were destroyed by enemy shells penetrating the belt armour and detonating the magazines. Each of the British battlecruisers was penetrated through a turret roof and her magazines ignited by flash fires passing through the turret and shell-handling rooms. Lützow sustained 24 hits and her flooding could not be contained. She was eventually sunk by her escorts' torpedoes after most of her crew had been safely removed (though six trapped stokers died when the ship was scuttled). Derfflinger and Seydlitz sustained 22 hits each but reached port (although in Seydlitz's case only just).

The disturbing feature of the battlecruiser action is the fact that five German battle-cruisers engaging six British vessels of this class, supported after the first twenty minutes, although at great range, by the fire of four battleships of the "Queen Elizabeth" class, were yet able to sink 'Queen Mary' and 'Indefatigable'....The facts which contributed to the British losses, first, were the indifferent armour protection of our battle-cruisers, particularly as regards turret armour, and, second, deck plating and the disadvantage under which our vessels laboured in regard to the light. Of this there can be no question. But it is also undoubted that the gunnery of the German battle-cruisers in the early stages was of a very high standard.
— Sir John Jellicoe, Jellicoe's official despatch
Jellicoe and Beatty, as well as other senior officers, gave an impression that the loss of the battlecruisers was caused by weak armour, despite reports by two committees and earlier statements by Jellicoe and other senior officers that Cordite and its management were to blame. This led to calls for armour to be increased, and an additional 1 in (2.5 cm) was placed over the relatively thin decks above magazines. To compensate for the increase in weight, ships had to carry correspondingly less fuel, water and other supplies. Whether or not thin deck armour was a potential weakness of British ships, the battle provided no evidence that it was the case. At least amongst the surviving ships, no enemy shell was found to have penetrated deck armour anywhere. The design of the new battlecruiser HMS Hood (which had started building at the time of the battle) was altered to give her 5,000 long tons (5,100 t) of additional armour.


Death toll
See also: Damage to major ships at the Battle of Jutland and List of ships sunk at the Battle of Jutland
The total loss of life on both sides was 9,823 personnel: the British losses numbered 6,784 and the German 3,039. Counted among the British losses were two members of the Royal Australian Navy and one member of the Royal Canadian Navy. Six Australian nationals serving in the Royal Navy were also killed.

British
113,300 tons sunk:
German
62,300 tons sunk:


Today in Naval History - Naval / Maritime Events in History
31 May 1916 - Battle of Jutland - Part VIII - The lost british Ships
The British Grand Fleet engages the High Seas Fleet in the largest naval battle of the war, which proves indecisive


The List of ships sunk at the Battle of Jutland is a list of ships which were lost during the Battle of Jutland.

This battle was fought between the British Royal Navy's Grand Fleet and the Imperial German Navy's High Seas Fleet on 31 May and 1 June 1916, during the First World War. The list is in chronological order of the time of sinking.

Unbenannt.JPG
Unbenannt1.JPG

  • Time-of-day versus "action" may vary, as some ships received their deadly damage during one action but limped through to a later time or even a later action.
  • The majority of British loss of life came from Vice-Admiral Sir David Beatty's battlecruiser force, which lost Queen Mary and Indefatigable in the opening minutes, and Invincible two hours later, with a total of 3,309 lives lost.


HMS Queen Mary – the battlecruiser exploded and sank in the Battle of Jutland on 31 May 1916, killing 1,245 men.

HMS Queen Mary was the last battlecruiser built by the Royal Navy before World War I. The sole member of her class, Queen Mary shared many features with the Lion-class battlecruisers, including her eight 13.5-inch (343 mm) guns. She was completed in 1913 and participated in the Battle of Heligoland Bight as part of the Grand Fleet in 1914. Like most of the modern British battlecruisers, she never left the North Sea during the war. As part of the 1st Battlecruiser Squadron, she attempted to intercept a German force that bombarded the North Sea coast of England in December 1914, but was unsuccessful. She was refitting in early 1915 and missed the Battle of Dogger Bank in January, but participated in the largest fleet action of the war, the Battle of Jutland in mid-1916. She was hit twice by the German battlecruiser Derfflinger during the early part of the battle and her magazines exploded shortly afterwards, sinking the ship.

HMS_Queen_Mary_leaving_the_River_Tyne,1913.jpg

QueenMary1916.png

Her wreck was discovered in 1991 and rests in pieces, some of which are upside down, on the floor of the North Sea. Queen Mary is designated as a protected place under the Protection of Military Remains Act 1986 as it is the grave of 1,266 officers and ratings.


HMS Invincible – a British battlecruiser that exploded and sank in the Battle of Jutland on 31 May 1916. 1,026 men were lost; six survived.

HMS Invincible was the lead ship of her class of three battlecruisers built for the Royal Navy during the first decade of the twentieth century and the first battlecruiser to be built by any country in the world. During the First World War she participated in the Battle of Heligoland Bight in a minor role as she was the oldest and slowest of the British battlecruisers present. The ship engaged the German light cruiser Cöln, but did not hit her before Cöln was sunk by the battlecruiser Lion. During the Battle of the Falkland Islands, Invincible and her sister Inflexible sank the armoured cruisers Scharnhorst and Gneisenau almost without loss to themselves, despite numerous hits by the German ships.

HMS_Invincible_(1907)_British_Battleship.jpg

She was the flagship of the 3rd Battlecruiser Squadron during the Battle of Jutland in 1916. The squadron had been detached from Admiral Beatty's Battlecruiser Fleet a few days before the battle for gunnery practice with the Grand Fleet and acted as its heavy scouting force during the battle. She was destroyed by a magazine explosion during the battle after one of her gun turret's armour was penetrated.


HMS Indefatigable – Battlecruiser, she sank in the Battle of Jutland on 31 May 1916, killing 1,015 men. There were two survivors.

HMS Indefatigable was the lead ship of her class of three battlecruisers built for the Royal Navy during the first decade of the 20th Century. When the First World War began, Indefatigable was serving with the 2nd Battlecruiser Squadron (BCS) in the Mediterranean, where she unsuccessfully pursued the battlecruiser Goeben and the light cruiser Breslau of the German Imperial Navy as they fled towards the Ottoman Empire. The ship bombarded Ottoman fortifications defending the Dardanelles on 3 November 1914, then, following a refit in Malta, returned to the United Kingdom in February where she rejoined the 2nd BCS.

HMS_Indefatigable_(1909).jpg

Indefatigable was sunk on 31 May 1916 during the Battle of Jutland, the largest naval battle of the war. Part of Vice-Admiral Sir David Beatty's Battlecruiser Fleet, she was hit several times in the first minutes of the "Run to the South", the opening phase of the battlecruiser action. Shells from the German battlecruiser Von der Tann caused an explosion ripping a hole in her hull, and a second explosion hurled large pieces of the ship 200 feet (60 m) in the air. Only three of the crew of 1,019 survived.


HMS Defence – Armoured Cruiser, exploded in the Battle of Jutland on 31 May 1916. 903 men were lost, there were no survivors.

HMS Defence was a Minotaur-class armoured cruiser built for the Royal Navy in the first decade of the 20th century, the last armoured cruiser built for the Royal Navy. She was stationed in the Mediterranean when the First World War began and participated in the pursuit of the German battlecruiserSMS Goeben and light cruiser SMS Breslau. The ship was transferred to the Grand Fleet in January 1915 and remained there for the rest of her career.

HMS_Defence_1907.jpg

Defence was sunk on 31 May 1916 during the Battle of Jutland, the largest naval battle of the war. Escorting the main body of the Grand Fleet, the ship was fired upon by one German battlecruiser and four dreadnoughts as she attempted to engage a disabled German light cruiser. She was struck by two salvoes from the German ships that detonated her rear magazine. The fire from that explosion spread to the ship's secondary magazines, which exploded in turn. There were no survivors.


HMS Black Prince – Armoured Cruiser, was sunk in the Battle of Jutland on 31 May 1916, with the loss of 857 men, the entire crew.

HMS Black Prince was a Duke of Edinburgh-class armoured cruiser built for the Royal Navy in the early 1900s. She was stationed in the Mediterranean when the First World War began and participated in the pursuit of the German battlecruiser SMS Goeben and light cruiser SMS Breslau. After the German ships reached Ottoman waters, the ship was sent to the Red Sea in mid-August to protect troop convoys arriving from India and to search for German merchant ships. After capturing two ships, Black Prince was transferred to the Grand Fleet in December 1914 and was sunk during the Battle of Jutland on 1 June 1916, with the loss of all hands.

HMS_Black_Prince.jpg


Today in Naval History - Naval / Maritime Events in History
31 May 1916 - Battle of Jutland - Part IX - The lost german Ships
The British Grand Fleet engages the High Seas Fleet in the largest naval battle of the war, which proves indecisive


SMS Pommern was one of five Deutschland-class pre-dreadnought battleships built for the Kaiserliche Marine between 1904 and 1906. Named after the Prussian province of Pomerania, she was built at the AG Vulcan yard at Stettin, Germany (now Szczecin, Poland), where she was laid down on 22 March 1904 and launched on 2 December 1905. She was commissioned into the navy on 6 August 1907. The ship was armed with a battery of four 28 cm (11 in) guns and had a top speed of 18 knots (33 km/h; 21 mph). The ships of her class were already outdated by the time they entered the service, being inferior in size, armor, firepower, and speed to the revolutionary new battleship HMS Dreadnought.

SMS_Pommern_1916.jpg

After commissioning, Pommern was assigned to II Battle Squadron of the High Seas Fleet, where she served throughout her peacetime career and the first two years of World War I. Before the war, the fleet was primarily occupied with cruises and extensive training exercises, developing strategic concepts for use in a future conflict. At the start of the war, Pommern and the rest of II Battle Squadron were tasked with supporting the defenses of the German Bight, and were stationed at the mouth of the Elbe. They also participated in several fruitless sorties into the North Sea in attempts to lure out and destroy a portion of the British Grand Fleet.

Bundesarchiv_DVM_10_Bild-23-61-21,_Linienschiff__SMS_Pommern_.jpg

These offensive operations culminated in the Battle of Jutland on 31 May – 1 June 1916. She and her sisters briefly engaged the British battlecruisers commanded by David Beatty late on the first day, and Pommern was hit once by a 12 in (30.5 cm) shell from the battlecruiser HMS Indomitable. During the confused night actions in the early hours of 1 June, she was hit by one, or possibly two, torpedoes from the British destroyer HMS Onslaught, which detonated one of Pommern's 17-centimeter (6.7 in) gun magazines. The resulting explosion broke the ship in half and killed the entire crew. Pommernwas the only battleship of either side sunk during the battle.


SMS Wiesbaden was a light cruiser of the Wiesbaden class built for the Imperial German Navy (Kaiserliche Marine). She had one sister ship, SMS Frankfurt; the ships were very similar to the previous Karlsruhe-class cruisers. The ship was laid down in 1913, launched in January 1915, and completed by August 1915. Armed with eight 15 cm SK L/45 guns, Wiesbaden had a top speed of 27.5 knots (50.9 km/h; 31.6 mph) and displaced 6,601 t (6,497 long tons; 7,276 short tons) at full load.

1024px-SMS_Frankfurt.jpg
sistership SMS Frankfurt

Wiesbaden saw only one major action, the Battle of Jutland on 31 May – 1 June 1916. The ship was badly damaged by gunfire from the battlecruiser HMS Invincible. Immobilized between the two battle fleets, Wiesbaden became the center of a hard-fought action that saw the destruction of two British armored cruisers. Heavy fire from the British fleet prevented evacuation of the ship's crew. Wiesbaden remained afloat until the early hours of 1 June and sank sometime between 01:45 and 02:45. Only one crew member survived the sinking; the wreck was located by German Navy divers in 1983.


SMS Lützow was the second Derfflinger-class battlecruiser built by the German Kaiserliche Marine (English: Imperial Navy) before World War I. Ordered as a replacement for the old protected cruiser Kaiserin Augusta, Lützow was launched on 29 November 1913, but not completed until 1916. Lützow was a sister ship to Derfflinger from which she differed slightly in that she was armed with an additional pair of 15 cm (5.9 inch) secondary guns and had an additional watertight compartment in her hull. She was named in honor of the Prussian general Ludwig Adolf Wilhelm von Lützow who fought in the Napoleonic Wars.

Lutzow_illustration.png

Lützow was commissioned on 8 August 1915, but did not join I Scouting Group until 20 March due to engine damage during trials. This was after most of the major actions conducted by the German battlecruiser force had taken place. As a result, Lützow saw very little action during the war. She took part in only one bombardment operation: the Bombardment of Yarmouth and Lowestoft on 24–25 April 1916, after which she became Admiral Franz von Hipper's flagship. One month later, the ship was heavily engaged during the Battle of Jutland, on 31 May–1 June. During the battle, Lützow sank the British battlecruiser HMS Invincible and is sometimes given credit for sinking the armored cruiser HMS Defence. However, she was heavily damaged by an estimated 24 heavy-caliber shell hits. With her bow thoroughly flooded, the ship was unable to make the return voyage to Germany; her crew was evacuated and she was sunk by torpedoes fired by one of her escorts, the torpedo boat G38.

1920px-Lützow1916.png


SMS Frauenlob ("His Majesty's Ship Frauenlob")[a] was the eighth member of the ten-ship Gazelle class, built by the Imperial German Navy. She was built by the AG Weser dockyard in Bremen, laid down in 1901, launched in March 1902, and commissioned into the High Seas Fleet in February 1903. Armed with a main battery of ten 10.5 cm (4.1 in) guns and two 45 cm (18 in) torpedo tubes, Frauenlob was capable of a top speed of 21.5 knots(39.8 km/h; 24.7 mph).

SMS_Frauenlob.jpg

Frauenlob spent her entire career in the reconnaissance forces of the High Seas Fleet. She saw action during World War I at the Battle of Heligoland Bight in August 1914, where she badly damaged the British cruiser HMS Arethusa, and at the Battle of Jutland on 31 May 1916. There, in a chaotic night engagement, Frauenlob was hit by a torpedo launched by HMS Southampton, which caused the ship to capsize and sink with the vast majority of her crew. The wreck was discovered in 2000, and is in remarkably good condition, sitting upright on the ocean floor.


Today in Naval History - Naval / Maritime Events in History
31 May 1920 – Launch of Mutsu, the second and last Nagato-class dreadnought battleship built for the Imperial Japanese Navy (IJN) at the end of World War I.


Mutsu was the second and last Nagato-class dreadnought battleship built for the Imperial Japanese Navy (IJN) at the end of World War I. It was named after the province, In 1923 she carried supplies for the survivors of the Great Kantō earthquake. The ship was modernized in 1934–1936 with improvements to her armour and machinery, and a rebuilt superstructure in the pagoda mast style.

Other than participating in the Battle of Midway and the Battle of the Eastern Solomons in 1942, where she did not see any significant combat, Mutsuspent most of the first year of the Pacific War in training. She returned to Japan in early 1943. That June, one of her aft magazines detonated while she was at anchor, sinking the ship with the loss of 1,121 crew and visitors. The IJN investigation into the cause of her loss concluded that it was the work of a disgruntled crew member. The navy dispersed the survivors in an attempt to conceal the sinking in the interest of morale in Japan. Much of the wreck was scrapped after the war, but some artefacts and relics are on display in Japan, and a small portion of the ship remains where it was sunk.

Mutsu33903u.tif.jpg


Description
Mutsu had a length of 201.17 metres (660 ft) between perpendiculars and 215.8 metres (708 ft) overall. She had a beam of 28.96 metres (95 ft) and a draught of 9 metres (29 ft 6 in). The ship displaced 32,720 tonnes (32,200 long tons) at standard load and 39,116 tonnes (38,498 long tons) at full load. Her crew consisted of 1,333 officers and enlisted men as built and 1,368 in 1935. The crew totalled around 1,475 men in 1942.

In 1927, Mutsu's bow was remodelled to reduce the amount of spray produced when steaming into a head sea. This increased her overall length by 1.59 metres (5 ft 3 in) to 217.39 metres (713 ft 3 in). During her 1934–1936 reconstruction, the ship's stern was lengthened by 7.55 metres (24 ft 9 in) to improve her speed, and her forward superstructure was rebuilt into a pagoda mast. She was given torpedo bulges to improve her underwater protection and to compensate for the weight of the additional armour and equipment. These changes increased her overall length to 224.94 m (738 ft 0 in), her beam to 34.6 m (113 ft 6 in) and her draught to 9.49 metres (31 ft 2 in). Her displacement increased over 7,000 tonnes (6,900 long tons) to 46,690 tonnes (45,950 long tons) at deep load.


Construction and service
Mutsu20.jpg
Mutsu at anchor, shortly after completion

Mutsu, named for Mutsu Province, was laid down at the Yokosuka Naval Arsenal on 1 June 1918 and launched on 31 May 1920. Funding for the ship had partly come from donations from schoolchildren. While Mutsu was still fitting out, the American government called a conference in Washington, D.C. late in 1921 to forestall the expensive naval arms race that was developing between the United States, the United Kingdom and the Empire of Japan. The Washington Naval Conference convened on 12 November and the Americans proposed to scrap virtually every capital ship under construction or being fitted out by the participating nations. Mutsu was specifically listed among those to be scrapped even though she had been commissioned a few weeks earlier. This was unacceptable to the Japanese delegates; they agreed to a compromise that allowed them to keep Mutsu in exchange for scrapping the obsolete dreadnought Settsu, with a similar arrangement for several American Colorado-class dreadnoughts that were fitting out. Mutsu was commissioned on 24 October 1921 with Captain Shizen Komakiin command. Captain Seiichi Kurose assumed command on 18 November and the ship was assigned to the 1st Battleship Division on 1 December. Mutsu hosted Edward, Prince of Wales, and his aide-de-camp and second cousin, Lieutenant Louis Mountbatten, on 12 April 1922 during the prince's visit to Japan.


Today in Naval History - Naval / Maritime Events in History
31 May 1937 - The Bombardment of Almería was a naval action which took place on 31 May 1937, during the Spanish Civil War.


The Bombardment of Almería was a naval action which took place on 31 May 1937, during the Spanish Civil War. The Kriegsmarine bombed the city of Almería in retaliation for a Republican air attack on the German cruiser Deutschland.

1.JPG 2.JPG

Background
In April 1937, the Non-intervention Committee established naval patrols in order to patrol the Spanish coasts and harbors. The naval patrols were furnished by Great Britain, France, Germany and Italy. The Spanish Republican Air Force carried out attacks against the harbor of Mallorca, a known-Nationalist naval base. On 24 May 1937, a Republican air raid hit the Italian cruiser Barletta, killing six Italian sailors and on the morning of 26 May another Republican air raid nearly missed the German torpedo boat Albatros. The commander of the German naval patrol protested, nevertheless Mallorca was a patrol zone assigned to France and the foreign ships were inside Spanish territorial waters. The same day, two Republican bombers piloted by Russian pilots, attacked the German pocket battleship Deutschland at Ibiza, killing 20–23[2] German sailors and wounding 73. Hitler wanted to declare war on the Republic, but instead ordered to shell the city of Almeria.

Admiral_Scheer_in_Gibraltar.jpg
Admiral Scheer in Gibraltar in 1936

Bombing of Almeria
At dawn 31 May 1937, the German pocket battleship Admiral Scheer and four German destroyers attacked the city of Almeria. The German ships fired 200 shells at the town, killing 19-20 civilians, wounding 50 and destroying 35 buildings. Indalecio Prieto, the Republican minister of Defense wanted to attack the German fleet, but the president Manuel Azaña and the prime minister Juan Negrin were opposed to Prieto's plan because an open war against Germany might have brought the annihilation of the Republic. Negrin and Azaña sent protest notes to the secretary-general of the League of Nationsand to the French and the English government. But the English and the French government said that the German attack had been justified.

Aftermath
On 15 June, Germany denounced a supposed Spanish Republican Navy attack against the German cruiser Leipzig, and on 23 June Germany and Italy withdrew from the Non-Intervention Committee and Portugal withdrew the British observers on its frontier. At the end of July the Italian started a campaign of maritime attacks against republican and neutral merchant ships. The loss of merchant ships and the beginning of the Sino-Japanese war led the Soviets to reduce their aid to the Republic. By mid 1937 the Republic was virtually isolated.


Today in Naval History - Naval / Maritime Events in History
Other Events on 31 May


1564 - Battle of Öland


1619 - Dutch defeat French at the mouth of the Vilaine River


1696 HMS Lizard (24), Cptn. Joseph Welby, was lost off Toulon


HMS Lizard
(1694) was a 24-gun sixth rate launched in 1694 and wrecked in 1696.


1698 – Launch of HMS Worcester was a 50-gun fourth rate ship of the line of the Royal Navy, launched at Southampton

HMS Worcester
was a 50-gun fourth rate ship of the line of the Royal Navy, launched at Southampton on 31 May 1698.
The vessel was rebuilt according to the 1706 Establishment at Deptford Dockyard and relaunched on 31 August 1714. She served in the North Sea, including participation in the May 1719 capture of Eilean Donan Castle during the Jacobite rising of 1719.' 'Worcester was broken up in 1733.


1742 May 31 - Swedes retreat after battle with Russians in Gulf of Finland


1743 - Battle of Korpr Strom, 31st May 1743


According to Swedish histories, the Swedish galley squadron from the "skärgårdsflotta" that attacked the Russians at Korpoström included 22 galleys and 3 gun prams (skottpråmar). However, the Russian commander observed only one pram, and three different Swedish diagrams or maps of the battle show only one (Herkules). The number of galleys actually present is hard to determine but seems to have been 19, as shown on the most detailed Swedish representation. The Russian squadron included prams Olifant and Dikii Byk and 20 out of 21 galleys (best guess is that when sick had been sent to the rear while the Russians were awaiting the Swedish attack, they went in o were escorted by one of the galleys). I have the names only of 14 of the Russian galleys. Other Swedish vessels present according to Jan-Erik Karlsson were galley Stå Bi and half-galley Stören. Correct spellings include Lidingön Snåll,and Löwen or von Löwen, and Töva Litet (which seems to mean "to be a little late"!) or Tövalite.

https://threedecks.org/index.php?display_type=show_battle&id=352


1800 - Godfrey - English registered schooner commanded by H. Atkinson, captured by a French privateer and recaptured by American sloop of war USS Merrimack

https://en.wikipedia.org/wiki/USS_Merrimack_(1798)


1803 – Launch of French Brutus, a Téméraire class 74-gun ship of the line of the French Navy.

Brutus was a Téméraire class 74-gun ship of the line of the French Navy. Launched on 24 January 1803, she was renamed Impétueux on 5 February 1803.
She served in the Caribbean under Willaumez during the Atlantic campaign of 1806.
On 19 August 1806, she was dismasted in a tempest and drifted until 10 September. On the 14th, she was chased by Strachan's squadron comprising Belleisle, Bellona and Melampus; unable to fight, she beached herself in Chesapeake Bay. The wreck was set ablaze by the British and the crew was taken prisoner.


1803 - May 31, June 1 - HMS Adams versus Tripolitan gunboats


1803 HMS Resistance (36), Cptn. Hon. Philip Wodehouse, wrecked on Cape St. Vincent


HMS Resistance
(1801) was a 36-gun fifth rate launched in 1801 and wrecked in 1803


1808 HMS Redwing (18), Thomas Ussher, took two sail at Tarifa.

HMS Redwing
was a Cruizer-class brig-sloop of the British Royal Navy. Commissioned in 1806, she saw active service in the Napoleonic Wars, mostly in the Mediterranean, and afterwards served off the West Coast of Africa, acting to suppress the slave trade. She was lost at sea in 1827.


1809 Attack at Santa Maura, 31st May 1809

HMS Topaze
(38), Cptn. A. J. Griffiths, took four vessels and destroyed five at St. Maura, Albania.


1809 - HMS Unique (12) used as a fireship in Guadeloupe.


1812 – Launch of French Romulus, a Téméraire class 74-gun ship of the line of the French Navy


The Romulus was a Téméraire class 74-gun ship of the line of the French Navy.
In February 1814, under captain Rolland, she sailed from Toulon to Genoa, being part of a division under Julien Cosmao. On 13, she was engaged by three British ships of the line, notably HMS Boyne and HMS Caledonia, and managed to escape to Toulon by sailing close to the coast to avoid being surrounded.
By 1821, she had been razéed into a frigate, and renamed Guerrière. She was captained by Commander Jean-Léon Émeric.
She was eventually broken up in 1840.

Combat_du_vaisseau_francais_Le_Romulus_contre_trois_vaisseaux_anglais_à_l'entrée_de_la_rade_de...jpg
Painting of the action of 13 February 1814, by Pierre-Julien Gilbert

800px-Combat_du_Romulus_mg_5099.jpg
Fight of the Romulus against HMS Boyne and HMS Caledonia, by Vincent Courdouan (1848)


1836 – Launch of The second USS Porpoise was a 224-ton Dolphin class brigantine. (In early American usage, a brigantine was referred to as a hermaphrodite brig.) The USS Porpoise was later rerigged as a brig (see illustration at right). She was based on the same plans as Dolphin.

The second USS Porpoise was a 224-ton Dolphin class brigantine. (In early American usage, a brigantine was referred to as a hermaphrodite brig.) The USS Porpoise was later rerigged as a brig (see illustration at right). She was based on the same plans as Dolphin.

Porpoise was authorized by Congress on 30 June 1834; built in 1835; and launched 31 May 1836; Lieutenant William Ramsay in command.

Porpoise sailed from Boston, Massachusetts on 25 August 1836, called at various southern ports, and conducted coastal surveying operations under the direction of Lt. Charles Wilkes in the summer of 1837. In October 1837, she hunted pirates along the southern coast, and then resumed her survey work in December.

Porpoise, Lt. Cadwalader Ringgold in command, was then assigned to the squadron which Wilkes was to command on an extended exploratory expedition around the world. She stood out of Hampton Roads on 18 August 1838 with the United States Exploring Expedition Squadron. She assisted in the exploration and survey work of the Expedition as it confirmed the existence of the Antarctic Continent, charted vast areas of the South Pacific, circumnavigated the world, and returned to New York four years later.

USS_Porpoise_(1836).jpg

Porpoise underwent overhaul at New York at the end of 1842 and sailed on 8 February 1843 for the west coast of Africa to join the squadron patrolling for slavers. She returned to New York on 19 November 1844.

From February 1845-July 1847, Porpoise cruised in the Gulf of Mexico, participating in the Naval operations against Tampico, Pánuco, and Veracruzduring the War with Mexico. Upon return to Norfolk, Virginia, she remained decommissioned until 1 January 1848.

During the next three and a half years, she hunted slavers along the west coast of Africa, touching at the U.S. in the spring of 1850. Returning to New York from this extended cruise on 19 December 1851. She again decommissioned on 3 August 1852.

Recommissioned in May 1853, she was assigned to North Pacific Exploring and Surveying Expedition under Commander Cadwalader Ringgold, a veteran, like Porpoise, of the Wilkes Expedition. She joined the squadron at Hampton Roads, and with it, stood out to sea on 11 June 1853. Porpoiserounded the Cape of Good Hope, and with the squadron explored and charted many Pacific islands and shoals before arriving in China in March 1854. The squadron put to sea once more to explore in the Bonins, the Ladrones, and the Marianas. Porpoise parted company with the other vessels on 21 September 1854 between Formosa and China, and was never heard from again. It is supposed that she foundered in a heavy typhoon which occurred a few days after her separation from the squadron.

https://en.wikipedia.org/wiki/USS_Porpoise_(1836)


1857 - Steamer Louisiana – Burned during the night of 31 May 1857 in the Gulf of Mexico, several miles off the coast of Galveston, Texas. The vessel, in the Southern Steamship Company fleet, was en route from New Orleans to Galveston. A fire broke out amidships, which prevented communication and hampered the crew's attempts to fight the fire.


1870 – Launch of HMS Sultan was a broadside ironclad of the Royal Navy of the Victorian era, who carried her main armament in a central box battery.


HMS Sultan
was a broadside ironclad of the Royal Navy of the Victorian era, who carried her main armament in a central box battery. She was named for Sultan Abdülâziz of the Ottoman Empire, who was visiting England when she was laid down. Abdülâziz cultivated good relations with the Second French Empire and the British. In 1867 he was the first Ottoman sultan to visit Western Europe; his trip included a visit to England, where he was made a Knight of the Garter by Queen Victoria and shown a Royal Navy Fleet Review, with Isma'il Pasha of Egypt.

Hms-sultan-1870.jpg


1900 - Sailors and Marines from USS Newark (C 1) and USS Oregon (BB 3) arrive at Peking (now known as Beijing), China, to protect U.S. and foreign diplomatic legations during the Boxer Rebellion.


1918 - USS President Lincoln is torpedoed and sunk by German submarine, (U 90). Twenty-six lives are lost.

USS President Lincoln
was a troop transport in the United States Navy during World War I.

Formerly the German steamer President Lincoln of the Hamburg-American Line, it was built by Harland and Wolff in Belfast in 1907. Seized in New York harbor in 1917, it was turned over to the Shipping Board and transferred to the Navy for operation as a troop transport.

Having been damaged severely by her German crew, the President Lincoln underwent extensive repairs and conversion at Robin's Dry Dock and Repair Company in Brooklyn, New York before being re-commissioned as a Navy troop transport at Brooklyn on 25 July 1917. Commander Yates Stirling, Jr.was then placed in command.

S.S._President_Lincoln.jpg


1919 - Curtiss flying boat NC 4 lands at Plymouth, England, concluding the first transatlantic flight.


1927 – Launch of HMAS Canberra (I33/D33), named after the Australian capital city of Canberra, was a Royal Australian Navy (RAN) heavy cruiser of the Kent sub-class of County-class cruisers


1280px-HMAS_Canberra_1_2-100605.jpg


1934 – Launch of Mikuma (三隈 Mikuma) was the second vessel in the four-vessel Mogami class of heavy cruisers in the Imperial Japanese Navy.

Mikuma1939.jpg

https://en.wikipedia.org/wiki/Japanese_cruiser_Mikuma


1942 - Gino Allegri – On 31 May 1942 the Italian cargo vessel Gino Allegri, en route from Brindisi to Bengasi with munitions and other supplies, blew up after being hit by combined attacks of aircraft and HMS Proteus. 21 wounded survivors were picked up by the destroyer Euro, out of some 300 men aboard.

https://en.wikipedia.org/wiki/HMS_Proteus_(N29)


1944 - USS England (DE 635), assisted by six destroyers and destroyer escorts, sinks sixth Japanese submarine in less than two weeks.


1944 - USS Barb (SS 220) and USS Herring (SS 233) attack Japanese shipping in the Sea of Okhotsk about 150 miles west of Matsuwa Island, Kuril Islands, sinking several ships.
 
Today in Naval History - Naval / Maritime Events in History
1 June 1535 – Conquest of Tunis in 1535
Combined forces loyal to Charles V attack and expel the Ottomans from Tunis during the Conquest of Tunis.


The Conquest of Tunis in 1535 was an attack on Tunis, then under the control of the Ottoman Empire, by the Habsburg Empire of Charles V and its allies.

1280px-Battle_of_Tunis_1535_Attack_on_Goletta.jpg
Attack on La Goletta, with Tunis in the background.

1.JPG

Background
In 1533, Suleiman the Magnificent ordered Hayreddin Barbarossa, whom he had summoned from Algiers, to build a large war fleet in the arsenal of Constantinople. Altogether 70 galleys were built during the winter of 1533–1534, manned by slave oarsmen, including 2,000 Jewish ones. With this fleet, Barbarossa conducted aggressive raids along the coast of Italy, until he conquered Tunis on 16 August 1534, ousting the local ruler, theretofore subservient to the Spanish, Muley Hasan. Barbarossa thus established a strong naval base in Tunis, which could be used for raids in the region, and on nearby Malta.

Charles V, one of the most powerful men in Europe at the time, assembled a large army of some 30,000 soldiers, 74 galleys (rowed by chained Protestants[clarify] shipped in from Antwerp), and 300 sailing ships, including the carrack Santa Anna and the Portuguese galleon São João Baptista, also known as Botafogo (the most powerful ship in the world at the time, with 366 bronze cannons) to drive the Ottomans from the region. The expense involved for Charles V was considerable, and at 1,000,000 ducats was on par with the cost of Charles' campaign against Suleiman on the Danube. Unexpectedly, the funding of the conquest of Tunis came from the galleons sailing in from the New World, in the form of a 2 million gold ducats treasure extracted by Francisco Pizarro in exchange for his releasing of the Inca king Atahualpa (whom he nevertheless executed on 29 August 1533).

Despite a request by Charles V, Francis I denied French support to the expedition, explaining that he was under a 3-year truce with Barbarossa following the 1533 Ottoman embassy to France. Francis I was also under negotiations with Suleiman the Magnificent for a combined attack on Charles V, following the 1534 Ottoman embassy to France. Francis I only agreed to Pope Paul III's request that no fight between Christians occur during the time of the expedition.

2.JPG

Battle
On 1 June 1535, protected by a Genoese fleet, Charles V destroyed Barbarossa's fleet and, after a costly yet successful siege at La Goletta, captured Tunis. In the action, the Portuguese galleon Botafogo distinguished itself by breaking the chains protecting the harbour's entrance with its spur ram, thereafter opening fire on La Goletta. In the ruins, the Spanish found cannonballs with the French Fleur-de-lys mark, evidence of the contacts stemming from the Franco-Ottoman alliance.

The resulting massacre of the city left an estimated 30,000 dead. Barbarossa managed to flee to Algiers with a troop of several thousand Turks. Muley Hasan was restored to his throne. The stench of the corpses was such that Charles V soon left Tunis and moved his camp to Radès.

The siege demonstrated the power projection of the Habsburg dynasties at the time;[citation needed] Charles V had under his control much of southern Italy, Sicily, Spain, the Americas, Austria, the Netherlands and lands in Germany. Furthermore, he was Holy Roman Emperor and had de jure control over much of Germany as well.

Ottoman defeat in Tunis motivated the Ottoman Empire to enter into a formal alliance with France against the Habsburg Empire. Ambassador Jean de La Forêt was sent to Istanbul, and for the first time was able to become permanent ambassador at the Ottoman court and to negotiate treaties.

Charles V celebrated a neo-classical triumph "over the infidel" at Rome on April 5, 1536 in commemoration of his victory at Tunis. The Spanish governor of La Goulette, Luys Peres Varga, built fortified the island of Chikly in the lake of Tunis to strengthen the city's defences between 1546 and 1550.

Aftermath
Main article: Conquest of Tunis (1574)
Barbarossa managed to escape to the harbour of Bône, where a fleet was waiting for him. From there, he sailed to accomplish the Sack of Mahon, where he took 6,000 slaves and brought them to Algiers.

The Ottomans recaptured the city in 1574. However the Ottoman governors of Tunis were semi-autonomous Beys who acted as privateers against Christian shipping. Consequently, raiding in the Mediterranean continued until the French subjugated the region as a protectorate three centuries later in 1830 with an invasion leading to the creation of French Algeria, and the establishment of a protectorate over Tunisia in 1881.

800px-Bombardment_of_La_Goletta.jpg

800px-Capture_of_Tunis_1535_liberation_of_20000_Christian_captives.jpg


Back
Top