• Win a Free Custom Engraved Brass Coin!!!
    As a way to introduce our brass coins to the community, we will raffle off a free coin during the month of August. Follow link ABOVE for instructions for entering.

Keel Problem

  • Thread starter Thread starter AvB
  • Start date Start date
  • Watchers Watchers 12

AvB

Joined
Mar 20, 2024
Messages
25
Points
48

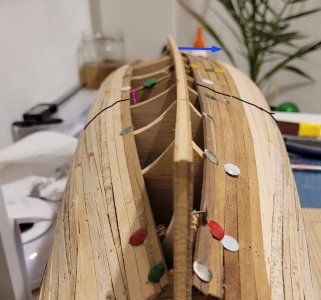
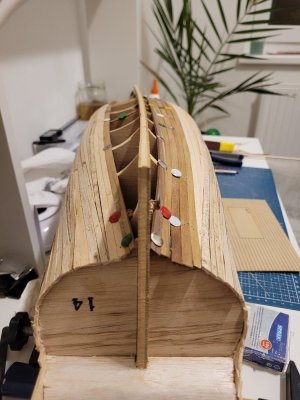
Hi! I’ve purchased a used ship model that was already started, i would like to Continue the build. Most of the parts were already in place. Later I noticed that the keel has a large warp to the left. I think it’s probably too late to repair it. Has anyone seen a similar problem before? Is it very bad?

20251026_171542.jpg
 
use the attachment editor and rotate the image

warping of the center profile piece is common on plank on bulkhead kits and it could be corrected when the bulkheads are installed. With this case it is far too late to fix it.

ok first of all the "keel" is not yet on the model what is warped is the center profile piece. At this point you can install the keel that is wider than the profile thickness and that might cover some of the warp.
if that does not work the next idea is to cut the planking between the bulkheads at the warp then use a block of wood and wedge it between the bulkheads this will force the center profile piece straighter

is the planking on the hull the first layer? is there a second planking that goes over what i see there? from what i can see that is one bad planking job. If there is no second layer of planking i would sand what you have and plank over it.
 
Thank you for the idea you shared. I will try one of them, this is the first planking yes, and there will be a second the final planking. It's not a nice job I know I have a lot of work to correct the faulty parts.
 
that is quite a warp i see 2 options here
1st i would finish off the first layer of planking and use a wood filler to smooth out the hull and with the second planking plank right up flush with the center profile piece better yet plank right over it so the bottom planks the on each side meet in the middle. Then just lay the keel over the bottom planks.

extreme idea 2 is to cut the planking at the black line, then cut a piece of wood to fit where the little red arrow is between the bulkheads this will force that center piece in the direction of the blue arrow. The second layer of planking will join the hull back together

keel warp.jpg
 
Considering the quality of the initial planking, why not just strip it all, install spacer blocks to straighten the centerboard properly, and re-do the planking completely? You’ll get a better result with less frustration and more satisfaction IMHO.
I think your correct.
Take of the planks and line out the basic "keel" and "bulks".
Start planking again on a dry and strait base.
The result will be better then a repaired base. ;) Good luck.
 
If it were me, I would consider the whole project as sunk cost. Time means something. It cannot be recovered.

That central spine has taken its equilibrium conformation. It is always going to seek that shape. Even if it can be straightened, it is too late to fit in anything to effectively counter Nature. A warped spine is probably always going to be a lost cause. Going back to the mfg for a replacement is drinking from the same poisoned well. Get something better.

However:
If the vessel is one that you have a real desire to build, it can be started over using better quality stock.
If the plans have the patterns for the central spine and the molds:
a) trace them
b) have OfficeMax or a clone scan and print the kit plan sheet(s)
c) I am under the impression that OfficeMax et al. have DIY machines that provide an exact 1:1? or have a scale adjustment (a ruler scale on the original - take the ruler to the copy shop.
d) copy them on a home 3in1 BUT you must correct for the scale distortion that every home scanner/printer is born with. Scan a metric ruler, open in a drawing program with a scale adjustment function, print the ruler scan, compare the print to the original, calculate a scale adjustment, duplicate the layer with the ruler scan and adjust the scale on that layer, print it out and compare. Rinse and repeat until the absolute accuracy scale factor is determined. Tape a Post-It with that number on your computer screen frame, and on your printer. It will not change for your machine and is too much of a PITA to repeat finding if the %# is lost.
e) No patterns on the plans? Totally debond everything on the hull - PVA: 91% Isopropanol, Duco: acetone, CA: acetone, hide glue: hot ethanol. Trace the parts.

Power tools are not necessary for scroll cutting. Scroll saw, fret saw, coping saw - all sorta look the same to me. If you have surplus funds and are the majority party, Knew has a 3 inch saw with blade rotation that is elegant looking. Blade, for a tablesaw or a bandsaw (but no way for resawing thick stock-go slow) 3-4 teeth in the stock, so I am guessing it is similar for a scroll saw. Teeth with a full gullet no longer cut - just increase friction.

Find a local hardwood lumber yard or big box builders supply and buy much better and thicker starting material for the spine and molds. For the layer one planking, order some Basswood or Yellow Poplar planking that is twice as wide as the kit supplied dross. Spill the planking. It will get you a much better job. While you are at it, take a look at what is supplied for layer two and see if there is third party planking species that is better. Again get stock that is wider and spill. Keep one edge as is, and do the spilling/wastage on the other "meeting what is there" edge.

One thing about using a filler/spackling compd on layer one of a two layer PoB? If it is just gaps between planks, why bother? Gaps in layer one have no effect on layer two. If there are dips and hollows, if significant, scab PVA bonded wood and scrape and sand to smoothness, filler for shallow.
 
Last edited:
Well, I don't have the hull in my hands to rotate it and get a good look at it, but from all indications, the planking that's now in place was hung on bulkheads that followed the bend in the keel piece or it wouldn't have a bend like that in it now. The planking isn't going to let go and follow the keel if the keel even could be bent straight, which it can't as long as the planking is attached. As it stands now with the planking glued on, it's a structure that cannot be bent into shape to straighten the keel. I'm guessing if you took a good look at it, you'd discover that the hull is not the same shape on each side! There's only one type of vessel that is built with a bent keel. That's the Venetian gondolas which have keels bent to starboard with asymmetrical hulls that cause them to list and turn to starboard to counteract the turning force of the gondolier rowing with only one oar the port side, using a special oarlock, called a forcola. (See: https://en.wikipedia.org/wiki/Fórcola) (Factoid provided for future use to win a bet in some yacht club bar. :D)

From the looks of the planking stock and the fact that it is "plank on bulkhead" construction with "double planking," I'm going to go out on a fairly strong limb here and say the kit is probably crap and there's a lot of crappy kits out there. If you could tell us which kit it is, we could determine that fairly easily. That said, if the kit does have decent instructions and quality fittings and it's a model you want to build, you would be better off tearing the planking off with some care given to trying to salvage the bulkheads and save those to use starting the build over completely giving the attention due to getting a precisely accurate "set up" of a new keel and stem and sternpost if the latter aren't salvageable. There's no need to try to salvage any of the planking. It's junk wood to begin with. Just cut the planking between the bulkheads and try to clean up the bulkhead edges if possible. If not, make new bulkheads. Remember, a very accurate bulkhead set-up with properly faired bulkhead edges is critical to doing a decent planking job. As Jaager suggested, use new planking stock. I'd forget about the double planking and just plank with single planks of greater thickness. Forget the crappy "strip wood" planking and spile the planks properly to their required shapes and heat bend them as necessary. It's far easier to plank once and do it right than to plank twice, one layer on top of the other, and hope to cover the inevitable bad results of the first layer of planking with thin wood on bulkheads anyway.

I doubt there's ever been an experienced ship modeler without firsthand experience in tearing out finished work and doing it over again better than before. That's one of the "secrets" of ship modeling. If you stick with it, you'll find yourself repeatedly making more than one attempt to get something done to your satisfaction. That's really the difference between a well-done model and a mediocre one.

I suspect this is your first kit build. Frankly, if this is not a high-quality kit, you will likely encounter a lot of difficulties and frustrations (as the first owner obviously did.) You may be better off setting this kit aside for your third or fifth build after building a few quality kits that are easier to build. In that fashion, you should get the experience required to "kit-bash" this one into a model that you will be satisfied with. There's nothing worse than getting suckered into buying a poor-quality kit, becoming inevitably discouraged, and giving up entirely on ship modeling which, on a good day, can be a wonderful hobby.
 
Thank you all for the support and knowledge you shared! I will try to do my best with this one. This is my third ship actually and the hardest one I started to build. The owner of the Kit had also lot of Issues with it as, as I do, but I will try to Continue his work. This is an old Kit from Carta Augusto German Friedrich wilhelm zu pferde with lack of instructions. The decorative elements are in good shape. The shape of the hull is not that bad as it seems, so I will try to cut the hull in the middle and fix the curve as possible.
 
@DAWarden-(Jaager) is right. The planks were added to an already bent keel, and they are reinforcing it, which is bad. They need to be removed... all of them. You can do a much better planking job using nicer wood anyway. Once the planks are gone, then you can decide whether trying to straighten the keel plate is worth it, or if the frames should be cut free and a new keel cut from fresh wood, using the old one at a pattern.
 
Friedrich wilhelm zu pferde
Prins Willem is not an unknown subject - look for logs here and MSW.

There is a book:
https://shipsofscale.com/sosforums/threads/book-abouth-the-prins-willem-from-herman-ketting.7666/

The above mentions a digital copy
I have the Delius, Klasing & Co. 1981 printing. It is essentially a monograph with two sheets of 1:100 plans.
With the book and plans no other instructions for the WHAT is needed. The HOW is generic. There are more than enough books and logs covering this.
Ab Hoving has said little that was complementary about the other "historical" vessel recreations from this GDR publisher.
He would need to be asked about the historical validity of this particular volume. He is a member: PM?
This book seams to have begun as Dutch not German. There is a contemporary model of this VOC East Indiaman. If the lines for the plans are takeoffs from the model - this one may not be a fantasy created from whole cloth - unlike the other Delius, Klasing subjects.

This is a very complicated model. A little more time spent now in getting a secure and precise starting structure may save future heartache and regret.
 
Last edited:
IMHO if you are determined to proceed with rescuing the existing project, Namabiiru's suggestion seems to be the most workable. But you must ask yourself: "Should I throw good time and money after bad?" Are you so enamored of and invested in this project that it is worth the aggravation and frustration of trying to rescue it? Or should I start over with another project, that I like equally, with a clean slate and opportunity for success?
 
Remove the planks and straighten the warp by clamping the keel between two straight pieces of wood. Then replank doing a few planks on one side and then a few on the other side. Looks like this one was done one whole side first and then the other side. The planks will probably pop right off.
 
A lot of people talked of just removing the planking. It may not be as difficult as one would think depending on the type of glue used. If it is a pva or epoxy type glue you can use a heat gun and soften the glue and gently pry the planks off of the hull. Using this method you won't damage the structure beneath. It takes a bit of time but hey...models take time.
 
Okay, you've already gotten some good advice. I'm just going to state how I would tackle it if it were my problem to deal with.

I think I would sand/taper that center piece using the bulkheads as the guide. The goal would be to just create a base that you could complete that first layer of planking over, not paying any attention to the lateral curve of the centerboard. I would try to get a nice, smooth full layer of planking over the entire bottom of the hull. Then when you glue on the actual keel piece, you could ensure it follows a nice straight path from bow to stern, and once the second layer of planking is laid to go with it, no one will know the mess that's underneath.

In fairness, I might be more concerned with if the masts will tend to be leaning to port or starboard if the centerblock they bottom out on is off to one side due to that curve. Not unresolvable, just something to keep in mind once you start the masting and rigging process. You can always let the base of the mast "float" in the space, and just let the shrouds and stays keep the masts in their proper alignment Good luck with your project. I'm sure you can rescue it.
 
You can always let the base of the mast "float" in the space, and just let the shrouds and stays keep the masts in their proper alignment
Just as with an actual vessel, mast wedges can be used for lateral alignment and to set the rake. When I see kit logs where a ring is fixed to the deck at the base of a mast, I wonder: Why not use actual wedges? They are simple enough to make.
 
Okay, you've already gotten some good advice. I'm just going to state how I would tackle it if it were my problem to deal with.

I think I would sand/taper that center piece using the bulkheads as the guide. The goal would be to just create a base that you could complete that first layer of planking over, not paying any attention to the lateral curve of the centerboard. I would try to get a nice, smooth full layer of planking over the entire bottom of the hull. Then when you glue on the actual keel piece, you could ensure it follows a nice straight path from bow to stern, and once the second layer of planking is laid to go with it, no one will know the mess that's underneath.

In fairness, I might be more concerned with if the masts will tend to be leaning to port or starboard if the centerblock they bottom out on is off to one side due to that curve. Not unresolvable, just something to keep in mind once you start the masting and rigging process. You can always let the base of the mast "float" in the space, and just let the shrouds and stays keep the masts in their proper alignment Good luck with your project. I'm sure you can rescue it.
If you do that, the hull curves will not be symmetrical, but the non-symmetry may be able to be compensated for using wood filler and sanding.
 
A ship model without an accurately shaped hull is a waste of time and effort. Trying to cure the problem without Straightening the central spine will result in a misshapen hull. Isopropyl alcohol will soften PVA glue and Acetone more aggressive adhesives like CA and Epoxy.

Remove and throw away the planking. Remove and save the bulkheads. Clamp the warped center spine to a piece of craft plywood and saw out a new one. Now, start over.

Roger
It's very doubtful that epoxy was used for the planking, but even so - while acetone can be used to thin epoxy prior to cure, acetone has no effect whatsoever on epoxy once it is cured.
 
Back
Top