You are using an out of date browser. It may not display this or other websites correctly.
You should upgrade or use an alternative browser.
You should upgrade or use an alternative browser.
Willem Barentsz by Kolderstok AD 1596
- Thread starter Pathfinder65
- Start date
- Watchers 32
I’m thinking about either the brass nails or lifting hooks. Seems to me that there had to be someway to lift the hatch.I had a quick look again, now. You really have an excellent fit on that desk - definitely better than mine! Are you going to add the brass nails on the two pieces that run lengthwise?
I taped a piece of sandpaper to the deck and rubbed the hatch back and forth to get the slight deck side to side curve on the hatch bottom. It didn’t take much to get a good fit.
BTW, the hatch is all Walnut as per the kit, but I made the frame from Mahogany.
Jan
Good afternoon Jan- I’m so glad I’m not the only one who questions my mathematical ability.Absolutely true
I just found it humorous this morning. After all my careful measuring, preparation and advanced math skills, the end result was a riot to look at this morning.
Jan
 Ahhh....this AHA moments. For a hatch not to been your fix is cool.
Yup, that was a little bit of a head scratcher.Good afternoon Jan- I’m so glad I’m not the only one who questions my mathematical ability.Ahhh....this AHA moments. For a hatch not to been your fix is cool.
The Small Hatch.
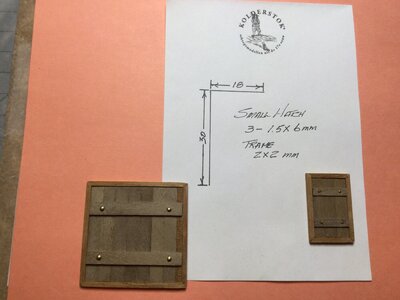
I chose to use the "nails" versus lifting hook eyes to "hold" the planks. On the large hatch I used nail heads from the nails included in the kit, for the smaller hatch I used 10mm nail heads.
I tried a dry fit on deck "A" to aline both hatches with the markings on the deck. Viola, I think I've got this part right.
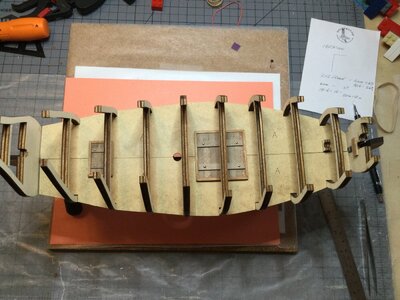
Since the hatches more or less won't be exposed because of the upper deck, how do I finish them. Stain, Linseed oil, ???
Jan

I chose to use the "nails" versus lifting hook eyes to "hold" the planks. On the large hatch I used nail heads from the nails included in the kit, for the smaller hatch I used 10mm nail heads.
I tried a dry fit on deck "A" to aline both hatches with the markings on the deck. Viola, I think I've got this part right.

Since the hatches more or less won't be exposed because of the upper deck, how do I finish them. Stain, Linseed oil, ???
Jan
- Joined
- Jan 9, 2020
- Messages
- 10,377
- Points
- 938

That looks excellent Jan! I finished mine with Tung Oil, but that was because I couldn't get Danish oil. Two things to remember here: (a) they are not going to be visible and (b) when the ladder gets installed later on, its feet will rest on the small hatch. If you are going to apply glue to the feet of the ladder, and you are going to use an oil finish, just use it sparingly, so that you do not compromise adhesion.
“If you are going to apply glue to the feet of the ladder, and you are going to use an oil finish, just use it sparingly, so that you do not compromise adhesion.”
I‘ll have to look up Danish oil, I’ve worked with MinWax stains, but have no experience with other finishes.
Did you cover the deck planking with the same finish?
I‘m trying to decide what to do next, fairing or plank the deck.
Jan
I‘ll have to look up Danish oil, I’ve worked with MinWax stains, but have no experience with other finishes.
Did you cover the deck planking with the same finish?
I‘m trying to decide what to do next, fairing or plank the deck.
Jan
- Joined
- Jan 9, 2020
- Messages
- 10,377
- Points
- 938

Jan be careful with stains - the walnut is very dark already, so it has to be a very light-colored stain. Personally, and with the benefit of hindsight, I will use a clear or matte polyurethane varnish. I covered the lower deck with tung oil as well, but I did not like the finish - it made the Abachi wood too yellow. For the upper deck I will use said varnish if I can get it. @Dean62 Dean uses Varethane and his results speak for themselves.
You have to plank Deck A first as the deck has to be faired together with the bulkheads.
You have to plank Deck A first as the deck has to be faired together with the bulkheads.
- Joined
- Jan 9, 2020
- Messages
- 10,377
- Points
- 938

Jan just follow the sequence of my build log. You still have plenty of work to do before you can even start thinking of fairing the hull. You need to plank the stern bulkhead, cut out the rudder hole and scribe the gunports and then glue the stern frame to the hull. That stern frame has to be included in the whole fairing process.
Thanks Heinrich, I will do that.Jan just follow the sequence of my build log. You still have plenty of work to do before you can even start thinking of fairing the hull. You need to plank the stern bulkhead, cut out the rudder hole and scribe the gunports and then glue the stern frame to the hull. That stern frame has to be included in the whole fairing process.
- Joined
- Jan 9, 2020
- Messages
- 10,377
- Points
- 938

It's a pleasure my friend! The instructions call for the scribing of the gunports and cutting out the hole for the rudder much later, but I just found that it is a lot easier doing it when the stern frame is not attached to the hull. 
Good morning Jan- you have experience advice from Heinrich for sure- my 2 cents- maybe test some spare wood with oils vs various stains and how many coats of stain. I found if you apply stains lightly they don’t get too dark (can be variable shade tho.) pity you won’t see the hatches they look good. CheersThe Small Hatch.
View attachment 291530
I chose to use the "nails" versus lifting hook eyes to "hold" the planks. On the large hatch I used nail heads from the nails included in the kit, for the smaller hatch I used 10mm nail heads.
I tried a dry fit on deck "A" to aline both hatches with the markings on the deck. Viola, I think I've got this part right.
View attachment 291532
Since the hatches more or less won't be exposed because of the upper deck, how do I finish them. Stain, Linseed oil, ???
Jan
That is good advice. I don’t have any experience with using oils and stains. My inventory of that stuff is woefully lacking. So it’s mask up and off to the hardware store.Good morning Jan- you have experience advice from Heinrich for sure- my 2 cents- maybe test some spare wood with oils vs various stains and how many coats of stain. I found if you apply stains lightly they don’t get too dark (can be variable shade tho.) pity you won’t see the hatches they look good. Cheers
One thing about using stains - most have you stain, let it soak for a period of time, then its wiped back off. The time left on the wood determines the darkness or shade. The best thing to do if you're not sure of the outcome is to apply it scrap pieces and decide from there.Good morning Jan- you have experience advice from Heinrich for sure- my 2 cents- maybe test some spare wood with oils vs various stains and how many coats of stain. I found if you apply stains lightly they don’t get too dark (can be variable shade tho.) pity you won’t see the hatches they look good. Cheers
Last edited:
Thank you for that information, I‘ve not done a lot of staining or painting. My knowledge and experience on that particular endeavor is close to zero.One thing about using stains - most have you stain, let it soak for a period of time, then its wiped back off. The time left on the wood determines the darkness or shade. The best thing to do if you're not sure of he outcome is to apply it scrap pieces and decide from there.
Jan
Good news and not so good news. The Hardware stores shelves were just like Mother Hubbards cupboard. Lack of stock and Covid related supply chain problems.
I did find this (one of two on a mostly empty shelf).
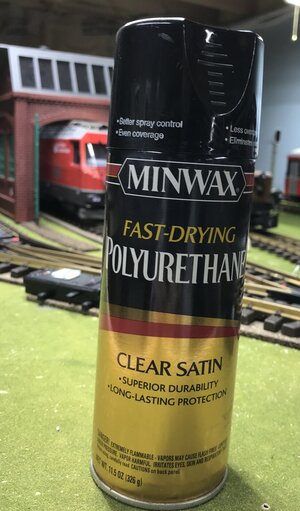
Four quick passes about an hour apart and twenty four hours of drying and I have this result.
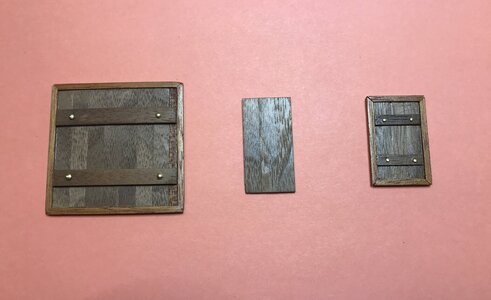
The piece in the middle of the hatches was my test piece. I'm happy with the outcome.
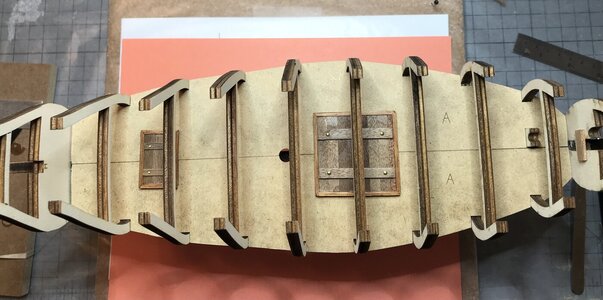
Only the 1:50 crew and the ships cat will see the hatches. But Heinrich and I know that this small build piece was worth the effort.
Jan
I did find this (one of two on a mostly empty shelf).

Four quick passes about an hour apart and twenty four hours of drying and I have this result.

The piece in the middle of the hatches was my test piece. I'm happy with the outcome.

Only the 1:50 crew and the ships cat will see the hatches. But Heinrich and I know that this small build piece was worth the effort.
Jan
- Joined
- Jan 9, 2020
- Messages
- 10,377
- Points
- 938

Those hatches look fantastic Jan!  And you are so right about that being a worthwhile [art of the build - I found that very satisfying and once you have planked the deck around them, you will be even happier!
About my kit being an earlier version - you are right! About 426 years earlier !!!
 And you are so right about that being a worthwhile [art of the build - I found that very satisfying and once you have planked the deck around them, you will be even happier!
 About my kit being an earlier version - you are right! About 426 years earlier !!!


