This week-end, I will start on my first "big" ship. The last one I did was about four year ago, a Heller Jean de Arq. Can't recall the scale but it was minute. Did enjoy it though. This time I think I would like to do something from the Kriegsmarine - just out of respect for my german roots and interest in WWII. Really looking forward to the process. And yes it takes me a while to decide on a model.... Will keep you all posted.

You are using an out of date browser. It may not display this or other websites correctly.
You should upgrade or use an alternative browser.
You should upgrade or use an alternative browser.
Well good day to all.
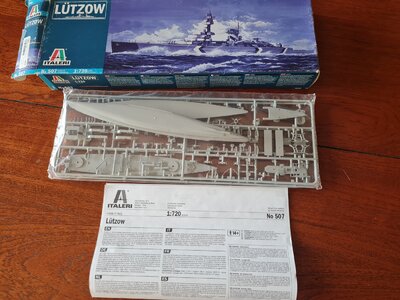
As an introduction to building scale ships, I have decided to do the Italeri 1/760 Lutzow. I did the unboxing this morning and started on cleaning up the hull and added a few bits to the lower part of the hull (part #2), eight of them I think they are there to hold the upper part of the hull in place?
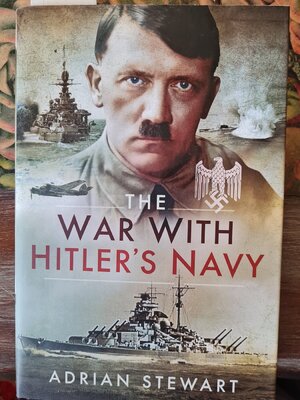
I have also started to read At war with Hitler's navy just to introduce myself to a bit of history around the Kriegsmariene. If I understand correct then the Lutzox was a Deutcshland class ship, and also had the name Deutcschland until it was changed by A.H...?
Progress on this buit will be slow, as the whole build does not come naturally to my hand. Been busy for to long with little panzers and figures. But I suppose the as the fear and apprehension subsides the fun experience will increase .
.
So .....what do I do regarding rails in this scale?
As an introduction to building scale ships, I have decided to do the Italeri 1/760 Lutzow. I did the unboxing this morning and started on cleaning up the hull and added a few bits to the lower part of the hull (part #2), eight of them I think they are there to hold the upper part of the hull in place?
I have also started to read At war with Hitler's navy just to introduce myself to a bit of history around the Kriegsmariene. If I understand correct then the Lutzox was a Deutcshland class ship, and also had the name Deutcschland until it was changed by A.H...?
Progress on this buit will be slow, as the whole build does not come naturally to my hand. Been busy for to long with little panzers and figures. But I suppose the as the fear and apprehension subsides the fun experience will increase
.So .....what do I do regarding rails in this scale?
Attachments

Ettienne,
you can get 1/700 Photo Etched railings ( the scale of this model is 1/720 ), the difference is not noticeable! - that is further down the road. You may want to paint the lower hull & upper hull separately, it will save a lot of masking! If you can, assemble bits in 'modules' Ie turrets, funnels, bridge , so you can add small parts & detail paint with easier access. I have seen modellers assemble complete models without any paint, then paint afterwards, which seems to be making difficulties, without any advantage!
totsiens!
Dave
David thank you for your input. Some very good ideas and advice. It seems that if the upper hull and the lowe hull are joined one may end up with a seam that may need some work, i.e. filling and sanding. Or was there a prominent seem or at least a seam there anyway? Then, I was looking at the rigging of the Lutzow, would there be a diagram to show how the rigging looked? FYI - I am planning to do an earlier rendition of this ship.
Ettienne,David thank you for your input. Some very good ideas and advice. It seems that if the upper hull and the lowe hull are joined one may end up with a seam that may need some work, i.e. filling and sanding. Or was there a prominent seem or at least a seam there anyway? Then, I was looking at the rigging of the Lutzow, would there be a diagram to show how the rigging looked? FYI - I am planning to do an earlier rendition of this ship.
I would dry fit ( ie trial fit without glue ) the top & bottom hull, to see if they need any attention - if at all prepare the edges to remove any irregularities. Doing this before gluing can save a lot of time & effort. Edge preparation can show up problems before the glue is applied. There shouldn't be a prominent seam at the waterline, just a narrow painted band ( boot-topping ).
Rigging is more difficult, you will probably have to look for contemporary pictures, the only drawing I could find is rather rudimentary........................

I think the early 'Deutschland' carried a Heinkel 60 biplane - they were replaced by the Arado 196 in 1939, I don't know what the Italeri model supplies......................... In 1941 the bows of the ship were altered, again I don't know which form the Italeri model is! It's best if you can find a good contemporary photo & stick to that as reference. At times, you can find looking for information can take longer than actually making the model!
Are there any good model shops local to you? I used to visit The RSA, when I was in the Merchant Navy - Capetown, East London, Port Elizabeth, Durban & even Walvis Bay ( this was in the 70s/80s )
Dave
David thank you for assissting me through this built. Think I will sit down and do a bit of researh - a part of model building that I actually like. We have good shops around, but not here in Bloemfontein. Have to rely on ordering from their sites and courier services. Will come back to you on the aircraft. The one included in the Italeri kit is a bi-plane, so could it actually be the Heinkel 60...? Thank you for the rigging diagram. I grew up not too far away from Cape Town about 40 km. My father took us quite often to see the navy ships anchored/moored in the CT harbour. And from time to time we also popped over to Simonstown to watch the navy exercises with Buccaneers, and litlle Wasps and all. I see that you are from Gloustershire - went there for a working week-end when I was employed by the NHS from 2003 to 2007.
Ettienne,David thank you for assissting me through this built. Think I will sit down and do a bit of researh - a part of model building that I actually like. We have good shops around, but not here in Bloemfontein. Have to rely on ordering from their sites and courier services. Will come back to you on the aircraft. The one included in the Italeri kit is a bi-plane, so could it actually be the Heinkel 60...? Thank you for the rigging diagram. I grew up not too far away from Cape Town about 40 km. My father took us quite often to see the navy ships anchored/moored in the CT harbour. And from time to time we also popped over to Simonstown to watch the navy exercises with Buccaneers, and litlle Wasps and all. I see that you are from Gloustershire - went there for a working week-end when I was employed by the NHS from 2003 to 2007.
I think it used to be a Sunday afternoon tradition for families to come down to the Cape Town docks to see the ships - we used to talk to quite a few, as they strolled by!
I think the Kriegsmarine only ever used the Heinkel 60 floatplane on their ships - so that sounds OK.
I'm in South Gloucestershire, in a small village on the edge of the Cotswolds - ideal retirement area!
Dave
Yes, Sundayafternoons indeed David.
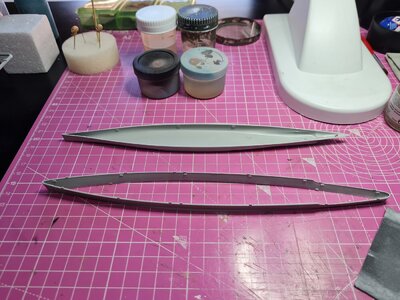
Today the deck parts were joined to the upper hull and the two hull halves were also joined - despite cleaning up the two halves it still ended up with a prominent joint line. But nothing a slight brush of putty cannot fix - I hope. Not a real challenge when you are used to filling up the gaps between the wingroots and fuselage when building aircraft.
But still, I wanted the joint a bit more perfect. The fit at the bow is not a 100% either. But onwards it is. Going to let the glue dry for a few hours and continue tomorrow.
Today the deck parts were joined to the upper hull and the two hull halves were also joined - despite cleaning up the two halves it still ended up with a prominent joint line. But nothing a slight brush of putty cannot fix - I hope
. Not a real challenge when you are used to filling up the gaps between the wingroots and fuselage when building aircraft.But still, I wanted the joint a bit more perfect. The fit at the bow is not a 100% either. But onwards it is. Going to let the glue dry for a few hours and continue tomorrow.
Attachments
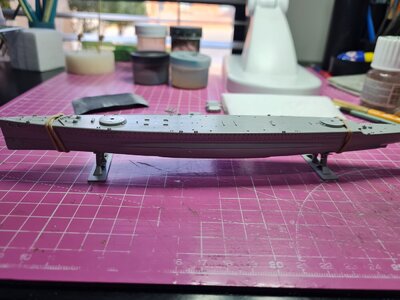
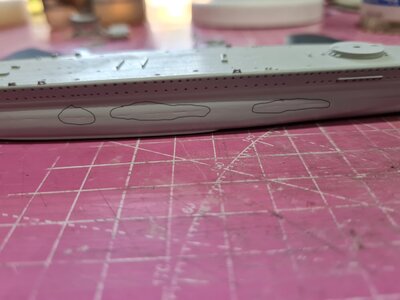
Continued some work with joining the two hulls. This involved quite a bit of filling and sanding, and filling and sanding ... Despite cleaning up the two halves, the joint was not good. I think it may be the concept of the way the two halves is joined, not really a good idea from Italeri. Perhaps the two parts were ever so slightly warped?
While waiting for the joint to dry I have started drilling out the guns - quite a challenge in 1/700 scale.
In retrospect, the Italeri kit was perhaps not the best kit as a "starter" kit. All the parts have significant flash to clean up and injection marks, at times in quite obvious places... but we will continue.
Attachments

Ettienne,
The Italeri Model dates back to the late70's/early 80's - having been reboxed several times! So the moulds are over 40 years old! A good reference site for plastic models is https://www.scalemates.com/kits/italeri-507-dkm-luetzow--1007543 - it lists the vast majority of kits & info on them, including dates & various boxings. Some listings have reviews attached & some even have the instructions as a download ( not all! ). It's always my first reference, when I'm considering buying a model ( it lists all other genres of plasic kits, as well, cars, aircraft, tanks etc )
Dave
Did some more filling and sanding work on the hulle. Some improvements were noted. I hope that some more painting can mask some of the blemishes (not the way I like to do things, but at some point one should say that "this is the best I will get it").
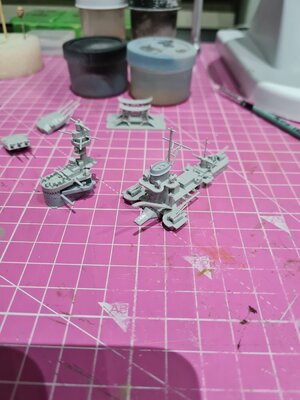
Spent a hour or so on assembling some smaller parts, mainly parts of the superstructure (that what one will call it ?) and bridge (?). As Dave said, it is an old kit and need a lot of TLC.
Parts #9 and #10, #51 (AA guns), #25, #26 were cleanded up, assembled and some work was done on #22. Had quite some fun.
Attachments

Ettienne,
I reckon the way the model was split was to enable the model to be completed as full hull, or waterline. Personally, I prefer waterline, the ship can be seen as she should be - afloat!, but it's nice to have the option
Dave
I reckon the way the model was split was to enable the model to be completed as full hull, or waterline. Personally, I prefer waterline, the ship can be seen as she should be - afloat!, but it's nice to have the option
Dave
Kurt Konrath
Kurt Konrath

Sometimes having a lower quality kit you have to WORK on to get a quality final product makes you appreciate the new breed of higher quality kits available.Continued some work with joining the two hulls. This involved quite a bit of filling and sanding, and filling and sanding ... Despite cleaning up the two halves, the joint was not good. I think it may be the concept of the way the two halves is joined, not really a good idea from Italeri. Perhaps the two parts were ever so slightly warped?
While waiting for the joint to dry I have started drilling out the guns - quite a challenge in 1/700 scale.
In retrospect, the Italeri kit was perhaps not the best kit as a "starter" kit. All the parts have significant flash to clean up and injection marks, at times in quite obvious places... but we will continue.
Of course we still have the old saying, you get what you pay for!
I have build planes and model railroad kits where quality control was not great in design or production.
Have fun with the build, and if the task at hand gets frustrating, set it down, take a break, do research or work on another part of the construction.
You don't want to have frustrations build up to point you stop all together! I speak from experience here, ended up with several year break in my model work.
Best of wishes on the ship.
Thank you Kurt, good advice.Sometimes having a lower quality kit you have to WORK on to get a quality final product makes you appreciate the new breed of higher quality kits available.
Of course we still have the old saying, you get what you pay for!
I have build planes and model railroad kits where quality control was not great in design or production.
Have fun with the build, and if the task at hand gets frustrating, set it down, take a break, do research or work on another part of the construction.
You don't want to have frustrations build up to point you stop all together! I speak from experience here, ended up with several year break in my model work.
Best of wishes on the ship.
Yes, it takes a lot of work, but I really enjoy the new experience. Will push through, but this week-end I will take a break and do something different.
Well after a break in the Drakensberg I resumed the building process.
I did some work on to structures, and believe me, it took a lot of time as there were quite a number small little parts. The process is slow, but there is progress. I am not well aquinted with ships and all the different models available, but Italeri succeeded in putting quite a bit of detail on this kit.
Tomorrow,I will start to do some paintwork on the hull - some masking ahead there... And then a break. Put in about two to three hours today.
Attachments
Kurt Konrath
Kurt Konrath
The structure detail work looks good, keep going as you feel and one day you will be done, and have a grand ship to display.
Good morning from a sunny Bloemfontein,
It has been a while since I have posted something about my shipbuilding process.
The past week or so, I have spent time on painting and putting together the hull and the superstructure and adding other little bits and pieces, i.e. masts, guns etc. I must confess I have lost one of the cranes during the painting process - the carpet monster apparently got it . So I am contemplating schratchbuilding one or just leaving it of.... (it went in for repairs perhaps?)
Regarding the boot stripe, as per opinion on some sites I have opted not to use black, but rather a dark greay (Tamiya Panzer Grey), but after painting the upper hull (Humbrol Dark Sea Greay) the contrast between the two shades of grey was much less than expected. But in this case as well I am going to leave it like it is. Have learned a lesson though when doing the next ship.....
Today I am planning to work a bit on the minute Heinkel He 60 (??), adding the rest of the AA guns and the life boats. Then we are almost there. What is awaiting is painting of small parts, a wee bit of weathering and still wondering whether I should schratch build the one crane.
Oh and then thge rigging, or at least some of it.
Etched railings were ordered, but they will take months before they will arive.
It has been a while since I have posted something about my shipbuilding process.
The past week or so, I have spent time on painting and putting together the hull and the superstructure and adding other little bits and pieces, i.e. masts, guns etc. I must confess I have lost one of the cranes during the painting process - the carpet monster apparently got it
. So I am contemplating schratchbuilding one or just leaving it of.... (it went in for repairs perhaps?)Regarding the boot stripe, as per opinion on some sites I have opted not to use black, but rather a dark greay (Tamiya Panzer Grey), but after painting the upper hull (Humbrol Dark Sea Greay) the contrast between the two shades of grey was much less than expected. But in this case as well I am going to leave it like it is. Have learned a lesson though when doing the next ship....
.Today I am planning to work a bit on the minute Heinkel He 60 (??), adding the rest of the AA guns and the life boats. Then we are almost there. What is awaiting is painting of small parts, a wee bit of weathering and still wondering whether I should schratch build the one crane.
Oh and then thge rigging, or at least some of it.
Etched railings were ordered, but they will take months before they will arive.
Attachments

These old Kits weren't the best quality it is from 1977 so the moulds are not the best at all.
Für further details of the sprue's History you can look here:
 www.scalemates.com
The Kit ist self will nat glue itself together as with modern Kits - Just Look around in the web for pictures - especially on Russian naval web sides there are a plenty of pictures to be found.
The sides maybe repairable with a good putty on sanded ground so the putty has GRIP - I used parallel cuts with a knife also successfully and only sanded rectangular to the knife's directions. (So sometimes glueing a 0,4mm pice of plastic Sheet in there and fill the Rest makes Life easier...)
Hope this helps a Bit.
Für further details of the sprue's History you can look here:
Lützow, Italeri 507 (2016)
www.scalemates.com
The Kit ist self will nat glue itself together as with modern Kits - Just Look around in the web for pictures - especially on Russian naval web sides there are a plenty of pictures to be found.
The sides maybe repairable with a good putty on sanded ground so the putty has GRIP - I used parallel cuts with a knife also successfully and only sanded rectangular to the knife's directions. (So sometimes glueing a 0,4mm pice of plastic Sheet in there and fill the Rest makes Life easier...)
Hope this helps a Bit.
Last edited:
Thanks for the heads up Chris, much appreciated.These old Kits weren't the best quality it is from 1977 so the moulds are not the best at all.
Für further details of the sprue's History you can look here:
Lützow, Italeri 507 (2016)
The Kit ist self will nat glue itself together as with modern Kits - Just Look around in the web for pictures - especially on Russian naval web sides there are a plenty of pictures to be found.
The sides maybe repairable with a good putty on sanded ground so the putty has GRIP - I used parallel cuts with a knife also successfully and only sanded rectangular to the knife's directions. (So sometimes glueing a 0,4mm pice of plastic Sheet in there and fill the Rest makes Life easier...)
Hope this helps a Bit.
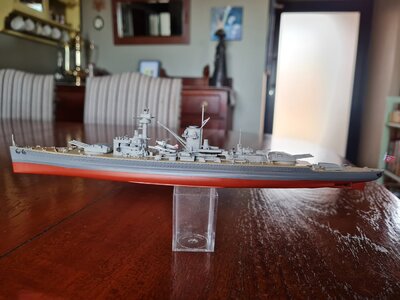
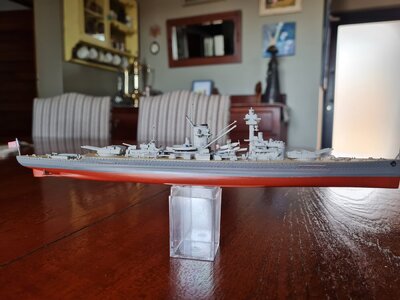
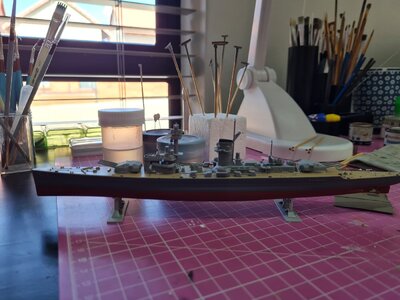
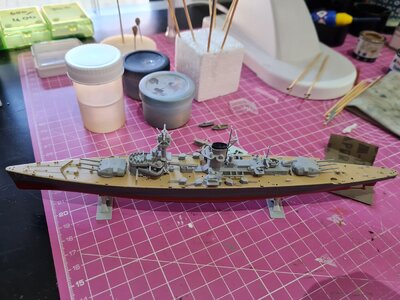
Most of the construction work and paint work are now done. What is left is to add some rigging, weathering and when the etched rails arrive (eventually) to add them.
I would like to add some light weathering as well - any ideas to make it look more realistic?
Up to now the build had its challenges - gaps to fill, a quite prominent seam along the hull to fill and clean and numerous injection marks to clean up. But it is quite an old mould.
The building process will be interrupted from this coming Friday by a lenghty leave in the Western Cape.