La Couronne Corel/scratch 1:100 First build [COMPLETED BUILD]

Nobody makes teeny tiny shoe blocks for martnets? Make'em yourself! Eight blocks supplied by Corel were turned into eight 4mm shoe blocks for the martnets. These will link front and rear martnet lines to the fall line used to raise the leeches of the sail for furling. A shoe block is a block with two sheaves, one at each end, which are at right angles to each other. I needed eight of them, four for the fore lower sail and four for the main lower sail. You hold the tiny block with forceps and sand them to shape using a sanding stick until they look proper.

1601940376235.png

1198 Make Shoe Blocks from 4mm Blocks for Martnets.jpg
 
Last edited:
This is my third time today working on La Couronne. Just can't stop. Rigged the fore yard lifts. The lines are tied to the belaying pins, then run up through the pennant blocks hanging from the top, then outboard through violin blocks on the end of the yard, then tied off back at the pennant block strops. There are plenty of pins on the forecastle deck fiferail that went unused because the clew lines for the three sails above were re-routed to the rail at the front of the forecastle, according to the Vincenso Lusci rigging plan. The Corel rigging plan ran the clew lines the fiferail. I will run the clewlines for the main mast sails to the main fiferail, which conforms to both Corel and Lusci's rigging plans. For the fore sails, either method works.

1199 Belay Fore Yard Lifts on Fiferail.jpg

1200 Rig Fore Yard lifts.jpg
 
Love your effect on the sails, guess you now constantly have to check if the door is closed as you see the wind in your sails.
The stretchy fabric and starch used really make them look like there is wind behind them. The starch makes the fabric quite stiff. It's a beautiful effect. The bowlines are important because they draw the sails forward so that the tension on the sheets is taut, which helps with illusion of wind.
 
The drabbler is a second extension of the lower sail and it attached to the foot of the upper sail extension, the bonnet, by lacing. The fact that I mistook the drabbler lacing for a reefing band on the fore and main lower sails has bothered my for some time. So, before work progresses any farther on the fore lower sail, I hand stitched the proper lacing stich onto the sail. Even though the lacing and bonnet should be separate parts, I did not make them separate like the seam between the bonnet and the lower sail itself. Because the bonnet-to-sail seam appears too thick and large, containing within it two bolt ropes, I will probably not make separate sail parts on the next ship model and instead simulate the lacing and seam. That will appear more in scale for a model than trying to duplicate all the intricacies of the bonnet and drabbler connections.

1201 Hand Stitched Drabbler Lacing.jpg
 
The martnets and the bridals for the fore lower sail are finally finished. The 2mm blocks from Falkonet in Russia are absolutely essential to such small detail work and I can't praise them highly enough. Before bending the sail to the yard, the leech lines for all eight martnet bridal sets will be attached to the belaying pins on the fiferail behind the foremast and routed through blocks attached to the forestay collar.

1202 Foresail Martnets and Bowline Bridals Complete.jpg

1203 Bowline Bridal Complete.jpg

1204 Foresail Martnets and Bowline Bridals Rear Side.jpg
 
A double fairlead for fore tack lines was fashioned from a stick of walnut. It was filed and dremeled to shape, glued to the underside of the knee of the head, and varnished. To prepare for being the lower fore sail, the two tack lines are attached to the forecastle siderails at the forward corners and routed through the double fairlead. The ends will hand loose until the the sail is bent to the yard and all the clewlines, leechlines with martnets, bowlines, have been rigged. The use of a double fairlead is typical of early 17th century vessels. The rigging arrangement of the tack lines changed in the mid 17th century.

1205 Fabricate and Attach Doouble Fairlead to Knee of the Head.jpg

1206 Route Fore Tacks from Forecastle Thru Fairlead.jpg
 
A double fairlead for fore tack lines was fashioned from a stick of walnut. It was filed and dremeled to shape, glued to the underside of the knee of the head, and varnished. To prepare for being the lower fore sail, the two tack lines are attached to the forecastle siderails at the forward corners and routed through the double fairlead. The ends will hand loose until the the sail is bent to the yard and all the clewlines, leechlines with martnets, bowlines, have been rigged. The use of a double fairlead is typical of early 17th century vessels. The rigging arrangement of the tack lines changed in the mid 17th century.

View attachment 184059

View attachment 184060
It looks like a spider web.
 
It looks like a spider web.
It sure does. It's why I chose to build an early 17th century vessel over 18th-19th century vessels that tend to all look alike and are more utilitarian in style. Take a look at these mid 17th century French drawings. Look at the martnets hanging loose from the furled mainsail, the crowsfeet at the end of the mizzen sail lifts, topmast stays, topgallant stays, spritsail topmast stays, and the draping bowlines routed through blocks on the stays. It's getting pretty crowded to work on running rigging at this late stage, even with tools. Once you are familiar with all the types of lines on a square rigger, drawings like this are your only existing source to show you where the lines were typically rigged. As you build your model, you can pick out many individual lines from them and verify the correct typical location of their route, and the general location of where they are belayed. You can locate some specific locations for certain blocks like the ones that the lifts pass through on the masts before they pass down to the deck, blocks tied to the stays and which bowlines pass through them, brace blocks on the stays, etc.

Here's a new one I didn't notice before. Look at how the bowlines are stored when the lower fore sail is in use and the bowlines are not being used. They are detached from the sail cringles and the ends of the bridles are tied to the yard. The lines are left hanging there loose, just like how they are stored when the main lower sail is furled. It tells you that when sailed are deployed, bowlines may be stored and not attached to the sails. I guess they weren't worried about getting them tangled in the wind. The topsails show their bowlines deployed and in use. Fascinating! It's nice of the French to have labelled all the bowlines, so I don't get then confused with the leechlines and martnets, which do not appear on these drawings. The drawings only show running rigging that operates the sails, not rigging that is used to store or deploy the sails (furl and unfurl). Even the reef points are not shown.

All this rigging looks impossible complicated when viewed as a whole, but when you step through construction of each type of line, categorized by function, and use R.C. Anderson's The Rigging of Ships in the Days of the Spritsail Topmast, 1600-1720 along with original prints of drawings like these, it all makes sense. You rig each type of line by function to keep it all straight in your head, with the same pattern for each mast. Plus, you can also draw upon the kit instructions as verification, but understand that they are also guesses on the part of the model manufacturer, so trust your own research sources first. This is my first fully rigged ship model, so it definitely will be much easier on the next model. Just learning all the lines, styles of rigging between nations and time periods, and period ship's features has been an huge but rewarding education. And, the next ship is always better...

Couronne_Fournier FULL SIZE.jpg

Couronne_Fournier.jpg
 
Last edited:
Did you know that the Couronne was the first ship build purposely as a war ship by the French?
Before that they where using conversion of merchant ship or purchasing from other country.
Also the wood used to build her came from a forest of a noble that was not friendly to the king and he almost not paid for it (and that noble he was not very happy about it), in fact the king used all the wood of that forest on subsequent ship with almost not paying for it.:p
It's told that an entire forest was used to build La Couronne. And you wonder why Americans rebelled against a monarchy in 1776.... ;)
 
Here is a quick step-by-step on how to tie a line to a belaying pin located in a rather inaccessible area behind the shrouds. In this case, the starboard fore course brace line, tied to the third pin on the rail from the rear end of the forecastle. In a few cases, I can use my fingers to hold line tension while applying some glue between steps to hold the line in place as it is belayed the pin.

Step 1 - Cut a length of line about 15 cm longer than you estimate you'll need. Line is cheap. Take one end of the line, and pinch a loop. Fish it under the the rail and hook it around the lower pin.
1207 Tying a Belaying Pin - 1 - Run Loop Under pin.jpg

Step 2 - While holding the loop in place with slight tension with one hand, use a dental pick in your other hand to apply some CA glue to the bottom pin to hold to cement the line there. Below you can see that the line stays in place after the CA dries and you let go of it.
1208 2 - Apply CA Glue to Hold it in Place.jpg

The pattern the line will follow will look like this, as viewed from the forecastle deck.
1602293650538.png

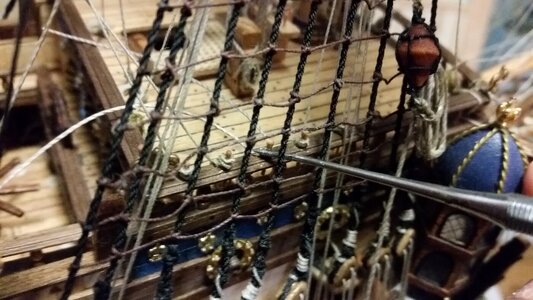
Step 3 - You will be belaying the short length of line to the pin. The long length will be routed up through block and tied to the yard later, so it lays on the forecastle for now. Using needle nose pliers in one hand to hold the end of the line, hook the line with a hooked dental pick in the other hand and pass the line over and around the top pin. Below, a straight pick was used to hold the line in place with my right hand, allowing me to remove the pliers and grab the CA glue bottle.
1209 3 - Hook Short Line Around Upper Pin.jpg

Step 4 - After grabbing and holding the loose end of the line with the pliers again, I apply some CA glue to the upper pin with the dental pick. Once the glue takes hold, I can let go wit the pliers again, and use that free hand to take the picture below.
1210 4 -Apply CA to Upper Pin With Pick.jpg

Step 5 - While holding the end of the line with pliers, draw the line downward, and with your other hand, use the hook to draw a loop once again under and around the bottom pin, and put some tension with the plier to hold the line in place while you extract the hook.
1211 5 - Loop Line Around Bottom Pin Again.jpg

Step 6 - Apply CA glue again to the bottom pin and the line there. When it is dry, you can let go of the pliers holding the tension.
1212 6 - Apply CA to Bottom Pin Again.jpg

Step 7 - While holding the end of the line with pliers, snag the standing part with a dental hook and rotate the hook to form a loop, or bight. This bight, when slipped over the top pin, should be oriented such that the bitter end lies beneath the loop in the line, thus trapping it. Getting the correct direction to spin the hook and form the bight takes a bit of practice. If you accidentally release the line, the entire line you've tied thus far will unravel, because you glued all the passes around the pin, so there's no need to panic.
1213 7 - Hook Line and Rotate to Form Loop and Place Over Top Pin.jpg

Step 8 - Tug the loose end of the line downward toward the deck to tighten the last bight on the belaying pin, but be gentle.
1214 8 - Tighten by Pulling Downward .jpg

Step 9 - Apply a drop of PVA glue to prevent it from untying itself. Remove excess glue and allow to dry. The line is now secured to the belaying pin.
1215 9 - Apply PVA Glue.jpg

Step 10 - If you don't have these by now, buy them. These are Fisker's scissors. They are small, razor sharp, and the tips can cut line so close a knot that you cannot find the bitter end afterward.
1216 10 -Get Small Fisker Scissors.jpg

Step 11 - This is where you cut off the excess line. Tip: ALWAYS insert the scissors through previous rigging with the blades CLOSED until the tips are at the location where you wish to make your cut. Otherwise, the simple act of inserting the scissors will easily slice through rigging lined. So, bearing that in minded grab the end of the excess line with pliers, and insert the scissors, and open them a tiny bit, just enough to cut the excess line off.
1217 11 - Careful Cut Off Excess Line.jpg
 

Attachments

  • 1209 3 - Hook Short Line Around Upper Pin.jpg
    1209 3 - Hook Short Line Around Upper Pin.jpg
    214.2 KB · Views: 7
Last edited:
The fore course was finally bent to the yard, tied to the yard with gaskets.
1219 Bend Fore Sail to Yardarm.jpg

After belaying the lines to the belaying pins using the technique described previously, The fore course brace lines were routed through blocks on the main stay, then through the brace pendant blocks, then tied off back at the main stay. The braces for all three sails on the fore mast hold the yards at the desired angle, relative to the wind direction. On the model, the lower shrouds put some pressure on the yardarms, trying to push them back to a central position, and the braces counteracted this.

Fore course brace lines tied off to the main stay.
1229 Tie Ends of Fore Course Braces to Main Stay Line.jpg

Two buntlines were rigged to the fore course sail. The lines start at the belaying pins on the side rails of the forecastle, third pin back from the front corner of the forecastle. The lines are run up behind the sail through blocks tied to the fore stay collar, then down across the front of the sail to foot. The then pass through thimbles on the foot of the sail, simulated with loops of thick black line, and outboard along the foot where they are tied to the sail, typically at a cringle. I just tied them through the sail, around the bolt rope, because the cringle would be too small to see at this scale.
1230 Rig Fore Course Buntlines.jpg

The fore course clew lines were rigged. They were belayed near the 5th pin from the front, on the side rails of the forecastle. The line was then routed upward as shown.
1231 Rig Fore Course Clew Lines.jpg
 
The leechlines and bowlines were connected up today. R.C. Anderson commented in his book that the way most ship plans show the martnets will not work, because when you draw the leechlines in, the blocks joining the front and rear bridals run up against the block located under the top, resulting in the leech of the sail only being drawn halfway up, not far enough forth sailors to furl the sail properly. He suggested an alternate method of rigging the martnets and leechlines, which I have used, and which will function properly, although there is no historical source to support this method. On each side of the sail, I used 3mm triangular deadeyes for the martnet bridals. These where linked together with a section of rope that passes through a 2mm single block at the end of the fall of the leech line. This line passed through a show block resting on the top of the yardarm to the 2mm block for the martnets on the opposite side of the sail. To draw the shoeblock up and toward midships, a leech line is used and runs as follows. Starting at the side rail of the forecastles, four belaying points back from the front corner of the forecastle, the line end is belayed to the rail. From there it runs up behind the yard to a single block attached to the trestle tree under the top, inboard of the clew line pendant. The line then passes outboard and through the shoeblock, then back, ending at an eyebolt on the bottom of the top. There is no historical source that mentions where the leechline is tied, but it seemed logical to attached it back under the top.

Since the showblock is located halfway out toward the tip of the yard, drawing the leech line will draw the shoe block in and up to the underside of the top, and the leech of the sail will be drawn in far enough for the topmen (sailors) to gather the fabric in the process of furling.

Six sets of bowlines bridals, with three bridals in each set, were connected to the bowlines previously run from their belaying points. There are upper, middle, and lower bowlines, corresponding to the three sections of the sail, the sail proper, the bonnet, and the drabbler at the very bottom. I am really glad these are done making the bowlines and the leechline martnets took many hours. All that is left for rigging the fore course is attaching the tacks and rigging the sheets to the clews of the sail. Then rigging work begins all over again on the main mast.

1223 Fore Course Leech and Bowlines Front view.jpg

1224 Fore Course Bowlines.jpg

1225 Fore Course Leechlines and Martnets on Rear Side.jpg

1226 Progress So Far 46.jpg
 
Back
Top