I am asking for leads for a thin-wall brass tube cutter that will handle tubes less than 1/8" which seems to be the small end limit that I have found. 1/16" may be acceptable but smaller OD if possible. Thanks for any and all suggestions and leads as I want to move from my filing/sawing and trimming approach. Rich (PT-2)
-

Win a Free Custom Engraved Brass Coin!!!
As a way to introduce our brass coins to the community, we will raffle off a free coin during the month of August. Follow link ABOVE for instructions for entering.
-

PRE-ORDER SHIPS IN SCALE TODAY!
The beloved Ships in Scale Magazine is back and charting a new course for 2026!
Discover new skills, new techniques, and new inspirations in every issue.
NOTE THAT OUR FIRST ISSUE WILL BE JAN/FEB 2026
You are using an out of date browser. It may not display this or other websites correctly.
You should upgrade or use an alternative browser.
You should upgrade or use an alternative browser.
Hello Rich,
If you have Byrnes or Proxxon table saw, you might try these so called slitting saw blades, which are thin and fine toothed ones made of HSS. They will cut thin brass and copper tubing like a dream. One very good source to get them:
 knupfer.info
If you have Byrnes or Proxxon table saw, you might try these so called slitting saw blades, which are thin and fine toothed ones made of HSS. They will cut thin brass and copper tubing like a dream. One very good source to get them:
Sägeblätter
KNUPFER Modell - und Feinwerktechnik | Feine und feinste Modellschrauben und Verbindungselemente für den anspruchsvollen Modellbau und Industrie.Hi Rich,
Totally agree with Moxis.
Cheers,
Stephen.
Totally agree with Moxis.
Cheers,
Stephen.
If the brass tubes are round and the wall is 0.1 mm thin I think you can also just roll it on a cutting mat with a scalpel so you make a small scratch all the way around and then break it with your hands. At least that is the method Albion Alloys suggest:
Hi,If the brass tubes are round and the wall is 0.1 mm thin I think you can also just roll it on a cutting mat with a scalpel so you make a small scratch all the way around and then break it with your hands. At least that is the method Albion Alloys suggest:
Thats the way I also do. It’s simular to the plummers with the big tubes and the rotating ‘wrech-knife’ with the sharp wheel running around the tube.
And with the tip of the knife you can scrape off any ‘braams’ on the inside. Or make a little inside bevel.
Regards, Peter
Last edited:
I tried doing this rolling groove method but was not able to keep the blade tracking and ended up with helix threads, over and over. The best that I obtained was not deep enough and crimped the tube into an elbow. I don't have a scalpel blade and the sharpest Xacto #11 does not work. Some thing is wrong in what I am using or doing. :-(( I'll keep experimenting in trying to get short 4 - 5 mm lengths with 2.5 mm thin wall brass tubing. RichHi,
Thats the way I also do. It’s simular to the plummers with the big tubes and the rotating ‘wrech-knife’ with the sharp wheel running around the tube.
And with the tip of the knife you can scrape off any ‘braams’ on the inside. Or make a little inside bevel.
Regards, Peter
Hi Rich,
Are you intending on making multiple 2.5 mm diameter tubes preferably all the same length?
To prevent crimping the end put a piece of rod up the tube to provide support.
Cheers,
Stephen.
Are you intending on making multiple 2.5 mm diameter tubes preferably all the same length?
To prevent crimping the end put a piece of rod up the tube to provide support.
Cheers,
Stephen.
I used the 2.5 mm tube with a 2.0 rod to make the vent pipe on top of the main cabin roof, filed the rod to get a 90 degree bend and then soldered that elbow to a short tube riser and the longer horizontal pipe with a soldered support piece. Having the old photo of that helped with the grey color as I originally had blackened the brass and had to paint over that. Fairleads that you mention may be the future now that you have mentioned those. Most fairleads are not much more than beads at our scale. Those would possibly be 1.5 mm at most. Previously I used a single turning block for that use leading the fall up to a belaying pin. I have seen that on Bluenose II deck photos also. I'll keep a tube in mind when as I want to get all of the deck items in place that I can now before access is obstructed. RichHi Rich,
Are you intending on making multiple 2.5 mm diameter tubes preferably all the same length?
To prevent crimping the end put a piece of rod up the tube to provide support.
Cheers,
Stephen.
You have to get a flat easy regular rolling. At the 1st starter not too much pressure and then you get the 1st groove. Like in the video, use the lines of the cuttingmat to stay angle.I tried doing this rolling groove method but was not able to keep the blade tracking and ended up with helix threads, over and over. The best that I obtained was not deep enough and crimped the tube into an elbow. I don't have a scalpel blade and the sharpest Xacto #11 does not work. Some thing is wrong in what I am using or doing. :-(( I'll keep experimenting in trying to get short 4 - 5 mm lengths with 2.5 mm thin wall brass tubing. Rich
And don't be to frugal with the blades. A pack of 100 costs little. Scalpel #11 with the flat cutting surface works best. See this link:
-> Scalpel 11 <-
The size of the blade and the handle must fit. Both size 3 of 4. The smaller ones you can use for precies cutting and carving.
Hopefully this will help you.
PS:
Be carefull with stiching the blade on the handle! I fold the alu open, leave the blade with the tip inside, set my fingers beside the alu and stich the blade in the opening till you hear the click.
Stiching a new one: use a old alu to fold over the old blade. With your thumb of you other hand, you click the end of the old blade up and push it from the blade.
And be carefull with the old blades. I collect them and before trowing away I fold them with tape.
The dirt processor doesn't have to cut his fingers.
Regards, Peter
Last edited:
I am sorry Rich I don't quite understand your answer,I used the 2.5 mm tube with a 2.0 rod to make the vent pipe on top of the main cabin roof, filed the rod to get a 90 degree bend and then soldered that elbow to a short tube riser and the longer horizontal pipe with a soldered support piece. Having the old photo of that helped with the grey color as I originally had blackened the brass and had to paint over that. Fairleads that you mention may be the future now that you have mentioned those. Most fairleads are not much more than beads at our scale. Those would possibly be 1.5 mm at most. Previously I used a single turning block for that use leading the fall up to a belaying pin. I have seen that on Bluenose II deck photos also. I'll keep a tube in mind when as I want to get all of the deck items in place that I can now before access is obstructed. Rich
I am happy you have fabricated components from brass tube and rod.
What I meant with the rod inside the tube is the rod gives support to help prevent crimping the tube while cutting.
I was going to suggest a simple jig if you needed to produce multiple pieces of tube.
I agree with Peter, scalpel blades are a great investment also so useful for so many modeling jobs, you cannot beat a fresh blade for lots of jobs, and if you buy a pack of 100 blades the overall cost per blade is quite low.
Cheers,
Stephen.
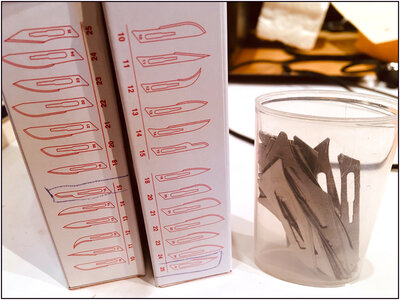
This are the blade numbers:

And you can collect the old blades also in a little jar. I use them later for putting some glue somewhere or other work that it to big for my fingers or tweezers.
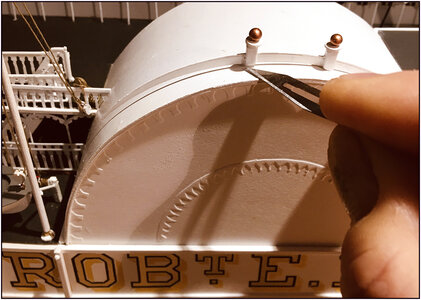
As now by putting some glue under the little ornament:

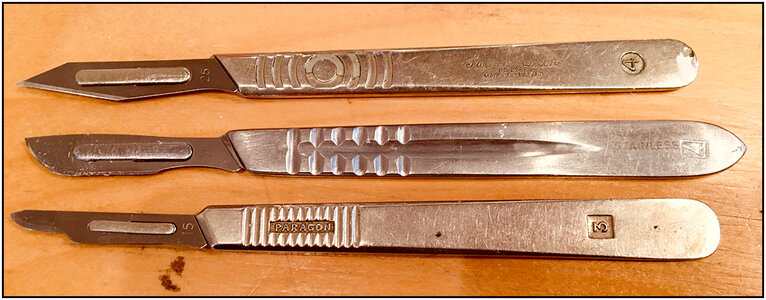
I use the most:-
handle #4 with scalpel #11 / #25 (flat) and #20 (curved),
handle #3 with scalpel #15 (tiny curved)

An investment that is multi functional.
Regards, Peter

And you can collect the old blades also in a little jar. I use them later for putting some glue somewhere or other work that it to big for my fingers
As now by putting some glue under the little ornament:

I use the most:-
handle #4 with scalpel #11 / #25 (flat) and #20 (curved),
handle #3 with scalpel #15 (tiny curved)

An investment that is multi functional.
Regards, Peter
Last edited:
- Joined
- Apr 21, 2018
- Messages
- 885
- Points
- 353

Consider these. Scalpel sharp but a very sturdy range with very little risk of blades snapping.
+Consider these. Scalpel sharp but a very sturdy range with very little risk of blades snapping.
Thanks to all of you for your recommendations and photos which will not be disregarded. Rich


