She’s looking very good Lawrence! 
- Home
- Forums
- Ships of Scale Group Builds and Projects
- Bluenose PoF Group Build
- Bluenose Group Build Logs
You are using an out of date browser. It may not display this or other websites correctly.
You should upgrade or use an alternative browser.
You should upgrade or use an alternative browser.
MY BLUENOSE- YUANQING SCALE 1:72 SCALE [COMPLETED BUILD]
Canoe21
Lawrence
Hello Dean, Yes we are slowly tying up all of the loose ends and she is also a bit more ship shape.She’s looking very good Lawrence!
Regards Lawrence
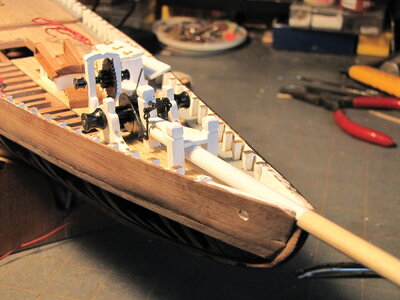
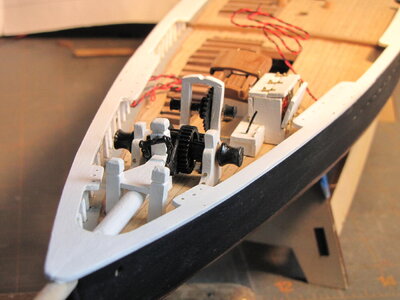
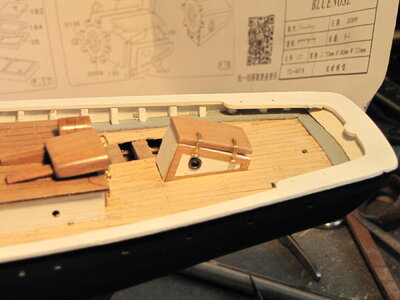
Good morning Lawrence. Congratulations on the lighting effect in the motor box. Stunning. All the little bits the little fellows have added is enhancing an already wonderful kit and build. Cheers GrantHello Ship Mates, Today has been a tidy up day in the Old Ship Yard for the little fellows and my self. Since we decided not to stain our decks this has led the way to glue and install all of the forward deck furniture. We have installed the ships windless, bow sprite, the forward companion way and the windless motor drive gears. We did install the windless motor in the motor box and also gave it a little Led Lamp. We also did the same for the companion way, and last but not the least we have finally installed the stairs to the upper deck. We have checked out our led lighting with only the starboard green lamp to add and the mast head light., these will be installed much later.
Regards Lawrence
View attachment 359501
View attachment 359502
View attachment 359503
View attachment 359504
View attachment 359505
Canoe21
Lawrence
Hello Grant, I thank you for your very kind words and nice comments. Yes the YQ-Bluenose has a lot of very nice features but we are adding a few of our own to make her one of a kind. The Led Lights will turn her into a nice night lamp.Good morning Lawrence. Congratulations on the lighting effect in the motor box. Stunning. All the little bits the little fellows have added is enhancing an already wonderful kit and build. Cheers Grant
Regards Lawrence
Canoe21
Lawrence
Hello Ship Mates, This AM while checking over our yesterdays pictures we discovered that the bow sprite saddle was sitting very much to high on the forward bits. After looking over the problem, we discovered that the Sampson post was not seated and being around 1/8" or 3.19mm to high. We loosened the glue and than reseat the sampson post, this corrected the problem
Regards Lawrence

Regards Lawrence

I agree with Paul: a Superb light in de motorbox to highlight the motor!Hello Ship Mates, Today has been a tidy up day in the Old Ship Yard for the little fellows and my self. Since we decided not to stain our decks this has led the way to glue and install all of the forward deck furniture. We have installed the ships windless, bow sprite, the forward companion way and the windless motor drive gears. We did install the windless motor in the motor box and also gave it a little Led Lamp. We also did the same for the companion way, and last but not the least we have finally installed the stairs to the upper deck. We have checked out our led lighting with only the starboard green lamp to add and the mast head light., these will be installed much later.
Regards Lawrence
View attachment 359501
View attachment 359502
View attachment 359503
View attachment 359504
View attachment 359505
Regards, Peter
Canoe21
Lawrence
Hello Peter, Thank you very much for your kind words they mean so much to me coming from you.I agree with Paul: a Superb light in de motorbox to highlight the motor!
Regards, Peter
Regards Lawrence
- Joined
- Sep 3, 2021
- Messages
- 4,207
- Points
- 688

With those lights you won't need any Christmas decorations for the next season!Hello Ship Mates, Today has been a tidy up day in the Old Ship Yard for the little fellows and my self. Since we decided not to stain our decks this has led the way to glue and install all of the forward deck furniture. We have installed the ships windless, bow sprite, the forward companion way and the windless motor drive gears. We did install the windless motor in the motor box and also gave it a little Led Lamp. We also did the same for the companion way, and last but not the least we have finally installed the stairs to the upper deck. We have checked out our led lighting with only the starboard green lamp to add and the mast head light., these will be installed much later.
Regards Lawrence
View attachment 359501
View attachment 359502
View attachment 359503
View attachment 359504
View attachment 359505
Canoe21
Lawrence
Hello Johan, I thank you for your very cheerfully words and comments. Yes that port side light was rather bright in my picture, I should have set them at a lower level, Sorry!With those lights you won't need any Christmas decorations for the next season!
Regards Lawrence
Canoe21
Lawrence
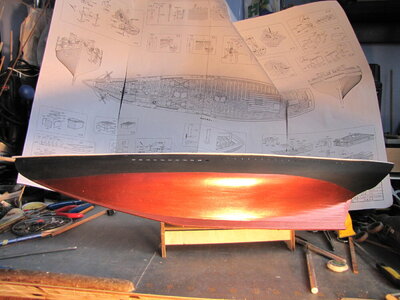
Hello Ship Mates, Well we finally got a copper bottom paint that we could live with and the little fellows and I re-painted the port side hull, we believe that it looks much better now. We also got up the nerve to install the main deck railings. Really it was not all that hard it was just the getting started, We did try to bend the monkey rail. We soaked it for around 1 hour and then applied some heat but disaster was about to happed, those laser bending lines were cut just too deep and it broke. Now we must saw out the two corner pieces in order for the monkey rail to go around the poop deck.
Regards Lawrence


Regards Lawrence


The base of the railing with the white paint looks nice, Lawrence. That Monkey rail is not easy to make and install. Fingers crossed…..Hello Ship Mates, Well we finally got a copper bottom paint that we could live with and the little fellows and I re-painted the port side hull, we believe that it looks much better now. We also got up the nerve to install the main deck railings. Really it was not all that hard it was just the getting started, We did try to bend the monkey rail. We soaked it for around 1 hour and then applied some heat but disaster was about to happed, those laser bending lines were cut just too deep and it broke. Now we must saw out the two corner pieces in order for the monkey rail to go around the poop deck.
Regards Lawrence
View attachment 360686
View attachment 360687
View attachment 360688
The ‘bottom color’ has now a warmer appearance.
Regards, Peter
- Joined
- Sep 3, 2021
- Messages
- 4,207
- Points
- 688

Dear Lawrence,We did try to bend the monkey rail. We soaked it for around 1 hour and then applied some heat but disaster was about to happed, those laser bending lines were cut just too deep and it broke. Now we must saw out the two corner pieces in order for the monkey rail to go around the poop deck.
A few months back I encountered the same issue. If you and your shipmates are interested, here's the link: https://shipsofscale.com/sosforums/threads/yq-bluenose-by-johan.8304/page-35#post-265949
- Joined
- Sep 3, 2021
- Messages
- 4,207
- Points
- 688

Although the color looks convincing, I still wonder how she looks when sitting upright. You scared me a bit when you talked about the copper paint. On the Bluenose my father left me, I used the paint as indicated by Billing Boats, leaving me with an unrealistic, very light color. My only excuse is I didn't know any better...Well we finally got a copper bottom paint that we could live with and the little fellows and I re-painted the port side hull, we believe that it looks much better now.
Canoe21
Lawrence
Hello Peter, Thanks for your very kind words, and also your warning on that up and coming monkey rail. Yes I do like this copper paint much better than the old one as it looks more like copper than gold like the first try.The base of the railing with the white paint looks nice, Lawrence. That Monkey rail is not easy to make and install. Fingers crossed…..
The ‘bottom color’ has now a warmer appearance.
Regards, Peter
Regards Lawrence
Canoe21
Lawrence
Hello Johan, I do thank you for all of your help in over coming this problem. The pear wood should have bent with no trouble but those laser cuts were almost 1/4 the thickness of the wood, can not under stand just why they would do that. I now have the corner pieces cut out and will follow your set path, Thanks.Dear Lawrence,
A few months back I encountered the same issue. If you and your shipmates are interested, here's the link: https://shipsofscale.com/sosforums/threads/yq-bluenose-by-johan.8304/page-35#post-265949
Regards Lawrence
Canoe21
Lawrence
Hello Johan, Yes paint can be deceiving at times, the first coat of bottom paint was Admiralty Paints that I got years ago from the UK. It was a copper paint but over the years it turned a Goldie color that I did not like. I replaced it with DecoArt , Metallic paint that is much nicer. It is not nearly as shiny as my picture.Although the color looks convincing, I still wonder how she looks when sitting upright. You scared me a bit when you talked about the copper paint. On the Bluenose my father left me, I used the paint as indicated by Billing Boats, leaving me with an unrealistic, very light color. My only excuse is I didn't know any better...
Regards Lawrence
Good morning Lawrence. You and the the little fellows nailed the hull colour. Lovely. I discovered with my Victory build that any part of a ship with an animal name causes consternation. So good luck with your monkey rail. Your white base looks spot on. Cheers GrantHello Ship Mates, Well we finally got a copper bottom paint that we could live with and the little fellows and I re-painted the port side hull, we believe that it looks much better now. We also got up the nerve to install the main deck railings. Really it was not all that hard it was just the getting started, We did try to bend the monkey rail. We soaked it for around 1 hour and then applied some heat but disaster was about to happed, those laser bending lines were cut just too deep and it broke. Now we must saw out the two corner pieces in order for the monkey rail to go around the poop deck.
Regards Lawrence
View attachment 360686
View attachment 360687
View attachment 360688
- Joined
- Sep 3, 2021
- Messages
- 4,207
- Points
- 688

Meaning the building of a ship is an accumulation of consternations.I discovered with my Victory build that any part of a ship with an animal name causes consternation.
Canoe21
Lawrence
Hello Grant, The little fellows and I are pleaded with the new paint job. The monkey rail seams to be straight forward except for part # 149 that did not want to bend. The painting will be finicky as it has to be fully painted before installing. I have taken a lot of very helpful information from Johan, he had the same problem.Good morning Lawrence. You and the the little fellows nailed the hull colour. Lovely. I discovered with my Victory build that any part of a ship with an animal name causes consternation. So good luck with your monkey rail. Your white base looks spot on. Cheers Grant
Regards Lawrence
Canoe21
Lawrence
Hello Johan, I do thank you for your concerns, this little job will just take a little more time than we had planed for. But it looks doable with all of your great help, we have not found any more surprises as yet but now we will keep an eye open, Thanks for the Heads up!Meaning the building of a ship is an accumulation of consternations.
Regards Lawrence


