Nails: To Remove or not to Remove

Joined
Jul 9, 2023
Messages
131
Points
103

Location
's-Hertogenbosch, Netherlands
Looking for opinions and arguments.

Is it wise to remove the nails from the first planking after the glue has dried?

Or is it a no go?

I have performed this action on two ships so far. The first ship, Shackleton's Endurance, is still in shipshape condition three months after completion. But should I worry about the future?
I must add I pre-bent the (limewood) planks, and thus did not mount them under excessive strain. I also glued the sides of the planks, so not only the points of contact with the bulkheads

I have searched SOS in vain on this topic. Elsewhere opinions seem to be split.

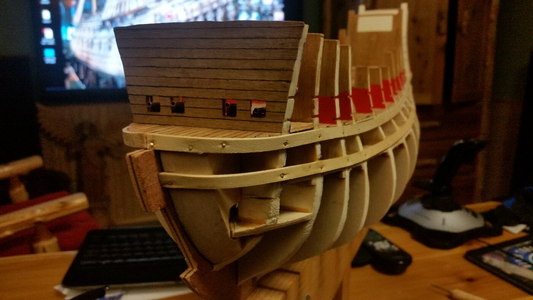
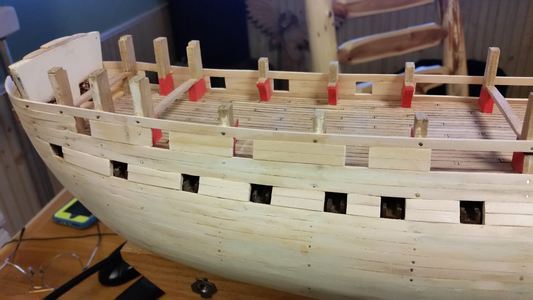
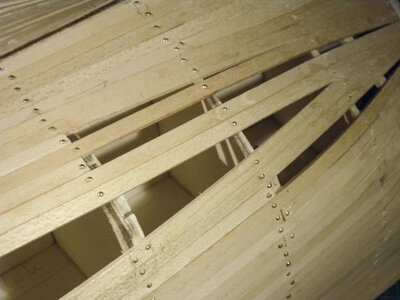
The two pictures below are of HM Bark Endeavour, with and without nails.
nails_02.jpg

nails_03.jpg
 
Last edited:
If this is a double-planked hull, you will either want to remove them, or you will need to drive them in so they are flush with the first planking. Otherwise they will cause problems on the second planking. That's why often we don't drive the nails all the way into the wood, so they are easier to remove.

Hope that helps !

Jeff
 
The nails are removed because it makes the hull easier to sand, i.e. just the wood without the nails. If you do the sheathing properly, you won't even need to use those nails, the glue alone will be enough. If you want to leave these nails, just cut off the ends and leave the pin in the hull, there will be no problem.
 
Basically, removal of brass pins from first planking is optional if the brass pin heads are submerged beneath the surface of the wood.

If you are using lime wood, they can be pried out if you like, but you will add small scratches and enlarge the hole of around the pinhead. This is not a problem because it will be planked over anyway by the finish planking layer. If you used basswood for first planking, trying to pry out submerged pin heads will do more damage since that wood is softer. Leaving the pinheads submerged and planking over them does no harm to the model, and digging them out is not usually worth the effort if they are deep. When I sand a hull, the submerged pinheads are often sanded off, leaving just the shanks in the wood.

If the pin heads are at or above the surface of the wood, you can use the edge of a razor knife to pry the pins out a bit, then pull them out with a needle nosed pliers, leaving nothing but a very small hole in the wood from the pin shank. That hole can shrink in time. I usually recover the pins that have heads raised above the surface for one reason: they can be re-used as long as you are careful not to bend them too much. I like to use Amati's Fine 7mm pins because the shanks are very thin and tend not to split wood, and they grab well and hold things down, but they are expensive enough for you to want to recover many of them for re-use. Protruding pin heads can sometimes catch on your sandpaper when sanding and wear the grit off, so there's another reason to pull out those pins.

Some of the pinheads below pull the surface of the wood in a bit when submerged as seen below on the second plank down. The first and third pins on the top plank are protruding enough that they can be retrieved and re-used again easily.
1698004628103.png

Some pins were recovered, many recessed ones were sanded until the pinheads were flat or completely removed, or the heads were covered entirely by filler later on.
1698004923322.png
 
Last edited:
Looking for opinions and arguments.

Is it wise to remove the nails from the first planking after the glue has dried?

Or is it a no go?

I have performed this action on two ships so far. The first ship, Shackleton's Endurance, is still in shipshape condition three months after completion. But should I worry about the future?
I must add I pre-bent the (limewood) planks, and thus did not mount them under excessive strain. I also glued the sides of the planks, so not only the points of contact with the bulkheads

I have searched SOS in vain on this topic. Elsewhere opinions seem to be split.

The two pictures below are of HM Bark Endeavour, with and without nails.
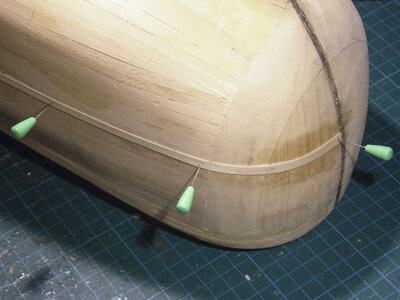
View attachment 401786

View attachment 401787
One other method not mentioned - grind the heads off flush with the planking using a Dremel and a suitable grinding stone.
 
One other method not mentioned - grind the heads off flush with the planking using a Dremel and a suitable grinding stone.
Is this a realistic option when dealing with hundreds of nails? And isn't there also the substantial risk of grinding away the wood itself?

The most important question is however : To what extend does leaving the nails, or the shafts of the nails, in the hull add to the overall strength in addition to the glueing (if glued properly)?
I built without nails to start with....
 
Is this a realistic option when dealing with hundreds of nails? And isn't there also the substantial risk of grinding away the wood itself?

The most important question is however : To what extend does leaving the nails, or the shafts of the nails, in the hull add to the overall strength in addition to the glueing (if glued properly)?
Another thought - what happens to each plank when you try to cut or pry the nails? Are they brass or plated steel? Just a suggestion that would work but naturally, care needs to be taken...
 
Last edited:
Another yhought - what happens to each plank when you try to cut or pry the nails? Are they brass or plated steel? Just asuggestion that would work but naturally, care needs to be taken...
If the strip is bent properly and fitted to the hull, it will not come off on its own. With accurate hull plating, nails are not needed even in the first layer. It is different with wood stretched by force, then the nail holds as long as it lasts.
 
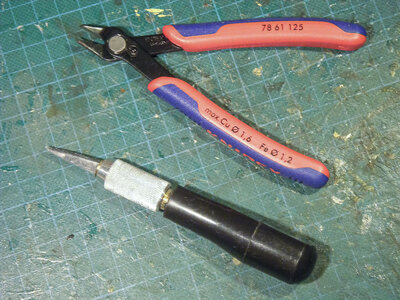
One tip, I find the best tool for pulling them out is sprue cutters.The backs of these are flat, you can pry the nails out enough to extract with normal pliers without marring the timber provided the nail head isn't buried. Just don't squeeze the cutters too hard to you will obviously cut through the nail.If you do dent the timber, apply water to the dent, quite often this is enough for the timber to swell and most if not all the dent will disappear.
 
One tip, I find the best tool for pulling them out is sprue cutters.The backs of these are flat, you can pry the nails out enough to extract with normal pliers without marring the timber provided the nail head isn't buried. Just don't squeeze the cutters too hard to you will obviously cut through the nail.If you do dent the timber, apply water to the dent, quite often this is enough for the timber to swell and most if not all the dent will disappear.

I also use cutters to this end in the same way you describe, @NMBROOK . In case this doesn't work because the nails are buried to deep (which I try to avoid) I use a hobby knife with a thick, strong blade to pry them out, keeping the knife as flat and horizontal as possible while twisting it round its axis.

Endeavour_nails01.jpg
 
Last edited:
One tip, I find the best tool for pulling them out is sprue cutters.The backs of these are flat, you can pry the nails out enough to extract with normal pliers without marring the timber provided the nail head isn't buried. Just don't squeeze the cutters too hard to you will obviously cut through the nail.If you do dent the timber, apply water to the dent, quite often this is enough for the timber to swell and most if not all the dent will disappear.
I can also vouch for the spruce cutter. In model railroading they are used for cutting rail but they work very well for pulling nails. As Mike said just don't squeeze to hard. Here in the states a quility cutter is made by Xuron & can be had at Amazon.
https://www.amazon.com/Xuron-2175-M...g=u7SCH&pd_rd_r=6fc66e3b-ce52-478d-803a-cd8ca
 
If this is a double-planked hull, you will either want to remove them, or you will need to drive them in so they are flush with the first planking. Otherwise they will cause problems on the second planking. That's why often we don't drive the nails all the way into the wood, so they are easier to remove.

Hope that helps !

Jeff
There is another advantage to not driving them all the way in. After I pull out the nails, many of them can be reused. You can never have too many nails.
 
After years of restoring both ancient furniture and models (mostly less ancient) metal fasteners are almost always cause for cursing their use in the first place. The wood changes over time, shrinks, expands and contracts. The ferrous metals corrode with disastrous results, swelling or becoming irrevocably rusted into the wood causing it to deteriorate and become inseparable from the surrounding wood. Nonferrous metals don't move with the wood and often are forced outward by the wood shrinking around it and getting irrevocably stuck in that awkward state by the surrounding wood getting a death grip on it having shrunk tightly around it. When restoring something we always made it a practice to have some consideration for what the next person to work on it will have to contend with years down the line.
I don't know what problems CA adhesives will present in this way with wood, except problems have arisen over time with natural fibers, copper and brass by way of turning to acid and causing these materials to deteriorate. Not so much with wood as far as I know, and I use it in lieu of nails. So far, I have had nothing fall apart gluing down planks with it, but who knows what the long term will bring, and it will be difficult for future restorers to undo years hence. (But I'll be long dead.)
There really is no substitute for the old gluepot heated hide glue, with its' instant adhesion long life, easy reversibility and repair. The caveat: lots of patience required. The old guys, with unsophisticated tools and materials (see todays' discussion on collecting tools) did some truly astonishing and mysteriously sophisticated work with the crude tools, lousy lighting and un-climate-controlled conditions they had to work with centuries ago. We may have become more complicated, but not necessarily any smarter or better craftsmen. :rolleyes:
In retrospect it just occurred to my wife that the above was the reason for the development of wooden "tree" nails... (duh :rolleyes: )... Thanks, honey!

Pete ;)
 
Last edited:
Back
Top