Need experts help

Jimsky

Administrator
Staff member
Administrator
Forum Moderator
Joined
Nov 3, 2018
Messages
12,164
Points
938

Location
Brooklyn, New York USA
Mates,

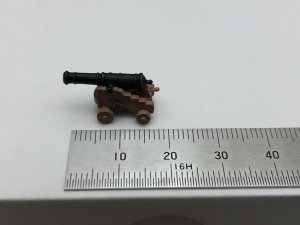
A rather strange question but it should be a straight answer. Below is the photo of the 1:72 scale gun. I have a dilemma whether the bolts imitation on the wheels is looking oversized. The first shot is macro, but the drill bit size is 0.23mm. I don't have a smaller drill bit...so here is the question: Should I leave as is or make wheels without bolts imitation?

BTW, I have photographed all the process making the gun carriages, once completed I will post it.

a. with bolt imitation (leave as is)
b. without bolt imitations
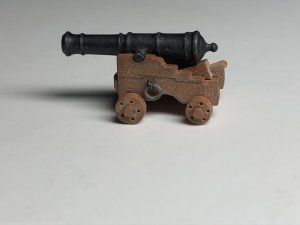
IMG_1360.jpegIMG_1361.jpeg

Many thanks, :)
 
They look good from here. I like the pencil dot idea though. I would think once the cannons are placed either method would meld into the detail of the surrounding material, ie, running blocks, tackle, etc.

Jan
 
They look good from here. I like the pencil dot idea though. I would think once the cannons are placed either method would meld into the detail of the surrounding material, ie, running blocks, tackle, etc.
Thanks Jan, I believe there will be not much surrounding material. Breeching will be for sure, as for the running\pulling tackles most likely not. At scale as this gun is, the blocks should be less than 1.5mm.
 
I like them as is. Looks good next to the ring. As said with the breeching in place should look pretty good.

I must agree with the others, use a pencil to imitate the bolts. That is the method that I have used with good results on a similar scale. It is difficult to find nails to scale and quite unnecessary.

Tanks Mike and Bob! Every opinion is counts!
 
Hi Jim
Personally I love them as they areThumbsupYou can go as far as your sanity lets you with stuff like this.I have been reading Eugene Yepurs log on the Russian Forum,forget magnifiers,this guy uses a microscope to do detail work.
Kind Regards

Nigel
 
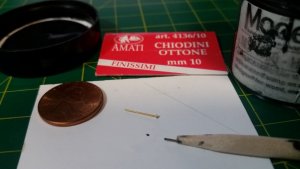
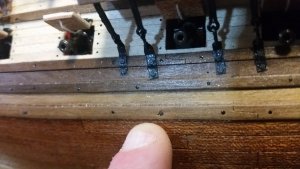
If the pencil marks are not well defined or lack contrast, you can make very consistent dots with black enamel or acrylic paint. Take a very thin Amati 10mm brass pin, and embed it point first into a thin dowel like the tool shown below. Then cut the head off the pin and file the end of the shank until it has no burr, and the very end is a sharply defined circle. You can use emery cloth backed with a piece of wood to to this. Dip the end of the pin lightly into the paint in the cap of your paint jar, and careful place a dot of paint on the part. If you use Testors enamel model paint, you can make perfectly round shiny black nail heads that you can feel with you fingers when dry. I used this technique to paint iron nail head on the wales of the hull of La Couronne. With a steady hand and a magnifying headset, you can precisely make iron nail heads that are very small. If the amount of paint on the pin is small, the nails heads are small. You can make slightly larger nail heads with a bit more paint on the pin. Practice will allow you to control the size of the dots. Note how the dots on the model hull are two different sizes.

The black dot on the white card below is a good example. Also you can see and feel the nails on the hull of the ship model.

20200501_015019.jpg20200501_015325.jpg
 
Last edited:
When not doing model ships or help restore 1:1 scale WWII aircraft, I am part of group know as Free-mo, a modular HO group with folks all around the country. We get together at various train shows and connect up to form a big layout.

Not much happening this year, with all train shows cancelled for summer. Even the NMRA cancelled big show in July in St. Louis.
 
My vote is (a) The bolts look just about right to me. I have some images of real cannon and carriages somewhere.
 
Back
Top