• Win a Free Custom Engraved Brass Coin!!!
    As a way to introduce our brass coins to the community, we will raffle off a free coin during the month of August. Follow link ABOVE for instructions for entering.

New to ships...new help

Joined
Oct 24, 2025
Messages
3
Points
3
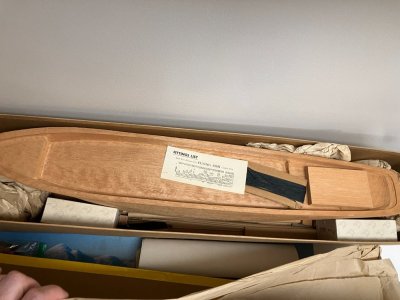
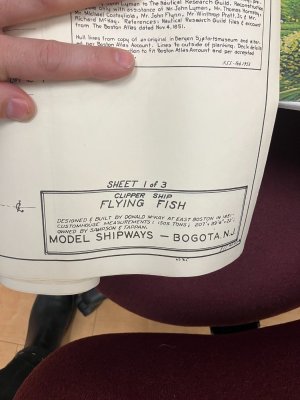
Hi all, I recently got a gift of a Model Shipways Clipper Flying Fish kit and had some questions. I used to make models as a child and enjoyed it, and thought I'd give this one a shot. From what I can tell, it's an older model, being a solid body, the more recent ones seem to have a ribbing that you need to assemble.
1. Is this a doable first ship model?
2. Is it normal to just have to follow a set of blueprints? no assembly instuctions?
3. any tips?

Thanks in advance, this forum seems like a cool place.
IMG_5754.JPG

IMG_5755.JPG
 
Hi Scharlick, welcome to the forum. To try and answer some of your questions, this wouldn't be a terrible first model, but I would personally find a simple kit like Artesania Latina's HMS Endeavor's Longboat or Model Shipways Lowell Grand Banks Dory as a first kit just to dip your feet into the water. As for the Flying Fish kit, yes this was typical of older model kits. They weren't the best at making things easy for entry level modelers, they had more of a sink or swim mentality. That is one of the reasons I recommend other kits as starters, they have better instructions these days. Your kit is actually an early version of the Fish, their later kit design is not solid hull, it's what is called Plank on Bulkhead.
 
Hi there, and welcome aboard!
The Flying Fish is indeed one of those old-school Model Shipways kits — solid hull and all — but she definitely belongs in the beginnings category. In fact, a solid hull can make life easier for a first project since you don’t have to worry about fairing frames or planking. It’s a great way to get back into the hobby and focus on shaping, detailing, and rigging.
  1. Doable the first model?
    Absolutely. Take your time shaping and smoothing the hull, and you’ll have a nice base to build on.
  2. Blueprints only?
    That’s normal for older kits. You’ll be working mostly from plans, with some interpretation along the way. Many of us have done the same, and checking other build logs for similar ships really helps visualize the steps.
  3. Tips:
    • Study the plans carefully before cutting or gluing anything.
    • Dry-fit every part first.
    • Seal and prime the hull before painting or adding fittings.
    • Don’t rush the rigging — it’s a great teacher of patience.
Personally, I think these solid-hull kits are underrated. They may look old-fashioned, but they’re perfect for learning and can turn into beautiful display pieces if you give them the care they deserve.

Good luck!
 
I will move forward with this one since I already own it.

Good choice! If you run into difficulties, consider the suggestion of the dory from MS which actually has a set of three beginner boats with great instructions. Maybe for the next project???
Belated welcome to SoS
Allan
 
To provide an alternate perspective:
First, that old MS Yellow Box is high quality.
It involves an "old school" expectation as for what work the builder must do. It evolved from: here are the plans, use everything you learned in high school shop class (if you have seen Hoosiers you see what the schools in the 20's and 30's were like).
By the Yellow Box era a legup is being offered by providing a mostly carved hull as a starting point. You are skating on the edge of it being a scratch build from the start.
The instructions were
The Neophyte Shipmodeller's Jackstay
by George F. Campbell: This is a classic instructional book for beginners interested in building ship models

Here is a commentary by Winova about the journey you are considering:
"I just finished building Model Shipways Kit of thr Flying Fish, and what
do I think of kit building,frankly it was a waste of time and money.
I bought the Kit at a sale price but had to pay freight , duty ,exchange
charges which were half as much as the Kit.
I was disappointed with the supplied fittings, even the brass nails
I could not use.Fitting sizes were all out of whack,even the flags
were out of scale.
Basically it was just a big disappointment ,my finished Model
became a scratch finished Model in my opinion"

His kit was probably the current PoB version. Carved hull is Park Ave. the PoB is trailer park. Those starting now have far different expectations from those of the WWI, WWII generations -

Here is what I would say to Winova:
Flying Fish 1851 extreme clipper (originally solid hull model) is a large ship at a small scale. 1:96 is 12.5% the size of a museum scale 1:48. 1:96 is right at the edge of being a miniature scale. The limitations of wood properties means than much of it needs to be more artistic illusion than scale replication. An extremely ambitious choice if it was your inauguration into this, you have beat the odds by finishing it.
 
Flying Fish 1851 extreme clipper (originally solid hull model) is a large ship at a small scale. 1:96 is 12.5% the size of a museum scale 1:48. 1:96 is right at the edge of being a miniature scale. The limitations of wood properties means than much of it needs to be more artistic illusion than scale replication. An extremely ambitious choice if it was your inauguration into this, you have beat the odds by finishing it.

What Jaager said! I cut my teeth building a couple of Model Shipways "Yellow Box" models. They were indeed high-quality models in their day. I would not call this Flying Fish model a "beginner's kit" by any stretch of the imagination if one expects to build a decent version of it. It will require a lot of "learning on the job" as you go. In its day, a "kit" was what you see in the box, which was basically a collection of the machine carved hull, some sticks and string, and some fittings. They made no pretense of it being anything else. It was basically "on stop shopping" for a scratch-built model. They expected the builder to know what they were doing. The materials in this model and the plans can certainly be used to create a beautiful model, but not by a beginner unless he is committed to taking his time and climbing a steep learning curve without rushing it. The biggest challenge of this model is its small scale. At this scale, a lot of detail will have to be achieved by subtle "artistic suggestions" because the scale is just too small to make the parts at that small size.

The instructions were
The Neophyte Shipmodeler's Jackstay
by George F. Campbell: This is a classic instructional book for beginners interested in building ship models

Yep. Model Shipways (before it was bought out by Model Expo) suggested that the builder buy this book to supplement their plans drawings. Sometimes they would include a single 8..5" X 11" page of typewritten "instructions" that told you what colors to paint it, but that was about it. You will have to find some books to learn the general procedures for building these older "scratch building" kits and study them well. The more recent books on building ship model kits will be helpful, but most written after about 1960 or so will probably focus on "plank on bulkhead" hull construction rather than the machine carved solid hulls. In fact, the solid hulls are much easier to build well than the planked ones, which are cheaper for the manufacturers to produce, package, and ship. Many have found Ship Modeling Simplified: Tips and Techniques for Model Construction from Kits by Frank Mastini to be helpful. (See: https://www.amazon.com/Ship-Modeling-Simplified-Techniques-Construction/dp/0071558675) Note also that many standard ship modeling books such as this one are available used on eBay and other secondhand book dealers online for substantially reduced prices.) If you are committed to doing a great job on this model, you should purchase a copy of The American Built Clipper Ship, 1850-1856: Characteristics, Construction, and Details by William L. Crothers. It is the "Bible" on American clipper ships and will answer any questions you have about details and construction of Flying Fish. (See: https://www.amazon.com/American-Built-Clipper-Ship-1850-1856-Characteristics/dp/1635617332)

"Crothers" will go way beyond what you have in terms of plans in the kit itself, and it is up to date. Your model was designed in the 1950's. Crothers' book was published in 1997 and undoubtedly contains more accurate information than was available when your kit plans were drawn. This rather expensive book is now available in a quality paperback format for much less than the hardcover edition and, of course, used copies can be had for substantial savings.


A few comments regarding what you should be aware of before trying to build any of it:


The hull exterior is very close to the proper finished dimensions and should not require any carving to shape. Sanding should be sufficient, although the stem, keel, and sternpost and rudder will need to be added to the carved hull. Note that the rails are thick in dimension. This was done to prevent breakage in shipping and handling. The rails will have to be carved down to a very thin dimension in order to get them to scale thickness. This is a process that requires precision and care. Sometimes, it was easier to cut the rails off the solid hull entirely and then carve a thin rabbet in the hull at deck level and glue new rails made of thin wood or card stock. Serious thought to the rest of the build should be given before going this route though because the rails may well require considerable strength if they are intended to provide a secure attachment for the shrouds. Don't be intimidated by the woodworking, though. Surfacing putty and "plastic wood" can cure a multitude of mistakes and we all make them! :D

The fittings may be problematic, depending upon how old this kit is. While later editions cured the problem, the earlier "Yellow Box" kits contained cast fittings containing considerable lead. The problem is that small lead castings are highly prone to oxidation, essentially "lead rust," that turns them to white powder (lead oxide) in short order if they are exposed to any sort of acidic environmental conditions, particularly in the "dead air" of a tightly closed case. (And, every ship model worthy of keeping must live in a proper display case or its life will be nasty, brutish, and short!) The newer castings were made of lead-free metals, often Britania metal or other alloys that were not susceptible to lead oxidation or what was called "lead bloom." Read this article: Lead Corrosion in Exhibition Ship Models (https://cdn.wildapricot.com/278718/...M8lXH-gIw__&Key-Pair-Id=K27MGQSHTHAGGF[/SIZE])

If your fittings are lead based, obtain another set of fittings from Model Shipways for their current version of Flying Fish in this scale. (I believe it is still in production at this scale.) Then throw the old lead ones out!

Materials and adhesives generally should be "archival." That's just a fifty-cent word for "long lasting." There's no point in putting hundreds of hours into building a great model only to have it fall apart in five or ten years. Besides there being no point, it's heartbreaking! Stick to wood, long lasting fibers, and non-corrosive metals. Avoid plastics at all costs. Some last better than others, but all plastics are problematic in one way or another. Read this article: Here today. Maybe Gone Tomorrow. - Ephemeral Materials in Ship Models. (https://thenrg.org/resource/articles/materials-in-ship-models) It will answer a lot of your questions regarding what to use for materials and adhesives.

Rigging materials in most all kits have always been substandard even down to the present day, albeit now less so. Purchasing after-market rigging cordage is routine. In fact, many serious modelers lay up their own rigging cordage with miniature rope making machines, but that's a story for another night and another model. The small scale of this Flying Fish model will almost certainly demand nothing more detailed than carefully selected thread "off the spool." Purchasing quality polyester thread, while "plastic," is considered by many museum curators and restorationists to be the most archival material for the job these days. (Linen thread was once though the best, but, sadly, they don't sell it in the quality required for modeling anymore.) Given the small scale of this model, you may find that fine (noncorrodible) wire in various gauges may be a better option for a lot of the rigging on a "near-miniature" model of this scale. Such wire in suitable colors is available from jewelers' supply houses, "bead stores," and well-stocked crafting emporiums, but make sure it is not iron-based. Some will be brass plated or anodized iron, which you don't want to use.

Paints and sealers will require thought and some decision-making. There is no other aspect of modeling that will make or break a model more than its paint job. It behooves any modeler to learn about finishing before "just slapping it on." A good model requires a paint job as perfect as the hood of a new Rolls Royce. Don't skimp on paint quality or the painter's attention to detail. There are two schools of thought: oil-based coatings and water-based coatings. Pick your poison. Some have excellent results with water-based coatings, but this requires that all bare wood be sealed before application because water will raise the grain of the wood and make it very difficult to get a smooth surface upon which to paint. Others have their favorites, but my go-to sealer is clear ("white") shellac. I seal all wood on a model with clear shellac available at any paint store. (Zinsser's Bulls Eye brand is what I use.) Shellac is a staple for many modelers. It is soluble in denatured alcohol and cleans up easily with alcohol. It is invisible on the wood surface. It's also great for cementing tiny knots in thread. I could write a book about shellac's uses in modeling, but enough of that for the moment. As for painting, a single application of shellac to a wood surface is compatible with either oil-based or water-based paints and clear finishes and hardens the surface of soft woods making it much easier to sand them to a fine surface. (Remember, though, that if you are going to stain a wood before finishing it, stain first, then shellac it, because the stain will not soak into the wood through the shellac.) "Floquil" brand paints and other coatings were once the choice of all good miniaturists, but, alas, it is no longer made. At present, there are model paint brands that are trying to replace Floquil, but with mixed results. For a number of good reasons, many serious modelers have gone to using high-quality "tubed" artists' oil paints, thinned as appropriate for brush or air brush application. It is far more economical than the wildly overpriced "hobby paints" in the one- and two-ounce bottles that dry up a couple of months after opening. They do require learning to mix and condition "toothpaste thick" artists' oils properly for use using linseed oil, turpentine, and Japan driers, etc., but all paint must be conditioned to account for the environmental circumstances at the time of application and the materials and surfaces to which it is applied. (Don't believe the DYI propaganda at the Big Box home improvement stores. Finishing is a highly skilled trade if it's going to be done well.) While old stock unopened Floquil bottles are only sold now like an illegal drug on eBay, Floquil's comprehensive instruction book of painting miniatures lives on through the magic of the internet. Read Painting Miniatures. It will save you a lot of grief and make finishing your models a joy! (See: https://www.paulbudzik.com/tools-techniques/floquil-paint/Floquil Painting Miniatures.PDF)

So, good luck with your Flying Fish. Don't be afraid to ask questions! It's a "vintage" model kit that deserves to be built well.

With apologies to the USMC's Rifleman's Creed, recite this every night before you go to sleep:


The Ship Kit Modeler's Creed:

This is my ship model kit. There are many like it, but this one is mine.

My model kit is my best friend. It is my life. I must master it as I must master my life.

Without me, my model kit is useless. Without my model kit, I am useless. I must build my model kit true. I must build it better than other modelers who are trying to build a better version of the same kit as mine. I must build a better model before they build a better one than me. I will ...

My model kit and I know that what counts in life is not the money we make, the cars we drive, the clothes we wear, the friends we have, the noise we make, or the cigars we smoke. We know that it is the model kits that count. We will model ...

My model kit is human, even as I am human, because it is my life. Thus, I will learn it as a brother. I will learn its weaknesses, its strengths, its parts, its accessories, its masts and its rigging. I will ever guard it against the ravages of sunlight and the family cat as I will ever guard my legs, my arms, my eyes and my heart against damage. I will keep my model clean and safe. We will become part of each other. We will ...

Before God, I swear this creed. My model kit and I are the defenders of my sanity. We are the masters of our pride. We are the saviors of my life.


So be it, until my model is finished and there are no more unbuilt model kits stashed in my closet!
 
Last edited:
The response from this community has been very heartening.

I took some time yesterday to study the plans, look over the materials, and try to get my head around the build. I was a bit overwhelmed.

"use everything you learned in high school shop class "
I had come to this rough conclusion. Staring at the detail of the railings, I thought, "I guess I'm just expected to know how to notch the wood to make all those openings." Then i thought "we have lost so much as a society" but that's a thought for another forum, lol
Being a 30-something, I did not have woodshop; they had converted the shop to a computer lab by that point, so it looks like I have some skills to learn before I start.

Bob Cleek, thanks for your detailed response; it is helping me focus on the point and the mindset of "real" model making. Why i would start, what the point is, and what the end goal is. I had also thought they were lead, knowing it was produced in the 50's, but thanks for the confirmation. I will dispose of them properly and get new fittings.

Ok, my next step is to study the plans more and try to find a place to start. I'll update as I go....slowly.
 
I will dispose of them properly and get new fittings.

Don't worry about "disposing of them properly." You can just throw them in the trash. It's not like they're radioactive waste or anything. They're no more "dangerous" than fishing weights. :D
Don't discard the lead fittings just yet! First make sure they are lead. It's easy to tell if they've got white powder all over them. But they might not, depending upon how they've been stored. There are kits sold in hardware stores to test for lead oxide in paint. Test them first before throwing them out.
If they are lead, don't throw them out until you have replacements in hand. If replacements aren't available, the lead fittings may still be of value as patterns to cast replacements in a non-corrodible metal, which not as difficult as you might think. (See: https://micromark.com/pages/rapid-search-results?q=casting&page=4)

If you haven't got the instructions to the Model Shipways 1:96 scale Flying Fish, here is the link to the PDF of the 56 page instruction manual for their present plank on bulkhead version which should be identical to the one you now have, save for the your version's solid hull which is much better than the POB version.

Also, here's the parts list for the new version. The castings should be identical to what you have. They are now produced in Britania metal. As I mentioned previously, check to see if your kit was a late enough production run to have used the Britania instead of the lead. If the castings are still silvery bright, they may well not be lead based.

 
I still build solid hull models, just not from kits. IMHO, if you are going to paint your model, and Clipper ship models should be painted, this is a much better choice than a POB kit.

Regarding shaping of the carved hull. I usually agree with my friend Bob Cleek, but not this time. I would first check the hull carefully rather than assume that it has been accurately carved to shape. To do this you first need to to establish a centerline. Do this by turning the hull upside down. There should be flats where the bow and stern come together. Mark the center of each and draw a line along the bottom of the hull connecting these two marks.

Now look at your drawing. There should be an end view of the hull. It will look strange as the forward part of the hull is shown on one side and the aft on the other. You will see a series of curved lines. These are called body plan sections and can be thought of as slices through the hull. You need to trace each one and glue it to a piece of cardboard. When carefully cut out these become templates.

Now look at the side view on the drawing. Running vertically from the keel are straight lines, each marked with a number. These numbers will match those on the body plan sections and show where each body plan sections is located along the hull. Mark the number and its location along the centerline that you drew.

Beginning at midships, halfway between bow and stern, offer the applicable template to the hull at its correct centerline mark. It should fit but if it doesn’t you will have to remove material from the high spot. Rub a little blue carpenter’s chalk on to the template edge and it will mark the high spot. Move along the hull fore and aft using the different templates. When all stations are correct you will want to sand fore and aft in long strokes with the paper attached to a sanding block. This should produce nice smooth hull lines.

Roger
 
Regarding shaping of the carved hull. I usually agree with my friend Bob Cleek, but not this time.

I agree with you completely, Roger! I just didn't get into addressing templating the hull and that gave the wrong impression. Had I explained it as you have, I would have said, "You will probably find that the machine carving is quite accurate to begin with." My comment in that respect wasn't meant to convey that no checking of the accuracy was necessary. In my experience with the old "Yellow Box" machine carved hulls, which was limited admittedly to just a couple of them long, long ago, I found upon templating them that they were very accurate and only required smoothing, but that surely wasn't enough of a sampling to warrant a blanket warranty of their "out of the box" accuracy.

I would add that while one was at it checking the hull shape with templates from the body plan, the shear line should be checked for accuracy as well. Additionally, once the centerline has been marked and the hull faired, a builder should decide how the model will be mounted. My own preference for models of this scale and period are simple posts rather than cradles, but that's a stylistic builder's option. I find the cradles detract from the appreciation of the hull lines. If posts are chosen, the placement of the holes in the solid hull should be marked and drilled before further work on the hull proceeds. It's much easier to do this without damaging the finished work on the hull when it is in its "unadorned" state. I also drill a matching pair of post holes in a base stand, either a temporary or permanent base stand, either way. This stand is handy to support the hull when the model is being built, and the hull can be slid off the posts as may be convenient during the build. I use any suitable post material in my "slop chest," generally lengths of 1/4" welding rod or 3/8" clear acrylic rod, or something like that. The holes in the hull should be drilled to measured depths such that when the hull is placed upon the posts to their full depths the waterline will be level and parallel to the base board. Once a model is built, it is nearly impossible to drill accurate mounting holes in the bottom of the hull without breaking something. (Don't ask me how I know this! :rolleyes: )
 
Back
Top