Santisima Trinidad - Occre Build Log [COMPLETED BUILD]

Re: OcCre Santisima Trinidad Build Log

<t>You are welcome Nigel.<br/>
The Main Mast Lower Yard mounted. Prepping for the next on the lathe. The dark lines are guidelines carried over from the plans.</t>
 

Attachments

  • mainloweryardrigging07.jpg
    mainloweryardrigging07.jpg
    82.7 KB · Views: 119
  • maintopyard01.jpg
    maintopyard01.jpg
    87.5 KB · Views: 121
  • maintopyard02.jpg
    maintopyard02.jpg
    87.9 KB · Views: 106
  • maintopyard03.jpg
    maintopyard03.jpg
    74.3 KB · Views: 107
Re: OcCre Santisima Trinidad Build Log

<r>Hi Donnie,<br/>
first of all congratulation on your ST, amazing job... I just bought the ST two weeks ago and your build log was already very useful, thanks for sharing...I fond this plans of the Santisima Trinidad: <URL url="http://usuarios.arsystel.com/naviost/nst/I-index.html">http://usuarios.arsystel.com/naviost/nst/I-index.html</URL><br/>
I want to apply the deck planking scheme that is on the plans but I'm having trouble understanding them. the problem is on the fifth row, the 110 measure this doesn't make sense and the big board of the same row dons't have a measurement. I know you are much further ahead on the build but if you can give me a hand...</r>
 
Re: OcCre Santisima Trinidad Build Log

<t>I prefer the 4 step method. it is 20, 40, 60 and 80. I start with a full length plank, the one to its right is 20, the one next to it is 60 and the next one is 40 in length. Then I start all over again. After this pattern is continued from the center both directions, then all other planks are fit going forward are 80 length for the full length of the deck until it is cut to fit the last plank in each row. The the ends of each plank line up across the deck only on every 4 pieces. If your full scale plank is 20 foot long, the butts would be at 20, 5, 15 and 10 feet.</t>
 
Re: OcCre Santisima Trinidad Build Log

<t>Thank you Gary for helping with this topic !</t>
 
Re: OcCre Santisima Trinidad Build Log

<t>Thanks for all your replays, I created a building log for my ST. I will return to this question in the build log.</t>
 
Re: OcCre Santisima Trinidad Build Log

<t>The Latest. Main Top Yard Rigging. Bunt Lines, Leech Lines, Clew Lines, Sheets installed (while not on the ship) Thanks for looking in.</t>
 

Attachments

  • maintopyardrigging01-large.jpg
    maintopyardrigging01-large.jpg
    162.6 KB · Views: 106
  • maintopyardrigging02-large.jpg
    maintopyardrigging02-large.jpg
    172.2 KB · Views: 106
Re: OcCre Santisima Trinidad Build Log

<t>Very authentic looking sails you have there!!!<br/>
I am seriously considering having some furled sails for my sovereign build? they look so much better than fully open sails, and its an improvement on bare spars.<br/>
Once again, nice job<br/>
Steve..</t>
 
Re: OcCre Santisima Trinidad Build Log

<t>Thank you Stevie !<br/>
I wish I had more time, I would have actually taken the time to label each line (image) -<br/>
If (anyone) and you would think it would help, I can take the image taken and try to label it. However, let me say that from the image, it can be very deceiving because some of those lines, like the leech (I think) are folded back on themselves and are part of the lines that are being used to suspend the yard arm.<br/>
At this point, I have transferred the assembly over to the mast to hang it all. The most tedious part of this is to get the yard arm to sit still while I attach the yard arm using the set of parrels and to get that secured.<br/>
If you (or anyone else) here decide (not to) have full sails to remember that the yard arms are "lowered".</t>
 
Re: OcCre Santisima Trinidad Build Log

<t>The latest. Starting to mount the Main Top Yard Arm / Parrels. Ok, so - yes, I know - there were no brass parrels back then. But, .... I got carried away with the brass. Yes, I made the brass parrels - pretty nice - even though no such thing back then.</t>
 

Attachments

  • maintopyardparrels01-large.jpg
    maintopyardparrels01-large.jpg
    144.2 KB · Views: 127
  • maintopyardparrels02-large.jpg
    maintopyardparrels02-large.jpg
    135 KB · Views: 125
  • maintopyardparrels03-large.jpg
    maintopyardparrels03-large.jpg
    118.7 KB · Views: 123
  • maintopyardparrels04-large.jpg
    maintopyardparrels04-large.jpg
    141.3 KB · Views: 121
Re: OcCre Santisima Trinidad Build Log

<t>So Donnie, paint them wood color and no one will know it is not correct and they will look proper. Model Master used to make a paint called wood and I have used it an it looks natural and does work on metal.</t>
 
Re: OcCre Santisima Trinidad Build Log

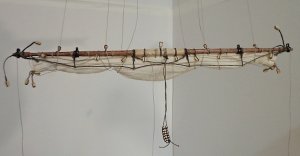
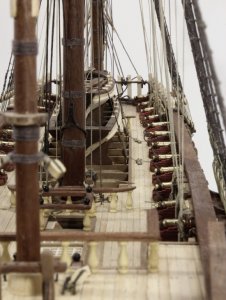
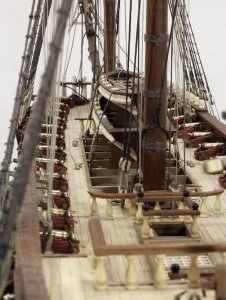
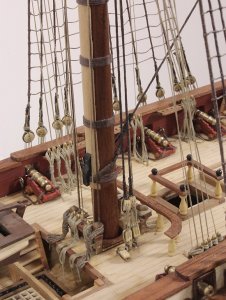
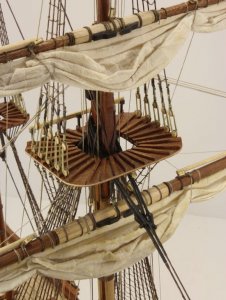
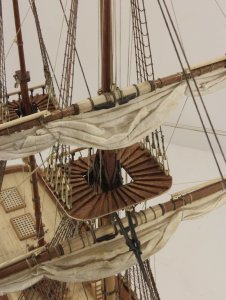
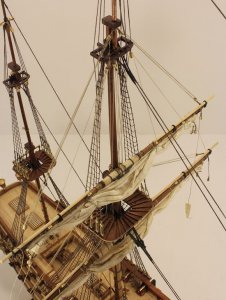
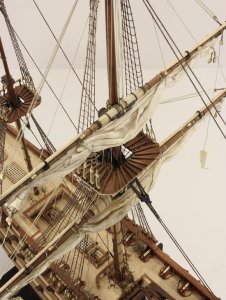
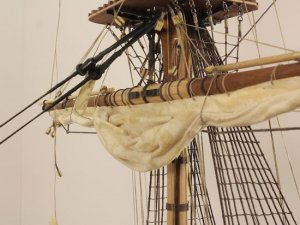
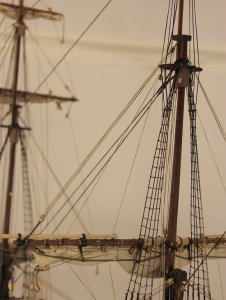
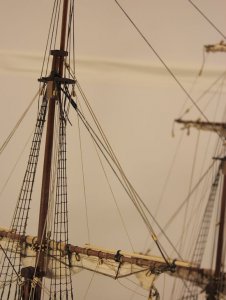
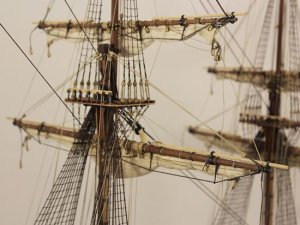
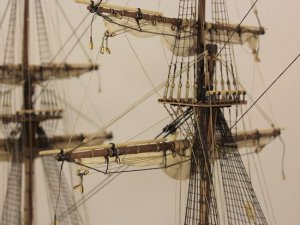
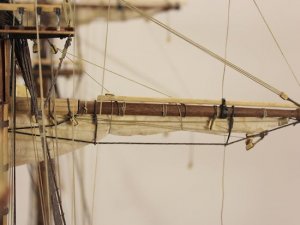
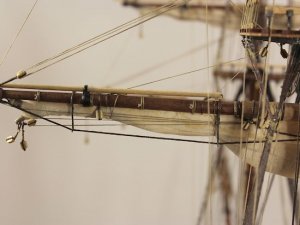
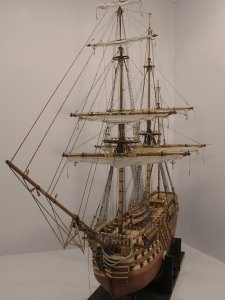
<t>Well, hello all modeling friends. I have worked on the main mast yard and top yard for several weeks off and on. Then for the past three days almost non stop to try and catch up. It seems as if I have a long way to go. <br/>
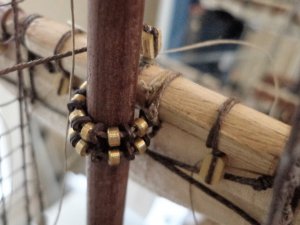
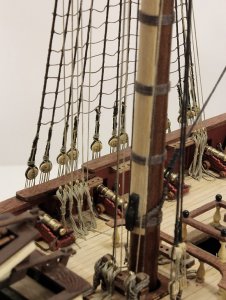
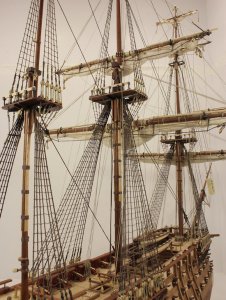
Just before writing this, I realize that all my back stay Dead Eyes rigging has not even been touched. I did it this way to eliminate as much stuff being in the way as possible while I install the rigging for the Pin Rails.<br/>
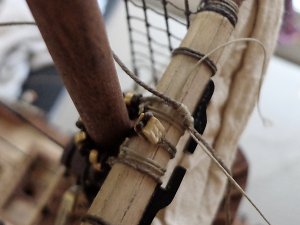
Then I continued to find things that needed to be tidied up. I guess its the details that really slow you down.<br/>
Ok, so I know this is a lot of images, 40 plus or so. I wanted to make sure that whoever else is building this will be offered as many different positions and angles of shots. Now, some may find a lot of mistakes or some will think some of this is good ideas.<br/>
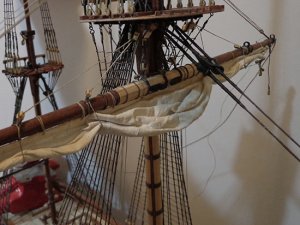
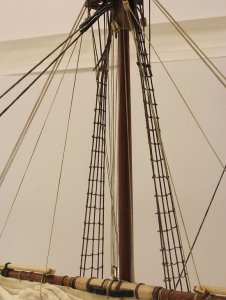
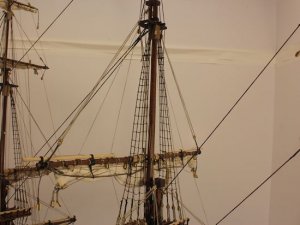
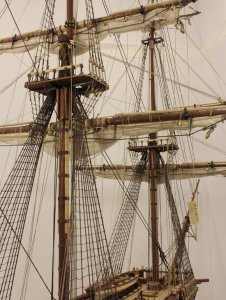
Let me say that due to the position of the Tops Trees, it really throws off the shrouds position in relation to how the running rigging flows. However, due to my inexperience in all sorts of ship construction, I decided at the time to stick with the manual and plans. I knew of one other person that shifted his Top Trees a little Aft to compensate for some down the road problems that might occur. Just because the rigging might look pretty and nice does not mean that it is in the right position or is structured correctly.<br/>
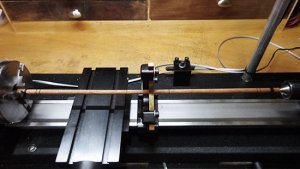
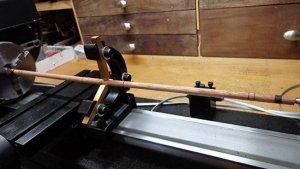
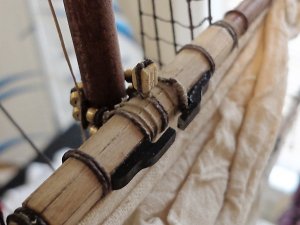
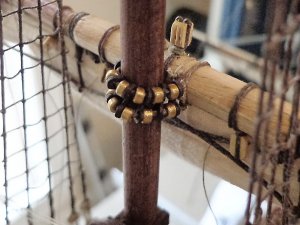
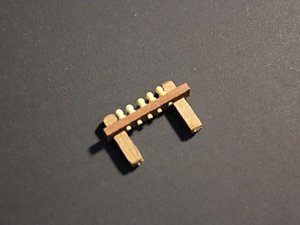
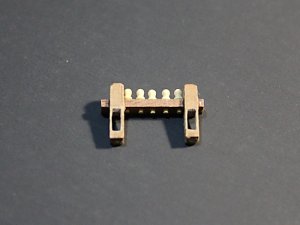
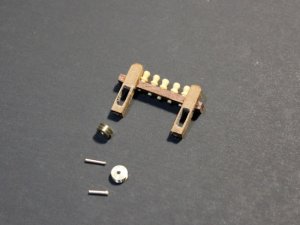
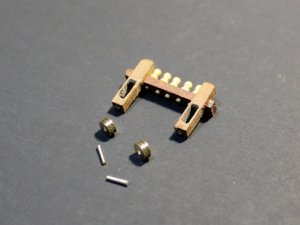
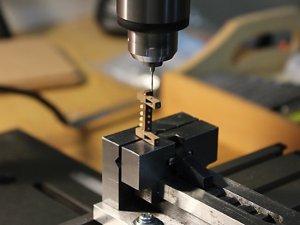
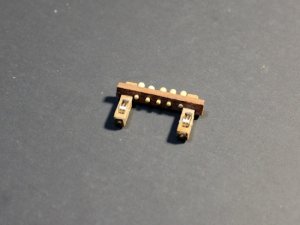
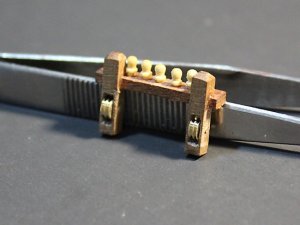
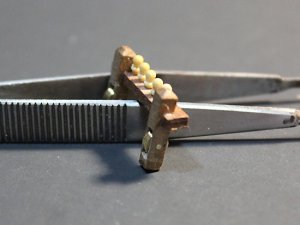
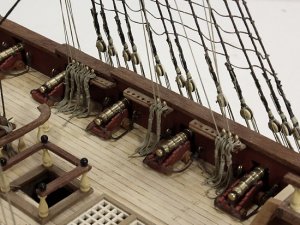
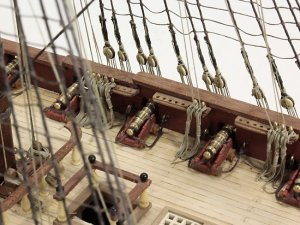
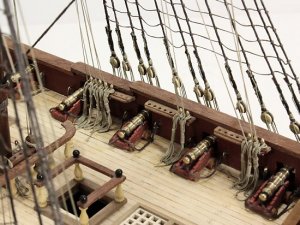
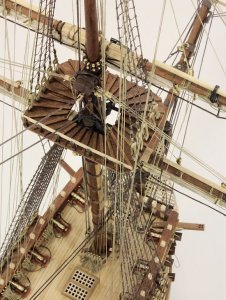
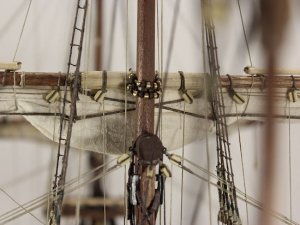
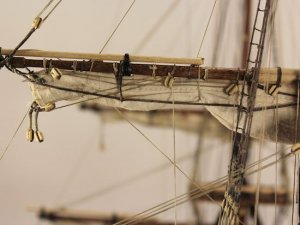
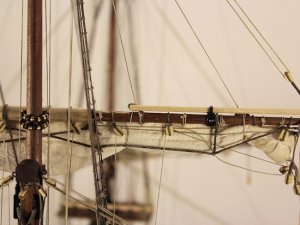
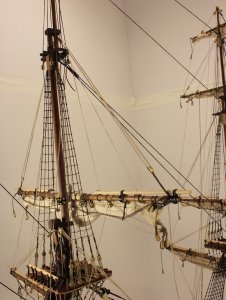
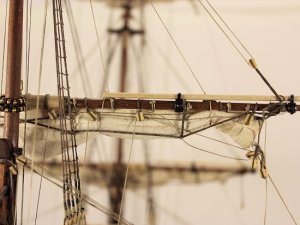
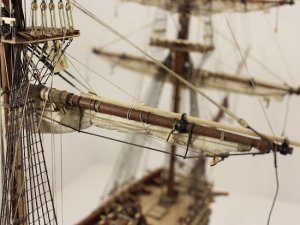
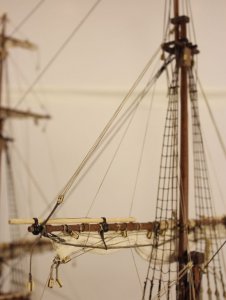
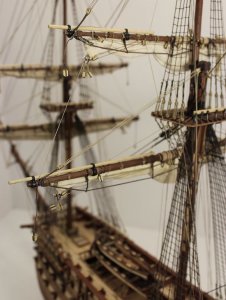
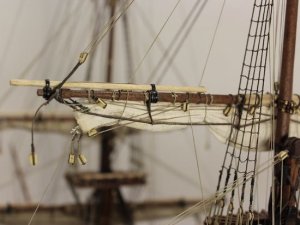
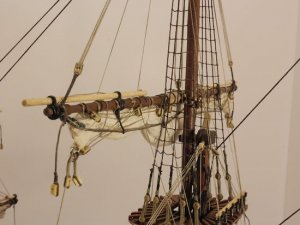
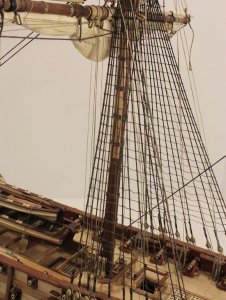
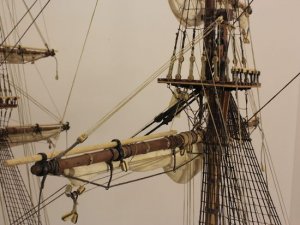
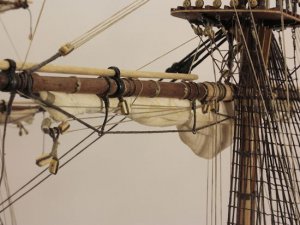
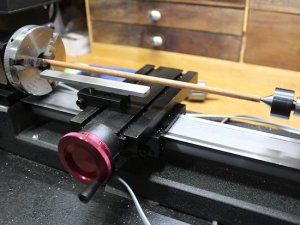
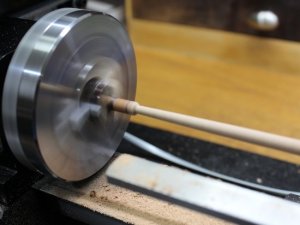
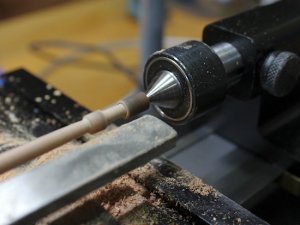
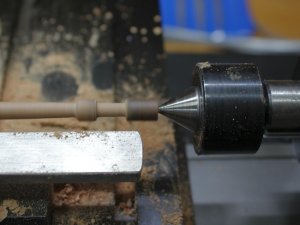
There are some that have found a huge amount of documentation recently on this forum. I want to congratulate those. All of these images are a combination of the Main Yard and the Main Top Yard because I might have left something out on the other post. Also, I am updating this forum post first[/b] as my original build log on the father site shipsofscale.com has a lot of work that needs to be done. It is a huge difference in posting your build log on a forum rather than actually writing the “code” for a web site. It is going to take a great deal of time to get all of the father site up to date. Again that you for tuning in and watching this log mistakes and all. The first images starts out with the Bitts of the Main Mast. This is prime example of once you start something you have to continue it. What I mean is that I thought it would really be a nice touch to actually make and add the pulleys to the Bitts post. Well, then the others have to have it too. So, another slow down to get that done. Those pulleys where made on the lathe and they measure 4mm in diameter and 2 mm wide. As you can see there are actually two pulleys. I don't know why I ask for so much headache on this. I guess I was not satisfied with just a square opening on the Bitts post. Well enough of talking – I hope you enjoy the pictures and documentation.<br/>
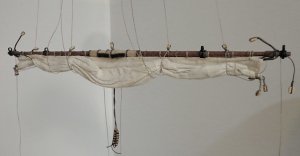
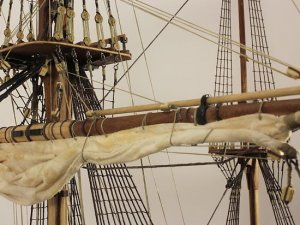
EDIT: April 3, 2014 The Bitt rails rigging lines are NOT correct and will be redone. All the Main Mast Yards Halyards will be moved to the Pulleys. The Stays on the deck tie-offs will be relocated as well. Main Top Yard Rigging with Additional Main Yard Rigging.<br/>
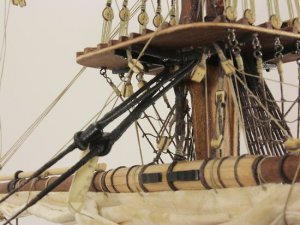
ps. I realize that I need to label the rigging so that one would know which is the Bunts, Leech, and Clew lines. This would take a considerable amount of time of which I do not mind doing. It might come as a later post.</t>
 

Attachments

  • bitts01.jpg
    bitts01.jpg
    48.3 KB · Views: 117
  • bitts02.jpg
    bitts02.jpg
    51.5 KB · Views: 113
  • bitts03.jpg
    bitts03.jpg
    60.9 KB · Views: 107
  • bitts04.jpg
    bitts04.jpg
    52.5 KB · Views: 106
  • bitts05.jpg
    bitts05.jpg
    55.6 KB · Views: 105
  • bitts06.jpg
    bitts06.jpg
    52.5 KB · Views: 105
  • bitts07.jpg
    bitts07.jpg
    58.3 KB · Views: 109
  • bitts08.jpg
    bitts08.jpg
    56.2 KB · Views: 116
  • bitts-rails01.jpg
    bitts-rails01.jpg
    108.7 KB · Views: 116
  • bitts-rails02.jpg
    bitts-rails02.jpg
    102.8 KB · Views: 120
  • bitts-rails03.jpg
    bitts-rails03.jpg
    115.7 KB · Views: 116
  • bitts-rails04.jpg
    bitts-rails04.jpg
    113.7 KB · Views: 114
  • bitts-rails05.jpg
    bitts-rails05.jpg
    74.9 KB · Views: 114
  • bitts-rails06.jpg
    bitts-rails06.jpg
    73.6 KB · Views: 112
  • bitts-rails07.jpg
    bitts-rails07.jpg
    76.5 KB · Views: 114
  • bitts-rails08.jpg
    bitts-rails08.jpg
    100.3 KB · Views: 117
  • maintopyardrigging03.jpg
    maintopyardrigging03.jpg
    101.5 KB · Views: 121
  • maintopyardrigging04.jpg
    maintopyardrigging04.jpg
    95.7 KB · Views: 122
  • maintopyardrigging05.jpg
    maintopyardrigging05.jpg
    96.7 KB · Views: 121
  • maintopyardrigging06.jpg
    maintopyardrigging06.jpg
    112 KB · Views: 120
  • maintopyardrigging07.jpg
    maintopyardrigging07.jpg
    131.4 KB · Views: 119
  • maintopyardrigging08.jpg
    maintopyardrigging08.jpg
    80 KB · Views: 119
  • maintopyardrigging09.jpg
    maintopyardrigging09.jpg
    67.4 KB · Views: 114
  • maintopyardrigging10.jpg
    maintopyardrigging10.jpg
    78 KB · Views: 117
  • maintopyardrigging11.jpg
    maintopyardrigging11.jpg
    66.4 KB · Views: 114
  • maintopyardrigging12.jpg
    maintopyardrigging12.jpg
    64.9 KB · Views: 115
  • maintopyardrigging13.jpg
    maintopyardrigging13.jpg
    71.2 KB · Views: 118
  • maintopyardrigging14.jpg
    maintopyardrigging14.jpg
    60.1 KB · Views: 113
  • maintopyardrigging15.jpg
    maintopyardrigging15.jpg
    78.1 KB · Views: 113
  • maintopyardrigging16.jpg
    maintopyardrigging16.jpg
    71.5 KB · Views: 111
  • maintopyardrigging17.jpg
    maintopyardrigging17.jpg
    62.6 KB · Views: 110
  • maintopyardrigging18.jpg
    maintopyardrigging18.jpg
    59.8 KB · Views: 111
  • maintopyardrigging19.jpg
    maintopyardrigging19.jpg
    48.3 KB · Views: 106
  • maintopyardrigging20.jpg
    maintopyardrigging20.jpg
    48.6 KB · Views: 102
  • maintopyardrigging21.jpg
    maintopyardrigging21.jpg
    52.8 KB · Views: 101
  • maintopyardrigging22.jpg
    maintopyardrigging22.jpg
    55.9 KB · Views: 102
  • maintopyardrigging23.jpg
    maintopyardrigging23.jpg
    93.4 KB · Views: 102
  • maintopyardrigging24.jpg
    maintopyardrigging24.jpg
    57.9 KB · Views: 102
  • maintopyardrigging25.jpg
    maintopyardrigging25.jpg
    62 KB · Views: 99
  • maintopyardrigging26.jpg
    maintopyardrigging26.jpg
    58.9 KB · Views: 97
  • maintopyardrigging27.jpg
    maintopyardrigging27.jpg
    80 KB · Views: 96
  • maintopyardrigging28.jpg
    maintopyardrigging28.jpg
    53.5 KB · Views: 98
  • maintopyardrigging29.jpg
    maintopyardrigging29.jpg
    53.6 KB · Views: 98
  • maintopyardrigging30.jpg
    maintopyardrigging30.jpg
    54.5 KB · Views: 100
  • maintopyardrigging31.jpg
    maintopyardrigging31.jpg
    53.6 KB · Views: 96
  • maintopyardrigging32.jpg
    maintopyardrigging32.jpg
    116.3 KB · Views: 97
  • maintopyardrigging33.jpg
    maintopyardrigging33.jpg
    64.9 KB · Views: 99
  • maintopyardrigging34.jpg
    maintopyardrigging34.jpg
    63 KB · Views: 113
  • fullshot01.jpg
    fullshot01.jpg
    93 KB · Views: 120
  • fullshot02.jpg
    fullshot02.jpg
    127.7 KB · Views: 123
  • fullshot03.jpg
    fullshot03.jpg
    125 KB · Views: 123
Re: OcCre Santisima Trinidad Build Log

<t>WOW!!!<br/>
That is just such an incredibly neat build, it looks like its been digitally enhanced. I am truly amazed how such a perfect build can be achieved?<br/>
Absolutely breath-taking. <br/>
First class, Steve..</t>
 
Re: OcCre Santisima Trinidad Build Log

<t>Thank you Steve and Gary. Much appreciated compliments. Now, I have the Main Top Gallants Prepped on the lathe.</t>
 

Attachments

  • maintopgallant01.jpg
    maintopgallant01.jpg
    63.5 KB · Views: 73
  • maintopgallant02.jpg
    maintopgallant02.jpg
    54.2 KB · Views: 73
  • maintopgallant03.jpg
    maintopgallant03.jpg
    59.6 KB · Views: 73
  • maintopgallant04.jpg
    maintopgallant04.jpg
    54.7 KB · Views: 73
Re: OcCre Santisima Trinidad Build Log

<t>Fantastic work Donnie i must say,and a very informative thread as well.I have also watched your vids on youtube that you made and enjoyed watching, i hope given time i will be able to produce work like this on my new xmas gift of a mini lathe from the wife.<br/>
Merry Xmas and a Happy New Year to you and your family<br/>
cheers steve</t>
 
Re: OcCre Santisima Trinidad Build Log

<t>Thank you Steve and Merry Christmas to you. I am very interested in knowing what brand of lathe you got.<br/>
I wish I were better with the videos. Hollywood they are not. I am sure they win the geek award.</t>
 
Re: OcCre Santisima Trinidad Build Log

<t>This is the one my wife got for me Draper 07989 250W 230V Variable Speed Mini Wood Lathe from amazon, i would have liked a proxxon or similar but this will do the job.Having never used a lathe before i cant compare it to anything else so learning to use this should be fun, i noticed in your photos it looks like the chisel you are using is more like a small screw driver.<br/>
Going to be busy looking round youtube for video's now on how to use it and the other tools i will need for it and how to set things up,it does come with some assembly/safety instructions but nothing else so when i get the chance i will have a play with it and the next thing on the list is the dremel moto saw.<br/>
cheers steve</t>
 
Re: OcCre Santisima Trinidad Build Log

<r>That looks like a nice well built wood lathe. It really comes in handy making things like the mast and Yard Arms which has a slight taper.<br/>
You are correct about the screw driver. Things are on a different scale here. I ground the tip with just an angled edge nothing scientific.<br/>
Actually I used the small screw driver for roughing out the shape and then used a course sand paper to finish the shape followed by a finer grit. You will be surprised to find out how much wood material will come off with just sand paper. What is the distance between the two ends or centers as they say. That measurement is the longest piece of stock you can put on the lathe.This just gives me an idea as to what scale you are working with. If you have any questions about how to use it just email me directly <EMAIL email="donnie@shipsofscale.com">donnie@shipsofscale.com</EMAIL></r>
 
Re: OcCre Santisima Trinidad Build Log

<t>Hi Donnie i think the space is 300mm if i remember right iv'e put the booklet down somewhere and cant find it now but im sure thats what it is and it weighs in at 21kg so its a hefty lump, im going to have to find a bit more out about it so i can get some extra bits for it and then learn some new skills.<br/>
Over the past few months iv'e been going over your videos as never having built a period ship before its all new to me and they are a great help,i like the way you seized up the shrouds and will have a stab at that but probably have to make my own thread up to get the right thickness.<br/>
There dont seem to be alot of stuff on youtube for the likes of rigging and scratch building bits, i intend to have a go at making my own blocks in due course of various sizes and try to make those mice that you did as well.<br/>
cheers steve</t>
 
Re: OcCre Santisima Trinidad Build Log

<t>Thank you Fragle for tuning in and watching. i need to get off my rump and do more on it this weekend.</t>
 
Back
Top