• LUCZORAMA SHIPWRECK SCAVENGER HUNT GIVEAWAY. 4 Weeks of Fun • 1 Legendary Prize ((OcCre’s Fram Ship)) • Global Crew Welcome!
    **VIEW THREAD HERE**

Oseberg V3 Build Log by Ashley

Joined
Apr 8, 2025
Messages
50
Points
78

Location
Central Portugal
Where is all Started

Hi all, I’m newish to this forum. I joined perhaps 3 months ago with a view to getting back into the hobby of model boat building. I was not sure what I wanted to build, so long as I did after more than forty years of not doing so. I’m now retired so have more time.

Initially I was more interested in paddle steamers and tugs. Working boats for the most. I’d built all of them then from scratch except one. I looked around here and on other forums and was truly surprised how things had changed in all those years. Mostly, in the sharing of information online. I became interested in the Oseberg, and that in particular as produced by Pavel.

After much research, I feel I became a little obsessed and started seeking more and more information about the Oseberg and following build logs with the greatest of interest. Finally, I could resist no more and ordered the Oseberg by Pavel Nikitin.

The order was placed about eleven weeks ago and whilst waiting, I became more and more interested in modelling again, and so with itchy fingers, bought the Bugatti Type 35 at 1/12 scale from Italia. That arrived and then a new compressor and much more. My best friend and wife is very understanding. I’m going to have to find a name for her for this forum. Can’t be another admiral. There is one or more here already. We are already know as the A-Team. Perhaps I’ll just call her blondie or cuddles. Yes, Cuddles will do.

My interest in the hobby has be revitalised big time and I’m going to start a build logs here for the Oseberg. I’ve found those by other builders to be most interesting and helpful, and therefore, wish to share my experiences with others on SOS as those past helpful builders. Let me thank them here for their efforts.

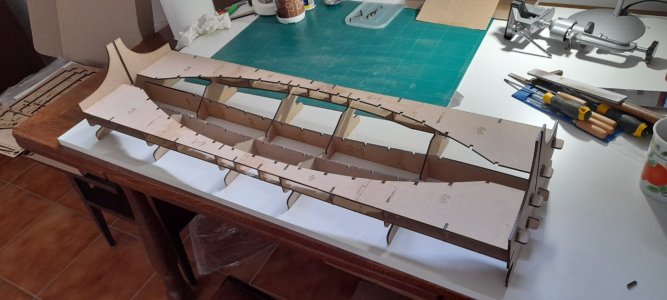
The Jig for Building the Oseberg

I’m sorry I can’t start with and unboxing from yesterday. But here we have part one.
Oseburg-first image.jpg
 
Last edited:
As a fellow Oseberg builder and the first to reply, I'll take a front row seat and will watch with enthusiasm.
Thanks Russ. It in part due to following your build log that I decided to go with this kit. I find the Oseberg fascinating and the fact it's customisable makes it so much better. Upon ordering the kit I started to educate myself on the Vikings and I think this additional knowledge will add to the pleasure of the build.

Just so you know Russ, I feel I learnt a lot following your build and along the way with mine, I'll refer back to yours and as should be the case, the videos of Pavel also. Those are downloaded for better viewing.
 
Thanks Ashley, I'm honored. I'm sorry that I haven't posted anything on the log in a while. Summertime means mowing, gardening, household repairs and living on a lake, spending time on the boat (the real one) while we're still physically able. The winters in upstate New York can be brutal, so we lap up all the summertime that we can. ROTF I'll get back to the Oseberg on the next rainy day that I'm not at work.
 
The Keel - Potential Problems & Solutions

I have now made a real start on the Oseberg. Since I became interested and then ordered the Oseberg, I followed as many build logs as possible. In one of them I read that the builder appeared to have a little difficulty with the alignment of the two halves of the keel. I was concerned about this and the level of char that may require removal.

I checked on the videos as supplied by Pavel. In the part that deals with the keel, he appears not to remove char.

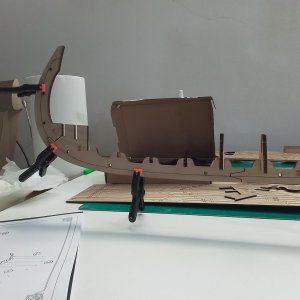
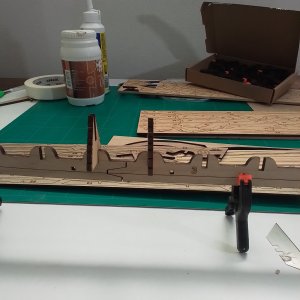
I decided to undertake the connection of all parts as a dry fit and discovered that even though the two halves are very closely aligned, they are not 100% perfect. To be expected with a natural product such as wood I suppose and especially so with such fine tolerances.

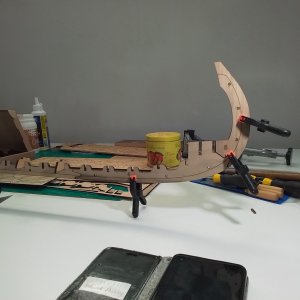
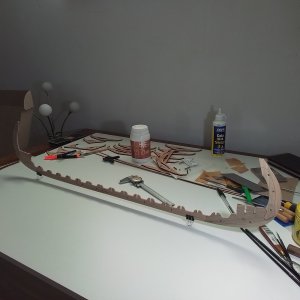
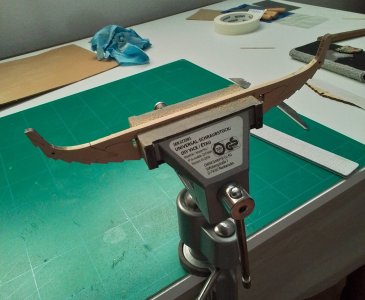
I devised a system as shown here to resolve the problem. All parts are clamped and aligned where most important. This way, it becomes clear where more or less char needs removal to achieve perfect alignment between two halves. I hope.

Upon glueing, I may use a similar technique to maintain alighnment. Grease proof paper between the two sides.

20250620_172623.jpg20250620_174927.jpg
20250620_172617.jpg
 
Last edited:
Ashley

In your background reading, have you come across The Long Ships, a novel by the Swedish writer Frans Bengtsson? It was published in 1941-5. It’s still available on Amazon, which so describes it:

Bengtsson's hero, Red Orm-canny - courageous and above all lucky - is only a boy when he is abducted from his Danish home by the Vikings and made to take his place at the oars of their dragon-prowed ships. Orm is then captured by the Moors in Spain, where he is initiated into the pleasures of the senses and fights for the Caliph of Cordova. Escaping from captivity, Orm washes up in Ireland, where he marvels at those epicene creatures, the Christian monks, and from which he then moves on to play an ever more important part in the intrigues of the various Scandinavian kings and clans and dependencies. Eventually, Orm contributes to the Viking defeat of the army of the king of England and returns home an off-the-cuff Christian and a very rich man, though back on his native turf new trials and tribulations will test his cunning and determination. Packed with pitched battles and blood feuds, and told throughout with wit and high spirits, Bengtsson's book is a splendid adventure that features one of the most unexpectedly winning heroes in modern fiction.

It’s not traditional history, but it based on solid history and it’s a splendid read: funny too. Good background to Pavel Nikitin.

I’m expecting the kit to arrive any day now, so I shall read your log with great attention.

Rodric
 
Keel Construction

The construction of the keel was undertaken with additional forthought due to problems I'd become aware of earlier. The problems were in the incorrect alignment of the Portside and Starboard side of the keel when joined to create a single unit.

I devised a way of aligning the two halves perfectly as described in my previous post. However, it is not possible, in my view, to remove char and achieve a correct fit. There is at one join point, 1mm gap between keel parts, even without me removing char. This being visible on the laser burn side.

With my above mentioned alignment technique, all parts did glue and align properly but result in weaker joins due to the char. The video of Pavel does not show any char removal in this stage.

The Drawings

One the assembly drawings of page 8, I failed to notice that parts 1 - 5 did not dispay a laser burn line along the length of the keel. It can be seen on parts 6 - 11. Here, I had previously aligned the keel's two sides to join as in the drawing's lower illustrations.

Before the joining of the two sides, I watched again the video as supplied by Pavel and noted he flips parts 1 - 5 to reverse its outward facing direction. This would result in the keel burn line facing outwards upon joining the two halves. Fortunately, me flipping the part later did not result in misalignment when gluing together.

The joining pegs are slightly tapered for easier insertion and is a detail that may be missed.

Taking into account the staggered join points of the keel, and the fact it will consist of four laminations total, I do not consider the weaker joints an issue for concern. In fact, I was surprised they held together so well.

After completion of the keel and the final cleanup and sanding I was delighted to find the keel simply slipped into place within the slipway and that other parts could be inserted flawlessly into place. I am impressed.

Proceeding with Caution

As the drawings have limited information it is vital to refer to the videos as available for better understanding.

Summary

So far, I think the precision of the parts I have assembled, to be very accurate for the most. I am of the view that with careful attention to detail, parts, drawings and the videos, the build should be very pleasurable.

20250622_181303.jpg
 
Ashley

In your background reading, have you come across The Long Ships, a novel by the Swedish writer Frans Bengtsson? It was published in 1941-5. It’s still available on Amazon, which so describes it:

Bengtsson's hero, Red Orm-canny - courageous and above all lucky - is only a boy when he is abducted from his Danish home by the Vikings and made to take his place at the oars of their dragon-prowed ships. Orm is then captured by the Moors in Spain, where he is initiated into the pleasures of the senses and fights for the Caliph of Cordova. Escaping from captivity, Orm washes up in Ireland, where he marvels at those epicene creatures, the Christian monks, and from which he then moves on to play an ever more important part in the intrigues of the various Scandinavian kings and clans and dependencies. Eventually, Orm contributes to the Viking defeat of the army of the king of England and returns home an off-the-cuff Christian and a very rich man, though back on his native turf new trials and tribulations will test his cunning and determination. Packed with pitched battles and blood feuds, and told throughout with wit and high spirits, Bengtsson's book is a splendid adventure that features one of the most unexpectedly winning heroes in modern fiction.

It’s not traditional history, but it based on solid history and it’s a splendid read: funny too. Good background to Pavel Nikitin.

I’m expecting the kit to arrive any day now, so I shall read your log with great attention.

Rodric
Hi Rodric. That is most interesting. I have not come across it. I shall check it out and especially so being I've become a little hooked on the Vikings.

I hope there are no delays in your delivery. I thought mine had got lost in customs at one point.

Update.

Just bought the book as an ebook from Amazon.

Thanks Rodric.
 
Last edited:
The Oseberg Build Continues

20250627_175204.jpg


Thoughts so Far


The keel of the Oseberg was an enjoyable part of the build process which did not result in alignment problems that I thought may have been present.

The Frames

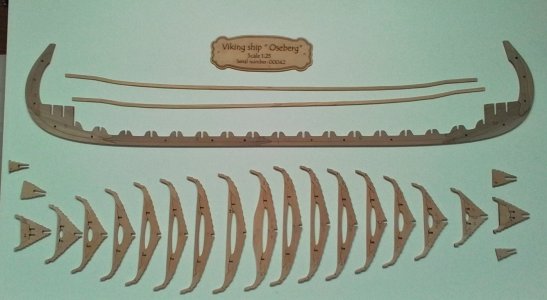
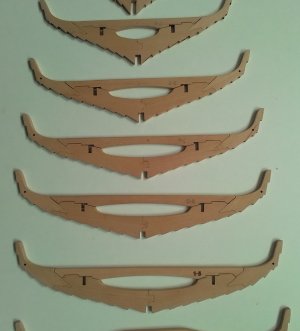
The frame sections I was very much looking forward to and I managed to complete them much quicker than I had anticipated. I was worried that the char was going to be a problems but it only resulted in minor rectifications. As usual, I watched the videos of Pavel and noted he hardly touched the char with a file or other abrasive material where parts joint.

I started the frames with an inspection of each part and a very light clean-up. Following, I joined each of the lower frame sections and gave the joining point a slight filing as the parts are a very tight fit. I did not want the adhesive to be forced out and become less effective.

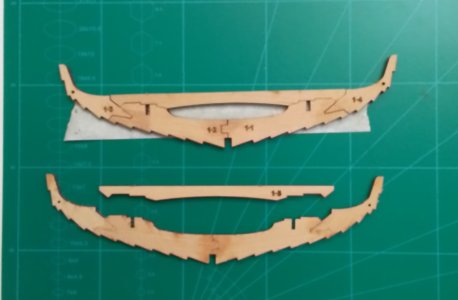
I placed the lower sections of each frame on masking tape to hold them more reliably and the placed the upper frame wings, if I can call them that, into place along with the cross members. This resulted in a poor fit when slotting the frame wings into their lower sections. Slight adjustment was required for perfection.

20250623_164318.jpg

The cross member sections caused a minor fitment problem due to the laser burn line not being parallel. RussF, whose also building the Oseberg, had mentioned this problem in one of his posts and suggested reversing the parts for better alignment. This worked well. Upon correct fitting I glued the upper frame wings into place and allowed the slightest amount of adhesive to escape to hold the frame cross members in place but not too securely.

20250623_175641.jpg

With all frames glues together, I kept each one as a whole unit and in a vice removed the visible char to the exterior sides and following, with the cross member removed, the inner parts. I reattached the cross member and again held it in place with tape so I could clean-up the faces of the frames. This could have been a mistake because initially, the lasered numbers irritated me. I was considering removing the number by sanding, and after starting, realised I was altering the thickness of the frame that could be very significant. That was potentially mistake number one of the build, but only made on one frame.

In the case of the frame sections, I had been concerned about the chamfering of the fore and aft ends. This is something I have not done before. The frame against the mask, I can say that with careful manipulation and work with a Dremel, my worries were without need and the part, I managed to craft very nicely.

Chamfering

The chamfering necessary to the frames as they progress fore and aft found my inexperience in this quarter, and I did struggle on the first two or three frames before settling into a workable routine. I would say, I feel the results may not be perfect where time will tell. I shall report later when planking.

Basically, I did not know if I should shape up until the line, centre of it, or to just beyond it. These parts are a little unclear in their markings and the videos do not provide any real benefits. I would advise, very good and appropriate tools for this section. Also, I would suggest the use of a vice and not just hand held.

20250627_175401.jpg

Conclusion

So far I have found the build process to be most enjoyable. It is the first model I have built is over 40 years and I'm delighted to have taken up the hobby again.
 
The Oseberg Build Continues

View attachment 529258


Thoughts so Far


The keel of the Oseberg was an enjoyable part of the build process which did not result in alignment problems that I thought may have been present.

The Frames

The frame sections I was very much looking forward to and I managed to complete them much quicker than I had anticipated. I was worried that the char was going to be a problems but it only resulted in minor rectifications. As usual, I watched the videos of Pavel and noted he hardly touched the char with a file or other abrasive material where parts joint.

I started the frames with an inspection of each part and a very light clean-up. Following, I joined each of the lower frame sections and gave the joining point a slight filing as the parts are a very tight fit. I did not want the adhesive to be forced out and become less effective.

I placed the lower sections of each frame on masking tape to hold them more reliably and the placed the upper frame wings, if I can call them that, into place along with the cross members. This resulted in a poor fit when slotting the frame wings into their lower sections. Slight adjustment was required for perfection.

View attachment 529259

The cross member sections caused a minor fitment problem due to the laser burn line not being parallel. RussF, whose also building the Oseberg, had mentioned this problem in one of his posts and suggested reversing the parts for better alignment. This worked well. Upon correct fitting I glued the upper frame wings into place and allowed the slightest amount of adhesive to escape to hold the frame cross members in place but not too securely.

View attachment 529260

With all frames glues together, I kept each one as a whole unit and in a vice removed the visible char to the exterior sides and following, with the cross member removed, the inner parts. I reattached the cross member and again held it in place with tape so I could clean-up the faces of the frames. This could have been a mistake because initially, the lasered numbers irritated me. I was considering removing the number by sanding, and after starting, realised I was altering the thickness of the frame that could be very significant. That was potentially mistake number one of the build, but only made on one frame.

In the case of the frame sections, I had been concerned about the chamfering of the fore and aft ends. This is something I have not done before. The frame against the mask, I can say that with careful manipulation and work with a Dremel, my worries were without need and the part, I managed to craft very nicely.

Chamfering

The chamfering necessary to the frames as they progress fore and aft found my inexperience in this quarter, and I did struggle on the first two or three frames before settling into a workable routine. I would say, I feel the results may not be perfect where time will tell. I shall report later when planking.

Basically, I did not know if I should shape up until the line, centre of it, or to just beyond it. These parts are a little unclear in their markings and the videos do not provide any real benefits. I would advise, very good and appropriate tools for this section. Also, I would suggest the use of a vice and not just hand held.

View attachment 529261

Conclusion

So far I have found the build process to be most enjoyable. It is the first model I have built is over 40 years and I'm delighted to have taken up the hobby again.

Your frames look great Ashley! I wouldn't get too caught up in the precision of chamfering the edges of the frames. I think I just split the thickness of the line. You will be adjusting these with a sharp x-acto when you are laying the strakes anyway. Your joinery is quite good. I also thought about sanding off the numbers, but stopped for the same reason as you. Your deck boards will be fastened down anyway and they will be hidden. That is, of course, unless you are planning on leaving some off to show ballast, stowage, etc. ala Olha B. However, keep in mind that these frames are not scale representations of the actual ship, but it is your call.
 
Your frames look great Ashley! I wouldn't get too caught up in the precision of chamfering the edges of the frames. I think I just split the thickness of the line. You will be adjusting these with a sharp x-acto when you are laying the strakes anyway. Your joinery is quite good. I also thought about sanding off the numbers, but stopped for the same reason as you. Your deck boards will be fastened down anyway and they will be hidden. That is, of course, unless you are planning on leaving some off to show ballast, stowage, etc. ala Olha B. However, keep in mind that these frames are not scale representations of the actual ship, but it is your call
Hi Russ. Thank you for the kind comments. I spent a lot of time reading your build log and that of Pathfinder65. Yours and his were so very helpful. I'm still going back and to, to include the paper instructions and videos. There is a lot to be gained. I started this build log as perhaps you suggested it. Even more important is when we can share thoughts and ideas it can be so enjoyable doing so. Others will also benefit. You keep up the good work with your quality build log. One other thing. I'm not so happy with the deck. The Oseberg deserves so much more. What a beautiful ship she is.
 
Hi Ashley, I just stumbled on to your log. You have made qiute a bit of progress in a short time.

Jan
Hi Jan, thank you for your comment. It is nice to receive feedback from other fellow builders. You are doing a beautiful job on your Oseberg. I may make progress that appears rapid but in part, that's because I've learned something from you. Plus, I'm not having some of the health issues as you do. In any event, it's most wonderful to read your words from here in Portugal. Keep well.
 
One other thing. I'm not so happy with the deck. The Oseberg deserves so much more.

I agree, that's why I'm putting so much work into mine and is where I left off when summer got in the way. :D As you probably know, the deck sloped up and back down at the mast partner. I'm shaping new deck boards individually to transition from flat to curved and it takes a lot of carving, shaping and sanding. I'm about 25% done with just that.
 
I agree, that's why I'm putting so much work into mine and is where I left off when summer got in the way. :D As you probably know, the deck sloped up and back down at the mast partner. I'm shaping new deck boards individually to transition from flat to curved and it takes a lot of carving, shaping and sanding. I'm about 25% done with just that.
I shall look forward to more build log posts from you. I waited a very long time for my kit to arrive and even before that, I got the itch to build the Bugatti Type 35. All in all a busy time for me so now, I need to set time aside to catch up on the works of others.
 
An Apology

First an apology if needed on what appears to be really very sloppy work. There is an explanation.

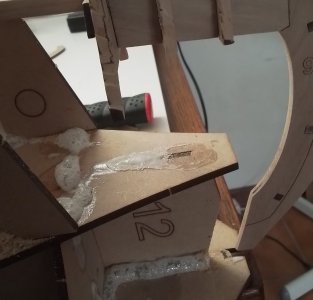
The adhesive I used on the Second Slipway seems to have had some kind of chemical reaction with the MDF parts of the slipway in that it bubbled after being applied. It bubbled in a very similar way to expanding foam. It is supposed to be a PVA adhesive. This is not the same adhesive as I've used on other parts of the kit.

20250704_201059.jpg
A strange adhesive for sure

An Unplanned Post

It was not my intention to write anything on the construction of the Second Slipway as in all honesty, there ought to have been no problems. I was wrong. It is also not for the carpenter to blame his tools. The following are my observations and not critism.

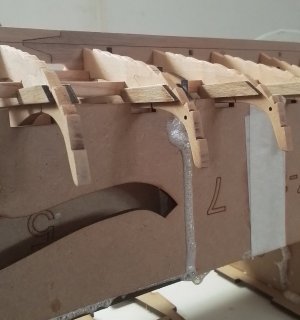
20250704_193407.jpg
The part I had to cut away fore and aft to permit insertion.

20250704_193634.jpg
She is not seated correctly

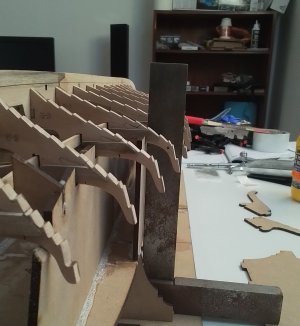
20250704_195236.jpgNice Alignment Here

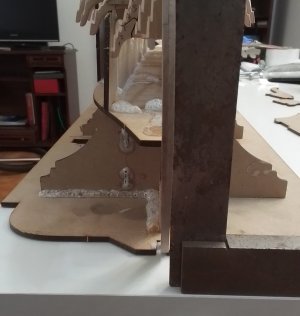
20250704_195140.jpg
Perfection horizontally

The plans as supplied with the kit are the same as seen in the video as provided by Pavel. The difference is that the parts are not in line with the plans. This does not matter much as common sense aids in construction. All parts fit together well with a minimum of adjustment necessary. I remain at this point with the view that the kit is beautifully crafted. However, I would say the whole structure does become fiddly if assembly is attempted in one time. I executed the process in two/three parts where I still need to attach the final sections later for working on the deck. Not show here are large clamps used to hold the various parts together and keep perfect alignment.

The fact that the adhesive expanded made no difference to the final slipway as heavy clamps were used to keep the whole rigid, and the surface I work upon is perfectly flat and level. I also know that the Oseberg keel is in perfect alignment and along the way, I have used a setsquare.

Following the Construction

Upon completion I discovered the OseBerg keel and frames do not fit as I would have expected. First, I discovered that part 12 of the slipway did not permit proper ship alignment. Upon further inspection of the drawings, I noted that I had fitted these the wrong way up. I corrected by removing part of the MDF to allow correct seating. The diagrams are not overly clear about fitment where this remains my fault. As said before, follow the videos closely.

With the correction I made to parts 12, the keel and frames could be inserted without misalignment. Upon closer inspection I discovered that the keel and frames where not seated properly. I discovered some parts of the slipway did not permit good seating. This continues to be the case. I do not believe it is a bad slipway design or poor workmanship on my part. The problem lies in too many parts laid together to form a single unit of perfection. It's difficult.

Resolving the Problem

Clearly, having a less that perfect glove like fit may potentially create problems later while planking. It has been some 45 years since my last planning and not of the same sort where I was able to then use fillers. Lapstrake is new for me and I remain a little nervous.

In an attempt to create a more rigid fitting of the keel and frames, I intend to hold that part in place with the use of perhaps copper wire drawn tight and attached to the frames and slipway. Also, I intend to hold the aft and stern ends more rigidly. I seem to remember that someone had a similar problem with the seating of the keel.

Conclusion

The model I remain more than happy with. Since before I received it, I was concerned about various aspects of the build process. I would not kid myself over my abilities. I felt confident I could overcome any potential problems due to being a very determine and precise person. At this time, I feel I have learnt a few thinks and in particular, in the construction of laser cut models. The story and pleasure shall continue.
 
Hi Ashley,

First - don't panic. It will turn out fine. ;)

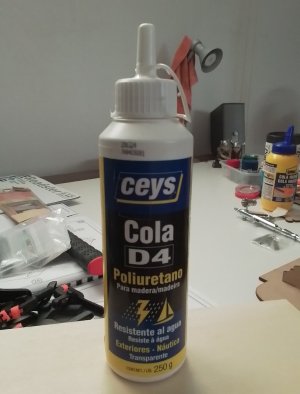
It is supposed to be a PVA adhesive.

Your glue did not have a reaction to the MDF. Looking at the front of the bottle, it says polyurethane (PU). That is NOT PVA and is about as far from it as you can get. Before even seeing the pictures, as soon as you mentioned foaming, I immediately knew what you were using. Please, take that bottle of PU and get it as far away from your models as you can. ROTF Go get yourself some Titebond II or similar, but make sure it actually says PVA.

I don't know if you have Gorilla Glue in Portugal, but it's original formula is PU. Their claim was that it would hold anything. Pure marketing. PU glue, an expanding glue (as you found out) is only good for VERY tight fitting and well clamped joints, such as a mortice and tenon on a table apron. Anywhere that glue has an opening, it will expand out in a foam and has no strength at all.

I seem to remember that someone had a similar problem with the seating of the keel.

I did, but it was on the first jig. I tied the keel down to the jig as I installed the longitudinal stringers and cross members (bitis). As for fitting in the second jig, I can't really see enough of the whole jig to see where you may have gone wrong, but don't fret. The boat's frame should be rigid enough now, that it will hold its shape very well. Trying to twist it out of shape now by forcing it to fit the jig will cause more problems than they cure. Your frame should just lay loosely in the jig. It is meant as more of a cradle than something to actually shape your boat. Cut away or add anything you need to the jig to get a stable platform on which to cradle your boat as you add the strakes.

It's all good - breath. :D
 
Thank you Russ for your comments. I sure did make a mistake on the glue. I have a few problems sourcing anything in Portugal. It's not so easy reading the labels and in all honesty, I bought it for the wife who wanted something for making bird houses outside. I guess I was mislead by the D4 part of the label. I'm far from a glue expert. Thanks for your tips on that. Most welcome.

I shall post another image or so of the slipway to make it more clear. Every thing is aligned I'm very sure except. It is just sitting in its frame loosely. It does not need twisting to align but what is not happening is that the keel part is not sitting in line with the cutout in the slipway base. I'll examine it more tomorrow. Thank you for you interest. Oh, I see the 3D printer was very handy.
 
An Apology

First an apology if needed on what appears to be really very sloppy work. There is an explanation.

The adhesive I used on the Second Slipway seems to have had some kind of chemical reaction with the MDF parts of the slipway in that it bubbled after being applied. It bubbled in a very similar way to expanding foam. It is supposed to be a PVA adhesive. This is not the same adhesive as I've used on other parts of the kit.

View attachment 530062
A strange adhesive for sure

An Unplanned Post

It was not my intention to write anything on the construction of the Second Slipway as in all honesty, there ought to have been no problems. I was wrong. It is also not for the carpenter to blame his tools. The following are my observations and not critism.

View attachment 530063
The part I had to cut away fore and aft to permit insertion.

View attachment 530064
She is not seated correctly

View attachment 530066Nice Alignment Here

View attachment 530067
Perfection horizontally


The plans as supplied with the kit are the same as seen in the video as provided by Pavel. The difference is that the parts are not in line with the plans. This does not matter much as common sense aids in construction. All parts fit together well with a minimum of adjustment necessary. I remain at this point with the view that the kit is beautifully crafted. However, I would say the whole structure does become fiddly if assembly is attempted in one time. I executed the process in two/three parts where I still need to attach the final sections later for working on the deck. Not show here are large clamps used to hold the various parts together and keep perfect alignment.

The fact that the adhesive expanded made no difference to the final slipway as heavy clamps were used to keep the whole rigid, and the surface I work upon is perfectly flat and level. I also know that the Oseberg keel is in perfect alignment and along the way, I have used a setsquare.

Following the Construction

Upon completion I discovered the OseBerg keel and frames do not fit as I would have expected. First, I discovered that part 12 of the slipway did not permit proper ship alignment. Upon further inspection of the drawings, I noted that I had fitted these the wrong way up. I corrected by removing part of the MDF to allow correct seating. The diagrams are not overly clear about fitment where this remains my fault. As said before, follow the videos closely.

With the correction I made to parts 12, the keel and frames could be inserted without misalignment. Upon closer inspection I discovered that the keel and frames where not seated properly. I discovered some parts of the slipway did not permit good seating. This continues to be the case. I do not believe it is a bad slipway design or poor workmanship on my part. The problem lies in too many parts laid together to form a single unit of perfection. It's difficult.

Resolving the Problem

Clearly, having a less that perfect glove like fit may potentially create problems later while planking. It has been some 45 years since my last planning and not of the same sort where I was able to then use fillers. Lapstrake is new for me and I remain a little nervous.

In an attempt to create a more rigid fitting of the keel and frames, I intend to hold that part in place with the use of perhaps copper wire drawn tight and attached to the frames and slipway. Also, I intend to hold the aft and stern ends more rigidly. I seem to remember that someone had a similar problem with the seating of the keel.

Conclusion

The model I remain more than happy with. Since before I received it, I was concerned about various aspects of the build process. I would not kid myself over my abilities. I felt confident I could overcome any potential problems due to being a very determine and precise person. At this time, I feel I have learnt a few thinks and in particular, in the construction of laser cut models. The story and pleasure shall continue.
Hi Ashley,

I've never seen glue react to MDF like that, I'm surprised.

I agree with Russ, the second jig is only a cradle to hold your ship while planking. If you can get your model to fit flat without forcing it, that's all you need.

I'm look forward to watching your build, so far it looks great!

Steve
 
Back
Top