• Ships of Scale has incorportated an extra level of security when you log In. Please follow on-screen prompts to acknowledge that you are not a robot via a "Check Box" or a "Pictorial Check Box Puzzle". This is needed due to higher level of AI Activity Security.
  • SUBSCRIBE TO SHIPS IN SCALE TODAY!

    The beloved Ships in Scale Magazine is back and charting a new course for 2026!
    Discover new skills, new techniques, and new inspirations in every issue.

    NOTE THAT OUR NEXT ISSUE WILL BE July/August 2026
  • Win a Free Custom Engraved Brass Coin!!!
    As a way to introduce our brass coins to the community, we will raffle off a free coin during the month of August. Follow link ABOVE for instructions for entering.

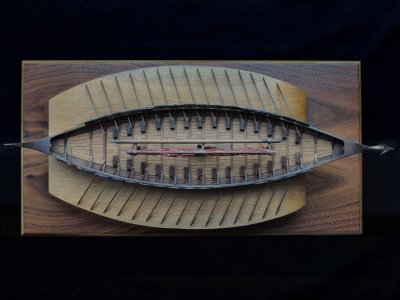
Oseberg V3 Build Log by Ashley

Even before I started actual construction of my Oseberg, I knew I wouldn't be able to tolerate the oar holes being completely different from the actual ship. Additionally, as I was applying all the other strakes, as you know, Pavel left some extra length in them to allow for trimming to a close fit at the joints. I figured that if that was the case with the oar strakes, it could be a real problem.

That is why I ordered some sheet birch from @Dave Stevens (Lumberyard) at https://www.dlumberyard.com . I sent him some photos of the kit sheets and he matched them as closely as possible. I plan on making my own oar strakes and now, thanks to you, I am aware of the misalignment issue. Hope you can get it worked out.
Hi Russ, there is no extra on the lengths. Not even a millimeter. If there was, it would not help because so many of the oar holes are misaligned. I need to make a new set where I'll create them to be more like the museum example. If I buy a little lathe later, I'll also make replacement oars.

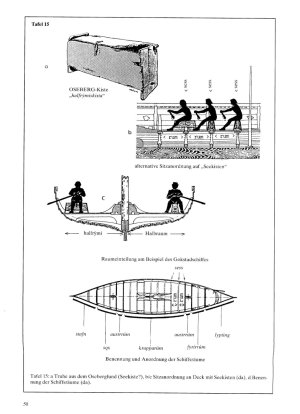
The bench positions in the plan drawings also needs looking at as its impossible to row as detailed.

Portugal is far from good when trying to seek anything. They are a little behind on the internet and using it for the purpose of marketing their products. What I did this morning was ordered 5 sheet (minimum) via Amazon in Spain. Most of what I buy comes from northern Europe in fact. I'll get back to the Oseberg but I am disappointed that these issues are not corrected.
 
Hi Ashley.

That's a real bummer for sure, I've never heard of anyone else noticing this. From day one several people have mentioned the shape of the oar cutouts being wrong, I'm surprised Pavel never made a fix for it. Maybe that's why all of his model pics show the oars stored onboard, instead of fully displayed. In all of the completed builds of Pavel's Oseberg 1/25 V3 I've seen, none of them showed the oars displayed...maybe that's why no one noticed before you.

When people complained about the mast being one frame off and the oars being way out of spec he made corrections and made them available. Maybe if he is contacted he can address this and make a fix for it. I know very little about CAD or Laser Printing but I can't imagine it would be hard for him to make a correction, we can only hope.

Steve
Hi Steve,

Ship building is a great hobby to be involved in where these days ,we can communicate around the world so easily. It can help us all - the sharing of information. That's why when it was suggested here, how about me doing a build log, I thought, why not. I've learnt a lot through Youtube and SOS plus other forums similar to this. During the works in my previous posting, I have gained so much knowledge. Why not share? Help the community.

Your comment about the oars always being onboard, I'd not ever considered. You could be correct there. From a marketing perspective, the oars in operational place would have been very attratcive.
 
Hi Russ, there is no extra on the lengths. Not even a millimeter. If there was, it would not help because so many of the oar holes are misaligned. I need to make a new set where I'll create them to be more like the museum example. If I buy a little lathe later, I'll also make replacement oars.

The bench positions in the plan drawings also needs looking at as its impossible to row as detailed.

Portugal is far from good when trying to seek anything. They are a little behind on the internet and using it for the purpose of marketing their products. What I did this morning was ordered 5 sheet (minimum) via Amazon in Spain. Most of what I buy comes from northern Europe in fact. I'll get back to the Oseberg but I am disappointed that these issues are not corrected.

Oops, I forgot you are in Portugal.

Aside from the misshapen oar ports, another reason I decided to make my own strakes is to make up for any variance to the gunnel that may have happened as I applied the other strakes. If I overlapped my strakes just a little too much, the final strake would be too narrow. This way, I can make it to fit.

On a side note regarding the oar ports, according to excavation documents, unlike other burial finds, there is no evidence on the original that there were ever any covers for the ports as Pavel has indicated. This fact alone has sparked some conjecture about the ship. Since the gunnels are so low in this type of vessel, it could easily ship water through the ports in rough seas, so there are a couple of thoughts about this. One is that the vessel was originally used to ferry a high ranking official (one of the women found buried with her) only in inland waters on relatively calm days and the other is that there may have been another style of "plug" that was not fastened to the hull with a hinge pin. No evidence of these were found however, so who knows?
 
Hi Steve,

Ship building is a great hobby to be involved in where these days ,we can communicate around the world so easily. It can help us all - the sharing of information. That's why when it was suggested here, how about me doing a build log, I thought, why not. I've learnt a lot through Youtube and SOS plus other forums similar to this. During the works in my previous posting, I have gained so much knowledge. Why not share? Help the community.

Your comment about the oars always being onboard, I'd not ever considered. You could be correct there. From a marketing perspective, the oars in operational place would have been very attratcive.
Greetings... A drakkar is truly beautiful with its oars stowed, sailing under sail... and just as beautiful when moving under oars. Perhaps it’s worth having two models... to fully showcase all that beauty!23.jpg
 
This is true for sure. The image is also very beautiful. The position of the sailor chests is one of question. I need to investigate this. Thank you for the input.
 
This is true for sure. The image is also very beautiful. The position of the sailor chests is one of question. I need to investigate this. Thank you for the input.

This is true for sure. The image is also very beautiful. The position of the sailor chests is one of question. I need to investigate this. Thank you for the input.
Take your pick... it’s a debatable point... perhaps things played out differently in different situations...50 — копия.jpg
 
A Beneficial Supplier Found

I have been reading the build log of the HMS Sphinx - Vanguard Models 1:64 by Ronald-V. I have been thinking of my next model and became interested in the models as produced by Vanguard Models. In that build log, Ronald-V required additional wood. He mentioned Hobbymill, a supplier in Europe. I live in Portugal and it's a devil of a job finding any suppliers here and therefore, I mention Hobby Mill here, as one I'm able to source from and as recommended by Ronald-V. It's as a reminder for myself and others in a similar situation as myself. Thanks to Ronald-V for the original link.

A Supplier is Below

Hobby Mill
 
Last edited:
Back in Business

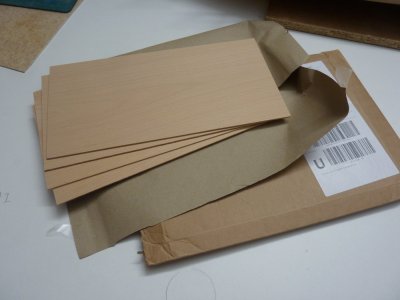
My Amazon delivery of Beechwood arrived today. Fortunately, it is a good match in grain and colour. Thickness is 2.4mm, so a little thick. I'll thin it to the required 1.5mm.

In some respects, having discovered the additional problems in the top strake parts, I'm glad that I need to make replacements as they will be much more like the originals as seen in the museum. If the inaccuracy had been minor, perhaps I would have left it. In this case, far too many errors are in all six parts as supplied in my kit to the point where the oars could not be inserted correctly and if they were, shields could not be in the correct positions .

P1090348.JPG

Summary

I'm looking forward to getting back to the building process.
 
Today was a Fun Day - Not a Thursday

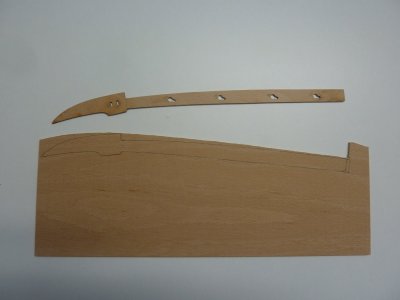
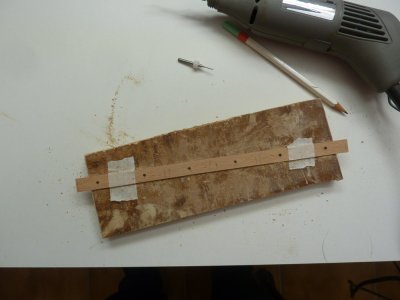
I was able to crack on with the Oseberg now that I have the Beechwood sheets. I started by tracing around the original parts, and making them 1cm longer than required. The shapes I tried cutting on an electric fretsaw and it never worked. It looked like a drunk had tried. I reverted to a hand fretsaw and it was a bit wobbly for sure until I got the hang of cutting. The wife said do it with less pressure, so I did and that improved the line cut. Another point for her. With the straight centre sections, I cut the sheets with a Stanley knife.

P1090349.JPG

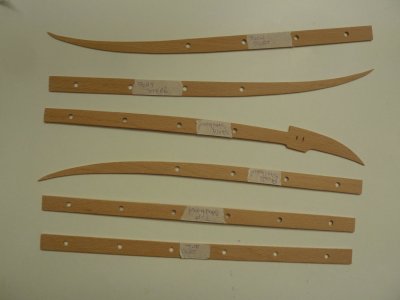
Filing, sanding and shaping into size was enjoyable with many checks to ensure they remained accurate. The problem I did have was making the parts thinner as was required. One section I broke while planing with a small cabinet hand held planer. In the end, all was good and I was delighted to have the replacement parts looking good.

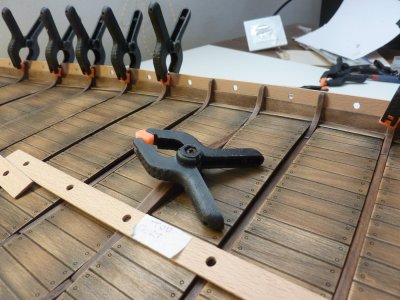
After the basic shape was completed I cut to length and dry fitted countless times and when all was well, I marked between each bulkhead and marked their positions. Following, I measured the centre and drilled tiny holes and then opened these up with a file. I never knew the Dremel was so limited in chuck size. It would also be nice to have a slow start drill. One of the oars I have completed and checked it would fit through the oar opening.

P1090359.JPG

P1090363.JPG

P1090361.JPG

Staining

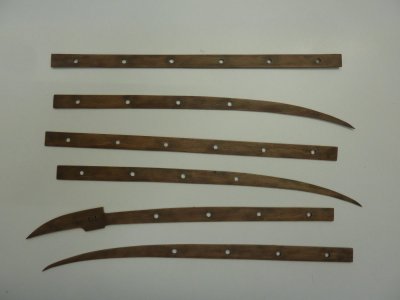
Staining went well but here I did notice that there is a slight difference between the original wood as supplied by Pavel and the replacement. The stain absorption is different resulting in a slight difference to the section below. It shall not be noticed but if it had been mid-planks on the hull, I would be very disappointed.

P1090364.JPG

Final Thoughts for Today

I'm a happy chappy as I'm back with the build. More important is that I replaced some parts I was far from impressed about since discovering they were not correct. In the replacement, I made just a simple hole for the oar. I feel it looks better than trying to duplicate the original shaped openings, at the scale necessary. Also it would be extremely difficult given my tools and ability. Further, I found it very rewarding making these replacement parts, even though simple.
 
Nice job Ashley!

Did you decide against putting in the blade clearance ears on the oar ports, or do you plan on doing it later?

Screenshot 2026-10-29 153014.jpg
 
Nice job Ashley!

Did you decide against putting in the blade clearance ears on the oar ports, or do you plan on doing it later?

View attachment 647144
Hi Russ,
I thought about that but at 1/25 scale that result in an ear of .8mm. The thickness of a very thin saw blade. I feel that perhaps a black ink line could do. I'll see how it looks when the shield support bar is in place along with the shields themselves.
 
Back
Top