How do I remove the incorrect E-2 seaman from below my name and enter a jpg of my E-5 PT-2?????
You are using an out of date browser. It may not display this or other websites correctly.
You should upgrade or use an alternative browser.
You should upgrade or use an alternative browser.
Kurt Konrath
Kurt Konrath
Are you a prior Navy person>
Ranks listed here under your aviator are based mostly on number of messages you have posted.
They are not reflective of personnel military rank.
As a retired USAF E-7 I understand the rank title issues.
And a thanks for your service!
Ranks listed here under your aviator are based mostly on number of messages you have posted.
They are not reflective of personnel military rank.
As a retired USAF E-7 I understand the rank title issues.
And a thanks for your service!
Are you a prior Navy person>
Ranks listed here under your aviator are based mostly on number of messages you have posted.
They are not reflective of personnel military rank.
As a retired USAF E-7 I understand the rank title issues.
And a thanks for your service!
Hi PT-2,
The ranking system is just a FUN ranking system that is solely created to rank members that have n+1 number of posts. As the number of posts that you make or respond to then your SOS ranking will change. The badges are NOT based on any personal service in the Military you have done.
The ranking system is just a FUN ranking system that is solely created to rank members that have n+1 number of posts. As the number of posts that you make or respond to then your SOS ranking will change. The badges are NOT based on any personal service in the Military you have done.
Hi PT-2,
The ranking system is just a FUN ranking system that is solely created to rank members that have n+1 number of posts. As the number of posts that you make or respond to then your SOS ranking will change. The badges are NOT based on any personal service in the Military you have done.
I appreciate the going back to Boot Camp approach to earn the stripes.Are you a prior Navy person>
Ranks listed here under your aviator are based mostly on number of messages you have posted.
They are not reflective of personnel military rank.
As a retired USAF E-7 I understand the rank title issues.
And a thanks for your service!
Yes, in 1963 I launched a short hitch in naval aviation as a photo interpreter primarily assigned to heavy attack reconnaissance squadrons out of NAS Sanford Florida connected with the RA5C Vigiante with 12 month cruises in the Med on CVA-60 Saratoga and then immediately following on CVA-61 Ranger operating on Yankee Station in the Tonkin Gulf with missions over the North. . . Tonkin Gulf Yacht Club. After a three year term I returned to school to complete my degree in architecture and bought a Constructo Select Series 18" scale pilot boat which was about 2/3 finished before going into dry dock until I pulled it out to complete it three months ago. Still about a month away from completion and the start of a 3/16" Bluenose from ModelExpo. While waiting for some parts and missing sail to be sewn I built a Mantua French Naval Cannon 1:17 which I tricked up as it was incorrect and lacking in the rigging necessary for shipboard firing which got me focused on blocks and rigging and at the same time I made a rope walk for the proper scale and hand of the falls. Plenty of dockside time to read up and chart my course for the Bluenose.
I would like to see the Rope WalkI made a rope walk for the proper scale
Wow.!! Welcome aboard.! Friendly place, this. Lots of good folks.
Welcome to SOS... Hope you stick around... I too would like to see the rope-walk.!
Welcome to SOS... Hope you stick around... I too would like to see the rope-walk.!
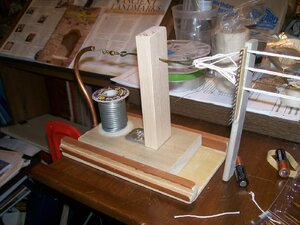
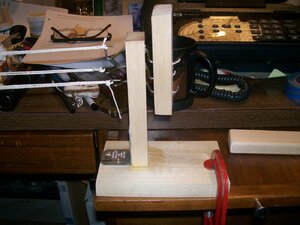
I will have to borrow my wife's camera as I have had zilch luck in downloading photos from my Iphone. It is simple to make with some spare wood and coat hangers that I found Googling up ropewalks. I also use a painters brush comb to separate the three twisted strands when twisting either the right hand clockwise cable or left hand counter-clockwise hawser lines. The number and size of the intial threads that are walked back and forth determine the diameter of the final product. There are a lot of YouTube videos about rope walks and rope making that I saw and consider in making my own. I have been doing this on the front of my desk with two pencile trays pulled out to produce lines of about 48 inches but with greater separation of the two end pieces any length could be produces. I'll post some photos in the next day or two.
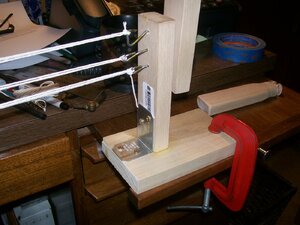
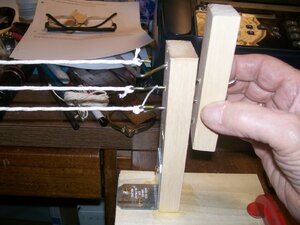
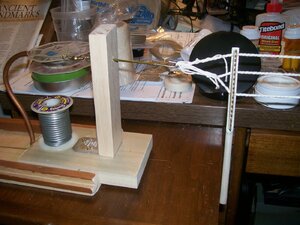
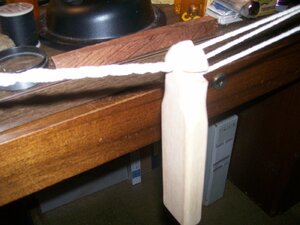
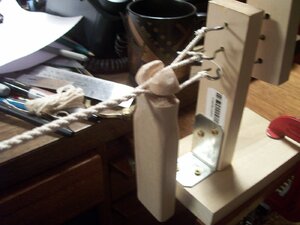
Here are a a series of rather poor photos of my ropewalk. I show the two components made as found on a YouTube search of wood and coat hanger wire: sliding or "sled" end to tie all three sets of strands with a weighted tension and friction base of sandpaper; the other fixed or twising end to receive the sets of threads and the rotating handle on the back for initial twising of threads and then with a brush comb to separate them into the three sets the sliding guide is applied and the desired handed twisting by totating the fixed end begins. . . working to achieve a 45 degree lay as the twisting continues. When done, whip each end to hold the hawser or cable lay in place. The use of heavy string was to illustrate the process and resulted in a line of about 5mm or 3/26 dia. I have made lines of many variations from size of starting thread, and number of lays back and forth for each strand experimenting from two to five but three is correct. If you upsize this you can make actual rope using jute twine from the box store. Two photos in the series are out of order as I put the brush comb to separate the three strands in place, holding it with a rubber band, before the sliding guide is put in place and the final twisting begins.I will have to borrow my wife's camera as I have had zilch luck in downloading photos from my Iphone. It is simple to make with some spare wood and coat hangers that I found Googling up ropewalks. I also use a painters brush comb to separate the three twisted strands when twisting either the right hand clockwise cable or left hand counter-clockwise hawser lines. The number and size of the intial threads that are walked back and forth determine the diameter of the final product. There are a lot of YouTube videos about rope walks and rope making that I saw and consider in making my own. I have been doing this on the front of my desk with two pencile trays pulled out to produce lines of about 48 inches but with greater separation of the two end pieces any length could be produces. I'll post some photos in the next day or two.
I hope this is clear enough if you want to build a similar or better rope walk but mine is sufficient for my needs.
Thank you.!! Far better than anything I have.!!
Zoltan, my other admin helped me find the post. I will read it in its entirety tomorrow. Thanks.
Donnie
Donnie
ok, so the 'thing' that has the three notches, I think they call that 'the top' - soooo. I assume that you insert that 'top' manually at the start (after the lines are twisted, then you must be sliding 'the top' along to the other end (where the crank is) and that is what combines all the three lines together? For some reason, I am having difficulty visualizing this - may be a video might help.
If this is the case, then how many times do you know how much to crank the three lines 'before' you insert 'the top that has the three notches' ???
If this is the case, then how many times do you know how much to crank the three lines 'before' you insert 'the top that has the three notches' ???
Quite ingenious. May have to borrow that idea. That's some pretty hefty line you've got on there.
Hey Donnie... I'm with you on this. I'd love to see a video of the process. I think I'll look on YouTube. See if I can find something like this in operation.!!
You have the general idea: first tie the end of one thread to the left sled end and "walk" it right to the "crank" looping it over one hook and back to the sled then lastly back to the crank and tie it off. Do this again for the other two crank hooks. Next put the brush comb between the three strands. You may have to fasten it in place so that it does nor rotate. The direction of the first twisting depends upon the hand of your final line but turn the crank handle until the threads have 45 degree overlay. Next I place the sliding separating stick between the three twisted strands before removing the brush comb. When then starting the crank again it should be in the direction that will overlay the hand of the three threads, locking them in place. As you turn that crank with the right hand slide the dividing stick slowly to the right only as fast as you see the lines behind it overlaying in a 45 degree manner. This should be in a slow continuous process until you reach the right crank side. Then with anothe piece of line whip the hawser or cable that you produced to hold the strands in place. Do the same on the sliding sled end and everything willl remain in place and you can cut the ends off.ok, so the 'thing' that has the three notches, I think they call that 'the top' - soooo. I assume that you insert that 'top' manually at the start (after the lines are twisted, then you must be sliding 'the top' along to the other end (where the crank is) and that is what combines all the three lines together? For some reason, I am having difficulty visualizing this - may be a video might help.
If this is the case, then how many times do you know how much to crank the three lines 'before' you insert 'the top that has the three notches' ???
Try using several different sizes of thread to start with experimenting how to arrive at your final diameter. I did not make a log of my early experiments and relied upon results and recollection . . . not a good procedure when I want to go back later but a quick examination of my saved results gives me the clue of thread size and number of "walks" back and forth making the initial loops. I will try to go back and find YouTube showing a Swedish ropemaker with his more complex machine but his explanation of dirction of cranking, from both ends in his case to offset overly twisting from one end, is good. You may find it before me on YouTube under rope walks or rope making. There are a lot of examples there and that was my source of making my own walk tool.
Here is an excellent demonstration of rope making on YouTube
 www.bing.com
youtube making hemp rope - Search Videos
From the YouTube video above you can see that the Swede twists the final rope from what I call the sled end on my own and I do not twist from. I do place the topper between the strands and twist/crank from my right side only but slide the topper along as is shown. My sled end can also rotate as the hooked rod extends through a tube to a weighted line over the end holding some tension at the same time as the friction of the sled obtains from the sandpaper track.
I did not answer your question: I insert the top before starting the final twisting with the right side crank. Same as on the YouTube video from Visby but I don't turn anyting from the left/sled side.ok, so the 'thing' that has the three notches, I think they call that 'the top' - soooo. I assume that you insert that 'top' manually at the start (after the lines are twisted, then you must be sliding 'the top' along to the other end (where the crank is) and that is what combines all the three lines together? For some reason, I am having difficulty visualizing this - may be a video might help.
If this is the case, then how many times do you know how much to crank the three lines 'before' you insert 'the top that has the three notches' ???
Very good video - it answers some questions I have - thanks.
Donnie
Donnie


