• Win a Free Custom Engraved Brass Coin!!!
    As a way to introduce our brass coins to the community, we will raffle off a free coin during the month of August. Follow link ABOVE for instructions for entering.

Rabetting tips?

Joined
Apr 7, 2025
Messages
10
Points
8

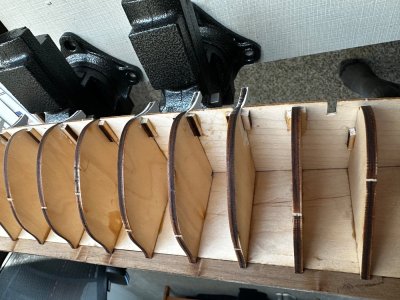
I’m working on a Mamoli Surprise, my very first project and as wonderful a meditative experience as I’ve ever found. I’ve read and re-read the planking handbook, but I’m nervous about cutting my rabbet into the keel.

The handbook assumes the rabbet is cut before the keel is placed, but nobody told Mamoli and they have the frames coming down well onto the keel. I’ve drawn my bearding line (in pencil) but I’d be very grateful for tips on this delicate procedure.

Thanks,

Shawn
IMG_1572.jpeg
 
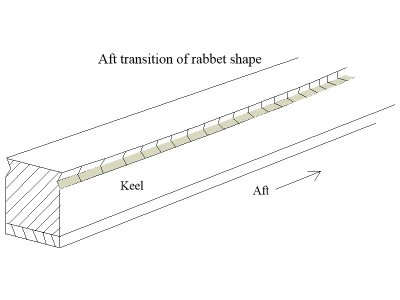
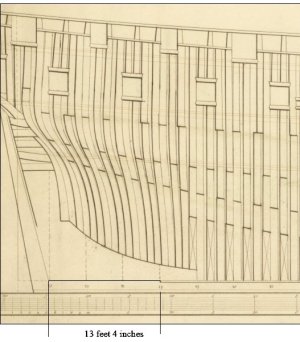
Cutting the rabbet with the bulkheads already in place is not going to be easy. Hopefully it is not already glued in place. The angle of the rabbet is dynamic throughout the length of the ship so carving it is a chore. Jeff's idea of a scraper is a good one. You can grind it so it has a ledge that will run along the bottom of the keel to keep it running true to at least cut a groove even if it is not the right shape, especially aft where it is very close to a 90 degree step. Also, remember that the rabbet on Surprise would end forward of the stern post. The contemporary plan below is HMS Hind (28) 1785

Allan

1754165445944.jpeg
1754166135149.jpeg
 
Is your keel wide enough? It appears to be quite thin. You need some "meat" to cut a proper rabbet. You may find you need to laminate on some more wood to reach the proper width of your keel.
 
Well, the keel width would never have occurred to me. I’ll check it for scale and size it up if necessary. I could just set the rabbet bevel up in the supplemental wood pieces, right?
 
One idea would be to make and use a scraper. You can make the scraper out of a piece of an old hacksaw blade.
Would that be better than a dremel? My dremel has angled bits that look like they would cut the right angle, although AlanKP59’s comment about the evolving angle of the rabbet has me re-thinking it.
 
Would that be better than a dremel? My dremel has angled bits that look like they would cut the right angle, although AlanKP59’s comment about the evolving angle of the rabbet has me re-thinking it.

I have found that a Dremel tool cuts too fast to control adequately at speed and lacks the torque power necessary when the motor is slowed down. Carving a rolling bevel is a job for a carving blade.

While the rabbet on a period ship of the line will be straight for the length of the straight keel, the bevel angle will "roll" as the hull shape above it changes. Outside of the straight rabbet sections, the rabbet will curve and roll. This rolling bevel can be lofted, but on a model to no good effect. The easiest way to do it, in my experience, is to use a "fit stick." A "fit stick" is just a piece of scrap wood as thick as the planking and about 1" x 2" for a model. The sides should be right angles. When the "stick" is laid flat against the frame or bulkhead edge and lowered down until its lower edge reaches the angle of the frame and keel, the lower end of the "stick" will give you the angle your rabbet needs to be.carve a notch in your keel deep enough to accommodate the bottom end of the "fit stick" let into the keel. Do this At each frame or bulkhead as well as the stem and sternpost. Then, exercising care, join all the angled notches the entire length of the rabbet by carving out between each existing angled cut. I find a knife is the best way to carve this bevel, along with a carving knife. Smoothing out the rolling bevel will give you a proper landing for your garboard plank and planking ends.
 
Stuart
And I was along similar lines, and a stout net over all the holes? [Near a pun stoat for stout].

I use the ubiquitous 10A scalpel blade together with the 3mm chisel myself.
 
I first mark my bearding and rabbet lines on the keel. Then I mark the exact depth of the cut on a chisel and scribe the chisel with a fine tip liquid gel pen parallel to the edge of the blade. Now I’ve got the exact depth of the rabbet marked on the chisel. Then I make cuts (perpendicular to the vertical axis of the keel) with it to the mark on the chisel (using it as a depth gauge). I’m careful not to exceed the depth of the mark on the chisel. I make cuts the length of the rabbet, then use the chisel “depth gauge” to check the depth along the entire length of the rabbet, marking any high (or low spots if I screwed up and went a little too deep) spots on the keel with a pencil. To increase the depth at any high spots I carefully sand them with a home-made sanding stick (I take a piece of planking slightly less thick than the hull planks to accommodate for the thickness of the sandpaper). I make the sanding stick by cutting the sandpaper (I like 150 grit) slightly longer and wider than the scrap planking and glueing it to the planking scrap with CA, folding the edges of the sandpaper up and around the planking scrap. I then sand the high spots flush with the rest of the rabbet. The thickness of the sanding stick also serves as a rough guide to ensure the proper depth of the rabbet. I also take a piece of scrap planking and measure the same depth on it as I used on the chisel and use it as a depth gauge or just use the marked chisel to measure the depth of the rabbet cuts. I also use the sanding stick or a piece of sandpaper to smooth out the taper of the rabbet. If you use a piece of scrap planking the same width as the actual hull planks for the sanding stick it pretty well gives me the proper width of the rabbet. The bevel of the rabbet is an important consideration too, I follow the plans to determine the angle of the bevel if the rabbet needs to be wider in some areas, especially from the rabbet to the bearding line, e.g. like the Bluenose I’m currently building- there’s a wide taper of the bevel in the stern because the rabbet and bearding lines are much wider apart than the bow and midship areas.
 
It might be difficult to get chisels and knives in there properly without wiggling the rabbet line right by the bulkheads. Did you install the keel with regular wood glue (PVA)? You can remove it by softening up the glue with 70%_ isopropanol. And the bonus is that the keel is fixed for the moment, so you can draw some awesomely accurate marks for the keel with a pencil before you remove it.
If it is PVA glue and you want to remove it, let me know. I would throw out models by the bushel if it weren't for second and third chances by dissolving glue.
I may do that! It hadn’t occurred to me, but it sure would make things easier.
 
I first mark my bearding and rabbet lines on the keel. Then I mark the exact depth of the cut on a chisel and scribe the chisel with a fine tip liquid gel pen parallel to the edge of the blade. Now I’ve got the exact depth of the rabbet marked on the chisel. Then I make cuts (perpendicular to the vertical axis of the keel) with it to the mark on the chisel (using it as a depth gauge). I’m careful not to exceed the depth of the mark on the chisel. I make cuts the length of the rabbet, then use the chisel “depth gauge” to check the depth along the entire length of the rabbet, marking any high (or low spots if I screwed up and went a little too deep) spots on the keel with a pencil. To increase the depth at any high spots I carefully sand them with a home-made sanding stick (I take a piece of planking slightly less thick than the hull planks to accommodate for the thickness of the sandpaper). I make the sanding stick by cutting the sandpaper (I like 150 grit) slightly longer and wider than the scrap planking and glueing it to the planking scrap with CA, folding the edges of the sandpaper up and around the planking scrap. I then sand the high spots flush with the rest of the rabbet. The thickness of the sanding stick also serves as a rough guide to ensure the proper depth of the rabbet. I also take a piece of scrap planking and measure the same depth on it as I used on the chisel and use it as a depth gauge or just use the marked chisel to measure the depth of the rabbet cuts. I also use the sanding stick or a piece of sandpaper to smooth out the taper of the rabbet. If you use a piece of scrap planking the same width as the actual hull planks for the sanding stick it pretty well gives me the proper width of the rabbet. The bevel of the rabbet is an important consideration too, I follow the plans to determine the angle of the bevel if the rabbet needs to be wider in some areas, especially from the rabbet to the bearding line, e.g. like the Bluenose I’m currently building- there’s a wide taper of the bevel in the stern because the rabbet and bearding lines are much wider apart than the bow and midship areas.
That’s a great approach! Do you have any advice about how to draw the bearding and rabbet lines accurately? That’s a challenge because it’s hard for me to visualize how the edge of the plank is going to sit in there.
 
I have found that a Dremel tool cuts too fast to control adequately at speed and lacks the torque power necessary when the motor is slowed down. Carving a rolling bevel is a job for a carving blade.

While the rabbet on a period ship of the line will be straight for the length of the straight keel, the bevel angle will "roll" as the hull shape above it changes. Outside of the straight rabbet sections, the rabbet will curve and roll. This rolling bevel can be lofted, but on a model to no good effect. The easiest way to do it, in my experience, is to use a "fit stick." A "fit stick" is just a piece of scrap wood as thick as the planking and about 1" x 2" for a model. The sides should be right angles. When the "stick" is laid flat against the frame or bulkhead edge and lowered down until its lower edge reaches the angle of the frame and keel, the lower end of the "stick" will give you the angle your rabbet needs to be.carve a notch in your keel deep enough to accommodate the bottom end of the "fit stick" let into the keel. Do this At each frame or bulkhead as well as the stem and sternpost. Then, exercising care, join all the angled notches the entire length of the rabbet by carving out between each existing angled cut. I find a knife is the best way to carve this bevel, along with a carving knife. Smoothing out the rolling bevel will give you a proper landing for your garboard plank and planking ends.
That’s hugely helpful. I’m kind of stalled while I obsess over this step. I know it’s important to get it right.
 
Do you have a picture of an example? I’m assuming the hacksaw blade would follow the angle of the rabbet, correct?
Here is a video of a guy that makes a card scraper out of a hand saw blade. Yours would be the same idea but it would have a negative version of the rabbet that you want to cut into the wood and also a right angle edge to align it along the edge of the wooden keel.
Link to video
 
Here is a video of a guy that makes a card scraper out of a hand saw blade. Yours would be the same idea but it would have a negative version of the rabbet that you want to cut into the wood and also a right angle edge to align it along the edge of the wooden keel.
Link to video
So, if I understand correctly, I'd use the saw blade teeth to rasp out the rabbet, changing the angle as I get further aft so the planking is flush with the edge of the rabbet when it's installed all the way down the length of the ship. Correct? Stopping just before the stern post.
 
One idea would be to make and use a scraper. You can make the scraper out of a piece of an old hacksaw blade.
Do you have a picture of an example? I’m assuming the hacksaw blade would follow the angle of the rabbet, correct?

So, if I understand correctly, I'd use the saw blade teeth to rasp out the rabbet, changing the angle as I get further aft so the planking is flush with the edge of the rabbet when it's installed all the way down the length of the ship. Correct? Stopping just before the stern post.
****************************************************************************************************************************************************************************

On, the saw blade teeth have nothing to do with it. If you want a right angled scraper, Corsair suggests you can cut one out of a hacksaw blade. There's no need to do that, though. The sharpened edge of a chisel would serve as well, if not better, as a scraper, but, while a scraper can be useful fairing off the rabbet faces if you care to do so, the job calls for a sharp knife, not a shaped scraper.

This isn't rocket science, but it does take a little bit of lofting, measuring, and carving know-how. This is one area where basic wooden boat and ship building skills equip a modeler to easily understand and complete a modeling task. Basically, it's about cutting a V-shaped groove in the side of your keel where the bottom square edge of the garboard (lowest) plank will be let it and fastened. On a real boat, cutting the keel rabbet is an exacting job because it must fit perfectly. If it doesn't, the garboard seam and the stopwaters will leak. It's not such a big deal on a model because models don't leak and sink. On a model, all you have to do is make sure your rabbet line seam is nice and fair and you're good to go. None of the rest will show. You don't have to worry about the faying surfaces, really. They won't need to be caulked.

These two articles have a lot of information; perhaps more than you'll ever need. There are, however, a lot of good illustrations which should explain how a rolling bevel is developed in stages with measured sections at each frame which are thereafter joined into a fair bevel by using the measured sections at each frame station as a guide. All you really have to do is follow the rabbet line. Use your fit stick to get a rough approximation of the angle of the bottom of your garboard, then cut down parallel to the bottom of your fit stick with a carving knife or sharp hobby knife point. Then make another cut parallel and at right angles to the first cut, again referencing your fit stick, and you'll be able to cut a narrow V-shaped sliver from the keel. Keep at it with straight cuts to enlarge the depth of your V- shape until it's deep enough that your fit-stick, which is as thick as your planking, will lay into the V-pocket you've cut out.

Once you have your reference notches cut at each frame (and you'll only need a few reference notches in straight areas of the rabbet, not at every frame,) then spring a batten fair between all the notches and line off your bearding line and "connect the dots."


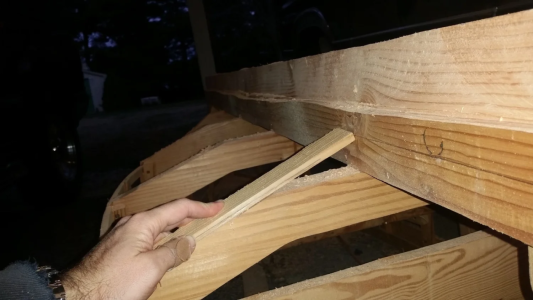
Below: The use of a fit-stick to determine the shape of the rabbet. This hull isn't round, but appears to be dory-planked, but no matter. The fit-stick is used to project the angle and depth of the rabbet. (The boat is resting upside down with the keel uppermost.) The fit-stick is the same thickness as the planking will be. It's placed as pictured. The bottom corner edge of its end resting against the keel is exactly where the rabbet line should be. Draw a line across under there. Now, imagine that the fit-stick needs to be pushed into the keel at the angle it has when resting on the frame. By cutting a straight line with your knife point holding your knife blade at the same angle as the bottom of your fit-stick, you can cut the beginning of your rabbet bottom. Now make another straight slicing cut with your knife with the blade held at the angle of the end face of the fit-stick, or, in other words, at a right angle to the first slicing cut you made. If (or when) the first and second cuts are the same depth or greater, you will be able to remove the V-shaped sliver. Using your fit stick as before, continue slicing cuts, one on top of the other, going deeper, at the angles defined by your fit-stick, until you have created a notch that permits your fit-stick, which represents plank thickness, to lay into the V-shaped notch you've carved to the extent of its full thickness. Then, connect these angles and, for modeling purposes, clean up the V-shaped rabbet so you're garboard plank can fit fairly into it.

This all may seem exceedingly tedious, and ... it is. But that's the cost of plank on bulkhead or plank on frame ship modeling. Were one building a "bread and butter" or "waterline lift" style hull of sawn solid stock, there'd be no need for a keel, stem, and sternpost rabbet at all.
Now, there are lots of ways to skin a cat, but I've only ever known this way of cutting rolling bevels. On a model, however, if you have some sharp, high quality carving tools, a suitably sized right angle vee-gouge would be useful for at least fairing the overall rabbet, if not cutting it in the first place. In my experience, however, it's best to make a "pilot cut" on the rabbet line with a straight blade or chisel edge and then use that as a guide for your vee-gouge.
Here's what using a fit-stick looks like on a full-scale boat before starting to cut the rabbet:

1755298238956.png

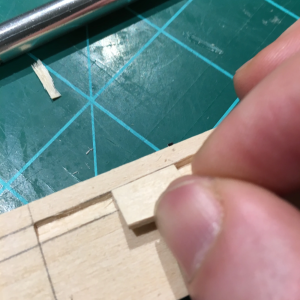
And here's what using a fit-stick looks like on a model after the rabbet is cut:

1755301518762.png
 
Last edited:
Do you have a picture of an example? I’m assuming the hacksaw blade would follow the angle of the rabbet, correct?

So, if I understand correctly, I'd use the saw blade teeth to rasp out the rabbet, changing the angle as I get further aft so the planking is flush with the edge of the rabbet when it's installed all the way down the length of the ship. Correct? Stopping just before the stern post.
****************************************************************************************************************************************************************************

On, the saw blade teeth have nothing to do with it. If you want a right angled scraper, Corsair suggests you can cut one out of a hacksaw blade. There's no need to do that, though. The sharpened edge of a chisel would serve as well, if not better, as a scraper, but, while a scraper can be useful fairing off the rabbet faces if you care to do so, the job calls for a sharp knife, not a shaped scraper.

This isn't rocket science, but it does take a little bit of lofting, measuring, and carving know-how. This is one area where basic wooden boat and ship building skills equip a modeler to easily understand and complete a modeling task. Basically, it's about cutting a V-shaped groove in the side of your keel where the bottom square edge of the garboard (lowest) plank will be let it and fastened. On a real boat, cutting the keel rabbet is an exacting job because it must fit perfectly. If it doesn't, the garboard seam and the stopwaters will leak. It's not such a big deal on a model because models don't leak and sink. On a model, all you have to do is make sure your rabbet line seam is nice and fair and you're good to go. None of the rest will show. You don't have to worry about the faying surfaces, really. They won't need to be caulked.

These two articles have a lot of information; perhaps more than you'll ever need. There are, however, a lot of good illustrations which should explain how a rolling bevel is developed in stages with measured sections at each frame which are thereafter joined into a fair bevel by using the measured sections at each frame station as a guide. All you really have to do is follow the rabbet line. Use your fit stick to get a rough approximation of the angle of the bottom of your garboard, then cut down parallel to the bottom of your fit stick with a carving knife or sharp hobby knife point. Then make another cut parallel and at right angles to the first cut, again referencing your fit stick, and you'll be able to cut a narrow V-shaped sliver from the keel. Keep at it with straight cuts to enlarge the depth of your V- shape until it's deep enough that your fit-stick, which is as thick as your planking, will lay into the V-pocket you've cut out.

Once you have your reference notches cut at each frame (and you'll only need a few reference notches in straight areas of the rabbet, not at every frame,) then spring a batten fair between all the notches and line off your bearding line and "connect the dots."


Below: The use of a fit-stick to determine the shape of the rabbet. This hull isn't round, but appears to be dory-planked, but no matter. The fit-stick is used to project the angle and depth of the rabbet. (The boat is resting upside down with the keel uppermost.) The fit-stick is the same thickness as the planking will be. It's placed as pictured. The bottom corner edge of its end resting against the keel is exactly where the rabbet line should be. Draw a line across under there. Now, imagine that the fit-stick needs to be pushed into the keel at the angle it has when resting on the frame. By cutting a straight line with your knife point holding your knife blade at the same angle as the bottom of your fit-stick, you can cut the beginning of your rabbet bottom. Now make another straight slicing cut with your knife with the blade held at the angle of the end face of the fit-stick, or, in other words, at a right angle to the first slicing cut you made. If (or when) the first and second cuts are the same depth or greater, you will be able to remove the V-shaped sliver. Using your fit stick as before, continue slicing cuts, one on top of the other, going deeper, at the angles defined by your fit-stick, until you have created a notch that permits your fit-stick, which represents plank thickness, to lay into the V-shaped notch you've carved to the extent of its full thickness. Then, connect these angles and, for modeling purposes, clean up the V-shaped rabbet so you're garboard plank can fit fairly into it.

This all may seem exceedingly tedious, and ... it is. But that's the cost of plank on bulkhead or plank on frame ship modeling. Were one building a "bread and butter" or "waterline lift" style hull of sawn solid stock, there'd be no need for a keel, stem, and sternpost rabbet at all.
Now, there are lots of ways to skin a cat, but I've only ever known this way of cutting rolling bevels. On a model, however, if you have some sharp, high quality carving tools, a suitably sized right angle vee-gouge would be useful for at least fairing the overall rabbet, if not cutting it in the first place. In my experience, however, it's best to make a "pilot cut" on the rabbet line with a straight blade or chisel edge and then use that as a guide for your vee-gouge.
Here's what using a fit-stick looks like on a full-scale boat before starting to cut the rabbet:

View attachment 538058

And here's what using a fit-stick looks like on a model after the rabbet is cut:

View attachment 538060
I am in your debt, as I am to everyone who contributed to this discussion. I think I'm ready to get on with it. Not without a little trepidation, but ready nonetheless!
 
Back
Top