Royal Caroline 1:50 YuanQing/ZHL [COMPLETED BUILD]

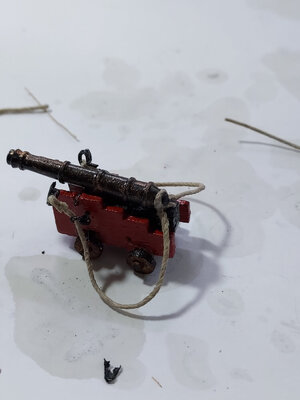
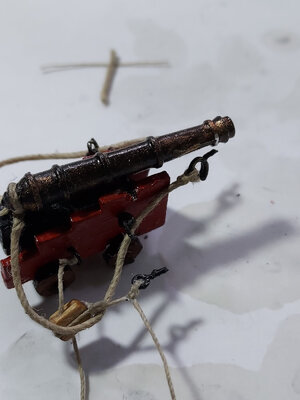
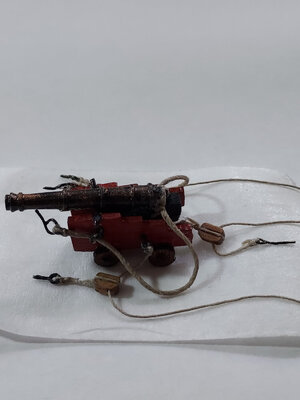
Sorry friends, it's been a while since my last post. Been working on a few small deck fixtures and later on I will post my work on the cannons.

I must say, though, that I have not been following the sequence of the build as contained in the instructions. I just try to anticipate which parts to build first, so as not to be in the way of succeeding steps. I also tried to avoid any vertical fixtures(e. g. railings, bell frame) which might break as I do other deck pieces.

I started with mounting the eyebolts that go at the base of the masts. This required a little work in assembling the 2-part eyebolts provided in the kit. Drilled the holes on the deck and glued the pins using gel glue. Note: the masts are just there temporarily.

PSX_20210604_170634.jpgPSX_20210607_140751.jpg


Next I worked on the water pumps. These are real tiny pieces that gave my chubby fingers more trouble than I thought.
These are the parts that came with the kit.

PSX_20210602_134901.jpg

Assembly required dexterity specially when applying the glue to the tiny pieces.
PSX_20210602_134954.jpgPSX_20210602_135015.jpg

To simulate the band around the pump, I flattened a bit of solder wire and wrapped it around the pump body.
PSX_20210602_135030.jpgPSX_20210602_135040.jpg

Here's the finished product. I am still struggling with my painting skills, still unable to avoid paint buildup. I used black acrilyc and topped with burnished bronze powder.
PSX_20210602_135050.jpgPSX_20210602_135101.jpgPSX_20210602_135451.jpg

I worked on the ladders leading up to the forecastle. This was fairly straightforward. Also put a couple of barrels underneath for effect.

PSX_20210602_135123.jpgPSX_20210607_140932.jpg

Next was the capstan. This turned out easier than expected. I remember how I struggled with the capstan on my previous Black Pearl build. This time, I assembled the pieces right on the dowel and it came together quite nicely.
PSX_20210602_134803.jpgPSX_20210602_134830.jpgPSX_20210602_134851.jpg
PSX_20210607_140733.jpg

Will show you my work on the guns in my next post. Thanks for dropping in.
 
In a prior post, I showed how I assembled the gun carriages. Here's a few pictures of them.
PSX_20210407_111237.jpgPSX_20210407_111259.jpgPSX_20210407_111414.jpgPSX_20210407_111441.jpgPSX_20210407_111502.jpgPSX_20210407_111454.jpg

The carriages didn't give me as much trouble as I thought. I did have to DIY the black pieces that served to cradle the guns.

However, rigging the breeching and tackle ropes was both challenging and time consuming. The following describes my approach to this task. I am sure there are other better methods to do this, but I found my approach worked really well for my purposes.

First I prepared all the eyebolts. The kit didn't provide nearly enough but luckily I had some leftovers in my stash and DIYed a few of them. For each carriage, I needed 10 eyebolts, slightly larger ones for the breeching rope and smaller ones for the tackle ropes and the rear ropes.

I then drilled pin holes, 2 on each side and one on the rear. Also drilled holes on the bulwark to anchor the carriages later on.

Then the ropes were assembled with the bolt rings. For the breeching rope, I made sure the bolt rings(the ones that will be glued on the side of the carriage) are threaded in, before securing the end bolts that will later be attached to the bulwarks. A bit confusing, but will be quite obvious during the build. The tackle ropes have the bolt rings on one end(the one that will be fastened to the side of the carriage), then the rope was threaded to a 5mm block (I wish I had smaller ones, maybe 3mm would have been nicer). The block was then attached to a rope tied to the end of the ring bolt that in turn goes to the bulwark. The last rope to assemble is the one in the rear. One end has the bolt that is fastened on the deck. The rope is then threaded to a 5mm block, which in turn is attached to a rope which is tied to a bolt that is attached to the rear of the carriage. Ha ha ha, I just re-read that last few sentences and I sounded like a bumbling idiot. The pictures to follow will help clear it up a bit, though.

By the way, the kit didn't provide for any blocks, so I looted my stash once again. Also, please note that I used 1mm beige rope for the breeching ropes and 0.5mm for the tackle ropes. The kit did provide various sizes/colors of rope, but I decided to use my own stash which had better texture, I thought.

Once all the ropes were assembled, I was ready to attach them to the carriage, again using gel glue at the pin end of the bolt. I also glued on the cannons to the carriage.
Here are pictures of them showing the breeching ropes.
PSX_20210602_135422.jpg

And the tackle ropes, as well as the rear ropes.
PSX_20210602_135442.jpg

PSX_20210602_135524.jpg

Now ready to mount the carriages onto the deck. Originally, I was just going to dab a bit of glue on the wheels, but I thought that may not be secure enough. Then I thought about attaching pins at the bottom of the carriage and gluing to the deck. But I didn't have the expertise to measure where to drill the holes so that everything is aligned properly. In the end, I decided to attach a piece of wood strip to the bottom, near the axle so it is hidden from view. This gave me a bit more glue surface to attach the carriage to the deck. I used gel glue and fortunately it had enough grip to bind to the poly-coated deck.

PSX_20210602_135601.jpgPSX_20210602_135549.jpg

Here are pictures of the 8 carriages mounted on the deck. There's still a lot of loose ropes to secure.
PSX_20210602_135632.jpg
PSX_20210602_135658.jpg

Now time to make some rope coils. I read a lot of different ways to do coils in the forum. I adapted certain ones and incorporated some of my ideas.

I start off by clamping a small drill bit on my desk vise.
PSX_20210604_165737.jpg

Then I cut 2 pieces of stiff plastic and punched holes in the middle. On the bottom piece, I cut notches on 2 sides (to hold the rope in place).

PSX_20210604_165756.jpg
PSX_20210604_165819.jpg

I then wind the rope while pressing the top piece down in order to keep the coil in place.

PSX_20210604_165834.jpg

I then carefully take the top piece off, apply some white glue to hold the rope in shape. The glue will not stick to the metal drill bit nor the plastic.
PSX_20210604_165914.jpg

After waiting a few minutes for the glue to set a bit, I pry off the rope .. and here's the finished coil.
PSX_20210604_165940.jpg

The coils are glued to the deck using white glue. The ends of the tackle ropes are tucked underneath the coils. The breeching ropes are shaped and a dab of glue applied in order to keep the shape.

PSX_20210604_170249.jpg

Here are the guns all in a row.

PSX_20210604_170057.jpgPSX_20210604_170231.jpg

That is it for now. I hope I didn't ramble too much. Thanks for the support. Continue to be safe everyone.
 

Attachments

  • PSX_20210602_135422.jpg
    PSX_20210602_135422.jpg
    115.9 KB · Views: 4
  • PSX_20210602_135442.jpg
    PSX_20210602_135442.jpg
    140.6 KB · Views: 2
  • PSX_20210602_135524.jpg
    PSX_20210602_135524.jpg
    130.7 KB · Views: 2
In a prior post, I showed how I assembled the gun carriages. Here's a few pictures of them.
View attachment 237551View attachment 237552View attachment 237553View attachment 237554View attachment 237556View attachment 237555

The carriages didn't give me as much trouble as I thought. I did have to DIY the black pieces that served to cradle the guns.

However, rigging the breeching and tackle ropes was both challenging and time consuming. The following describes my approach to this task. I am sure there are other better methods to do this, but I found my approach worked really well for my purposes.

First I prepared all the eyebolts. The kit didn't provide nearly enough but luckily I had some leftovers in my stash and DIYed a few of them. For each carriage, I needed 10 eyebolts, slightly larger ones for the breeching rope and smaller ones for the tackle ropes and the rear ropes.

I then drilled pin holes, 2 on each side and one on the rear. Also drilled holes on the bulwark to anchor the carriages later on.

Then the ropes were assembled with the bolt rings. For the breeching rope, I made sure the bolt rings(the ones that will be glued on the side of the carriage) are threaded in, before securing the end bolts that will later be attached to the bulwarks. A bit confusing, but will be quite obvious during the build. The tackle ropes have the bolt rings on one end(the one that will be fastened to the side of the carriage), then the rope was threaded to a 5mm block (I wish I had smaller ones, maybe 3mm would have been nicer). The block was then attached to a rope tied to the end of the ring bolt that in turn goes to the bulwark. The last rope to assemble is the one in the rear. One end has the bolt that is fastened on the deck. The rope is then threaded to a 5mm block, which in turn is attached to a rope which is tied to a bolt that is attached to the rear of the carriage. Ha ha ha, I just re-read that last few sentences and I sounded like a bumbling idiot. The pictures to follow will help clear it up a bit, though.

By the way, the kit didn't provide for any blocks, so I looted my stash once again. Also, please note that I used 1mm beige rope for the breeching ropes and 0.5mm for the tackle ropes. The kit did provide various sizes/colors of rope, but I decided to use my own stash which had better texture, I thought.

Once all the ropes were assembled, I was ready to attach them to the carriage, again using gel glue at the pin end of the bolt. I also glued on the cannons to the carriage.
Here are pictures of them showing the breeching ropes.
View attachment 237565

And the tackle ropes, as well as the rear ropes.
View attachment 237558

View attachment 237559

Now ready to mount the carriages onto the deck. Originally, I was just going to dab a bit of glue on the wheels, but I thought that may not be secure enough. Then I thought about attaching pins at the bottom of the carriage and gluing to the deck. But I didn't have the expertise to measure where to drill the holes so that everything is aligned properly. In the end, I decided to attach a piece of wood strip to the bottom, near the axle so it is hidden from view. This gave me a bit more glue surface to attach the carriage to the deck. I used gel glue and fortunately it had enough grip to bind to the poly-coated deck.

View attachment 237569View attachment 237568

Here are pictures of the 8 carriages mounted on the deck. There's still a lot of loose ropes to secure.
View attachment 237570
View attachment 237572

Now time to make some rope coils. I read a lot of different ways to do coils in the forum. I adapted certain ones and incorporated some of my ideas.

I start off by clamping a small drill bit on my desk vise.
View attachment 237575

Then I cut 2 pieces of stiff plastic and punched holes in the middle. On the bottom piece, I cut notches on 2 sides (to hold the rope in place).

View attachment 237576
View attachment 237577

I then wind the rope while pressing the top piece down in order to keep the coil in place.

View attachment 237578

I then carefully take the top piece off, apply some white glue to hold the rope in shape. The glue will not stick to the metal drill bit nor the plastic.
View attachment 237580

After waiting a few minutes for the glue to set a bit, I pry off the rope .. and here's the finished coil.
View attachment 237581

The coils are glued to the deck using white glue. The ends of the tackle ropes are tucked underneath the coils. The breeching ropes are shaped and a dab of glue applied in order to keep the shape.

View attachment 237589

Here are the guns all in a row.

View attachment 237586View attachment 237588

That is it for now. I hope I didn't ramble too much. Thanks for the support. Continue to be safe everyone.
That was an ingenuous way to do the rope coils, Reggie. I wish I had thought of that. I bought a bunch of 2mm blocks for my Soleil from Cornwall. I thinks they will be just right for the guns.
 
Time to start working on various fittings and fixtures on the deck. Starting with the pin racks on the bulwarks. This was fairly straightforward. I coated the racks with tung oil and drilled pins to help strengthen the grip.

PSX_20210623_102622.jpgPSX_20210623_102630.jpgPSX_20210621_140536.jpgPSX_20210621_140514.jpg
Next were the railing posts on the forecastle. These had to be cut and shaped from the provided wood strip. I used a mini saw to score a line on the strip then finished off by using a mini file to give them the groove shape.
PSX_20210621_140623.jpgPSX_20210621_140645.jpgPSX_20210621_140702.jpg

Each post was pinned with a piece of copper wire. This was later undone because I realized I needed a stiffer wire for the pin. The soft copper wire just wasn't strong enough to have a firm hold.
PSX_20210621_141033.jpg

I used CA gel to glue the posts in place.

PSX_20210621_141104.jpgPSX_20210621_141115.jpg

Then on to the catheads. These also had to be cut and shaped from a piece of wood strip provided in the kit. The strips then had to be sanded and shaped to taper towards one end. On the other end had to be installed a pulley, but I was confused, because the parts called for in the plans didn't seem to make sense, and there were no other parts that seemed to fit. These were my choices based on the plans.
PSX_20210621_140802.jpg
PSX_20210623_112652.jpg

So I was compelled to fashion my own pulley using some round blocks in my stash.

PSX_20210621_140925.jpg

But these were too wide to fit on the catheads, so I filed them down to reduce the thickness.
PSX_20210621_140937.jpgPSX_20210621_140937.jpg

Finally got them to fit and secured them in place using a piece of wire and a bit of CA gel.
PSX_20210621_140950.jpgPSX_20210621_141013.jpgPSX_20210621_141124.jpg

The catheads were installed at a 45degree angle at the corner of the forecastle. I had to trim a piece of the black strip to create a notch for the catheads. They are pinned and glued on as shown.

PSX_20210623_102118.jpgPSX_20210623_102224.jpg
 
Time to start working on various fittings and fixtures on the deck. Starting with the pin racks on the bulwarks. This was fairly straightforward. I coated the racks with tung oil and drilled pins to help strengthen the grip.

View attachment 240415View attachment 240416View attachment 240414View attachment 240413
Next were the railing posts on the forecastle. These had to be cut and shaped from the provided wood strip. I used a mini saw to score a line on the strip then finished off by using a mini file to give them the groove shape.
View attachment 240418View attachment 240419View attachment 240420

Each post was pinned with a piece of copper wire. This was later undone because I realized I needed a stiffer wire for the pin. The soft copper wire just wasn't strong enough to have a firm hold.
View attachment 240421

I used CA gel to glue the posts in place.

View attachment 240422View attachment 240423

Then on to the catheads. These also had to be cut and shaped from a piece of wood strip provided in the kit. The strips then had to be sanded and shaped to taper towards one end. On the other end had to be installed a pulley, but I was confused, because the parts called for in the plans didn't seem to make sense, and there were no other parts that seemed to fit. These were my choices based on the plans.
View attachment 240433
View attachment 240434

So I was compelled to fashion my own pulley using some round blocks in my stash.

View attachment 240425

But these were too wide to fit on the catheads, so I filed them down to reduce the thickness.
View attachment 240426View attachment 240426

Finally got them to fit and secured them in place using a piece of wire and a bit of CA gel.
View attachment 240427View attachment 240429View attachment 240430

The catheads were installed at a 45degree angle at the corner of the forecastle. I had to trim a piece of the black strip to create a notch for the catheads. They are pinned and glued on as shown.

View attachment 240431View attachment 240432
Wow, good job on making the cat heads with pulleys!
 
She is starting to look up Reggie. Things are looking busy on that deck! Thumbs-Up
 
Thanks everyone for the comments and likes. I am really having fun working on this kit, notwithstanding the occasional frustrations with the confusing instructions and design flaws. I have come to accept its shortcomings and focus on making the most of the cards that are dealt to me.
 
Thanks everyone for the comments and likes. I am really having fun working on this kit, notwithstanding the occasional frustrations with the confusing instructions and design flaws. I have come to accept its shortcomings and focus on making the most of the cards that are dealt to me.

You are doing a very nice job. I have been following it since the start.

Well done !!!
Daniel
 
Continuing with work on various deck fixtures. I started with the rack (I didn't know the correct name for it) just below the forecastle. Also did the pin rack on the fore deck. Like the other pieces, there was some work required in cutting and shaping certain parts. The wood had to be scored and filed to give them the required dimensions. The pieces had different colors so I applied a dark brown wash and finished them with tung oil, in order to give them consistency.

PSX_20210621_141145.jpgPSX_20210621_141154.jpgPSX_20210621_141205.jpg


PSX_20210625_132424.jpg

Then the pin rack on the forecastle.
PSX_20210623_102211.jpgPSX_20210623_102406.jpg

The next piece I worked on was a bit more difficult. This was the structure that supports the rack for the little boat.

After cutting and scoring the square wood strips, a hole had to be drilled (very carefully) to receive the round dowel.
PSX_20210621_141237.jpgPSX_20210621_141258.jpgPSX_20210621_141307.jpgPSX_20210621_141322.jpg

The top piece was supposed to sit on top of the dowel. I was originally going to drill and pin the two pieces together, but was afraid the dowel will split apart. I thought about other ways to strengthen the bond for the two pieces and I saw these round blocks in my stash, and thought they can give the dowel more gluing surface and at the same time give the piece a bit of flair.

PSX_20210621_141625.jpgPSX_20210623_101630.jpg

Here's the finished piece.
PSX_20210623_102128.jpg

And with the belaying pins

PSX_20210623_102334.jpg

I was about to mount the piece on the deck, but I had to take pause because I noticed the ring bolts just below the base of the mast. Checking on the plans, these are meant to secure certain running rigging to the deck. If I mount the boat rack piece now, it will be impossible to attach the running rigging to the bolts later on. There just won't be any space to maneuver my stubby fingers through that tight space.
PSX_20210623_101734.jpgPSX_20210623_101804.jpg

So I went very unconventional, and decided I will pre-attach the running rigging to the eyebolts now, and just leave them there for when I need them much much later in the build. I just needed to estimate how much rope I will need by referring to the rigging plans.


PSX_20210623_101816.jpgPSX_20210623_101834.jpg
PSX_20210623_101846.jpgPSX_20210623_101924.jpg

That's it for now. Thanks for dropping by.
 
Continuing with work on various deck fixtures. I started with the rack (I didn't know the correct name for it) just below the forecastle. Also did the pin rack on the fore deck. Like the other pieces, there was some work required in cutting and shaping certain parts. The wood had to be scored and filed to give them the required dimensions. The pieces had different colors so I applied a dark brown wash and finished them with tung oil, in order to give them consistency.

View attachment 241001View attachment 241002View attachment 241003


View attachment 241007

Then the pin rack on the forecastle.
View attachment 241005View attachment 241006

The next piece I worked on was a bit more difficult. This was the structure that supports the rack for the little boat.

After cutting and scoring the square wood strips, a hole had to be drilled (very carefully) to receive the round dowel.
View attachment 241012View attachment 241013View attachment 241014View attachment 241015

The top piece was supposed to sit on top of the dowel. I was originally going to drill and pin the two pieces together, but was afraid the dowel will split apart. I thought about other ways to strengthen the bond for the two pieces and I saw these round blocks in my stash, and thought they can give the dowel more gluing surface and at the same time give the piece a bit of flair.

View attachment 241016View attachment 241017

Here's the finished piece.
View attachment 241018

And with the belaying pins

View attachment 241019

I was about to mount the piece on the deck, but I had to take pause because I noticed the ring bolts just below the base of the mast. Checking on the plans, these are meant to secure certain running rigging to the deck. If I mount the boat rack piece now, it will be impossible to attach the running rigging to the bolts later on. There just won't be any space to maneuver my stubby fingers through that tight space.
View attachment 241021View attachment 241022

So I went very unconventional, and decided I will pre-attach the running rigging to the eyebolts now, and just leave them there for when I need them much much later in the build. I just needed to estimate how much rope I will need by referring to the rigging plans.


View attachment 241023View attachment 241024
View attachment 241025View attachment 241026

That's it for now. Thanks for dropping by.
I found that to be a wise decision to rig from the bottom up on my ships. I can keep the lines tauter that way. And I can reach where they tie off to easier when I don't have everything else done one the bottom. (See Constitution build.)
 
Good idea tying the lines to the eyebolts at this point in construction. It would next to impossible to tie them once the mast is in place.
 
Last edited:
Continuing with some more deck pieces. The boat rack required some square wood strips cut to size. The ends had to be drilled to receive the round dowel. Gratings also had to be assembled and served as platforms beside the boat. The whole assembly rests on top of the previously done rack on one end and on the fore castle on the other end.

Just showing here how it will sit, just dry fitted for now.
PSX_20210704_203603.jpgPSX_20210623_101720.jpg
PSX_20210625_132606.jpg

Here is the finished piece.
PSX_20210704_200737.jpg

And just trying out the skeleton of the little boat for size.
PSX_20210625_132658.jpg

Once the boat rack was dry fitted, it became obvious that space on the deck will be tight if I wait till later to rig the belaying pins. So, I decided again to pre-rig the ropes to the belaying pins.

PSX_20210623_102904.jpg
PSX_20210704_201501.jpg

PSX_20210623_102946.jpgPSX_20210623_102931.jpg

And finished them off with rope hanks.
PSX_20210704_201333.jpg

I thought I'd share my method for making the rope hanks. The process was borrowed from others' ideas and modified slightly for my purposes.

First I drill some holes on a piece of wood then drive nails as shown. I cut a notch on the top right to hold the rope in place. If you wonder why there are so many holes, I experimented with various lengths and used various hole spacings.
PSX_20210704_201021.jpg

I then wind the rope twice around before I hook around the top nail.
PSX_20210704_201041.jpgPSX_20210704_201101.jpg
Then wind additional turns and then secure the rope thru a notch on the bottom of the wood.

PSX_20210704_201136.jpg

I then dab a few drops of CA gel glue in strategic spots and then take out the newly formed hank out of the jig.

PSX_20210704_201156.jpg
The next steps might seem confusing but will become obvious when you actually do them. There is a loop on top of the hank that will need to be pulled in and through the middle hole.
PSX_20210704_201220.jpgPSX_20210704_201248.jpg

Then the final step to give it the proper shape to hang on the belaying pin. Insert a nail through the loop as shown in the picture and dab some glue to hold its shape.
PSX_20210704_201308.jpg

That's it....easy peasy.
 
Back
Top