Royal Louis 1/200 Heller

Joined
Jan 21, 2022
Messages
534
Points
353

Hello everyone. As I said in introduction I've started this model in august 2021 so this will be quite long post. Hope you can withstand.

I based my painting on model in Paris Museum. Painting in some places is a little bit off but at this point I can't fix it, because I wold trap myself in endless loop of fixing one part and braking other. Rigging is based on mamoli kit and there are also parts which are made of wood and brass.

This is stage for today . Standing rigging and shrouds completed -exept backstays.

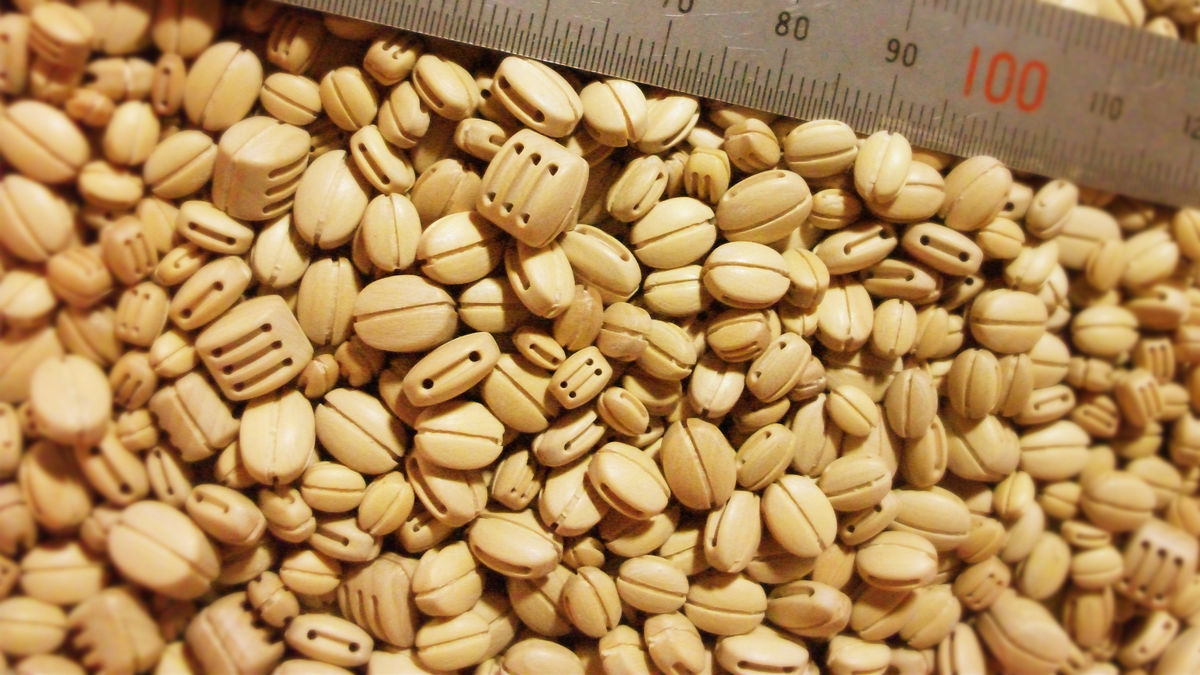
Duble and triple blocks are 3mm from Falconet . Single are 2 and 3mm from amati
IMG_20211212_180906.jpg
IMG_20211212_181004_BURST001_COVER.jpg
IMG_20211212_181055_BURST001_COVER.jpgIMG_20220109_171309.jpg
IMG_20220109_151637.jpg

Beginning

1. Setting dead eyes and modyfing hull.

At red dots are places where I drilled holes or added brass eyelets.
DSC_0282.JPG

Eyelet on deadeyes are made of solder brass
Deadayes 3mm and 2 mm
DSC_0316.JPG
DSC_0318.JPG
End result
DSC_0317.JPG
Clamps are made of 0,25mm Amati rope and some little nail 1mm or maybe smaller
The direction of clamps should be in one way and they should be made of two nails so this is wrong, but at that point I thought heller holes would be ok
 
2. Steering system-(is that correct name?)
DSC_0324.JPGDSC_0323.JPGDSC_0325.JPG


3. Burton pendants, shrouds, stays
DSC_0341.JPG


Upper parts of mast are made of 3mm and 2mm pearwood
DSC_0348.JPG

Cathead made of perwood and extra eyelets on deck

DSC_0350.JPG

DSC_0415.JPG
Mizzen stay. It ends weird but this is based on paris musum model
IMG_20211002_102027.jpg
Main stays and fore stays
IMG_20211002_101847.jpg
DSC_0425.JPG
DSC_0420.JPG

Bumpkin shrouds
IMG_20211002_102318.jpg
Cranes(or does it have other name?)
DSC_0417.JPG
 
Thanks. I've done some things on bowsprit, but couldn't find time to make photos.
 
11.02.2022 Update

Somebody on polish forum found mistake in this build - yards if there're no sails should be lowered. Fixed it and it's now in proper position. I also added sail clue and sheet
0c918c062f9deba067c38f3b0d58b915.0.jpg
5d7986e52a08b59a4ab74540cc374b88.0.jpg
b4c9f0f0855718648991789f2cf48875.0.jpg
72efaa9b2e56026f71d010462bd6cfdb.0.jpg
 
Last edited:
17.02.2022 Update.
I have attached the anchors. The method of tying anchors is according to J. Boudriot 74 gunship. The way of tying the anchor's block is not entirely correct, but because there are no anchors at all in the the Paris museum model, it is let's say, acceptable. When I started building the model, I looked at the Sans Pareil as most similar construction. So pulling block is mounted similarly to Sans Pareil and anchors are like in 74.


b437177251b2fd1e9195e2ef324e1523.0.jpg
23c4ab03845d7f57a94573a16c56847b.0.jpg
64690c35271e85204f1477953f5cb47e.0.jpg
9fc9478e9f5c42169b5253a7bc950ad6.0.jpg


Other inspirations:
http://mnm.webmuseo.com/ws/musee-na...JRJ_oFJcSADQftS41sjBCq3QNLc3hVThcPcGYAwDVS0Zp


I carved the buoys from a 3x3mm walnut strip.The anchors are metal Amati 30mm. I only changed eyelet to 0,5mm metal wire and wrapped a thread around it. I also learned it's called puddening.

My way of making eyelets.
DSC_0006.JPGDSC_0007.JPGDSC_0008.JPG
 
17.02.2022 Update.
I have attached the anchors. The method of tying anchors is according to J. Boudriot 74 gunship. The way of tying the anchor's block is not entirely correct, but because there are no anchors at all in the the Paris museum model, it is let's say, acceptable. When I started building the model, I looked at the Sans Pareil as most similar construction. So pulling block is mounted similarly to Sans Pareil and anchors are like in 74.


View attachment 291573
View attachment 291571
View attachment 291572
View attachment 291570


Other inspirations:
http://mnm.webmuseo.com/ws/musee-na...JRJ_oFJcSADQftS41sjBCq3QNLc3hVThcPcGYAwDVS0Zp


I carved the buoys from a 3x3mm walnut strip.The anchors are metal Amati 30mm. I only changed eyelet to 0,5mm metal wire and wrapped a thread around it. I also learned it's called puddening.

My way of making eyelets.
View attachment 291574View attachment 291575View attachment 291576
I commend you for your efforts and attention to detail on this subject.
 
Thanks. Next build will be more complicated because I'll be adding sails. But haven't decided witch one(First rate liner in plastic 1/100, mercedes from occre or french liner 1/72 in semi-scratch*). Maybe in next week i could show more on that subject or SZKUTNIK;)
 
Hello

No update on ship, but I've been preparing stuff for my next build. Almost all of blocks on Luis are bought or modyfied on already bought parts. In future I'm planning to do Le Superbe in 1/150. I'll need 2mm blocks so there's no option of buying. Here are my first attempts of making it.
DSC_0050.JPGDSC_0051.JPG
 
Hello
No update on ship, but I've been preparing stuff for my next build. Almost all of blocks on Luis are bought or modyfied on already bought parts. In future I'm planning to do Le Superbe in 1/150. I'll need 2mm blocks so there's no option of buying. Here are my first attempts of making it.
an alternative would be the blocks offered by @Dry-Dock Models & Parts
They have 1,5mm and 2mm blocks as the smallest onew - and btw extremely good quality
 
extremely good quality
I belive you, but they're extremely expensive especialy if I can make my own. Little less quality,but won't ruin my pocket. In next week i should get some pear wood and i count to get a better results
 
WojtasS- You can purchase 2mm & larger rigging blocks from ModelExpo. They are called "Beautiful Blocks" & are made of swiis pearwood, & they ship anywhere, I believe. They are the best blocks I have ever used & look real. You may want to check into it!
 
Buying it isn't a problem SKUTNIK has 2mm singles and dubles. I bought a milling machine among other things to make pulleys. 2mm ones are the hardest, 3+mm are no problem. They look good and are easy to make.


So I've read many tutorials and topics on making blocks and here it's my version of it.

Very important thing in such small blocks is quality of wood. In previous I used walnut. Pear is much better.

What you need(tools):
1.Milling machine
2.Table saw/mini guillotine
3.Dremel type drill
3.Milling cutter 0,5mm
4. Drill bit 0,4mm

And patience;)

Pear strip is 2mm thick, 3mm wide. Lenght doesen't matter now.

1. Forming strip into round-ish shape
DSC_0072.JPG

2.Cutting strip to 2mm pices.

I have a chinese saw just chaneged sawblade to proxon's 0,5mm blade for better precision.
DSC_0070.JPG

3. Milling block

I use 0,5mm milling cutter which is already broken. It's not a bug. It's a feature:). Even if you happen to have new one you'll break it, so don't
throw it away.

DSC_0078.JPG

After making grooves I put it on the end of vice and drill holes. Next step milling other side of pulley
DSC_0074.JPG

What I get is 2x2x3 pulley (width,thickness,length)

DSC_0075.JPG

In comparision to 1/100 Heller Victory's 12punder gun
DSC_0076.JPG

I hope it will help someone.
Cheers
 
Couple of triple ones. Unfortunetly they're too big for shifting backstay and too liitle for lower yards halyard. I didn't make lower holes because material is too frigile. I've also strengthen wood by soaking it in wood glue mixed with some water.
DSC_0084.JPG
 
Last edited:
Back
Top